Introduction
This instruction manual provides detailed guidance for installing and operating the YEABRICKS LED light kit, specifically designed for the LEGO Technic 2 Fast 2 Furious Nissan Skyline GT-R (R34) building blocks model (LEGO model 42210). This kit enhances the visual appeal of your model by adding functional lighting elements. Please note that the LEGO building set is not included with this light kit.
Safety Information
- Keep small parts away from children under 3 years of age to prevent choking hazards.
- Handle LED wires and components with care to avoid damage.
- Ensure power source is appropriate for the light kit (e.g., USB power bank, battery box).
- Do not expose components to water or extreme temperatures.
Package Contents
The YEABRICKS LED light kit includes various LED lights, connecting wires, a battery box (or USB power cable), and other necessary accessories for installation. The exact components may vary slightly depending on the specific kit version.

Image: The YEABRICKS LED light kit packaging and various components, including wires and a control board. The LEGO model is not included.
Setup and Installation
Detailed, step-by-step installation instructions are provided digitally. To access these instructions, please scan the QR code located in the product box. The digital guide includes both PDF instructions and video tutorials to assist you through the assembly process.
General Installation Steps:
- Preparation: Ensure your LEGO model is fully assembled and stable.
- Identify Components: Familiarize yourself with the different types of LED lights and connectors in your kit.
- Disassembly (Partial): Carefully disassemble specific sections of your LEGO model as indicated in the digital instructions to integrate the light wires.
- Wire Routing: Route the LED wires discreetly between LEGO bricks, ensuring they are not pinched or stressed.
- Connect Lights: Attach the LED lights to the designated areas (e.g., headlights, taillights, interior, undercarriage).
- Connect to Power: Connect all LED wires to the main control board/battery box.
- Reassembly: Carefully reassemble the LEGO model, ensuring all wires are secure and hidden.
- Test: Connect the power source and test all lights.
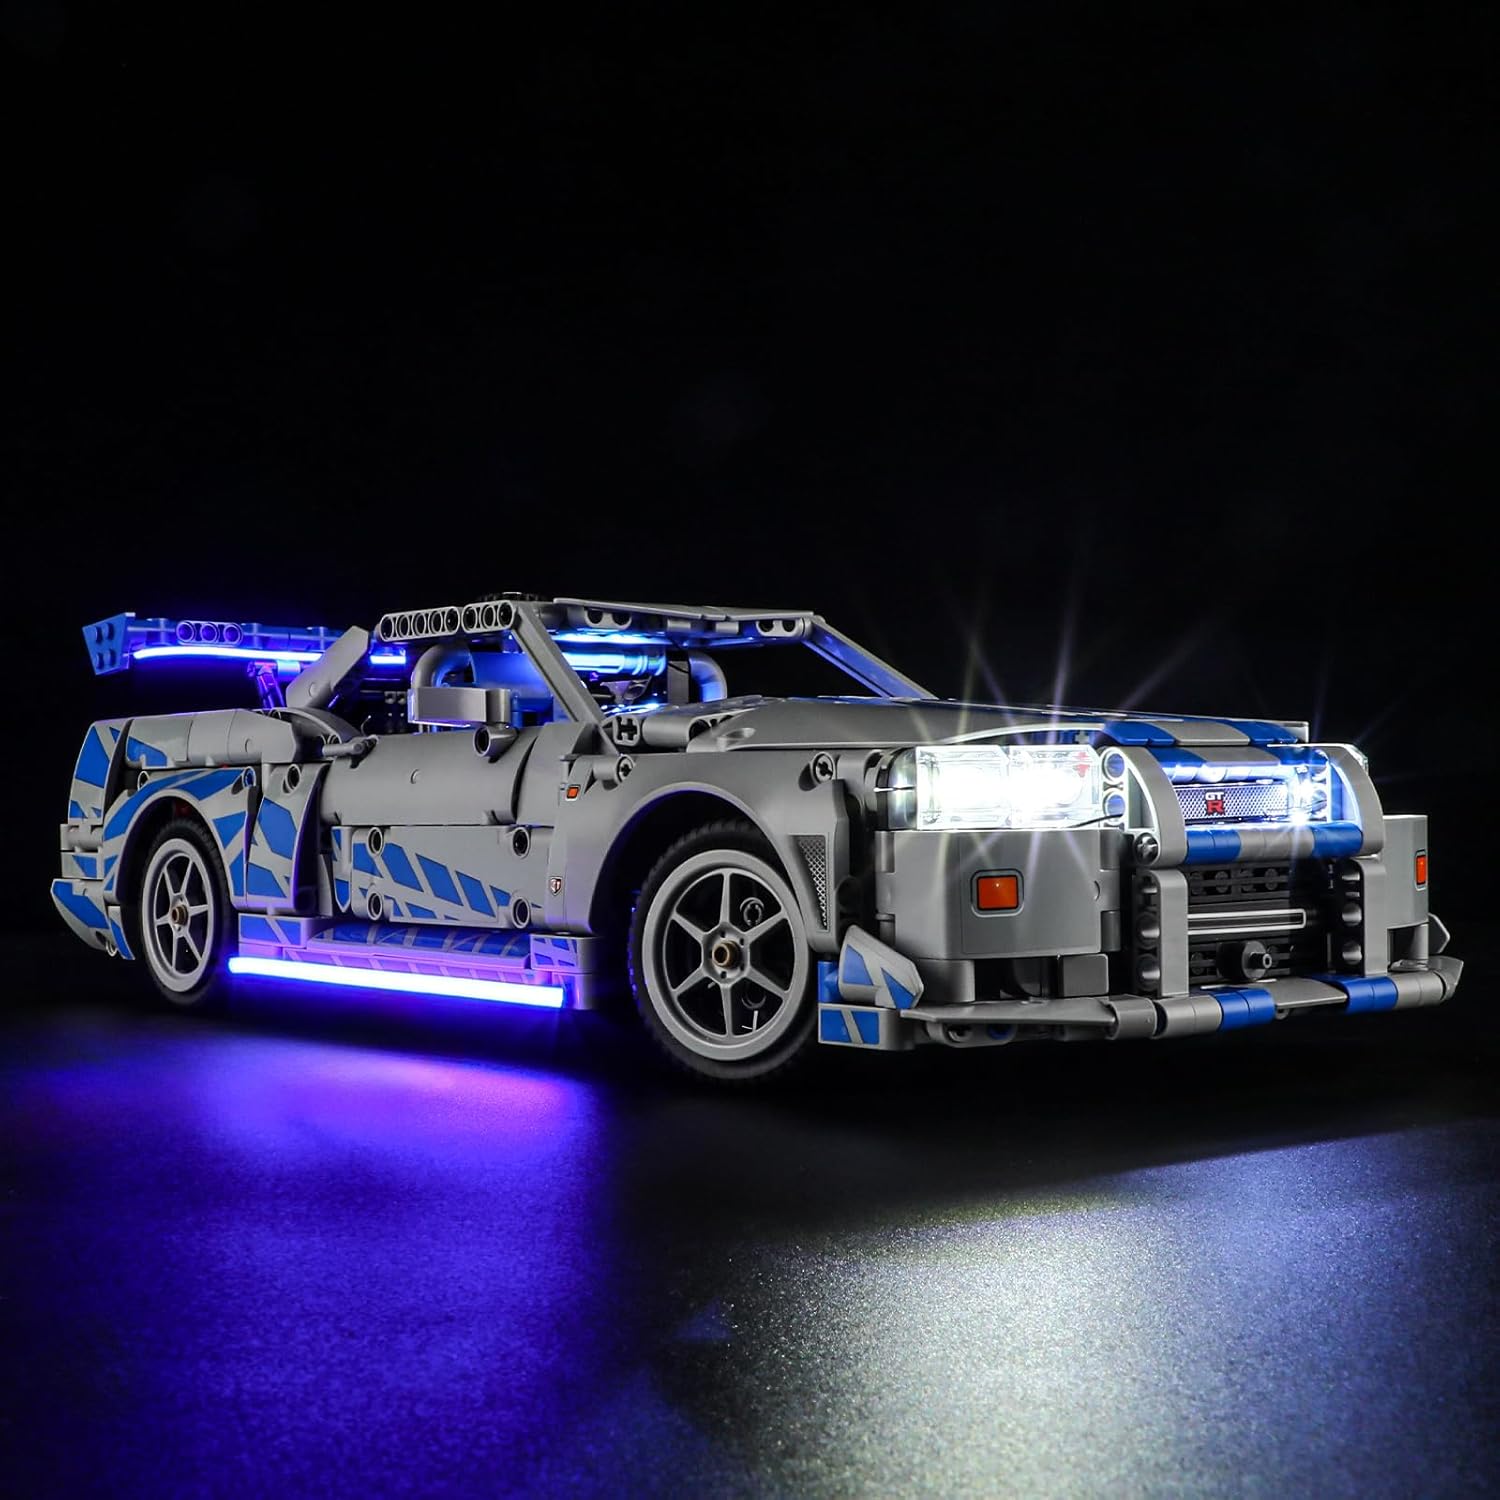
Image: Front view of the LEGO Nissan Skyline GT-R (R34) model with the YEABRICKS LED light kit installed, showcasing illuminated headlights and blue underglow lighting.

Image: Rear view of the LEGO Nissan Skyline GT-R (R34) model with the YEABRICKS LED light kit installed, showing illuminated red taillights and a white license plate light.

Image: Side view of the LEGO Nissan Skyline GT-R (R34) model with the YEABRICKS LED light kit installed, highlighting the illuminated interior and blue underglow lighting.

Image: A split image showing the LEGO Nissan Skyline GT-R (R34) model before and after the YEABRICKS LED light kit installation, demonstrating the visual enhancement.
Video: A demonstration of the YEABRICKS LED light kit installed on the LEGO Technic 2 Fast 2 Furious Nissan Skyline GT-R (R34) model, showcasing various illuminated features including headlights, taillights, interior lights, and underglow.
Operating Instructions
Once the light kit is fully installed and connected to a power source (either a battery box or USB power), the lights will illuminate. Depending on your specific kit, there may be a switch on the battery box or a USB connector to turn the lights on or off. Some advanced kits may include a remote control for different lighting effects; refer to your digital instructions for specific features.
Maintenance
- Cleaning: Use a soft, dry cloth to gently wipe dust from the LED components and wires. Avoid using liquid cleaners directly on the lights.
- Wire Management: Periodically check that all wires are securely routed and not exposed to excessive tension or friction.
- Battery Replacement: If using a battery box, replace batteries when lights dim or cease to function. Ensure correct polarity.
- Storage: When not in use for extended periods, disconnect the power source.
Troubleshooting
| Problem | Possible Cause | Solution |
|---|---|---|
| Lights do not turn on. |
|
|
| Some lights are dim or flickering. |
|
|
| Wires are visible or not fitting correctly. |
|
|
Specifications
- Model Number: LLK758
- Manufacturer: YEABRICKS
- Product Dimensions: 4.3 x 6.3 x 1.18 inches
- Item Weight: 4.9 ounces
- Recommended Age: 6 - 10 years (for LEGO model, light kit installation may require adult supervision)
- Compatibility: Designed for LEGO Technic 2 Fast 2 Furious Nissan Skyline GT-R (R34) Model 42210
Warranty and Support
YEABRICKS offers comprehensive after-sales service. If you encounter any problems or difficulties with the product, including missing parts or non-functional lights, please do not hesitate to contact us. We provide complimentary replacements for quality issues. Our customer support team is available to assist you.
For assistance, please refer to the contact information provided on the service card included in your package or visit the official YEABRICKS store on Amazon: YEABRICKS Store.