
1. Introduction
The HoloSpin 3D Hologram Fan (Model PD42) is a cutting-edge display device designed to create stunning 3D holographic visuals. Featuring 244 high-brightness LEDs and a 42CM display diameter, it delivers clear and vibrant images suitable for various applications, including store displays, events, and exhibitions. This manual provides essential information for safe installation, operation, and maintenance of your device.
2. Package Contents
Carefully unpack the box and ensure all items listed below are present and in good condition. If any items are missing or damaged, please contact customer support.
- HoloSpin 3D Hologram Fan (Model PD42)
- Power Adapter
- Remote Control Unit
- Mounting Screws and Wall Plugs
- Screwdriver
- User Manual

Image: HoloSpin 3D Hologram Fan, remote control, power adapter, mounting hardware, screwdriver, and user manual.
3. Product Overview
Familiarize yourself with the main components of your HoloSpin 3D Hologram Fan.

Image: Detailed view highlighting the infrared signal lamp, fan face, back of fan, power port, and machine bottom.
- Fan Face: The rotating blade equipped with LEDs that generate the holographic image.
- Infrared Signal Lamp: Used for remote control communication.
- Power Port: Connects the device to the power adapter.
- Machine Bottom: Contains mounting points and internal components.
4. Installation
4.1 Mounting the Device
The HoloSpin 3D Hologram Fan can be securely mounted to a wall or other suitable surface using the provided hardware. Ensure the mounting location is stable and can support the device's weight.
- Locate Setting Screw Holes: Identify the screw holes on the back of the fan's base.
- Mark Drilling Points: Hold the fan against the desired mounting surface and mark the positions for drilling.
- Drill Holes: Drill holes at the marked positions suitable for the provided wall plugs.
- Insert Wall Plugs: Insert the plastic wall plugs into the drilled holes.
- Insert Setting Screws: Partially insert the screws into the wall plugs, leaving enough space for the fan's base to hook onto them.
- Mount the Fan: Align the fan's screw holes with the inserted screws and slide the fan down to secure it. Tighten the screws if necessary.

Image: Step-by-step visual guide for wall mounting the HoloSpin 3D Hologram Fan.
4.2 Power Connection
After mounting, connect the power adapter to the power port on the device and then plug the adapter into a standard electrical outlet. The device will typically power on automatically or enter a standby mode.
5. Operation
5.1 Power On/Off
The device can be powered on or off using the remote control or through the mobile application.
5.2 Content Management and Connectivity
The HoloSpin 3D Hologram Fan supports multiple methods for content upload and control:
- Mobile App Control: Connect your smartphone to the device's Wi-Fi network. Download the dedicated 3D Holographic fan APP by scanning the QR code provided in the user manual. The app allows you to control the fan, upload/delete videos, and manage files.
- PC Side Software Control: Use the PC software to convert video formats and manage content directly on the SD card.
- SD Card Upload: Prepare your 3D video content on an SD card and insert it into the device.
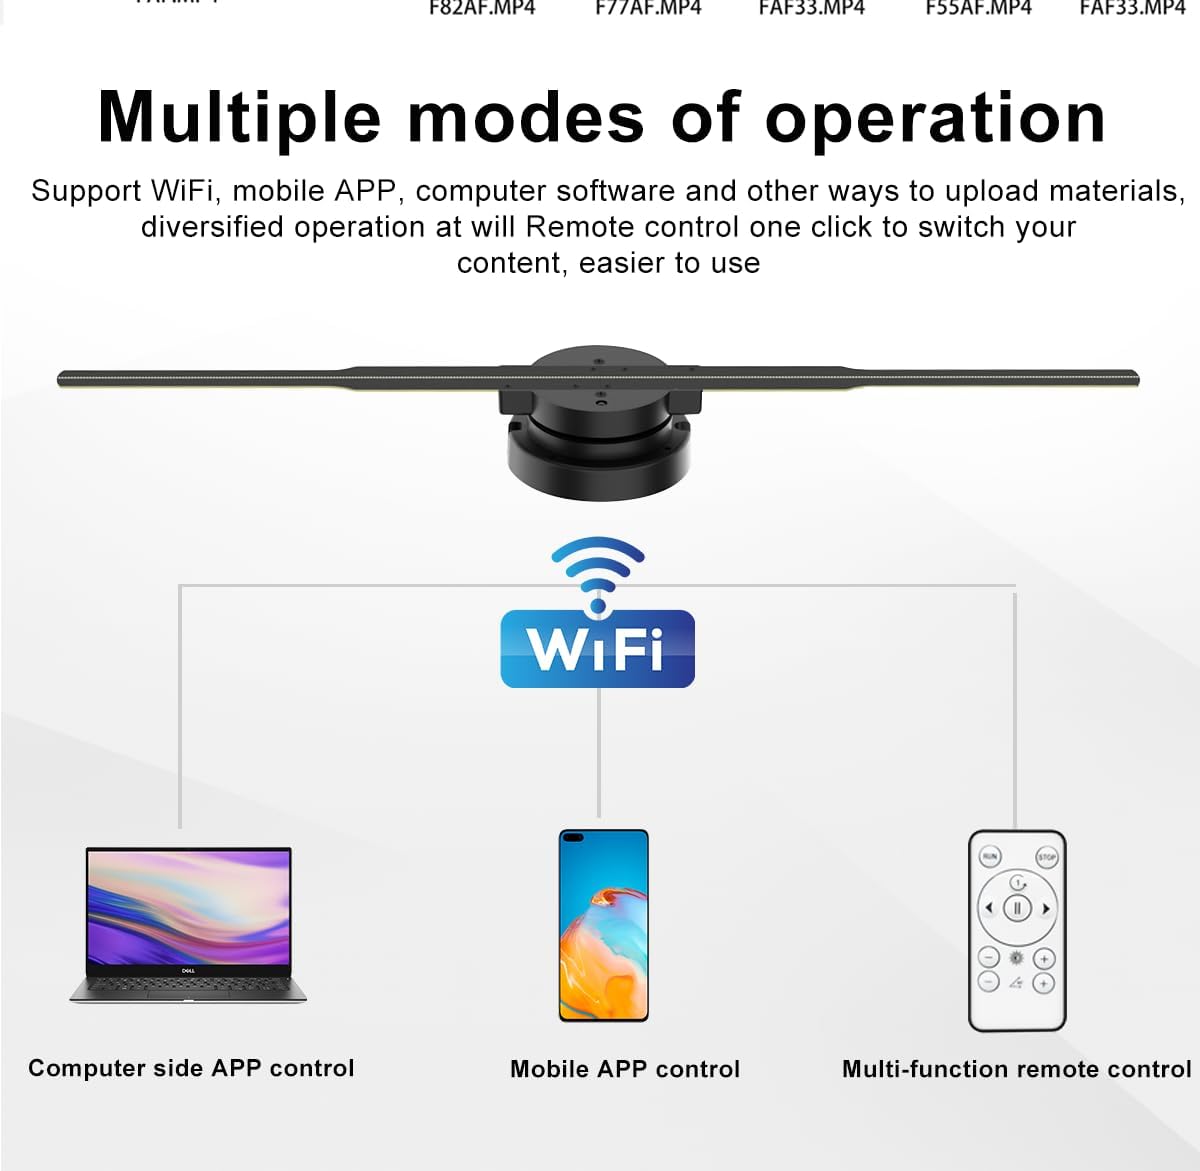
Image: Diagram illustrating control options via mobile app, PC software, and multi-function remote control.
5.3 Remote Control Functions
The multi-function remote control provides convenient access to various settings and playback options.

Image: Detailed layout of the remote control, showing buttons for Power Off, Loop Play, Switch Next, Increase/Reduce Brightness, Angle Correction, Activate, Switch Up, and Stop Playing.
- RUN/STOP: Start or stop the holographic display.
- Power Off: Turns the device off.
- Loop Play: Toggles continuous playback of content.
- Switch Next/Up: Navigates through content.
- Brightness +/-: Adjusts the display brightness.
- Angle Correction: Adjusts the display angle (left/right).
- Activate: Initiates certain functions.
The remote control requires 1 CR2032 battery (included). Ensure the battery is correctly inserted before use.
6. Specifications
Key technical specifications for the HoloSpin 3D Hologram Fan Model PD42.
| Feature | Specification |
|---|---|
| Brand | HoloSpin |
| Model | PD42 |
| Display Diameter | 42 CM (16.5 inches) |
| LED Quantity | 244 Highlight LEDs |
| Brightness | 2200 cd/m² |
| Resolution | 640 x 480 pixels |
| Power | 24W (12V/2A) |
| Motor Type | DC Brushless Motor |
| Motor Speed | Up to 750 rpm |
| Frame Rate | Approximately 25 fps |
| Connectivity | Wi-Fi |
| Content Upload | APP, PC Software, SD Card |
| Special Feature | 3D-Ready |
| Product Dimensions | 16.5 x 2 x 3 inches |
| Item Weight | 15.8 ounces |

Image: Comparison table of various HoloSpin holographic display models, including the PD42 (C42 in the table).
7. Maintenance
To ensure the longevity and optimal performance of your HoloSpin 3D Hologram Fan, follow these maintenance guidelines:
- Cleaning: Gently wipe the fan blades and base with a soft, dry cloth. Avoid using liquid cleaners or abrasive materials.
- LED Lifespan: The high-quality LED beads have a lifespan of up to 100,000 hours, requiring minimal replacement under normal operating conditions.
- Storage: When not in use for extended periods, store the device in a cool, dry place, away from direct sunlight and excessive dust.
- Disassembly: The product features a disassembly design for easier cleaning, part replacement, and maintenance. Refer to specific instructions if disassembly is required.

Image: Illustration of the HoloSpin 3D Hologram Fan's disassembly design, showing components separated for maintenance.
8. Troubleshooting
If you encounter issues with your HoloSpin 3D Hologram Fan, refer to the following common problems and solutions:
- Device Not Powering On:
- Ensure the power adapter is securely connected to both the device and a working electrical outlet.
- Verify the power outlet is functional.
- No Holographic Image / Image Distortion:
- Check if the fan blades are rotating freely without obstruction.
- Ensure the content uploaded is in a compatible format and resolution (640x480 pixels recommended).
- Adjust the angle correction using the remote control if the image appears skewed.
- App/Wi-Fi Connectivity Issues:
- Ensure your mobile device is connected to the HoloSpin fan's Wi-Fi network.
- Restart both the fan and your mobile device.
- If experiencing issues with the app download, ensure you are scanning the correct QR code from the physical user manual and not encountering redirects to advertisement pages. Contact customer support if download problems persist.
- For PC software, ensure it is installed correctly and compatible with your operating system.
- Remote Control Not Responding:
- Check and replace the CR2032 battery in the remote control.
- Ensure there are no obstructions between the remote control and the fan's infrared signal lamp.
If these steps do not resolve the issue, please contact HoloSpin customer support for further assistance.
9. Warranty and Support
HoloSpin is committed to providing high-quality products and customer service. Your HoloSpin 3D Hologram Fan comes with comprehensive after-sales support.
- Professional After-Sales Service: HoloSpin offers long-term professional after-sales service.
- Parts Replacement: Support for replacement of parts is available.
- Free 3D Video Library: Access to a library of over 1500 free 3D videos.
- Customization Services: Options for logo or video customization, and video wall project customization.
For any inquiries, technical support, or warranty claims, please refer to the contact information provided in your product packaging or visit the official HoloSpin website.