Important Safety Instructions
Please read all instructions carefully before using this appliance. Keep this manual for future reference.
- Ensure the voltage rating on the appliance matches your local power supply before connecting.
- Do not immerse the appliance, power cord, or plug in water or other liquids.
- Always unplug the machine from the power outlet when not in use and before cleaning.
- Do not operate the appliance with a damaged cord or plug, or after the appliance malfunctions or has been damaged in any manner.
- Keep hands and cords away from hot parts of the appliance during operation.
- Use only manufacturer-recommended accessories.
- This appliance is for household use only.
- Exercise extreme caution when handling hot steam and hot water.
Product Overview
Familiarize yourself with the components of your espresso machine.
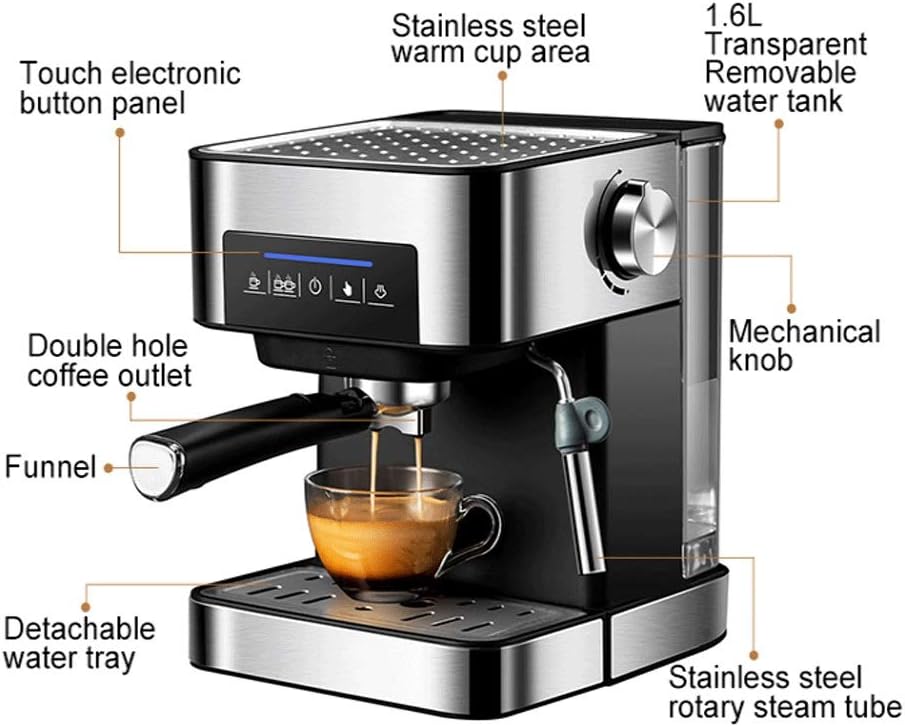
Image: Labeled diagram showing the various parts of the espresso machine.
- Touch electronic button panel: For controlling brewing functions.
- Stainless steel warm cup area: Top surface for pre-warming espresso cups.
- 1.6L Transparent Removable water tank: Located at the back, holds water for brewing.
- Mechanical knob: Controls steam function and power on/off.
- Double hole coffee outlet: Dispenses espresso into two cups simultaneously.
- Funnel (Portafilter): Holds ground coffee for brewing.
- Detachable water tray (Drip tray): Collects excess liquid and is easy to clean.
- Stainless steel rotary steam tube (Frother Wand): For steaming milk.
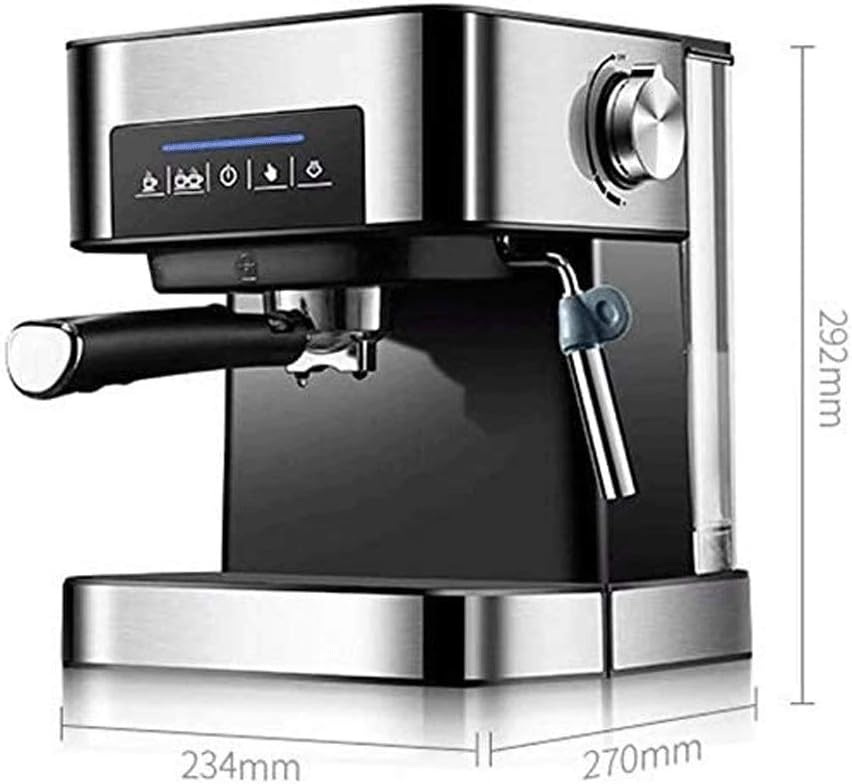
Image: Product dimensions: 234mm (width) x 270mm (depth) x 292mm (height).
Setup
Before first use, follow these steps to prepare your espresso machine.
- Unpacking: Carefully remove all packaging materials and ensure all parts are present.
- Initial Cleaning: Wash the water tank, portafilter, filter basket, and drip tray with warm, soapy water. Rinse thoroughly and dry. Wipe the exterior of the machine with a damp cloth.
- Water Tank Installation:Fill the removable water tank with fresh, cold water up to the MAX line. Place the water tank securely into its position at the back of the machine. Ensure it is properly seated to prevent leaks.

Image: A hand placing the removable 1.5L water tank into the back of the espresso machine.
- Power Connection: Plug the power cord into a grounded electrical outlet.
- Priming the Machine: Before brewing coffee, it is recommended to run a cycle with just water to prime the pump and clean the internal system. Fill the water tank, place a cup under the coffee outlet, and run a brewing cycle without coffee grounds.
Operating Instructions
Making Espresso
- Pre-heat: Turn on the machine using the mechanical knob. Allow the machine to pre-heat for a few minutes until the indicator light signals it's ready for brewing.
- Prepare Portafilter: Add desired amount of finely ground espresso coffee into the filter basket. Tamp the coffee evenly and firmly. Wipe any excess grounds from the rim of the portafilter.
- Attach Portafilter: Insert the portafilter into the brewing head and twist it firmly to the right until it is securely locked in place.
- Place Cups: Place one or two espresso cups on the drip tray directly under the coffee outlets. You can pre-warm your cups on the stainless steel warm cup area.
- Brew Espresso:Press the one-button start on the touch electronic panel. The machine will begin extracting espresso. You can adjust coffee strength and set the number of brewing cups using the respective buttons. If you do not stop it manually, it will stop automatically in 2 minutes. If you add coffee halfway, you need to stop it manually.
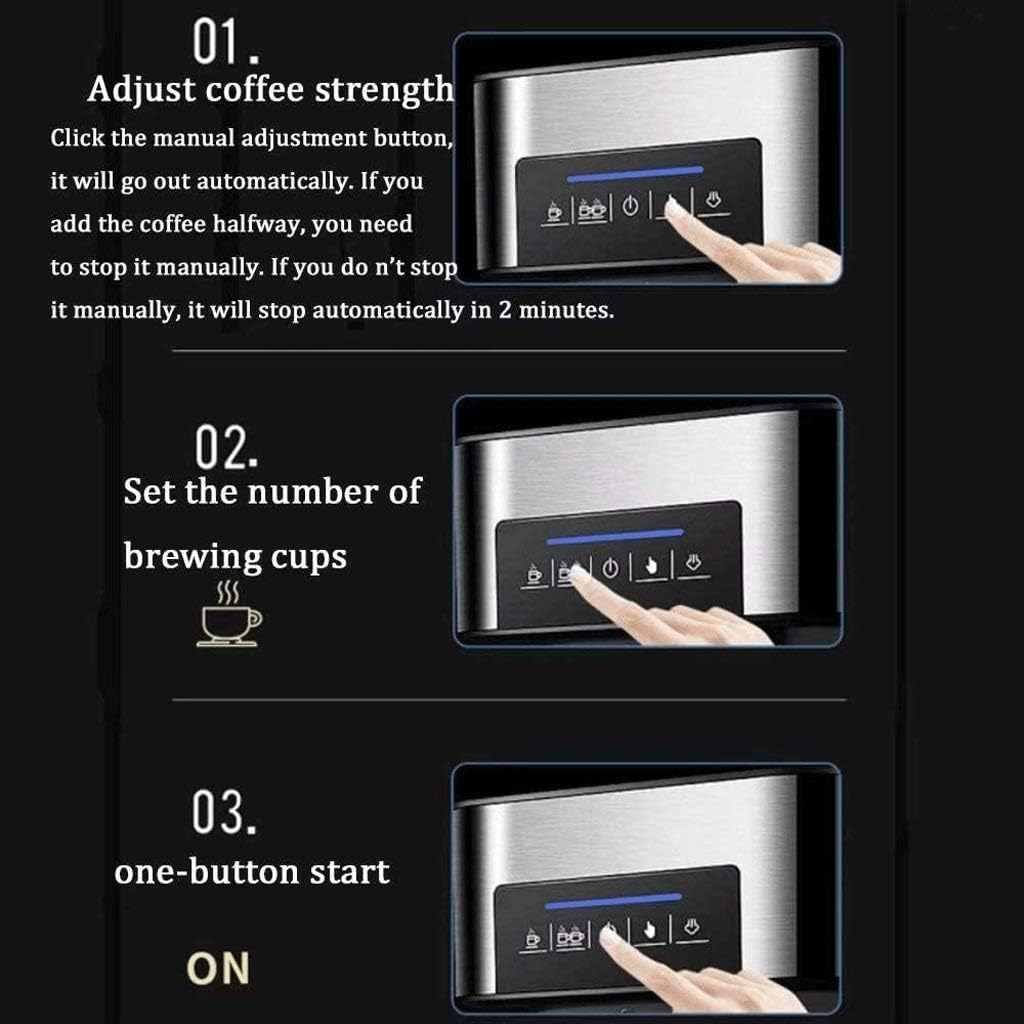
Image: Diagram illustrating the touch electronic button panel for adjusting coffee strength, setting the number of brewing cups, and one-button start.

Image: Close-up of espresso being extracted from the portafilter into a glass cup, demonstrating 20BAR high-pressure extraction.
- Serve: Once brewing is complete, remove the cups and enjoy your espresso.
Frothing Milk
Use the steam wand to create frothed milk for cappuccinos and lattes.
- Prepare Milk: Fill a stainless steel frothing pitcher with cold milk (dairy or non-dairy) to just below the spout.
- Activate Steam: Turn the mechanical knob to the steam setting. Wait for the steam indicator light to illuminate, indicating the machine has reached the correct temperature for steaming.
- Purge Steam Wand: Briefly open the steam valve to release any condensed water from the wand into the drip tray. Close the valve.
- Froth Milk: Immerse the tip of the steam wand just below the surface of the milk. Open the steam valve slowly. Move the pitcher up and down to incorporate air and create foam. Once desired foam consistency and temperature are reached, close the steam valve.

Image: Close-up of the mechanical knob with steam control markings. The text indicates that steam size can be adjusted, noting that too small steam results in poor milk foam, and too strong steam can cause splashing.
- Clean Steam Wand: Immediately after frothing, wipe the steam wand with a damp cloth to remove any milk residue. Briefly open the steam valve again to clear any milk from inside the wand.
Maintenance and Cleaning
Regular cleaning ensures optimal performance and longevity of your espresso machine.
- Daily Cleaning:
- Drip Tray: Empty and clean the detachable drip tray after each use. It is removable and washable.

Image: Close-up showing the removable and washable drip tray, along with the 0.5mm stainless steel filter and scald-proof handle.
- Portafilter and Filter Basket: Remove spent coffee grounds and rinse the portafilter and filter basket under running water.
- Steam Wand: As mentioned in the operating instructions, clean the steam wand immediately after each use.
- Exterior: Wipe the exterior of the machine with a soft, damp cloth. Do not use abrasive cleaners or scouring pads.
- Drip Tray: Empty and clean the detachable drip tray after each use. It is removable and washable.
- Water Tank: Clean the water tank periodically with mild detergent and rinse thoroughly.
- Descaling: Depending on water hardness and frequency of use, descale the machine every 2-3 months. Use a commercial descaling solution designed for espresso machines and follow the product's instructions.
Troubleshooting
Refer to this section for common issues and their solutions.
| Problem | Possible Cause | Solution |
|---|---|---|
| No coffee dispenses | No water in tank; Clogged filter; Machine not primed. | Fill water tank; Clean filter; Prime the machine by running a water-only cycle. |
| Espresso brews too slowly or not at all | Coffee grounds too fine or tamped too hard; Clogged filter. | Use coarser grind; Tamp less firmly; Clean filter. |
| Espresso brews too quickly | Coffee grounds too coarse or not enough coffee; Not tamped enough. | Use finer grind; Add more coffee; Tamp more firmly. |
| Milk frother not producing steam | Steam wand clogged; Not enough water in tank; Machine not heated to steam temperature. | Clean steam wand; Fill water tank; Wait for steam indicator light. |
| Water leaking from machine | Water tank not seated correctly; Drip tray full; Loose portafilter. | Re-seat water tank; Empty drip tray; Ensure portafilter is locked firmly. |
Specifications
- Model: B0F99RQV43
- Voltage: 110-240V 50Hz
- Power: 850 W
- Capacity: 1.5L (Water Tank)
- Pressure: 0-20 bar
- Net Weight: Approximately 3.6 kg
- Product Dimensions: 234mm (W) x 270mm (D) x 292mm (H)
Warranty and Support
This product comes with a 3-month warranty from the date of purchase.
For technical support, troubleshooting assistance, or warranty claims, please contact your retailer or the manufacturer directly. Please have your model number (B0F99RQV43) and proof of purchase ready when contacting support.


