1. Introduction
This manual provides detailed instructions for the installation, operation, and maintenance of your UNITOPSCI A4196H1MI2 Android Car Stereo. Please read this manual thoroughly before using the product to ensure proper functionality and to prevent damage. This unit is designed for Chevrolet Cruze J300 models manufactured between 2009 and 2015.
2. Safety Information
- Always operate the device responsibly and in accordance with local traffic laws. Distracted driving can lead to accidents.
- Do not attempt to install or repair the unit if you are not qualified. Improper installation can cause damage to the vehicle's electrical system or the unit itself.
- Ensure all wiring is correctly connected and insulated to prevent short circuits.
- Keep the unit away from water and excessive moisture.
- Avoid exposing the unit to extreme temperatures or direct sunlight for prolonged periods.
- Clean the screen with a soft, dry cloth. Do not use abrasive cleaners.
3. Package Contents
Verify that all items listed below are included in your package:
- Android Car Stereo Unit
- Backup Camera
- Power Cable
- Small Horn
- RCA Cable
- Rear Camera Input Cable
- Radio Antenna
- Microphone
- Canbus Box
- GPS Antenna
- 4/6 Pin USB Cable
- User Manual (this document)
- USB Adapter Cable
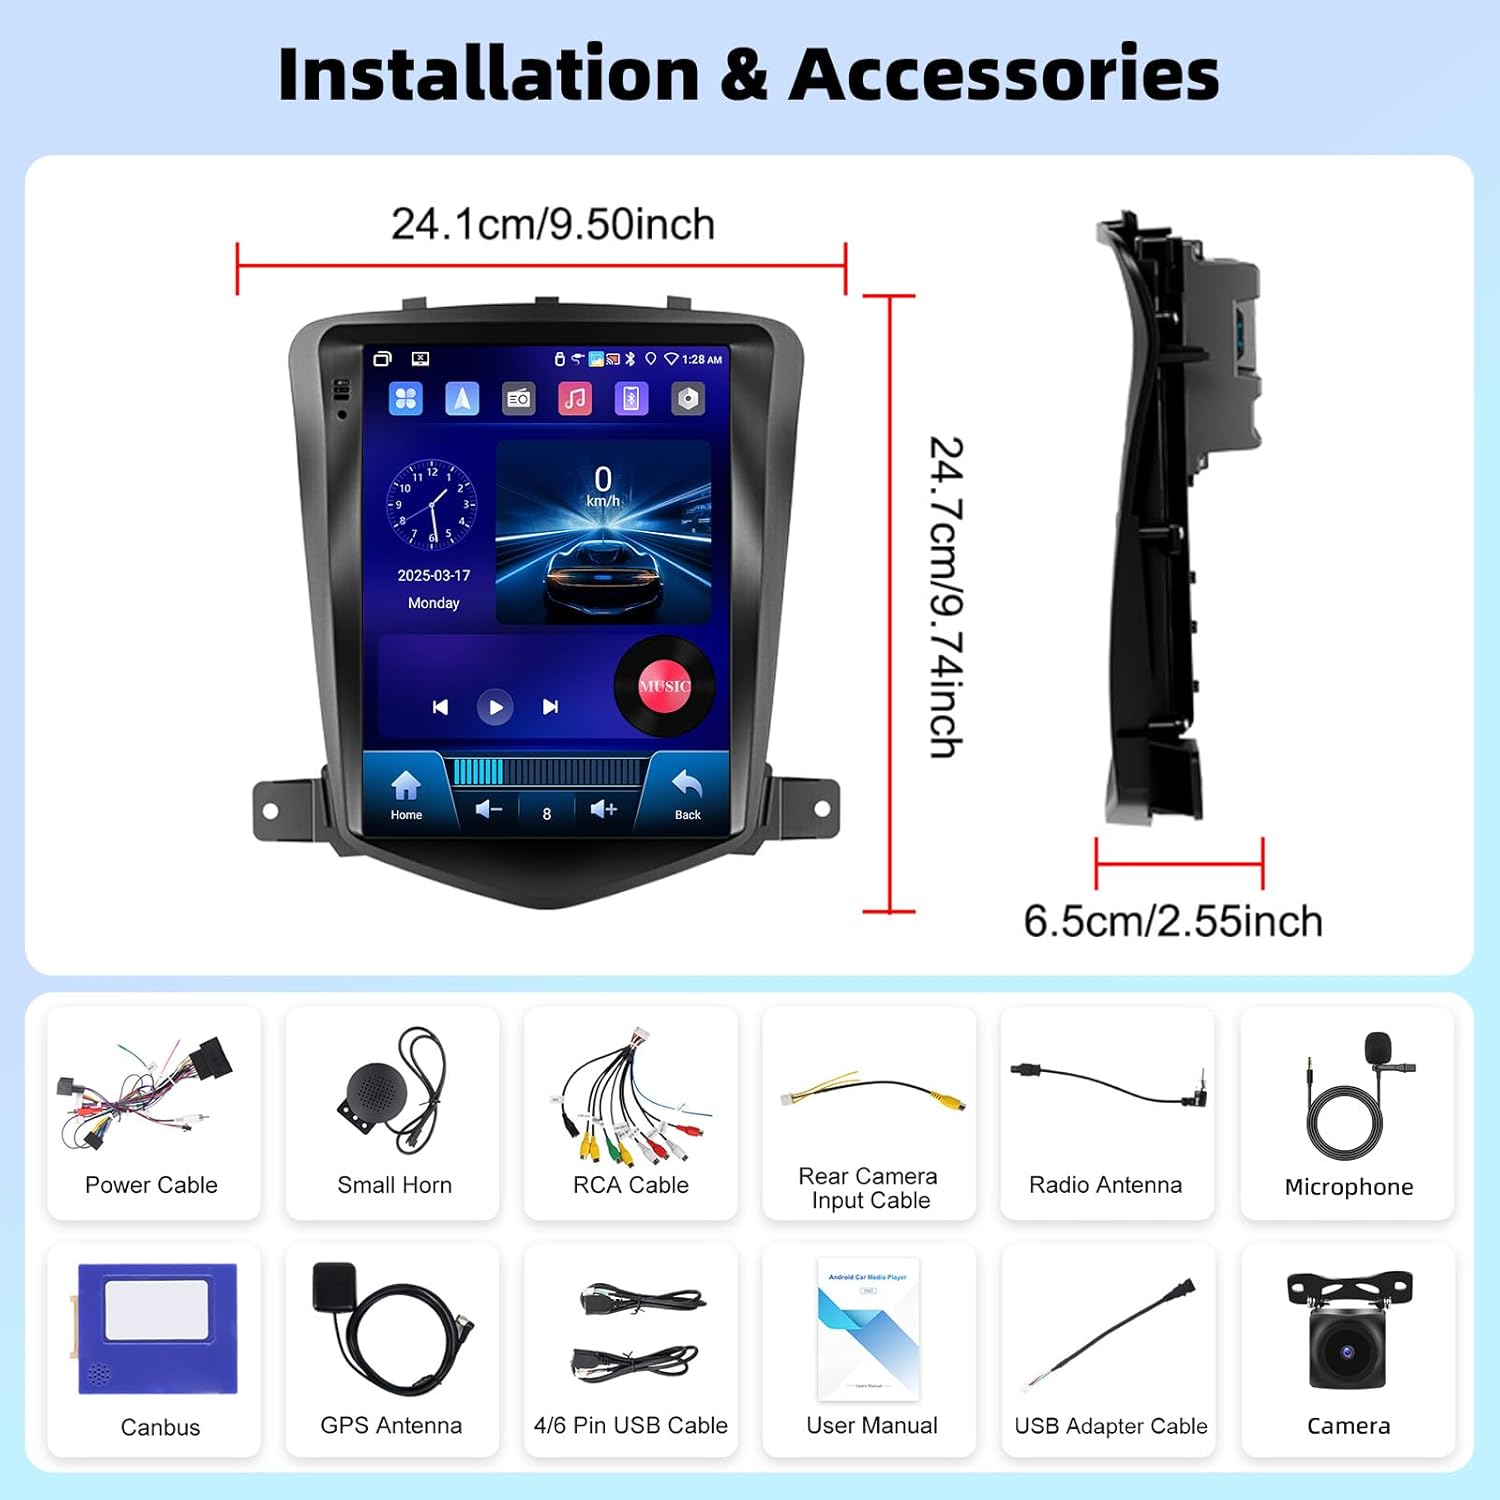
Image 3.1: Overview of the UNITOPSCI A4196H1MI2 car stereo dimensions and included accessories, such as power cables, antennas, and the backup camera.
4. Installation
4.1. Pre-Installation Checks
- Ensure your vehicle is a Chevrolet Cruze J300 model (2009-2015).
- Disconnect the vehicle's battery before starting any electrical work.
- Verify all components listed in Section 3 are present.
4.2. Removing the Original Radio
Carefully remove the trim panels and screws securing the factory radio. Refer to your vehicle's service manual for specific instructions on dashboard disassembly.
4.3. Wiring Connections
- Power Cable: Connect the provided power harness to the vehicle's wiring. Ensure correct polarity.
- RCA Cables: Connect for audio output (e.g., external amplifier) if applicable.
- GPS Antenna: Mount the GPS antenna in a location with a clear view of the sky, typically on the dashboard or under the windshield.
- Radio Antenna: Connect the vehicle's radio antenna to the unit.
- Microphone: Connect the external microphone for improved call quality. Position it near the driver.
- Backup Camera: Connect the rear camera input cable to the unit and route the camera cable to the rear of the vehicle. Connect the camera's power to the reverse light circuit for automatic activation.
- USB Cables: Connect the USB extension cables for external storage or wired CarPlay/Android Auto.
- Canbus Box: Connect the Canbus box as instructed to ensure proper communication with the vehicle's systems, including steering wheel controls.
4.4. Mounting the Unit
Secure the UNITOPSCI A4196H1MI2 unit into the dashboard opening using the provided brackets and screws. Reassemble the dashboard trim panels.

Image 4.1: Visual comparison of the Chevrolet Cruze J300 dashboard, illustrating the appearance before and after the UNITOPSCI A4196H1MI2 Android car stereo is installed.
5. Operating Instructions
5.1. Power On/Off
To power on the unit, start your vehicle. The unit will typically power on automatically. To power off, turn off your vehicle's ignition. The unit may have a soft power-off feature that allows it to resume quickly.
5.2. Touchscreen Interface
The unit features a 9.7-inch HD touchscreen with a resolution of 1024*600. Navigate through menus and applications by tapping, swiping, and pinching gestures, similar to a smartphone or tablet.
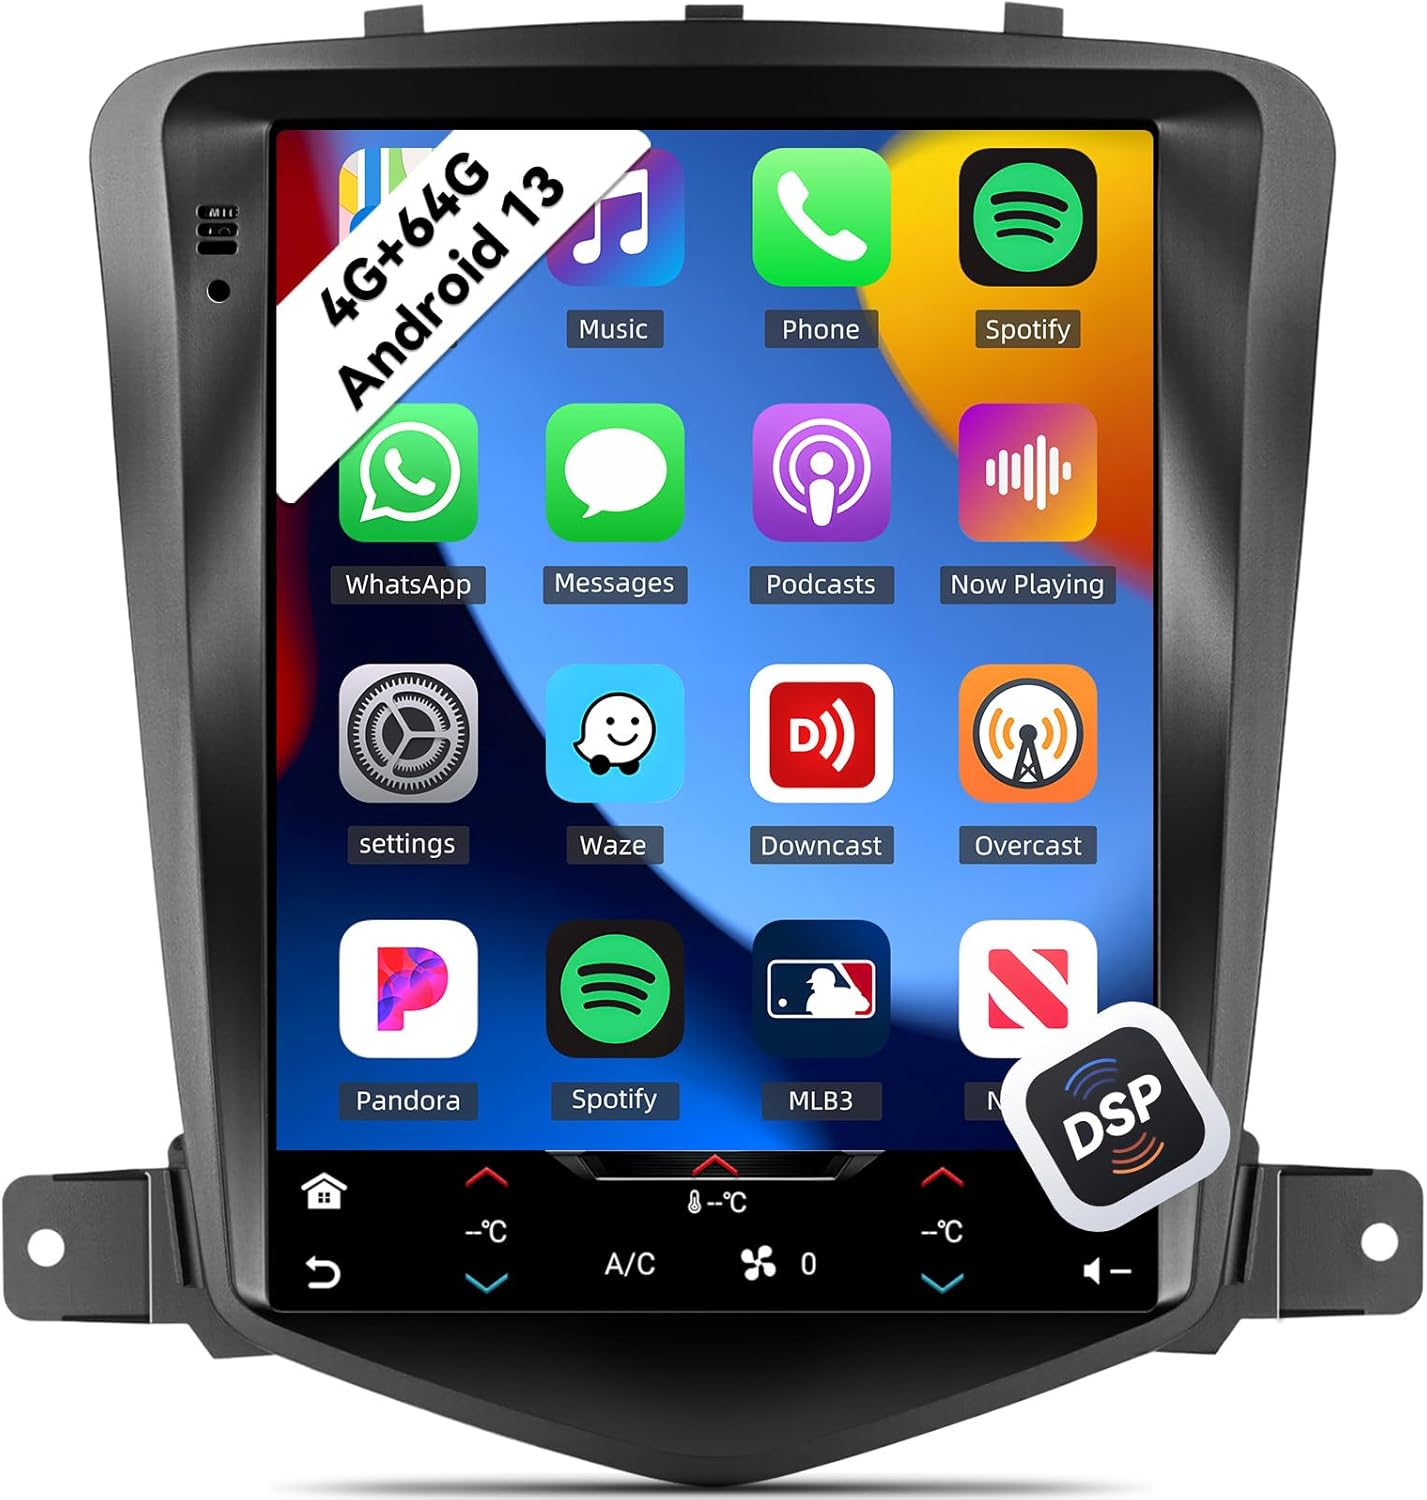
Image 5.1: The main interface of the UNITOPSCI A4196H1MI2 unit, displaying a grid of application icons for music, phone, Spotify, messages, and other functions.
5.3. Android 13 System
The stereo operates on the Android 13 operating system, featuring a quad-core processor, 4GB RAM, and 64GB ROM. This configuration provides a responsive user experience and ample storage for apps and media.

Image 5.2: A visual representation of the Android 13 system's core components, highlighting the 4-core CPU, 4GB RAM, and 64GB ROM for enhanced performance.
5.4. Wireless CarPlay & Android Auto
The unit supports both wireless Apple CarPlay and Android Auto. Connect your compatible smartphone wirelessly to access navigation, music, calls, and messages directly on the stereo's display.
- For CarPlay: Ensure Wi-Fi and Bluetooth are enabled on your iPhone. Follow the on-screen prompts to pair.
- For Android Auto: Ensure Wi-Fi and Bluetooth are enabled on your Android phone. Open the Android Auto app on your phone and follow the pairing instructions.
5.5. Mirror Link
Mirror Link allows you to display your smartphone's screen directly onto the car stereo. This feature is compatible with most Android and iOS phones, excluding some Samsung models.
- Access the Mirror Link application on the stereo.
- Follow the instructions to connect your phone via USB or Wi-Fi.

Image 5.3: The car stereo display demonstrating the integration of CarPlay, Android Auto, and Mirror Link functionalities, allowing seamless smartphone connectivity.
5.6. Bluetooth 5.0
The built-in Bluetooth 5.0 module enables hands-free calling and wireless audio streaming. An external microphone is included for clear voice transmission.
- Pairing: Go to the Bluetooth settings on the stereo and your phone. Search for available devices and select the stereo's name to pair.
- Hands-free Calling: Once paired, you can make and receive calls directly from the stereo interface. The phonebook can be automatically downloaded.
- Audio Streaming: Play music from your phone through the car's speakers wirelessly.

Image 5.4: The stereo's display showing the Bluetooth 5.0 interface for hands-free calling and music playback, along with the Digital DSP processor's 32-band equalizer.
5.7. FM/RDS Radio
Access local radio stations with the integrated FM/RDS tuner. You can save up to 18 preset stations.
- Navigate to the Radio application.
- Use the scan function to find stations or manually tune to a frequency.
- Press and hold a preset button to save the current station.
5.8. GPS Navigation & WiFi
The unit supports GPS, GLONASS, and Beidou navigation systems. You can use pre-installed offline maps or connect to Wi-Fi/hotspot for online navigation apps like Google Maps or Waze.
- Offline Maps: Access the navigation app and select your desired region.
- Online Maps: Connect the unit to a Wi-Fi network or your phone's hotspot via the Wi-Fi settings. Then, open your preferred online navigation application.

Image 5.5: The stereo's capabilities for built-in Wi-Fi, allowing access to various online applications, and GPS navigation, supporting both online and offline maps.
5.9. DSP 32-Band EQ
Customize your audio experience with the Digital Sound Processor (DSP) and its 32-band equalizer. This allows for precise tuning of sound frequencies, time correction, and speed-compensated volume.
- Access the EQ settings from the main menu or audio settings.
- Adjust individual frequency bands to match your audio preferences.
- Explore preset equalizer modes or create custom profiles.
5.10. Split Screen Functionality
The split-screen feature allows you to run two applications simultaneously on the 9.7-inch display, such as navigation and music playback.
- Open the first application.
- Long-press the recent apps button or swipe from the bottom (depending on Android version) to activate split-screen mode.
- Select the second application to display alongside the first.

Image 5.6: The 9.7-inch HD screen showcasing its wide viewing angle and the split-screen feature, allowing two applications to be viewed concurrently.
5.11. Steering Wheel Control (SWC)
The unit supports steering wheel controls, allowing you to manage volume, tracks, and calls without taking your hands off the wheel. This functionality is enabled via the Canbus box.
- Access the Steering Wheel Control settings in the unit's menu.
- Follow the on-screen instructions to program each button on your steering wheel to the desired function.
5.12. Backup Camera
The included AHD backup camera provides a clear view of the area behind your vehicle when reversing. The display automatically switches to the camera feed when the reverse gear is engaged.
- Ensure the backup camera is correctly installed and wired to the reverse light circuit.
- When shifting into reverse, the camera feed will appear on the screen.

Image 5.7: The AHD backup camera module and its clear display on the car stereo screen, alongside an illustration of the steering wheel control interface for programming functions.
6. Maintenance
- Screen Cleaning: Use a soft, lint-free cloth to gently wipe the touchscreen. For stubborn smudges, slightly dampen the cloth with water or a screen-safe cleaner. Avoid harsh chemicals.
- Software Updates: Periodically check for software updates from the manufacturer to ensure optimal performance and access to new features.
- General Care: Keep the unit free from dust and debris. Ensure proper ventilation around the unit to prevent overheating.
7. Troubleshooting
7.1. No Power
- Check Fuses: Inspect the vehicle's fuse box and the unit's inline fuse for any blown fuses.
- Wiring: Ensure the power cable is securely connected and has proper voltage.
- Ignition: Verify the vehicle's ignition is on.
7.2. No Sound
- Volume: Check if the volume is turned up and not muted.
- Speaker Connections: Ensure all speaker wires are correctly connected to the unit and not shorted.
- Audio Source: Verify the correct audio source (e.g., FM, Bluetooth, CarPlay) is selected.
7.3. GPS Not Working
- Antenna: Ensure the GPS antenna is properly connected and mounted in a location with a clear view of the sky.
- Signal: Allow time for the unit to acquire a GPS signal, especially after initial installation or in areas with poor reception.
- Maps: Verify that maps are installed or that the unit is connected to Wi-Fi for online navigation.
7.4. CarPlay/Android Auto Connection Issues
- Bluetooth/Wi-Fi: Ensure Bluetooth and Wi-Fi are enabled on both the stereo and your smartphone.
- Compatibility: Confirm your phone model and operating system version are compatible.
- USB Cable: If using wired connection, try a different, high-quality USB cable.
7.5. Backup Camera Not Displaying
- Wiring: Check the camera's power and video signal connections. Ensure the trigger wire is correctly connected to the reverse light circuit.
- Settings: Verify that the camera input is enabled in the stereo's settings.
8. Specifications
| Feature | Specification |
|---|---|
| Model Number | A4196H1MI2 |
| Operating System | Android 13 |
| Memory (RAM) | 4GB |
| Storage (ROM) | 64GB |
| Display Size | 9.7 Inches |
| Screen Resolution | 1024*600 |
| Connectivity | Bluetooth 5.0, Wi-Fi |
| Navigation | GPS/GLONASS/Beidou (North America, Worldwide maps) |
| Audio Features | DSP 32-Band EQ, Stereo Output |
| Special Features | Wireless Apple CarPlay, Android Auto, Mirror Link, Split Screen, Backup Camera Input, Steering Wheel Control |
| Product Dimensions | 2.55"L x 9.5"W x 9.74"H |
| Item Weight | 3.3 pounds |
9. Warranty and Support
9.1. Manufacturer's Warranty
This UNITOPSCI A4196H1MI2 car stereo comes with a 1-Year Manufacturer Warranty from the date of purchase. This warranty covers defects in materials and workmanship under normal use. Please retain your proof of purchase for warranty claims.
9.2. Customer Support
For technical assistance, troubleshooting, or warranty inquiries, please contact UNITOPSCI customer support. You can reach them via email at UNITOPSCI@126.com. Please provide your model number (A4196H1MI2) and a detailed description of your issue for efficient service.
Additional protection plans may be available for purchase from your retailer, offering extended coverage beyond the manufacturer's warranty.


