1. Introduction
This manual provides detailed instructions for the installation, configuration, and maintenance of the MSI PRO B850M-P WiFi Motherboard. Designed for efficient and stable performance, this motherboard supports AMD Ryzen 9000, 8000, and 7000 series processors on the AM5 platform. It features advanced connectivity and cooling solutions to ensure optimal system operation.

Figure 1: MSI PRO B850M-P WiFi Motherboard and included packaging.
2. Product Overview
The MSI PRO B850M-P WiFi motherboard is built on the AMD B850 chipset, offering robust features for modern computing needs. Key features include:
- Processor Support: Compatible with AMD Ryzen 9000, 8000, and 7000 series processors (AM5 socket).
- Power Delivery: Direct 7 Phase (P-PAK) VRM for stable power to the CPU, enhanced with Core Boost architecture.
- Cooling: Features 7W/mK MOSFET thermal pads, extra choke thermal pads, an Extended Heatsink, chipset heatsink, and EZ M.2 Shield Frozr II for thermal management.
- Memory: Four DDR5 DIMM SMT slots supporting memory overclocking speeds up to 8200+ MT/s (1DPC 1R).
- Expansion Slots: One PCIe 5.0 x16 SMT slot with Steel Armor for graphics cards, and additional PCIe 4.0 x16 slots.
- Storage: One M.2 Gen5 x4 128Gbps slot with EZ M.2 Shield Frozr II, one M.2 Gen4 x4 64Gbps slot, and one M.2 Gen4 x2 32Gbps slot.
- Connectivity: Integrated Wi-Fi 7, Bluetooth 5.4, Realtek 5G LAN, USB 10Gbps Type-C, and 7.1 HD audio with Audio Boost.

Figure 2: Top-down view of the motherboard, highlighting component layout.

Figure 3: Motherboard showcasing cooling features and durable PCB design.

Figure 4: Detailed view of the rear input/output panel, including USB, LAN, Wi-Fi, and audio ports.
3. Setup and Installation
Before beginning installation, ensure your system is powered off and unplugged. Handle the motherboard by its edges to avoid static discharge.
3.1. CPU Installation
- Open the CPU socket lever.
- Carefully align the CPU with the socket, ensuring the triangular mark on the CPU matches the mark on the socket.
- Gently place the CPU into the socket without forcing it.
- Close the socket lever to secure the CPU.
3.2. CPU Cooler Installation
Install your chosen CPU cooler according to its manufacturer's instructions. Ensure proper thermal paste application for effective heat dissipation.
3.3. Memory (RAM) Installation
- Open the clips on both ends of the DDR5 DIMM slots.
- Align the memory module with the slot, ensuring the notch on the module matches the key in the slot.
- Press down firmly on both ends of the memory module until the clips snap into place.
3.4. M.2 SSD Installation
The motherboard includes EZ M.2 Shield Frozr II for M.2 SSDs.
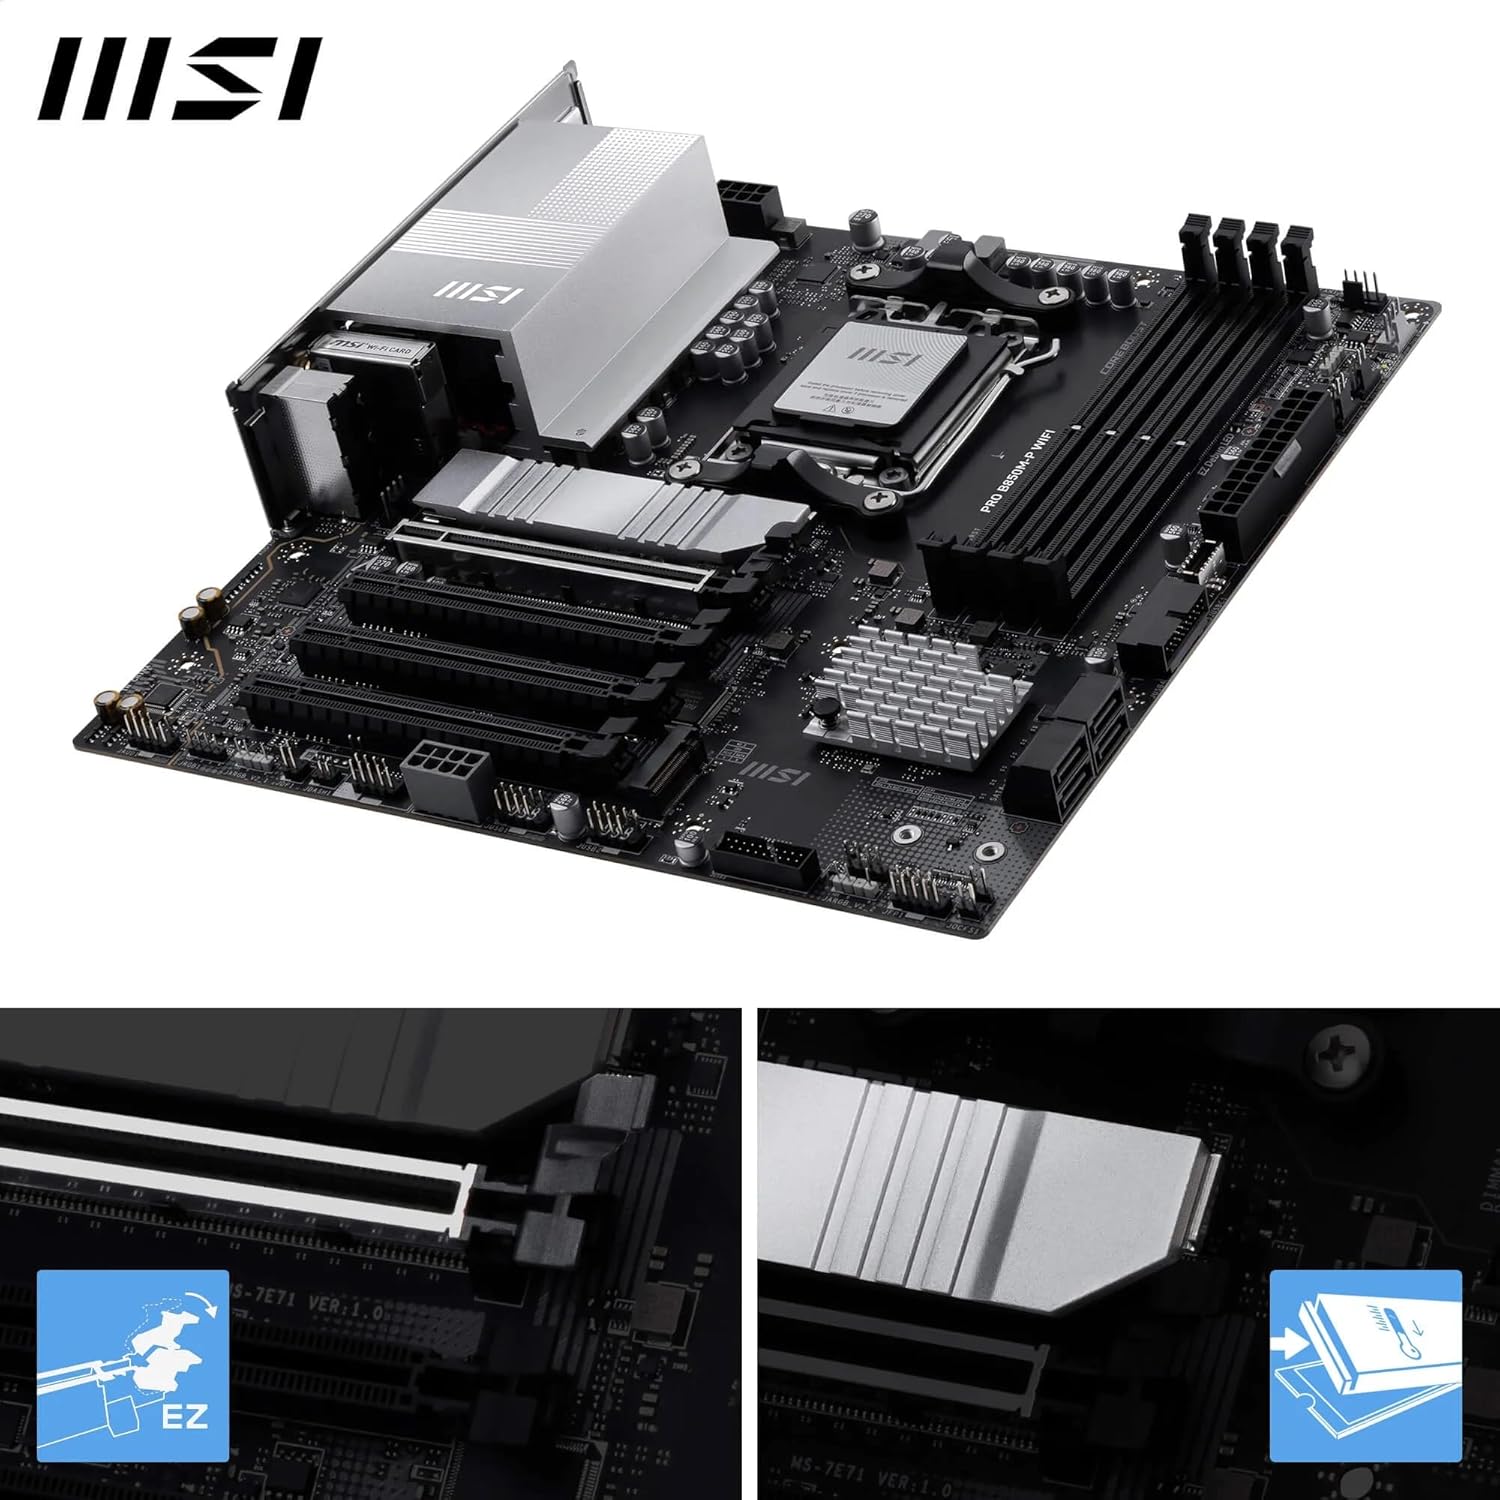
Figure 5: Close-up view of the M.2 Shield Frozr II, demonstrating its easy removal and installation.
- Unscrew and remove the EZ M.2 Shield Frozr II from the desired M.2 slot.
- Insert the M.2 SSD into the slot at an angle.
- Gently push down the M.2 SSD and secure it with the provided screw or tool-less latch.
- Reattach the EZ M.2 Shield Frozr II.
3.5. Graphics Card (GPU) Installation

Figure 6: Motherboard highlighting the PCIe 5.0 x16 slot and M.2 Gen5 slots.
- Open the latch on the PCIe 5.0 x16 slot.
- Align your graphics card with the slot and press down firmly until it clicks into place.
- Secure the graphics card to your PC case with screws.
3.6. Power Connections
Connect the 24-pin ATX power connector and the 8-pin (or 4+4-pin) CPU power connector from your power supply to the motherboard.
3.7. Front Panel Connectors
Connect the power button, reset button, HDD LED, power LED, and front panel USB/audio connectors to their respective headers on the motherboard. Refer to the motherboard layout diagram for exact locations.
3.8. Included Accessories
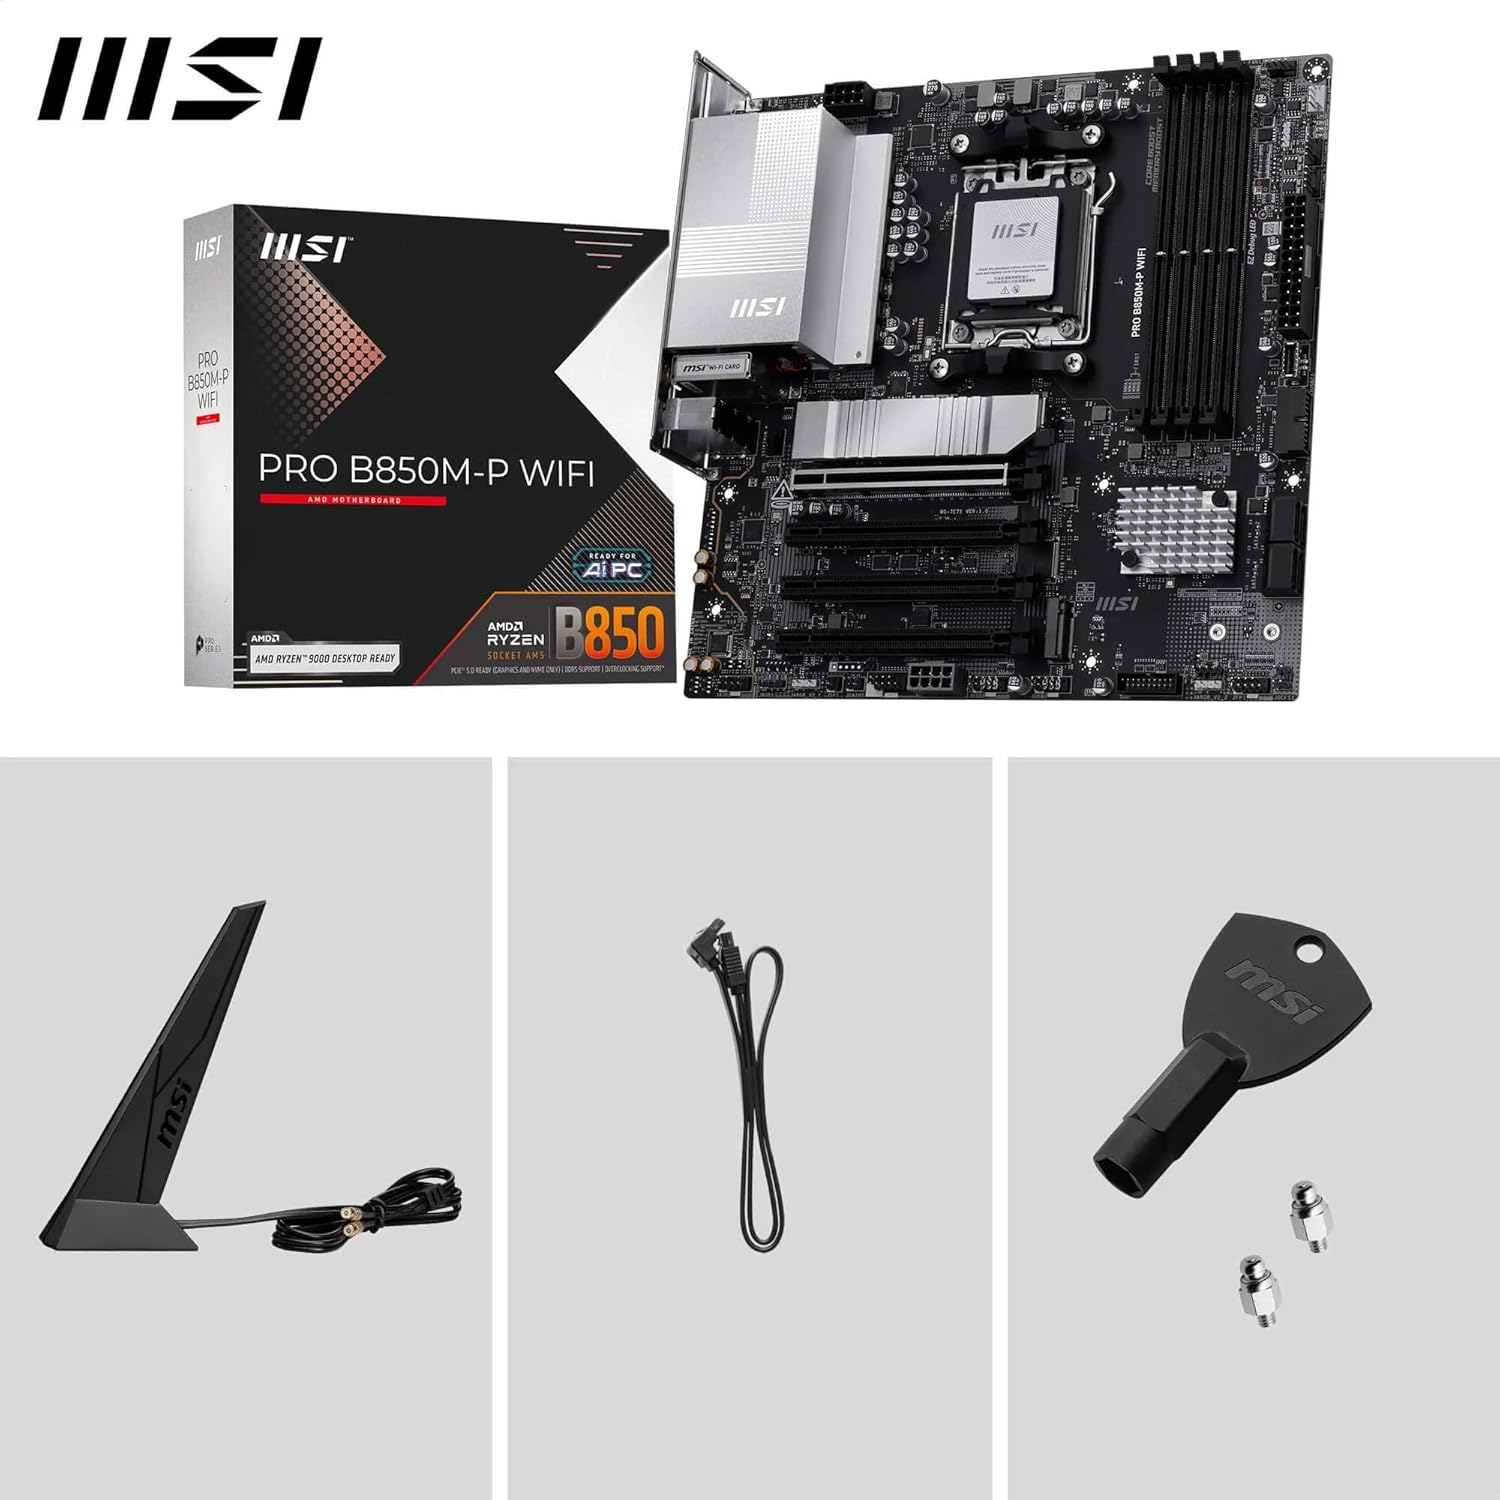
Figure 7: The motherboard shown with its standard accessories, including the Wi-Fi antenna, SATA cables, and M.2 screws.
4. Operating Instructions
4.1. BIOS/UEFI Setup
To enter the BIOS/UEFI setup utility, power on your system and repeatedly press the DEL key during the boot process. Here you can configure system settings, boot order, and monitor hardware status.
4.2. Driver Installation
After installing your operating system, install the necessary drivers for the motherboard's components. These can typically be found on the included driver CD/USB or downloaded from the official MSI website. Essential drivers include chipset, LAN, Wi-Fi, Bluetooth, and audio drivers.
4.3. MSI Software Utilities
MSI provides various software utilities to enhance your user experience, such as MSI Center for system monitoring and Mystic Light for RGB control. Download these from the MSI website.
5. Maintenance
5.1. Cleaning
Regularly clean your computer's interior to prevent dust buildup, which can lead to overheating. Use compressed air to remove dust from fans, heatsinks, and other components. Ensure the system is powered off and unplugged before cleaning.
5.2. BIOS Updates
Periodically check the MSI website for BIOS updates. BIOS updates can improve system stability, add support for new hardware, or fix bugs. Follow the instructions provided by MSI carefully when performing a BIOS update to avoid system damage.
6. Troubleshooting
If you encounter issues with your motherboard, refer to the following common troubleshooting steps:
- No Power/No Boot: Ensure all power cables (24-pin ATX, 8-pin CPU) are securely connected. Check the power supply unit (PSU) for proper function.
- No Display: Verify that the graphics card is properly seated in its PCIe slot and that the display cable is connected to the graphics card (not the motherboard's integrated graphics ports, unless using an APU).
- DRAM/CPU LED Indicators: If the motherboard's EZ Debug LEDs (CPU, DRAM, VGA, BOOT) illuminate, it indicates an issue with that specific component. For example, a red CPU light or yellow DRAM light suggests a problem with the CPU or memory, respectively. Try reseating the component or testing with known-good parts.
- System Instability: Ensure all drivers are up to date. Check memory compatibility and run memory diagnostic tools. Verify CPU and GPU temperatures to rule out overheating.
- BIOS Flashback: If a BIOS update fails or the system becomes unbootable, use the BIOS Flashback feature (if available on your model) to restore the BIOS. Refer to the MSI website for specific instructions on using this feature.
7. Specifications
| Feature | Specification |
|---|---|
| Brand | MSI |
| Model Name | PRO B850M-P |
| CPU Socket | Socket AM5 |
| Compatible Processors | AMD Ryzen 9000/8000/7000 Series Desktop Processors |
| Chipset Type | AMD B850 |
| RAM Memory Technology | DDR5 |
| Memory Slots | 4 x DDR5 DIMM SMT slots |
| Max Memory Speed (OC) | 8200+ MT/s |
| PCIe Slots | 1 x PCIe 5.0 x16 (with Steel Armor), 1 x PCIe 4.0 x16 |
| M.2 Connectors | 1 x M.2 Gen5 x4 128Gbps, 1 x M.2 Gen4 x4 64Gbps, 1 x M.2 Gen4 x2 32Gbps |
| LAN | Realtek 5G LAN |
| Wireless Connectivity | Wi-Fi 7, Bluetooth 5.4 |
| USB Ports (Rear) | USB 10Gbps Type-C, USB 10Gbps Type-A, USB 5Gbps Type-A, USB 2.0 |
| Audio | 7.1 HD Audio with Audio Boost |
| Video Output | HDMI, DisplayPort (4K/60Hz support) |
| Form Factor | ATX (based on product title, though description mentions mATX in reviews, relying on title for consistency) |
| Dimensions (LxWxH) | 11.2 x 10.8 x 2.8 inches |
| Item Weight | 2.86 pounds |
8. Warranty and Support
For warranty information, technical support, driver downloads, and further assistance, please visit the official MSI website. You can find detailed support resources, FAQs, and contact information for customer service.
MSI Official Website: www.msi.com
Always refer to the latest documentation available on the MSI website for the most up-to-date information regarding your product.


