1. Introduction
The LETOURWM RV Tire Pressure Monitoring System (TPMS) is designed to provide real-time monitoring of your vehicle's tire pressure and temperature. This system helps enhance driving safety by alerting you to abnormal tire conditions, such as low pressure, high pressure, high temperature, or rapid air leakage. It features a solar-powered display unit with USB-C charging capability and four external sensors, suitable for various 4-wheeled vehicles including RVs, trucks, SUVs, MPVs, and sedans.
Please read this manual thoroughly before installation and operation to ensure correct usage and optimal performance.

Figure 1: Compatible Vehicle Types. This TPMS is designed for various 4-wheeled vehicles, excluding large trucks or buses.
2. Package Contents
Verify that all items listed below are included in your package:
- 1 x TPMS Monitor (Display Unit)
- 4 x TPMS External Sensors
- 1 x USB Type-C Charging Cable
- 1 x Double-Sided Adhesive Tape (for mounting the monitor)
- 1 x Screwdriver (for sensor battery replacement)
- 4 x Metal Valve Gaskets (for sensor installation)

Figure 2: Package Contents. Ensure all listed items are present.
3. Product Features
- Real-time Monitoring: Continuously displays tire pressure and temperature for all four tires.
- Dual Charging Options: Equipped with a solar panel for continuous charging and a USB Type-C port for charging in low light conditions.
- Large LCD Display: Features an automatic backlight for clear readability in various lighting environments (day and night).
- Multiple Alarm Modes: Alerts for low pressure, high pressure, high temperature, fast leakage, and low sensor battery.
- Intelligent On/Off: The monitor automatically turns on when the car starts and shuts off when stationary to conserve power.
- Durable Sensors: IP68 waterproof, dust-proof, anti-theft, and designed to resist high/low temperatures.

Figure 3: Automatic Backlight LCD Display. The screen adjusts brightness for optimal viewing.
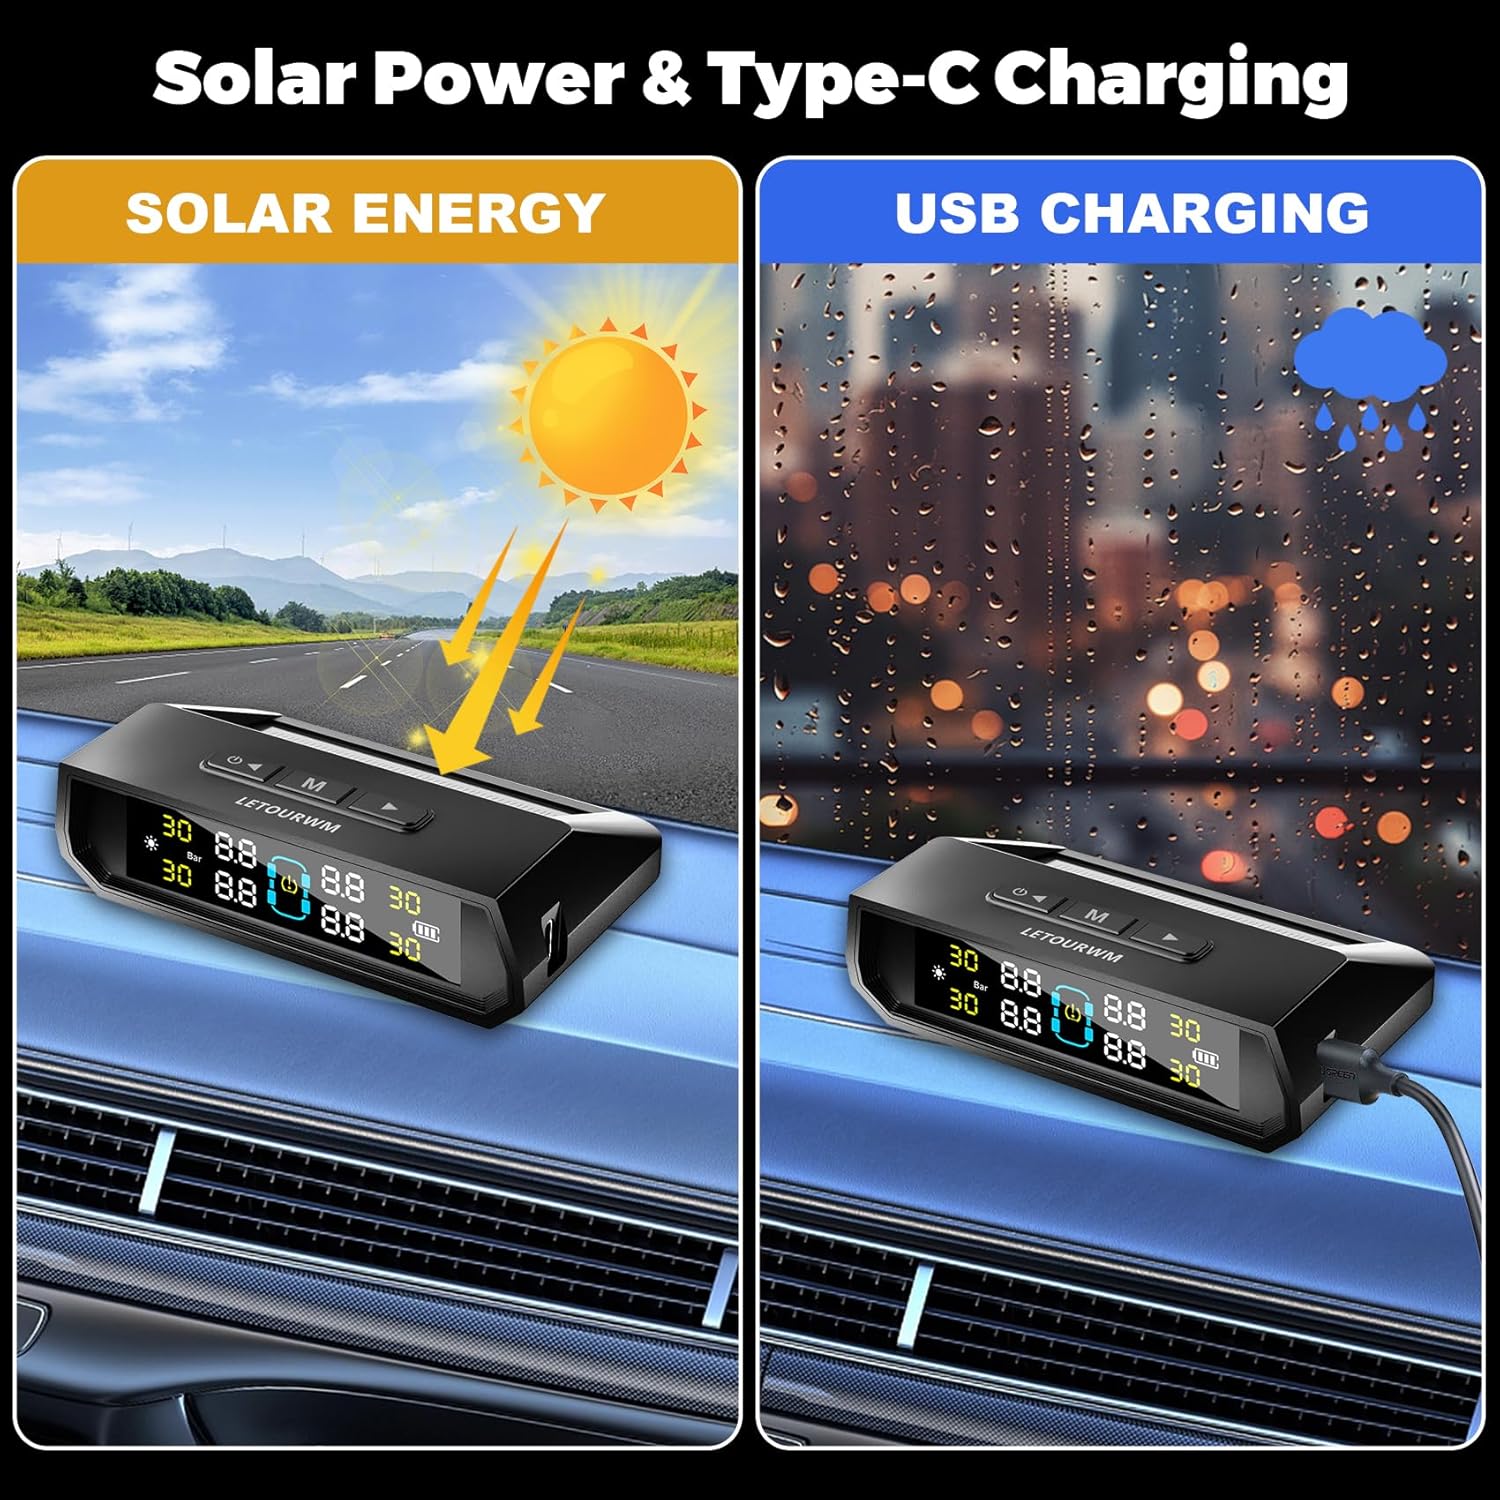
Figure 4: Solar and USB Type-C Charging. Ensures continuous power for the monitor.

Figure 5: Multiple Alarm Modes. Visual representation of various alerts.

Figure 6: Sensor Durability Features. Sensors are built to withstand various environmental conditions.
4. Setup and Installation
4.1 Monitor Placement
Choose a suitable location on your dashboard that does not obstruct your view while driving. Use the provided double-sided adhesive tape to secure the monitor firmly.
4.2 Sensor Installation
Follow these steps to install the external sensors on your vehicle's tires:
- Unscrew the original valve cap from the tire valve stem.
- Screw on the anti-theft nut onto the valve stem.
- Screw the corresponding sensor (FL for Front Left, FR for Front Right, RL for Rear Left, RR for Rear Right) onto the valve stem until it is hand-tight.
- Using the provided wrench, tighten the anti-theft nut against the sensor to secure it.

Figure 7: Sensor Installation Steps. Ensure sensors are securely fastened.
The sensors are pre-paired to their respective positions (FL, FR, RL, RR). If you need to re-match them, refer to Section 6.
5. Operating Instructions
5.1 Power On/Off
The monitor will automatically power on when it detects vehicle movement or vibration. It will automatically power off after a period of inactivity to save battery.
5.2 Display Overview
The LCD screen displays real-time tire pressure and temperature for all four tires. Key indicators include:
- Pressure Value: Displays current tire pressure (e.g., 30 PSI or Bar).
- Temperature Value: Displays current tire temperature.
- Tire Position Icons: Indicates Front Left (FL), Front Right (FR), Rear Left (RL), Rear Right (RR).
- Battery Level: Shows the monitor's battery status.
- Solar Charging Indicator: Appears when the monitor is charging via solar power.
- Pressure Unit: Indicates PSI or Bar.
5.3 Alarm Indications
When an abnormal condition is detected, the monitor will emit an audible alarm and display the specific warning icon (e.g., low pressure, high temperature) for the affected tire.
6. Customizing Tire Pressure/Temperature Settings
To adjust the alarm thresholds for tire pressure and temperature:
- Press and hold the 'M' button for 3 seconds. The Bar/PSI interface will flash, indicating entry into setting mode. Use the left and right arrow keys to select the unit (Bar or PSI). Press 'M' to switch to the next setting item.
- When a number on the display is flashing, use the left and right arrow keys to adjust the value.
- After setting the desired value, press the 'M' button to save the settings and move to the next item. Repeat for all settings (high pressure, low pressure, high temperature).
- After setting all values, press and hold the 'M' button for 3 seconds to save all changes and exit the setting mode.

Figure 8: Customizing Settings. Follow the on-screen prompts and button presses.
7. Re-matching Sensors
If a sensor is not displaying data or needs to be replaced, you may need to re-match it to the monitor:
- First, restart the receiver (monitor).
- Identify which wheel is not receiving data. Remove the sensor from that tire.
- Adjust the display to match mode by pressing the right button 8 times.
- If you see two bars blinking, you are setting up data for that tire.
- Press the right button to select the tire you want to match until it switches to the tire that needs to be re-matched.
- Screw the sensor back onto the tire. The display should show data.
- Once the tire pressure data is displayed, press and hold the 'M' button in the middle to save the data.
- After completing these steps, the data should be refreshed, and the receiver should be in normal pairing state.
- If there is still no display, unscrew the receiver again, wait for about 10 seconds, and then repeat steps 1-5.
8. Maintenance
8.1 Cleaning
Wipe the monitor and sensors with a soft, dry cloth. Do not use abrasive cleaners or solvents.
8.2 Sensor Battery
The external sensors use replaceable button cell batteries (e.g., CR1632). The battery life of sensors can last up to 2 years. When a sensor battery is low, the monitor will display a low battery warning. Use the provided screwdriver to open the sensor, replace the battery, and then re-install the sensor.
8.3 Monitor Charging
Ensure the monitor's solar panel is exposed to sunlight for continuous charging. If the monitor's battery is low, connect it to a USB power source using the provided Type-C cable.
9. Troubleshooting
| Problem | Possible Cause | Solution |
|---|---|---|
| Monitor does not turn on. | Low battery; no vibration detected. | Charge the monitor via USB-C. Ensure the vehicle is moving or gently shake the monitor to activate. |
| No tire data displayed. | Sensor not installed correctly; sensor battery low; sensor not paired. | Check sensor installation. Replace sensor battery. Refer to Section 7 for re-matching sensors. |
| Inaccurate pressure/temperature readings. | Sensor not fully tightened; external interference. | Ensure sensors are tightly secured. Re-match sensors if necessary. |
| Alarm sounds frequently. | Tire pressure/temperature outside set limits. | Check tire pressure/temperature. Adjust alarm thresholds if needed (Section 6). Address actual tire issues. |
10. Specifications

Figure 9: Product Specifications. Visual representation of monitor and sensor details.
- Brand: LETOURWM
- Model Number: 4- Sensors
- Monitor Dimensions: Approximately 95mm (L) x 85mm (W) x 20mm (H) (based on image)
- Sensor Type: External
- Sensor Battery Life: Up to 2 years (replaceable)
- Charging: Solar / USB Type-C
- Waterproof Rating: IP68 (sensors)
- Weight: Approximately 6.7 ounces (total item weight)
11. Safety Information
- Always ensure tire pressure is checked regularly with a reliable gauge, even with a TPMS installed.
- Do not attempt to install or remove sensors while driving.
- If an alarm sounds, safely pull over and inspect your tires.
- Keep small parts (sensors, nuts, batteries) away from children to prevent choking hazards.
- Dispose of old batteries according to local regulations.
12. Warranty and Support
For warranty information or technical support, please contact LETOURWM customer service through the retailer where the product was purchased. Please have your product model number and purchase date available when contacting support.


