1. Introduction
The eOUTIL 5-in-1 Stud Finder Wall Scanner is designed to assist users in accurately locating studs, wood framing, metal pipes, live AC wires, rebar, and support beams concealed behind various wall, floor, and ceiling materials. This device utilizes advanced sensor technology and a clear LCD display with audio alerts to enhance detection precision for DIY projects and professional tasks.
Key detection capabilities include:
- Wood Studs: Detects centers and edges of wood framing.
- Metal Objects: Locates metal studs, pipes, and rebar.
- Live AC Wires: Identifies active electrical wiring to prevent accidental damage.

Image 1: The eOUTIL stud finder detecting various hidden elements within a wall structure.
2. Safety Information
Always exercise caution when using any wall scanning device. Adhere to the following safety guidelines:
- Before drilling, cutting, or performing any invasive work, always confirm readings from multiple scans and methods.
- Be especially careful when detecting live AC wires. If live wires are indicated, turn off power to the area at the circuit breaker before proceeding.
- Do not rely solely on the device for critical safety decisions. Consult with a qualified professional if unsure about any findings.
- Keep the device dry and clean. Do not expose it to extreme temperatures or moisture.

Image 2: The stud finder indicating the presence of a live AC wire, highlighting the importance of caution.
3. Product Components
Familiarize yourself with the main components of your eOUTIL Stud Finder:
- LCD Display: Backlit screen showing mode, detection indicators, and battery level.
- ON/OFF Button: Powers the device on and off.
- MODE Button: Cycles through different scanning modes (1/2", 1", 1.5", Metal, AC).
- Scan Button (Side): Activates the scanning function when pressed against a surface.
- Marking Point: Top-center indicator for precise marking.
- AC Wire Warning Indicator: Visual alert for live electrical wires.
- Low Battery Indication: Icon on display indicating low battery power.

Image 3: Detailed diagram illustrating the various parts and indicators of the stud finder.
4. Setup
4.1 Battery Installation
The eOUTIL Stud Finder requires one 9V battery (included). To install or replace the battery:
- Locate the battery compartment cover on the back of the device.
- Use a small screwdriver (often included) to unscrew the cover.
- Insert a new 9V battery, ensuring correct polarity (+/-).
- Replace the cover and secure it with the screw.
4.2 Powering On/Off
Press the ON/OFF button once to power on the device. The LCD display will illuminate. To power off, press and hold the ON/OFF button until the display turns off.
5. Operating Instructions
5.1 Selecting a Mode
Press the MODE button to cycle through the available scanning modes. The selected mode will be indicated on the LCD display.
- Stud Scan (1/2", 1", 1.5"): For detecting wood studs at different depths.
- Metal Scan: For locating metal objects such as pipes, rebar, or metal studs.
- AC Scan: For identifying live unshielded AC electrical wires.
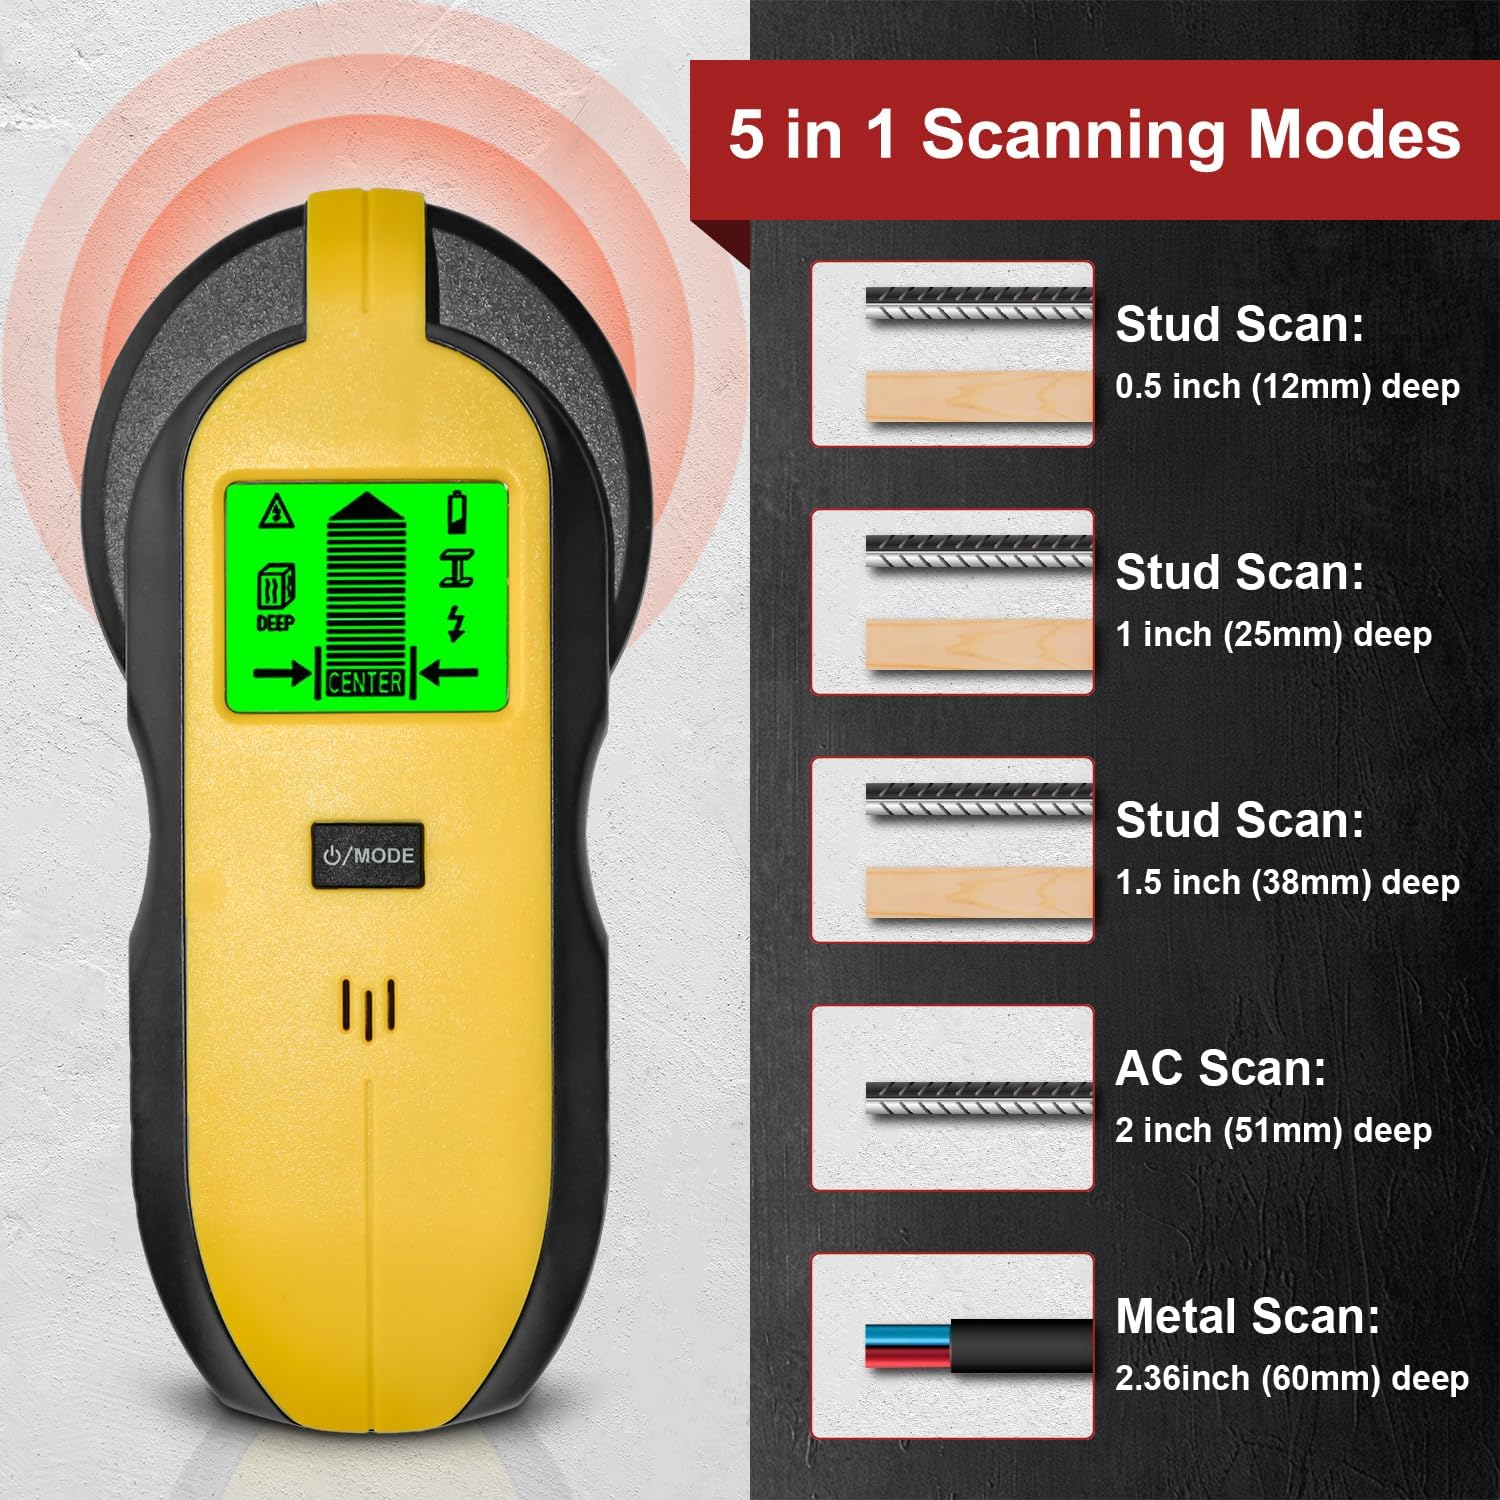
Image 4: Visual representation of the 5-in-1 scanning modes and their respective detection depths.
5.2 Calibration
Before each scan, the device must be calibrated. Place the stud finder flat against the wall in an area where you are certain there are no studs or wires. Press and hold the side Scan Button. The device will calibrate itself, and the display will indicate when it's ready to scan.
5.3 Scanning Procedure
While continuously holding the side Scan Button, slowly slide the device horizontally across the surface. Maintain firm contact with the wall. The LCD display will show indicators as it approaches and passes over a detected object.

Image 5: Demonstrating the scanning process, highlighting the digital LCD display and audio alerts for precise stud location.
5.4 Interpreting Readings
- Stud/Metal Detection: The display will show bars increasing in height as the device approaches a stud or metal object. An arrow will indicate the direction to the center. When the center is located, the display will show "CENTER" and an audible beep will sound.
- AC Wire Detection: In AC scan mode, or if AC wires are detected in other modes, a lightning bolt icon will appear on the display, accompanied by an audible alert.
Video 1: Demonstration of the eOUTIL 5-in-1 Stud Finder's multi-functional scanning capabilities and how to interpret its display for various detections.
6. Maintenance
- Keep the device clean by wiping it with a dry, soft cloth. Do not use abrasive cleaners or solvents.
- Store the device in a cool, dry place when not in use.
- Remove the battery if the device will not be used for an extended period to prevent leakage.
7. Troubleshooting
- Inaccurate Readings: Ensure the device is properly calibrated before each scan. Avoid scanning over wet paint or wallpaper, which can affect accuracy.
- No Detection: Check battery level. Ensure firm contact with the wall during scanning. Try different modes for varying depths or materials.
- Constant Beeping/Alerts: This may indicate the presence of live AC wires or a large metal object. Recalibrate in a different area or switch to AC/Metal scan mode to confirm.
8. Specifications
| Brand | eOUTIL |
| Model Number | TH250 |
| Dimensions | 1.69 x 3.5 x 6.69 inches |
| Item Weight | 7 ounces (0.2 Kilograms) |
| Power Source | Battery Powered (1x 9V battery) |
| Material | Plastic |
| Recommended Uses | Concrete Rebar Detection, Metal Detection, Stud Detection, AC Wire Detection |
9. Warranty and Support
For warranty information or technical support, please refer to the product packaging or contact eOUTIL customer service directly. Keep your purchase receipt as proof of purchase.