
1. Introduction
Thank you for choosing the AULA F99 Pro Wireless Mechanical Keyboard. This manual provides essential information for setting up, operating, and maintaining your keyboard. Please read it thoroughly to ensure optimal performance and longevity of your device.

Image: The AULA F99 Pro Wireless Mechanical Keyboard, showcasing its full layout and vibrant RGB backlighting.
2. Package Contents
Verify that all items are present in your package:
- AULA F99 Pro Wireless Mechanical Keyboard
- Keycap/Switches Puller x1
- USB Cable (Type-C)
- Dust Cover x1
- Extra Replacement Switches x 2
- User Manual (this document)
3. Key Features
The AULA F99 Pro keyboard is designed with advanced features for enhanced user experience:

Image: A visual summary of the AULA F99 Pro's main features.
3.1 Multi-Device Connectivity
Supports three connection modes: Bluetooth 5.0, 2.4GHz wireless, and USB Type-C wired. Easily switch between up to five connected devices (PC, laptop, tablet, gaming console, mobile phone) using FN + key combinations and the side button.
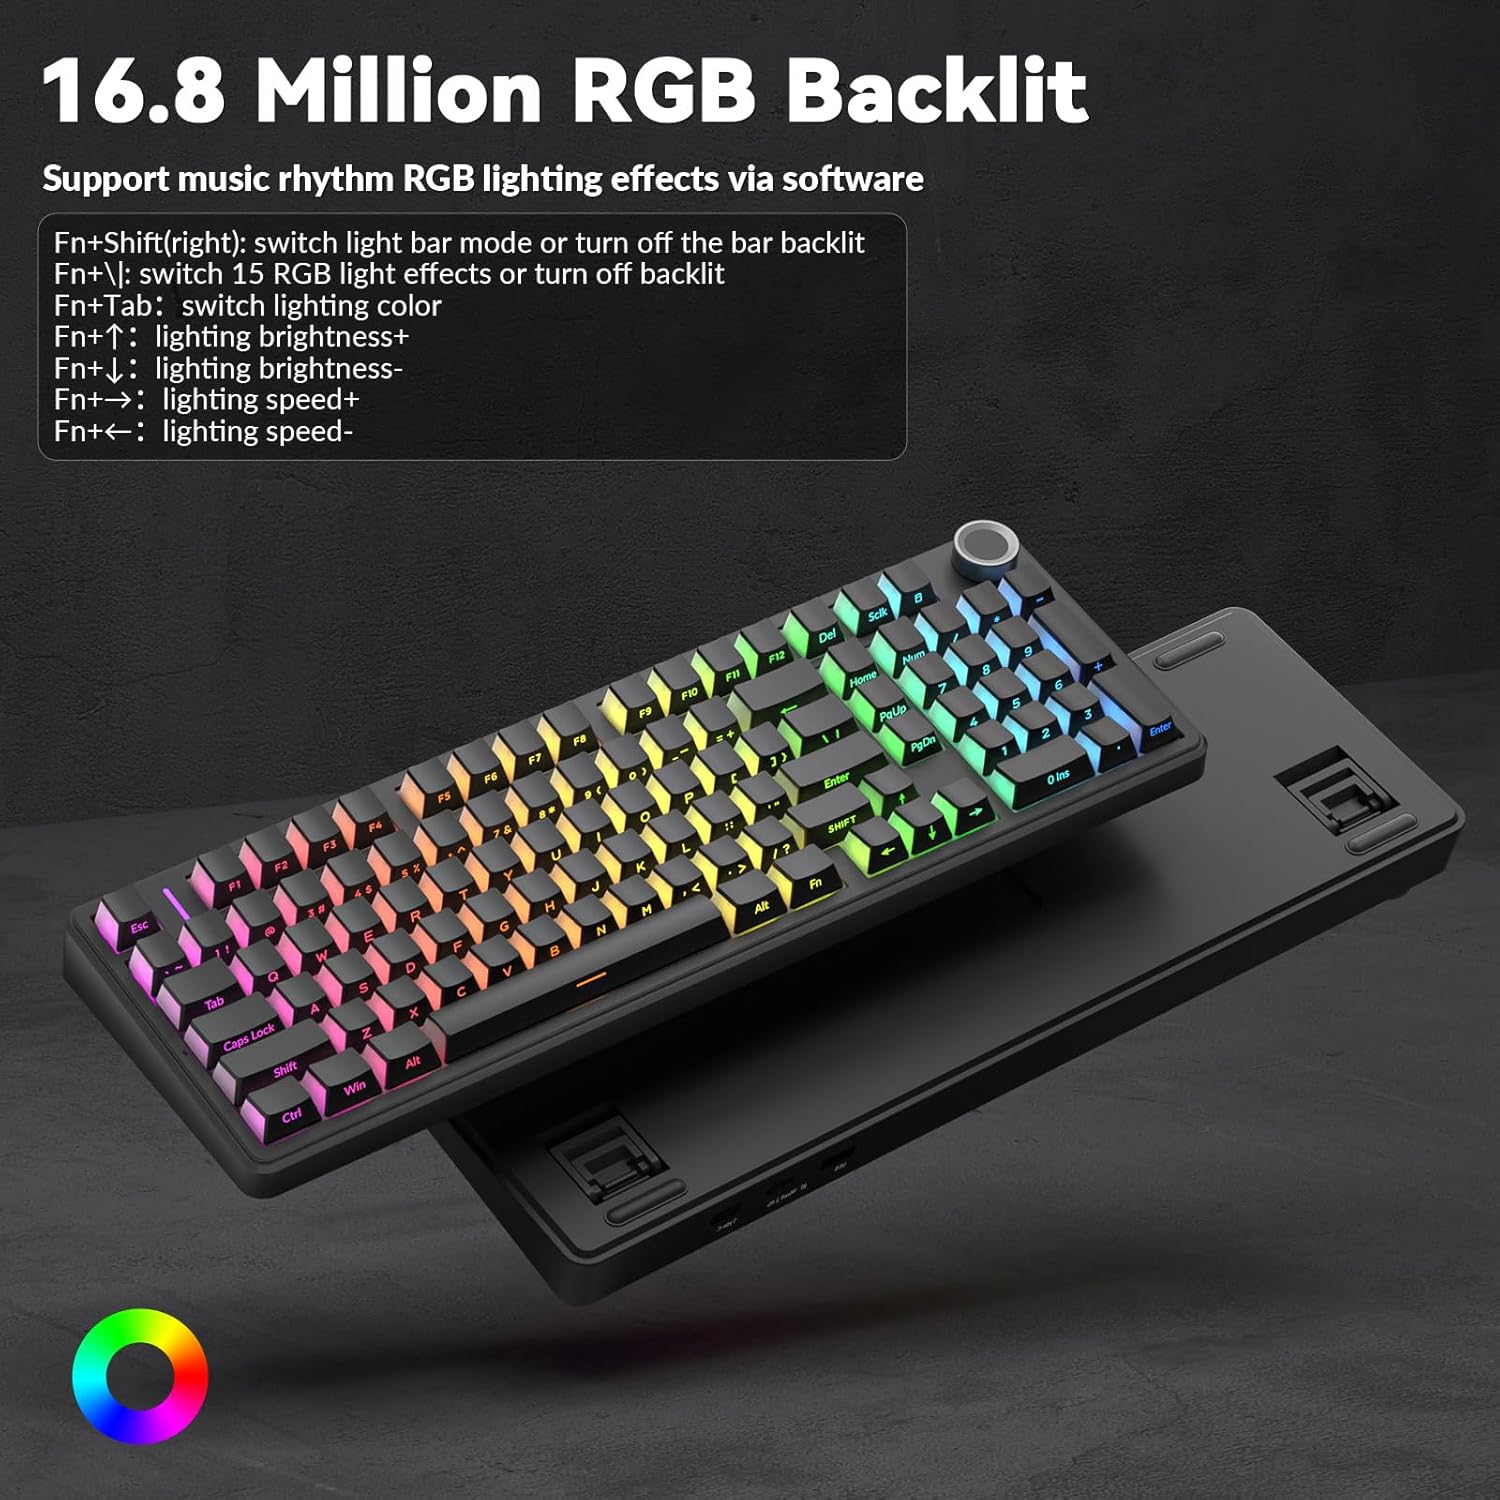
Image: Illustration of the keyboard's versatile triple-mode connectivity.
3.2 Hot-Swappable Design
The PCB supports 3-pin and 5-pin switches, allowing for easy replacement of switches without soldering. Keycaps are also replaceable. This feature enables customization of typing feel and sound.

Image: Close-up of the hot-swappable sockets, silent switches, and PBT keycaps.
3.3 Gasket Structure & Silent Operation
Features an advanced gasket-mounted design with an integrated silicone pad and PCB single key slotting. This structure, combined with five layers of sound-dampening materials (PORON cotton, IXPE shaft underpad, PET voice actor pad, PORON base cotton, silicone base pad), optimizes resilience, stability, and reduces cavity noise for a soft, elastic, and quiet typing experience.
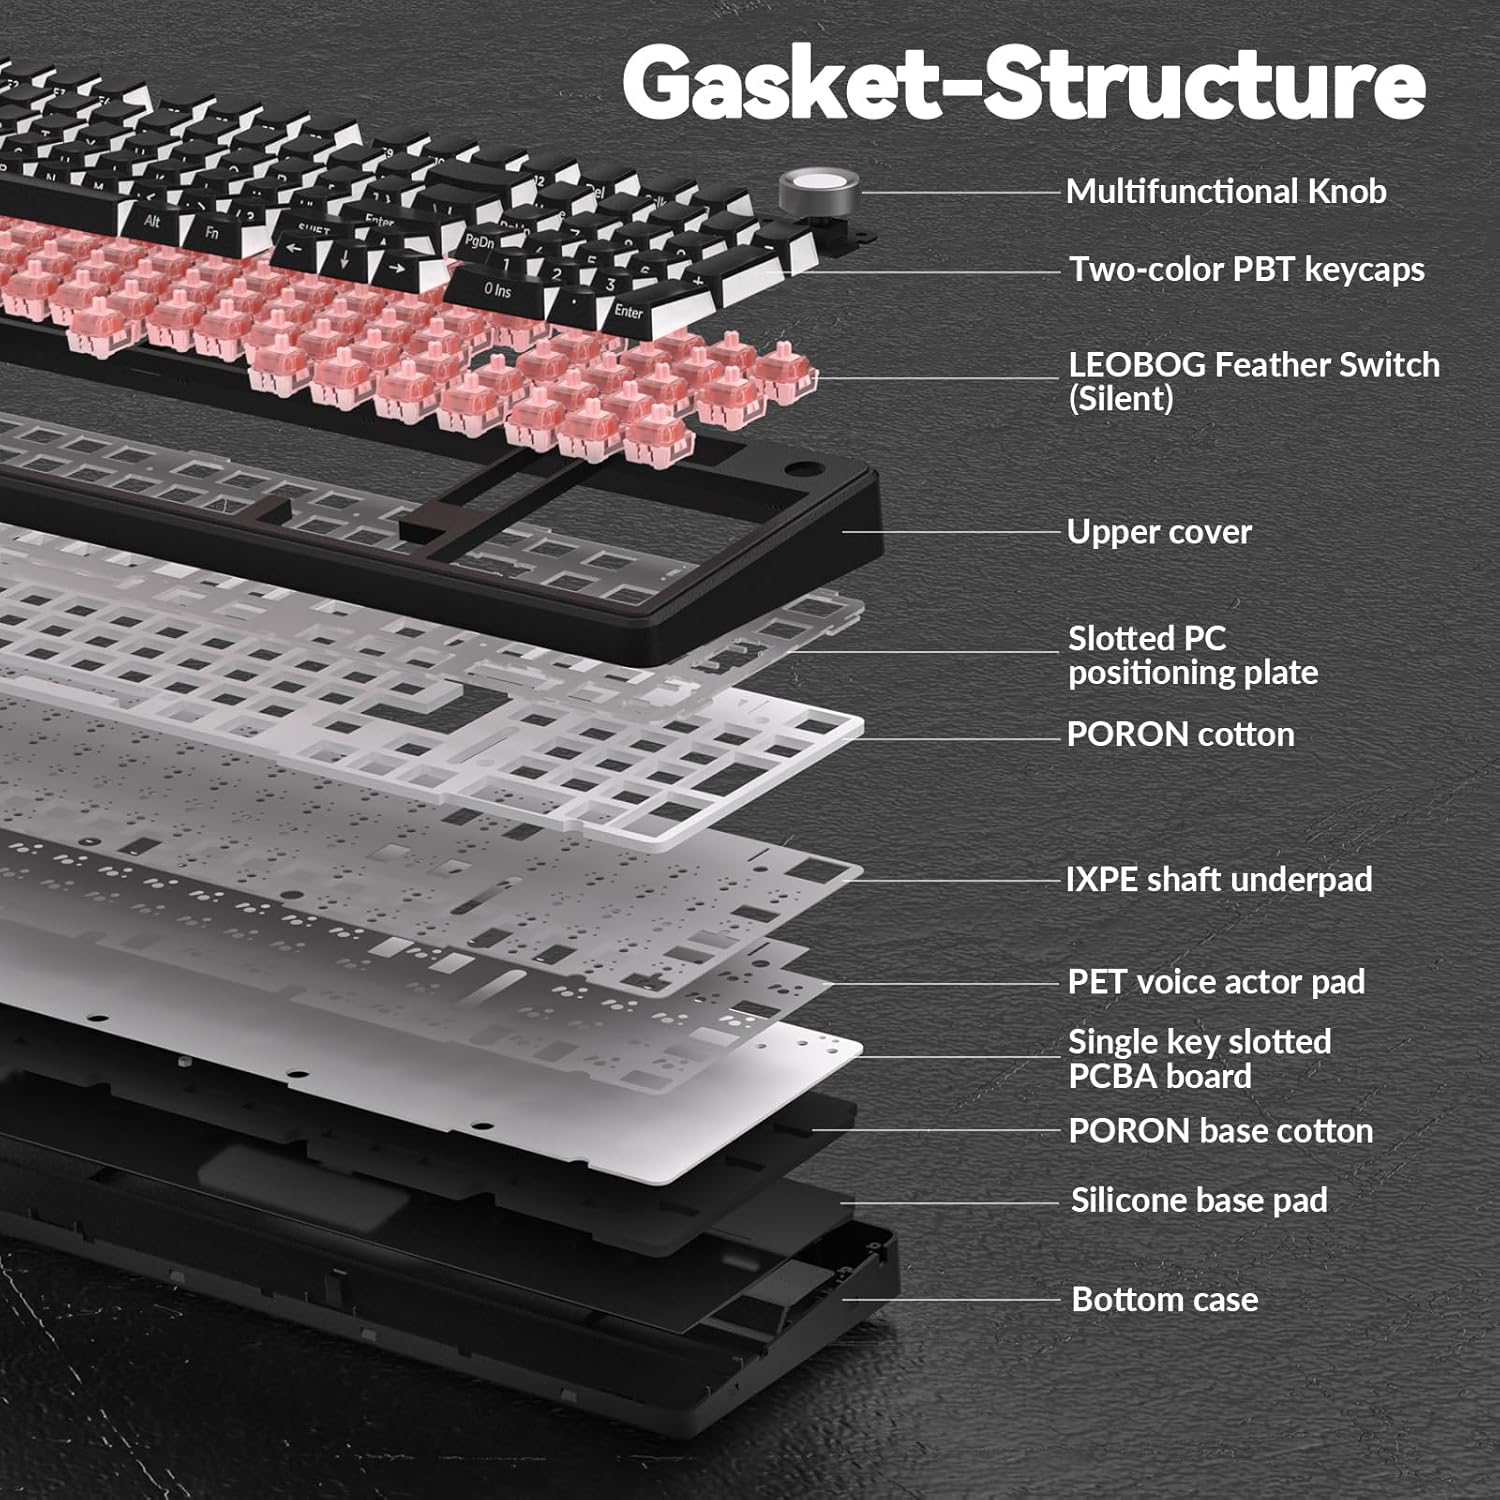
Image: Exploded diagram showing the internal gasket structure and sound-dampening layers.
3.4 RGB Backlighting & Customization
Offers 16 RGB lighting effects and supports 16.8 million colors. Lighting effects can be customized via driver software, which also allows for macro recording, editing, and custom shortcut keys. Features cool music rhythm lighting effects.

Image: Keyboard with RGB backlighting and key combinations for lighting control.
3.5 Multi-Function Control Knob
A dedicated knob allows switching between backlit mode and multimedia mode. In backlit mode, rotate to adjust brightness and click to switch lighting effects. In multimedia mode, rotate to adjust volume and click to play/pause. Long press the knob for approximately 5 seconds to switch modes.

Image: Detailed explanation of the control knob's functions.
3.6 High-Capacity Battery
Equipped with an 8000mAh battery for extended wireless use. Battery life is approximately 53 hours with backlighting on and up to 400 hours with backlighting off.

Image: Visual representation of the keyboard's 8000mAh battery capacity.
4. Setup
4.1 Charging the Keyboard
Before first use, fully charge the keyboard using the provided USB Type-C cable. Connect the cable to the keyboard's Type-C port and a power source (e.g., computer USB port, USB wall adapter). The charging indicator will show status.
4.2 Connection Modes
The AULA F99 Pro supports three connection methods:
- USB Wired Mode: Connect the keyboard directly to your device using the USB Type-C cable. The keyboard will be recognized automatically.
- 2.4GHz Wireless Mode:
- Locate the 2.4GHz USB receiver (usually stored in a compartment on the keyboard).
- Plug the receiver into an available USB port on your computer.
- Switch the keyboard to 2.4GHz mode (refer to keyboard's physical switch or FN key combination). The keyboard should connect automatically.
- Bluetooth 5.0 Mode:
- Switch the keyboard to Bluetooth mode (refer to keyboard's physical switch or FN key combination).
- On your device (PC, tablet, phone), enable Bluetooth and search for new devices.
- Select "AULA F99 Pro" from the list of available devices to pair.
- The keyboard can store up to three Bluetooth profiles. Use FN + 1/2/3 to switch between paired Bluetooth devices.
5. Operation
5.1 Multi-Function Knob Usage
The knob has two primary modes:
- Lighting Control Mode:
- Rotate the knob to adjust backlight brightness.
- Click the knob to cycle through different lighting effects.
- Multimedia Mode:
- Rotate the knob to adjust system volume.
- Click the knob to play or pause media.
To switch between Lighting Control Mode and Multimedia Mode, press and hold the knob for approximately 5 seconds.
5.2 RGB Backlight Control (FN Key Combinations)
In addition to the knob, use the following FN key combinations for lighting control:
- FN + Right Shift: Switch light bar mode or turn off the light bar backlight.
- FN + \: Switch between 15 RGB light effects or turn off the main backlight.
- FN + Tab: Switch lighting color.
- FN + Up Arrow: Increase lighting brightness.
- FN + Down Arrow: Decrease lighting brightness.
- FN + Right Arrow: Increase lighting speed.
- FN + Left Arrow: Decrease lighting speed.
5.3 Macro Customization & Driver Software
For advanced customization, including macro recording, editing, custom key functions, and 16.8 million light colors, download the official AULA driver software. The driver is available at bit.ly/m/AULA. Please note that the driver currently supports Windows systems and functions only in wired mode.

Image: Driver software interface for macro and RGB customization.
6. Maintenance
6.1 Cleaning the Keyboard
To clean your keyboard, first disconnect it from all power sources. Use a soft, lint-free cloth slightly dampened with water or a mild cleaning solution. For dust and debris between keycaps, use compressed air or a small brush. Avoid harsh chemicals or abrasive materials.
6.2 Replacing Keycaps and Switches
The AULA F99 Pro is hot-swappable, allowing for easy replacement of keycaps and switches. Use the included keycap/switch puller tool:
- Keycap Removal: Gently attach the keycap puller to the sides of the keycap and pull upwards evenly.
- Switch Removal: Use the switch puller to grip the top and bottom clips of the switch. Apply gentle pressure and pull the switch straight up.
- Installation: Align the new switch's pins with the PCB sockets and press down firmly until it clicks into place. Ensure pins are not bent. Place the new keycap onto the switch stem and press down.
7. Specifications
| Feature | Detail |
|---|---|
| Model Number | F99 Pro |
| Connectivity Technology | 2.4GHz Wireless, BT5.0, USB Wired (Type-C) |
| Keyboard Description | Mechanical |
| Special Features | Backlit, Hot-Swappable, Programmable Keys, Rechargeable, Silent |
| Backlighting | RGB (16.8 Million Colors) |
| Battery Capacity | 8000mAh |
| Estimated Battery Life | ~53 hours (backlight ON), ~400 hours (backlight OFF) |
| Keycap Material | PBT (Side-printed) |
| Switch Type | Pre-lubed Linear Switches (LEOBOG Feather Switch) |
| Compatible Devices | Gaming Console, Laptop, PC, Smartphone, Tablet |
| Item Weight | 3.39 pounds |
| Package Dimensions | 17.04 x 6.77 x 2.05 inches |
8. Troubleshooting
8.1 Keyboard Not Responding
- Ensure the keyboard is charged. Connect it via USB-C cable to check if it powers on.
- Verify the connection mode switch (wired, 2.4GHz, Bluetooth) is set correctly.
- For 2.4GHz, ensure the USB receiver is securely plugged in and the keyboard is in 2.4GHz mode.
- For Bluetooth, ensure Bluetooth is enabled on your device and the keyboard is paired. Try re-pairing if necessary.
- Try connecting the keyboard to a different USB port or computer to rule out port/device issues.
8.2 RGB Backlight Not Working/Incorrect
- Check brightness settings using the control knob or FN + Up/Down Arrow keys.
- Cycle through lighting effects using the control knob or FN + \ key.
- Ensure the keyboard is sufficiently charged, as low battery can affect lighting.
- If using driver software, ensure it is running and settings are applied correctly.
8.3 Connectivity Issues (Lag/Disconnections)
- Ensure the keyboard is within range of the receiver/Bluetooth device.
- Minimize interference from other wireless devices (e.g., Wi-Fi routers, other 2.4GHz devices).
- Ensure the keyboard battery is not low.
- For 2.4GHz, try plugging the receiver into a different USB port, preferably a USB 2.0 port if available.
- For Bluetooth, try removing and re-pairing the device.
9. Warranty & Support
AULA products are manufactured to high quality standards. For specific warranty information, please refer to the warranty card included with your product or contact AULA customer support. Keep your purchase receipt as proof of purchase.
For technical assistance or further inquiries, please visit the official AULA website or contact their customer service channels.


