1. Important Safety Instructions
When using electrical appliances, basic safety precautions should always be followed, including the following:
- Read all instructions before operating the appliance.
- Do not touch hot surfaces. Use handles or knobs.
- To protect against electrical hazards, do not immerse cord, plugs, or appliance in water or other liquid.
- Close supervision is necessary when any appliance is used by or near children.
- Unplug from outlet when not in use and before cleaning. Allow to cool before putting on or taking off parts, and before cleaning the appliance.
- Do not operate any appliance with a damaged cord or plug or after the appliance malfunctions or has been damaged in any manner.
- The use of accessory attachments not recommended by the appliance manufacturer may cause injuries.
- Do not use outdoors.
- Do not let cord hang over edge of table or counter, or touch hot surfaces.
- Do not place on or near a hot gas or electric burner, or in a heated oven.
- Extreme caution must be used when moving an appliance containing hot oil or other hot liquids.
- Always attach plug to appliance first, then plug cord into the wall outlet. To disconnect, turn any control to "off", then remove plug from wall outlet.
- Do not use appliance for other than intended household use.
- This appliance is not intended for use by persons (including children) with reduced physical, sensory or mental capabilities, or lack of experience and knowledge, unless they have been given supervision or instruction concerning use of the appliance by a person responsible for their safety.
- Children should be supervised to ensure that they do not play with the appliance.
SAVE THESE INSTRUCTIONS.
2. Product Overview
The SUNVIVI Panini Press Sandwich Maker (Model ZWF009) is a versatile 3-in-1 electric appliance designed for making delicious sandwiches, quesadillas, burgers, and more. It features non-stick plates for easy cleaning and a 1000W heating system for fast and even cooking.
Key Features:
- 3-in-1 Design: Functions as a panini press, contact grill, and opens flat 180° for a double-sided grill.
- Fast and Even Heating: 1000W power ensures quick preheating (approx. 3 minutes) and consistent cooking.
- Non-Stick Cooking Plates: High-quality non-stick coating prevents food from sticking and simplifies cleanup.
- LED Indicator Light: Provides clear feedback on preheating status.
- Compact Storage: Designed for vertical storage to save counter space.
- Heat-Resistant Handle: Ensures safe operation.
Product Components:
- Upper Grill Plate
- Lower Grill Plate
- Heat-Resistant Handle
- Locking Latch / 180° Release Button
- Power/Ready Indicator Light
- Power Cord

Figure 2.1: Front view of the SUNVIVI Panini Press Sandwich Maker with the lid open.

Figure 2.2: The 3-in-1 design of the panini press, illustrating its use as a panini press, contact grill, and 180° open-faced grill.

Figure 2.3: Illustration of the 1000W fast heating system, showing heat distribution across both plates.
3. Setup and First Use
Unpacking:
- Carefully remove the panini press and all packaging materials.
- Remove any stickers or labels from the appliance.
- Wipe the cooking plates with a damp cloth or sponge and dry thoroughly.
- Wipe the exterior of the appliance with a soft, damp cloth. Do not immerse the appliance in water.
Placement:
- Place the panini press on a stable, heat-resistant, and dry surface.
- Ensure there is adequate space around the appliance for ventilation.
- Keep the appliance away from flammable materials.
Initial Use (Seasoning):
Before first use, it is recommended to season the non-stick plates:
- Plug the appliance into a standard 110V electrical outlet. The red indicator light will illuminate, signaling that the unit is preheating.
- Once the red indicator light turns off (approximately 3 minutes), the appliance has reached its operating temperature.
- Carefully wipe a small amount of cooking oil onto the cooking plates using a paper towel.
- Unplug the appliance and allow it to cool completely.
- Wipe off any excess oil. The appliance is now ready for use.
4. Operating Instructions
Preheating:
- Ensure the appliance is closed and plugged into a 110V outlet.
- The red indicator light will turn on, indicating preheating.
- Wait for the red indicator light to turn off (approx. 3 minutes) before placing food on the plates. This indicates the optimal cooking temperature has been reached.

Figure 4.1: Close-up of the indicator light and ergonomic anti-scald handle. The red light indicates preheating.
Using as a Panini Press / Contact Grill:
- Preheat the appliance as described above.
- Carefully open the lid using the heat-resistant handle.
- Place your sandwich, quesadilla, or other food item onto the lower cooking plate. Do not overfill.
- Gently close the lid, allowing the top plate to rest on the food. The floating hinge design accommodates various food thicknesses.
- Cook for 3-8 minutes, or until desired crispness and internal temperature are reached. Cooking times may vary based on food type and thickness.
- Once cooking is complete, carefully open the lid and remove the food using a heat-resistant spatula (do not use metal utensils that could scratch the non-stick coating).
- Unplug the appliance when finished.
Using as a 180° Open-Faced Grill:
This mode is ideal for grilling larger items like steaks, bacon, vegetables, or multiple items simultaneously.
- Preheat the appliance as described above.
- Locate the red release button on the side of the appliance (see Figure 4.2).
- Press and hold the red release button while gently pushing the upper plate back until it lies flat, creating a double-sided grilling surface.
- Carefully place food items onto both cooking plates.
- Cook until desired doneness, flipping food as needed.
- To return to panini press mode, lift the upper plate and gently push it forward until it locks into place.
- Unplug the appliance when finished.

Figure 4.2: Instructions for opening the grill flat to 180 degrees by pressing the red release button.
Video 4.1: Official product video demonstrating the features and operation of the Sunvivi Panini Press Sandwich Maker, including its 3-in-1 functionality and ease of use.
5. Cleaning and Maintenance
Proper cleaning and maintenance will extend the life of your appliance.
Cleaning the Cooking Plates:
- Always unplug the appliance and allow it to cool completely before cleaning.
- Wipe the non-stick cooking plates with a soft, damp cloth or sponge. For stubborn residue, use a small amount of mild dish soap.
- Do not use abrasive cleaners, scouring pads, or metal utensils, as these can damage the non-stick coating.
- Ensure the plates are completely dry before storing.

Figure 5.1: Demonstrates how to easily clean the non-stick cooking plates with a soft cloth after use.
Cleaning the Exterior:
- Wipe the exterior surfaces with a soft, damp cloth.
- Do not use abrasive cleaners or immerse the appliance in water.
Storage:
- Ensure the appliance is clean and completely dry before storing.
- The panini press can be stored vertically to save space. Use the locking latch to keep the plates securely closed during storage.
- Store in a cool, dry place.
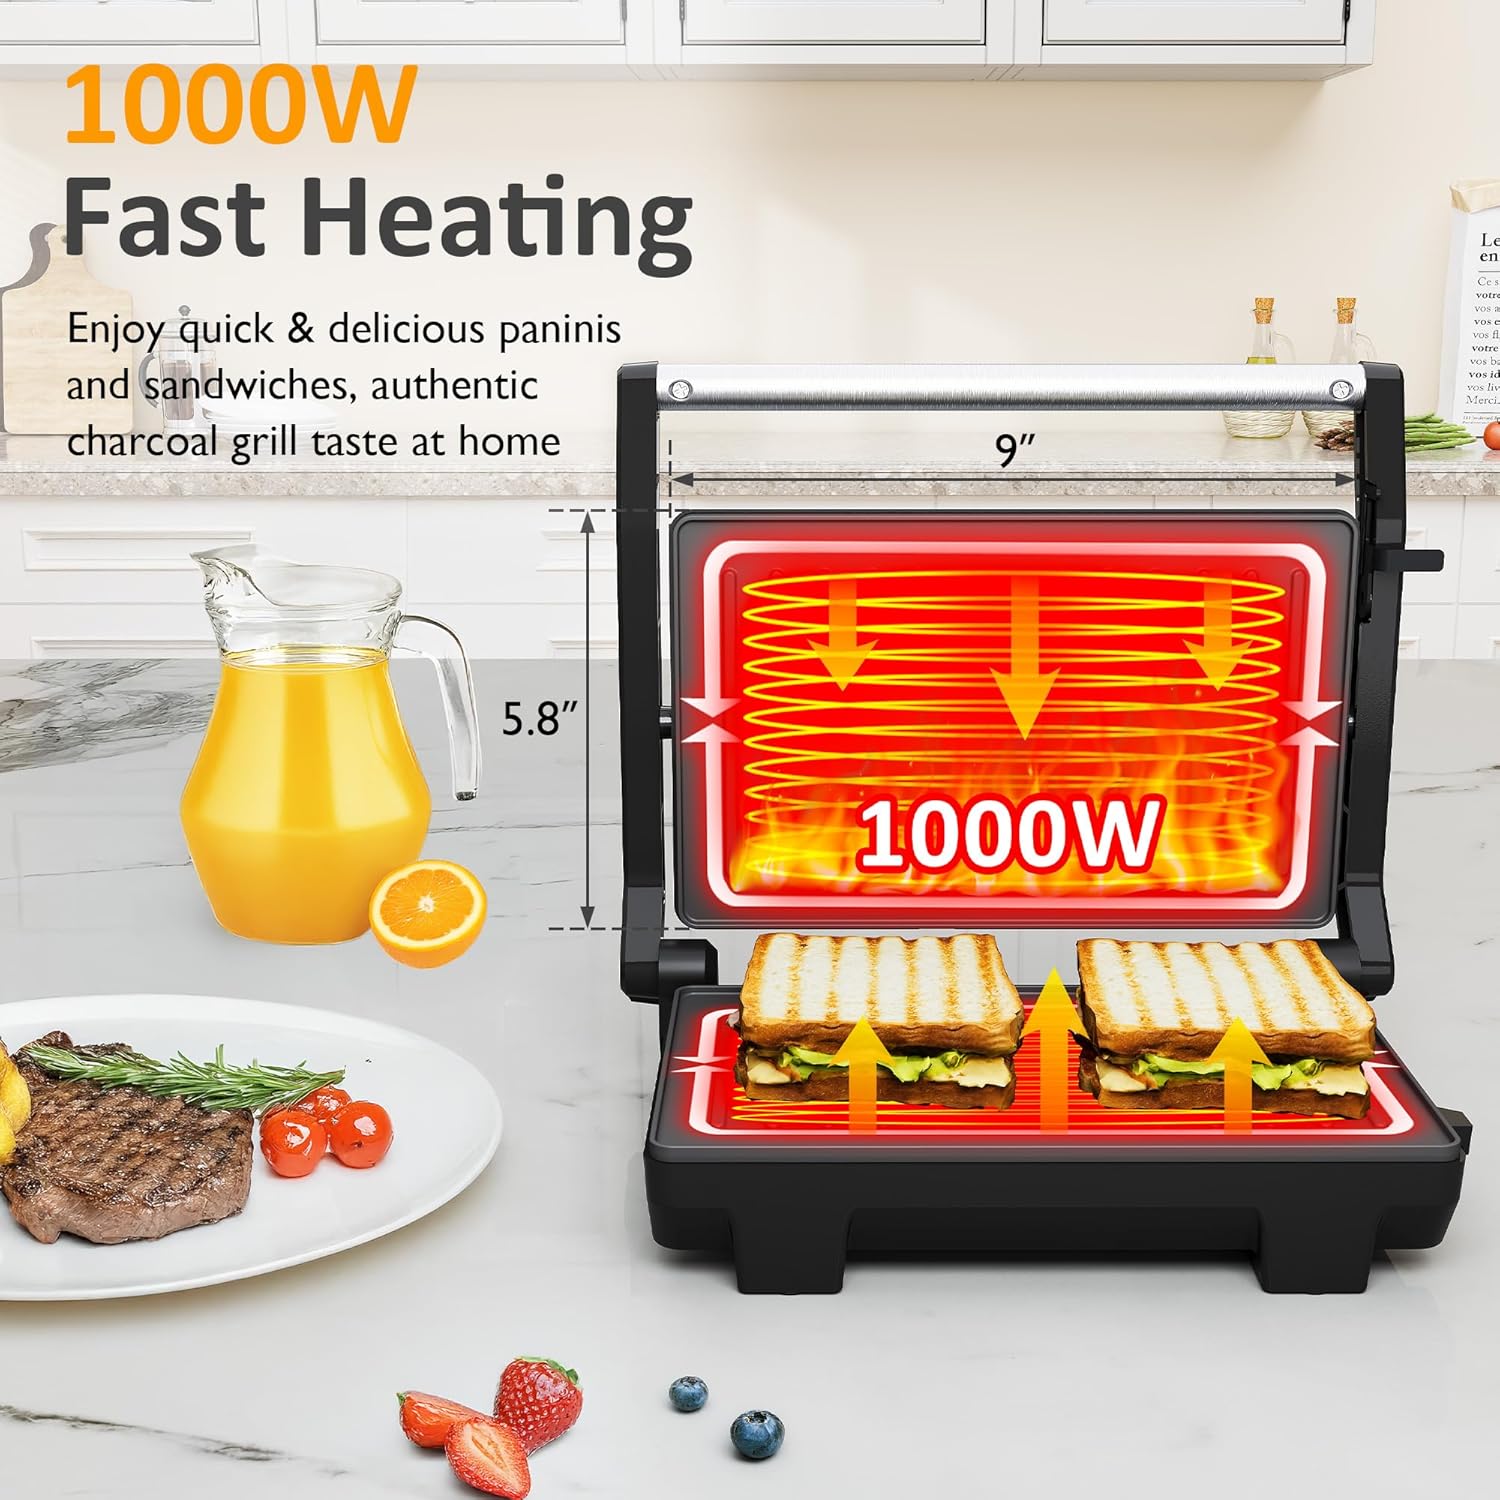
Figure 5.2: The compact design allows for convenient vertical storage, saving counter or cabinet space.
6. Troubleshooting
If you encounter any issues with your panini press, please refer to the table below:
| Problem | Possible Cause | Solution |
|---|---|---|
| Appliance does not turn on. | Not plugged in or power outlet issue. | Ensure the power cord is securely plugged into a working 110V outlet. Check the circuit breaker. |
| Food sticks to the plates. | Plates not properly seasoned or food not prepared correctly. | Ensure plates are seasoned before first use. Lightly brush plates with cooking oil before each use. Do not use metal utensils. |
| Food is not cooking evenly. | Appliance not fully preheated or food thickness is uneven. | Wait for the red indicator light to turn off before placing food. Ensure food is evenly distributed and not too thick. |
| Smoke or unusual odor during use. | Excess oil/food residue or initial burn-off. | A small amount of smoke/odor is normal during first use. If excessive, unplug immediately, allow to cool, and clean thoroughly. Ensure no food debris is left on plates. |
If the problem persists after trying these solutions, please contact customer support.
7. Product Specifications
| Feature | Detail |
|---|---|
| Brand | SUNVIVI |
| Model Number | ZWF009 |
| Power | 1000 Watts |
| Voltage | 110 Volts |
| Material | Metal (with non-stick coating) |
| Color | Black |
| Product Dimensions | 8.86"D x 10.47"W x 3.66"H |
| Item Weight | 2.64 Pounds |
| Special Feature | Temperature Control (Automatic) |
| Certifications | UL/ETL Certified |
8. Warranty and Customer Support
Warranty Information:
This SUNVIVI Panini Press Sandwich Maker (Model ZWF009) comes with a 1-year warranty from the date of purchase. This warranty covers defects in materials and workmanship under normal household use. It does not cover damage resulting from misuse, accident, alteration, neglect, commercial use, or unauthorized repair.
Please retain your proof of purchase for warranty claims.
Customer Support:
For any questions, concerns, or warranty claims, please contact SUNVIVI customer support. Our team is dedicated to providing responsive after-sales service.
- Online Support: Visit the official SUNVIVI website or the retailer's support page where you purchased the product.
- Email: Refer to your product packaging or the official SUNVIVI website for the most current contact email address.
Please have your model number (ZWF009) and proof of purchase ready when contacting support.


