1. Introduction
This manual provides detailed instructions for the safe and effective operation, maintenance, and troubleshooting of your KOPUO R66 Car Jump Starter with integrated 150 PSI Air Compressor. This device is designed to provide emergency jump-starting for vehicles and inflate tires, ensuring you are prepared for roadside situations.
2. Safety Information
WARNING: Read all safety warnings and instructions before using this product. Failure to follow the warnings and instructions may result in electric shock, fire, and/or serious injury.
- Keep out of reach of children.
- Do not operate the unit if it is damaged.
- Ensure proper ventilation during use.
- Do not expose the unit to rain or wet conditions.
- Avoid short-circuiting the jump starter terminals.
- Always connect the positive (+) clamp to the positive (+) terminal and the negative (-) clamp to the negative (-) terminal or vehicle chassis.
- Disconnect the clamps in reverse order after jump-starting.
- Do not use the air compressor continuously for more than 10 minutes to prevent overheating. Allow it to cool down for 15 minutes before resuming use.
- Wear eye protection when operating the unit.
- Store the unit in a cool, dry place.

Figure 2.1: Smart Clamps Protection. This image illustrates the various safety protections integrated into the smart jumper clamps, including over-charge, low voltage, reverse polarity, high-temperature, short circuit, low-temperature, over-load, over-discharge, and spark-proof protection.
3. Package Contents
Verify that all items are present in the package:
- KOPUO R66 Jump Starter Unit
- Smart Jumper Cables
- USB Type-C Charging Cable
- Air Hose
- Multiple Valve Adapters (e.g., for bicycle tires, balls, inflatables)
- Storage Case
- User Manual (this document)

Figure 3.1: What's in the Box. This image displays all components included with the KOPUO R66 unit: the jump starter, smart jumper cables, air hose, various valve adapters, USB-C charging cable, and a protective storage case.
4. Product Overview
Familiarize yourself with the components and controls of your KOPUO R66 unit.

Figure 4.1: KOPUO R66 Main Unit. This image shows the KOPUO R66 jump starter and air compressor unit, including the digital display, control buttons, air hose connection, and jumper cable port.
4.1. Controls and Indicators
- Digital Display: Shows battery level, air pressure (PSI, BAR, KPA), and operational status.
- Power Button: Turns the unit on/off, activates flashlight.
- Mode Button (M): Cycles through inflation modes or pressure units.
- Plus (+) / Minus (-) Buttons: Adjusts target air pressure.
- Start/Stop Button (S): Initiates or stops the air compressor.
- Jump Start Port: For connecting smart jumper cables.
- Air Hose Port: For connecting the air hose.
- USB Output Port: For charging external devices.
- USB-C Input Port: For charging the jump starter unit.
- LED Flashlight: Provides illumination.

Figure 4.2: Digital Display Interface. This image highlights the LED digital display, showing both the real-time pressure value and the preset target pressure, along with units (PSI, BAR, KPA) and battery status indicators.
5. Setup
5.1. Charging the Unit
Before first use, fully charge the KOPUO R66 unit. It is recommended to charge the unit every 3-6 months to maintain battery health.
- Connect the provided USB Type-C charging cable to the unit's USB-C input port.
- Connect the other end of the USB cable to a 5V/2A or higher USB wall adapter (not included).
- The digital display will show the charging status. The unit is fully charged when the battery indicator shows full.
6. Operating Instructions
6.1. Jump Starting a Vehicle
Ensure the jump starter is at least 50% charged before attempting to jump start a vehicle.
- Turn off the vehicle's ignition and all accessories.
- Connect the smart jumper cables to the jump start port on the KOPUO R66 unit. Ensure a secure connection.
- Connect the RED positive (+) clamp to the vehicle's positive (+) battery terminal.
- Connect the BLACK negative (-) clamp to the vehicle's negative (-) battery terminal or a solid, unpainted metal part of the engine block/chassis.
- Once connected, the smart cable indicator light will show its status (e.g., solid green for ready).
- Start the vehicle's engine. If it doesn't start immediately, wait 30 seconds and try again. Do not crank for more than 3 seconds per attempt.
- Once the vehicle starts, immediately disconnect the BLACK negative (-) clamp first, then the RED positive (+) clamp.
- Disconnect the smart jumper cables from the KOPUO R66 unit.
CAUTION: Do not touch the red and black clamps together once connected to the jump starter. Do not attempt to jump start a vehicle with a severely damaged or frozen battery.
6.2. Using the Air Compressor
The integrated air compressor can inflate tires and other inflatables up to 150 PSI.
- Connect the air hose to the air hose port on the KOPUO R66 unit.
- Attach the appropriate valve adapter to the air hose, if necessary, and then securely connect it to the item you wish to inflate (e.g., tire valve stem).
- Turn on the KOPUO R66 unit. The digital display will show the current pressure.
- Press the M (Mode) button to cycle through pressure units (PSI, BAR, KPA) or select a preset inflation mode (car, motorcycle, bicycle, ball).
- Use the + and - buttons to set your desired target pressure.
- Press the S (Start/Stop) button to begin inflation. The compressor will automatically stop once the preset pressure is reached.
- Disconnect the air hose from the item and the KOPUO R66 unit.

Figure 6.1: Rapid Inflation Feature. This image demonstrates the KOPUO R66's capability for rapid tire inflation, showing the unit connected to a car tire and highlighting features like 1-minute inflation time for 28-36 PSI (195/65R15 tire), 150 PSI maximum pressure, and a 22mm cylinder diameter.
6.3. Using the LED Flashlight
The KOPUO R66 includes a multi-mode LED flashlight for emergency illumination.
- To turn on/off: Long press the Power button.
- To cycle modes: Short press the Power button while the flashlight is on. Modes include:
- Solid On (Standard Flashlight)
- SOS Mode (Morse code for distress)
- Strobe Mode (Flashing light)
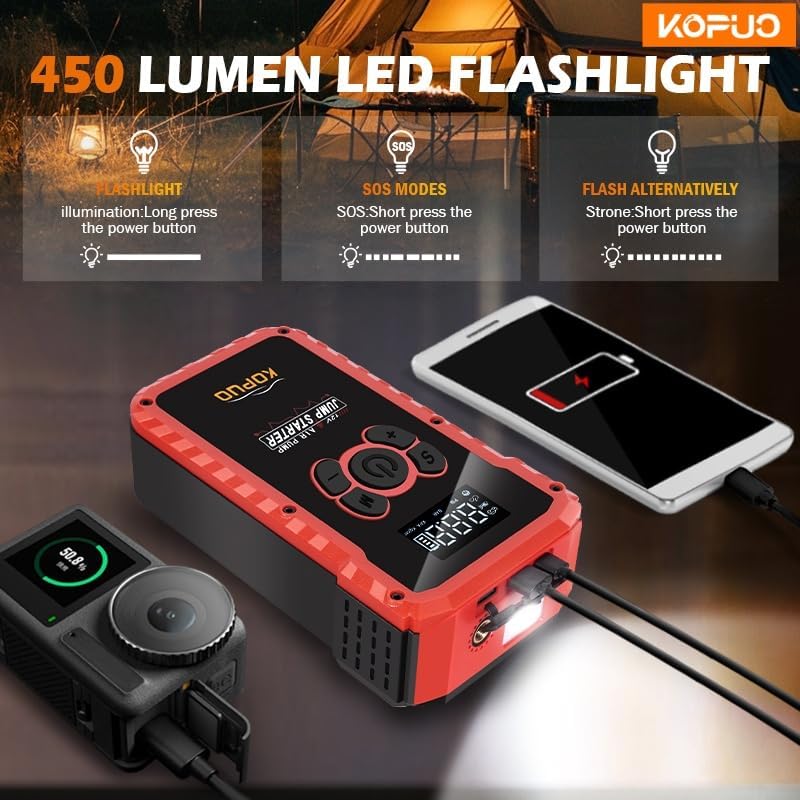
Figure 6.2: LED Flashlight Functionality. This image illustrates the 450 Lumen LED flashlight feature of the KOPUO R66, detailing its three modes: standard illumination (long press power button), SOS mode (short press power button), and flash alternatively (strobe mode, short press power button again).
6.4. Charging External Devices
The KOPUO R66 can act as a power bank to charge USB-powered devices.
- Connect your device's USB charging cable to the USB output port on the KOPUO R66 unit.
- The unit will automatically begin charging your device.
- Disconnect your device once charging is complete.
7. Maintenance
- Recharging: Recharge the unit after each use, especially after jump-starting, to ensure it's ready for the next emergency.
- Storage: Store the unit in its protective case in a cool, dry place, away from direct sunlight and extreme temperatures.
- Long-Term Storage: If storing for extended periods, charge the unit every 3-6 months to prevent deep discharge and prolong battery life.
- Cleaning: Wipe the unit with a soft, damp cloth. Do not use harsh chemicals or abrasive cleaners.
8. Troubleshooting
| Problem | Possible Cause | Solution |
|---|---|---|
| Vehicle does not start after jump-starting. |
|
|
| Air compressor does not turn on or stops prematurely. |
|
|
| Digital display is not working. |
|
|
9. Specifications
| Feature | Specification |
|---|---|
| Model | R66 |
| Peak Output Current | 20000 Amps |
| Starting Current | 5000 Amps |
| Engine Compatibility (Gas) | Up to 10.0 Liters |
| Engine Compatibility (Diesel) | Up to 8.0 Liters |
| Air Compressor Max Pressure | 150 PSI |
| Battery Type | Lithium Ion (4 required) |
| Product Dimensions (D x W x H) | 2.43" x 4.72" x 7.2" |
| Item Weight | 3 Pounds |
| Manufacturer | DongGuan chenshun New Energy Co., Ltd. |
10. Warranty and Support
KOPUO products are manufactured to high-quality standards. For warranty information or technical support, please refer to the contact details provided with your purchase documentation or visit the official KOPUO website. Please retain your proof of purchase for warranty claims.


