
1. Introduction
This manual provides comprehensive instructions for assembling the LEGO Technic Mini Firetruck Fire Engine. This set is designed to create a compact model resembling a fire engine, featuring Technic elements for functional movement. The completed model measures less than 3 inches tall.
Included Components:
- Fire Engine building components (80 pieces)
- The Brick People tile
2. Safety Information
WARNING: CHOKING HAZARD - Small Parts.
This set contains small parts which are not suitable for children under 6 years of age. Adult supervision is recommended during assembly and play for users under 7 years old. Please keep all packaging materials away from children.
3. Assembly Instructions
Follow these step-by-step instructions to construct your LEGO Technic Mini Firetruck Fire Engine. Ensure all pieces are accounted for before beginning assembly.
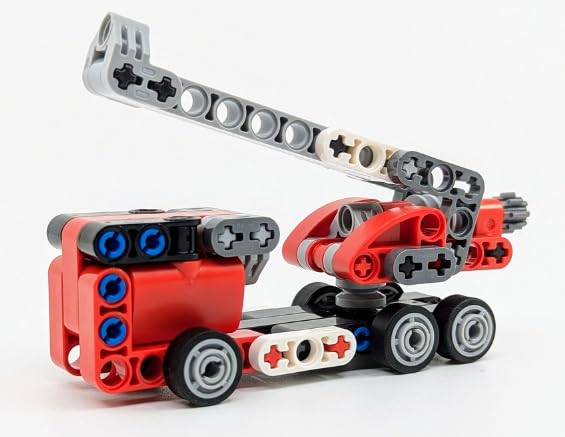
Figure 1: Product packaging for the LEGO Technic Mini Firetruck Fire Engine.
Building Steps 1-3: Chassis Base

Figure 2: Steps 1-3 detail the initial assembly of the chassis. Connect two 7-unit black Technic beams using two blue pins. Attach a 3-unit black Technic beam to the center of one 7-unit beam with a blue pin. Add a grey pin connector to the end of the 3-unit beam. Secure a 5-unit black Technic beam to the other 7-unit beam using two blue pins.
Building Steps 4-6: Extending the Chassis

Figure 3: Steps 4-6 continue the chassis assembly. Attach a 7-unit black Technic beam to the existing structure using a grey pin. Connect a 5-unit black Technic beam to the side. Add two blue pins to secure another 7-unit black Technic beam, forming the main frame. Ensure all connections are firm.
Building Steps 7-8: Adding Red Structural Elements

Figure 4: Steps 7-8 involve attaching red L-shaped Technic beams. Connect two red L-shaped beams to the chassis using blue pins and a grey axle pin. Then, attach another red L-shaped beam to the rear of the chassis with two blue pins.
Building Steps 9-11: Main Body Construction

Figure 5: Steps 9-11 focus on building the main body. Attach a grey Technic brick with axle holes and a red Technic beam. Connect a red 3x3 L-shaped beam and a red 1x3 Technic brick. Secure these with blue pins and a grey axle. Add a red 2x4 Technic plate to the top.
Building Steps 12-15: Detailing the Body

Figure 6: Steps 12-15 involve adding more details to the firetruck body. Attach a red Technic panel to the side using a grey pin. Connect two red Technic liftarms to the front. Secure a red 1x4 Technic brick to the top, completing the main body structure.
Building Steps 16-18: Water Cannon Base

Figure 7: Steps 16-18 begin the assembly of the water cannon. Connect a red Technic brick with an axle hole to a grey pin. Attach a red Technic connector to a red axle. Combine these with a red Technic pin connector to form the base of the cannon.
Building Steps 19-24: Water Cannon Nozzle

Figure 8: Steps 19-24 detail the water cannon nozzle. Attach a grey Technic gear to the red cannon base. Connect a long grey axle through the gear. Add a red Technic bush and a grey Technic pin connector. Secure a red Technic brick with a pin hole to the end of the axle. Attach a grey Technic bush to the side.
Building Steps 25-29: Ladder and Wheels

Figure 9: Steps 25-29 complete the model. Assemble the ladder mechanism by connecting several grey Technic beams with pins. Attach this ladder assembly to the main body of the firetruck. Finally, attach six wheels to the axles on the chassis, ensuring they spin freely.
4. Operating the Model
Once assembled, the LEGO Technic Mini Firetruck Fire Engine features a movable ladder. The ladder can be raised and lowered, and the water cannon at its end can be rotated. This allows for dynamic play and display.
5. Maintenance
To maintain your LEGO Technic Mini Firetruck Fire Engine, keep it free from dust and direct sunlight. If cleaning is necessary, gently wipe the bricks with a soft, damp cloth. Avoid using harsh chemicals or abrasive materials, as these can damage the plastic.
6. Troubleshooting
- Missing Pieces: If you find any pieces missing from your set, please contact LEGO Customer Service directly. They can assist with replacement parts.
- Difficulty Assembling: If you encounter difficulty with any step, re-examine the image and description carefully. Ensure all pins and axles are fully inserted. Sometimes, a small misalignment can prevent pieces from connecting correctly. Online video tutorials for similar LEGO Technic mini-builds may also provide visual guidance.
- Loose Connections: If parts feel loose, ensure that the correct pins and axles have been used and are fully pushed into their respective holes.
7. Specifications
| Brand | LEGO |
| Model Name | Minifigure (referring to the mini-scale nature) |
| Model Number | VVVFiretruck412501 |
| UPC | 673419100359 |
| Number of Pieces | 80 |
| Age Range | 6+ (Manufacturer Minimum Age 144 months / 12 years, but product title states 7+) |
| Material Type | Plastic |
| Item Dimensions (L x W x H) | 2.5 x 1 x 2 inches |
| Color | Red |
| Theme | Technic |
8. Warranty and Support
For information regarding product warranty, missing parts, or general support, please visit the official LEGO website or contact LEGO Customer Service directly. Details for contacting support are typically found on the LEGO Group's official channels.


