1. Introduction
This manual provides detailed instructions for the assembly, operation, and maintenance of your AODK 59-Inch L-Shaped Desk. Please read this manual thoroughly before assembly and use to ensure proper function and longevity of the product. Keep this manual for future reference.
2. Safety Instructions
- Ensure all parts are present and undamaged before beginning assembly.
- Assemble the desk on a soft, clean surface to prevent scratches.
- It is recommended that two people assemble this desk for safety and ease.
- Do not overtighten screws during assembly to avoid damaging components.
- Keep small parts away from children to prevent choking hazards.
- Do not place hot items directly on the desk surface without protection.
- Ensure the desk is placed on a level surface to prevent instability.
- For desks with electrical components (power outlets, LED lights), ensure they are connected to a grounded power source and avoid liquid spills.
3. Package Contents
Before assembly, verify that all components listed below are included in your package. If any parts are missing or damaged, please contact customer support.
(Specific parts list not provided in product data. Please refer to the separate parts list included with your physical product.)

Figure 3.1: Overview of the AODK 59-Inch L-Shaped Desk.
4. Setup and Assembly
Assembly of the AODK 59-Inch L-Shaped Desk requires approximately 2 hours with two people. No additional tools are needed beyond what is provided. Follow the instructions carefully, paying attention to the reversible design options.
4.1 Reversible Design
The L-shaped design is reversible, allowing you to configure the longer side to either the left or right, depending on your room layout. Decide on your preferred orientation before starting assembly.

Figure 4.1: Reversible design options for the L-shaped desk.
4.2 Assembly Steps
Refer to the detailed assembly diagrams and instructions provided in the separate assembly guide included with your product. Key steps generally include:
- Unpack all components and verify against the parts list.
- Assemble the main desk frames, ensuring correct orientation for your chosen reversible setup.
- Attach the desktop panels.
- Install the keyboard tray rails and tray.
- Assemble and attach the storage shelves and pegboard unit.
- Insert the fabric drawers into their designated compartments.
- Secure the CPU stand in its position.
- Install the built-in power outlet and LED light strip.
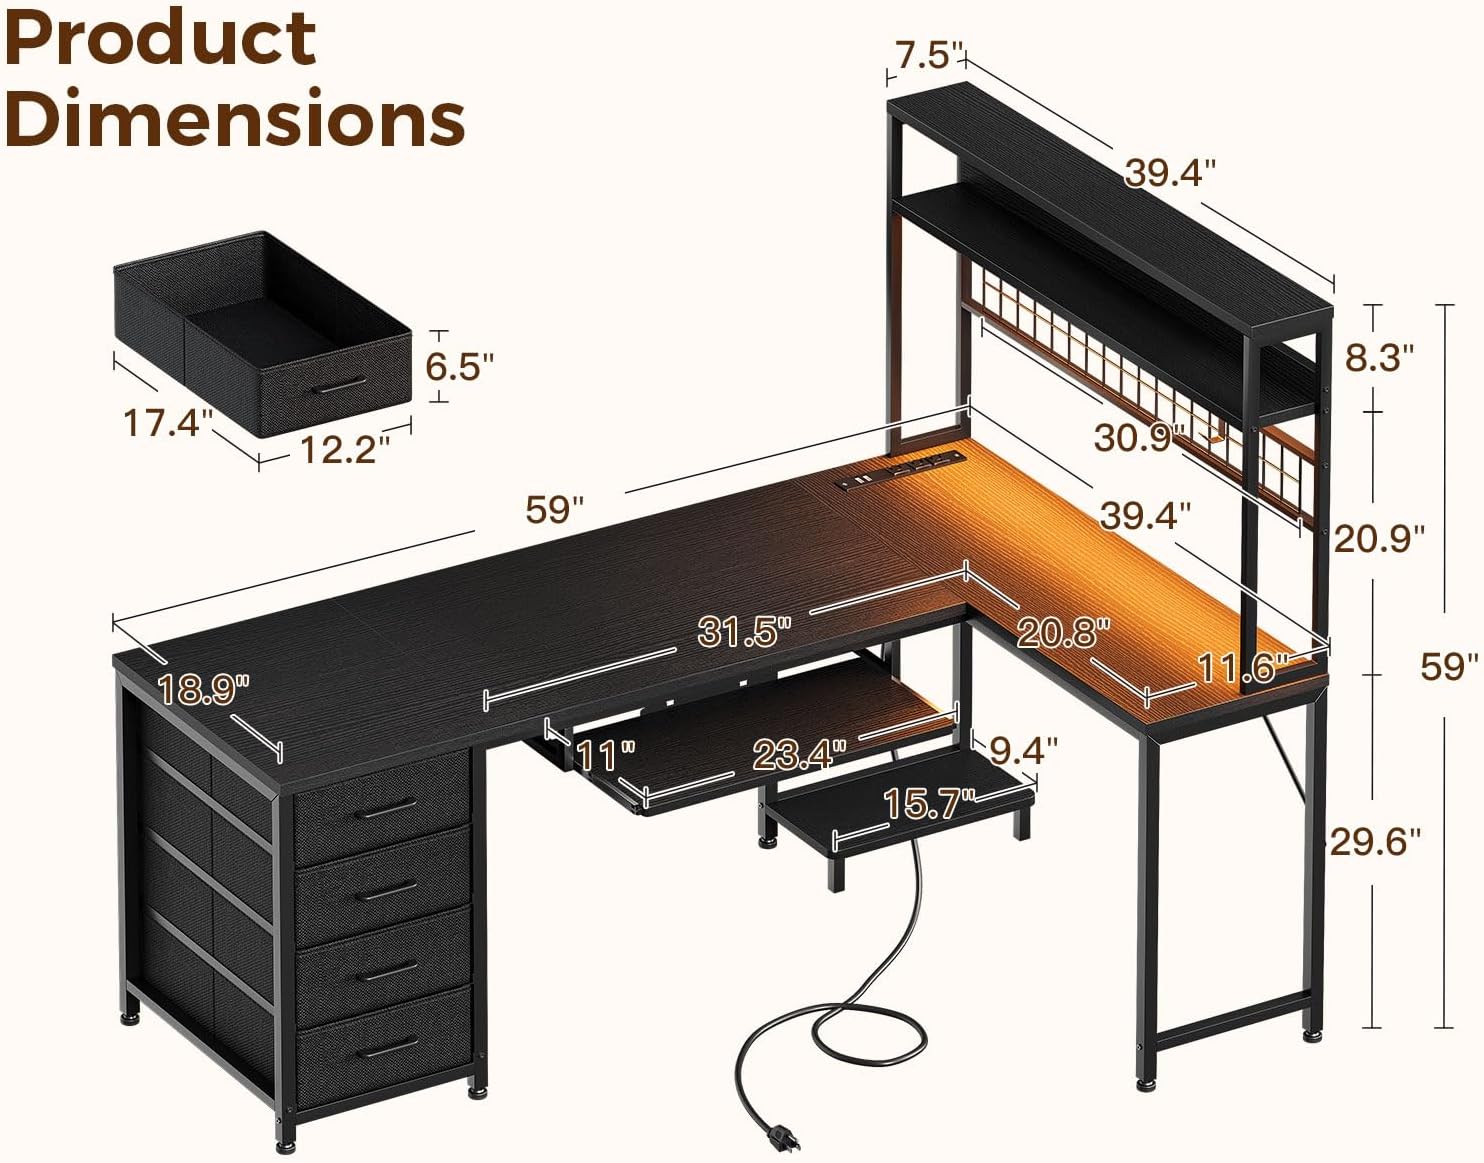
Figure 4.2: Product dimensions for planning your space.
5. Operating Instructions
5.1 Built-in Power Outlets
The desk features a built-in power strip with 3 AC outlets (120V/12A) and 2 USB ports (5V/2A). Connect the desk's power cord to a wall outlet. Use the AC outlets for devices like monitors or laptops, and the USB ports for charging smartphones or tablets.

Figure 5.1: Built-in power outlets and USB ports for convenient charging.
5.2 LED Light Strip
The adjustable LED light strip offers 10 colors and various modes. Use the included remote control to power on/off, change colors, adjust brightness, and select dynamic lighting effects. The LED strip is removable and reusable.

Figure 5.2: LED light strip providing ambient lighting.
5.3 Keyboard Tray
The 23.4-inch slide-out keyboard tray accommodates most keyboards and mice. It features a baffle to prevent items from slipping out. Slide the tray in and out as needed for comfortable typing or to free up desk space.

Figure 5.3: Keyboard tray in use.
5.4 Fabric Drawers
The four deep fabric drawers provide dust-free storage. They operate on smooth-gliding rails. Use them to organize files, office supplies, and personal items.

Figure 5.4: Fabric drawers for organized storage.
5.5 Pegboard and Storage Shelves
Utilize the pegboard with the included hook and clips for hanging headphones, displaying notes, or personalizing your workspace. The elevated storage shelves provide additional space for books, decor, or office essentials.

Figure 5.5: Pegboard and storage shelves for organization and display.
5.6 CPU Stand
The dedicated CPU stand keeps your computer tower elevated from the floor, reducing dust accumulation and protecting it from accidental kicks or spills.

Figure 5.6: CPU stand keeping the computer tower elevated.
6. Maintenance
- Cleaning: Wipe the desk surfaces with a soft, damp cloth. Avoid harsh chemicals or abrasive cleaners that may damage the finish.
- Fabric Drawers: The fabric drawers can be spot cleaned with a mild detergent and water. Allow them to air dry completely before reinserting.
- Hardware: Periodically check all screws and fasteners to ensure they remain tight. Retighten if necessary to maintain stability.
- Electrical Components: Ensure the power outlets and LED light strip are kept dry. Disconnect from power before cleaning.
7. Troubleshooting
| Problem | Possible Cause | Solution |
|---|---|---|
| Desk is wobbly or unstable. | Loose fasteners; uneven floor. | Check and tighten all screws. Ensure the desk is on a level surface; adjust leveling feet if present. |
| Keyboard tray does not slide smoothly. | Rails are dirty or misaligned. | Clean the rails. Ensure the tray is correctly installed on the rails. |
| Power outlets or USB ports not working. | Desk power cord not plugged in; circuit breaker tripped; faulty connection. | Ensure the desk's power cord is securely plugged into a working wall outlet. Check your home's circuit breaker. Verify internal connections if accessible (refer to assembly guide). |
| LED light strip not illuminating. | Power not connected; remote battery dead; faulty strip. | Ensure the LED strip is properly connected to its power source. Check the remote control battery. If issues persist, contact customer support. |
8. Specifications
| Feature | Detail |
|---|---|
| Brand | AODK |
| Model | 59 Inch L Shaped Desk |
| Product Dimensions (D x W x H) | 58.86"D x 39.37"W x 58.86"H |
| Color | Black |
| Style | Modern |
| Base Material | Alloy Steel |
| Top Material Type | Engineered Wood |
| Finish Type | Powder Coated |
| Number of Drawers | 4 |
| Drawer Type | Fabric Drawer |
| Keyboard Tray Size | 23.4 inches (width) |
| Power Outlets | 3 AC Outlets (120V/12A) |
| USB Ports | 2 USB Ports (5V/2A) |
| LED Light Strip | 10 Colors, 10 Modes, 8 Brightness Levels |
| Assembly Required | Yes |
| Recommended Assembly Persons | 2 |
| UPC | 850073927724 |
9. Warranty and Support
For warranty information, please refer to the documentation included with your purchase or contact AODK customer support directly. If you encounter any issues or have questions regarding your AODK 59-Inch L-Shaped Desk, please reach out to our support team for assistance.
Customer Support: Visit the AODK Store on Amazon


