1. Introduction
The UeeKKoo ESP32-S3 1.47-inch Touch Display Development Board is a compact and versatile module designed for a wide range of AIoT applications. It integrates a high-performance dual-core processor, a vibrant IPS touch display, and comprehensive wireless communication capabilities, making it suitable for interactive projects and embedded systems.

Image 1.1: Front view of the UeeKKoo ESP32-S3 1.47-inch Touch Display Development Board.
2. Key Features
- ESP32-S3R8 Processor: Equipped with a high-performance Xtensa 32-bit LX7 dual-core processor, operating up to 240MHz. Features powerful AI computing capabilities and reliable security.
- 1.47-inch Touch Display: Onboard IPS Capacitive Touch LCD with 172x320 resolution and 262K colors. Capable of smoothly running GUI programs like LVGL. Integrates an AXS5106L capacitive touch chip for high-sensitivity touch operation.
- Wireless Communication: Supports 2.4GHz Wi-Fi (802.11 b/g/n) and Bluetooth 5 (LE) with an onboard antenna.
- Memory: Built-in 512KB SRAM and 384KB ROM, with onboard 16MB Flash and 8MB PSRAM.
- Extensions and Interfaces: Multiple GPIO interfaces, full-speed USB standard (Type-C), onboard TF card slot for external storage, and support for SPI and I2C interfaces.
- Low Power Mode: Supports flexible clock control and multiple power modes for optimized power consumption.
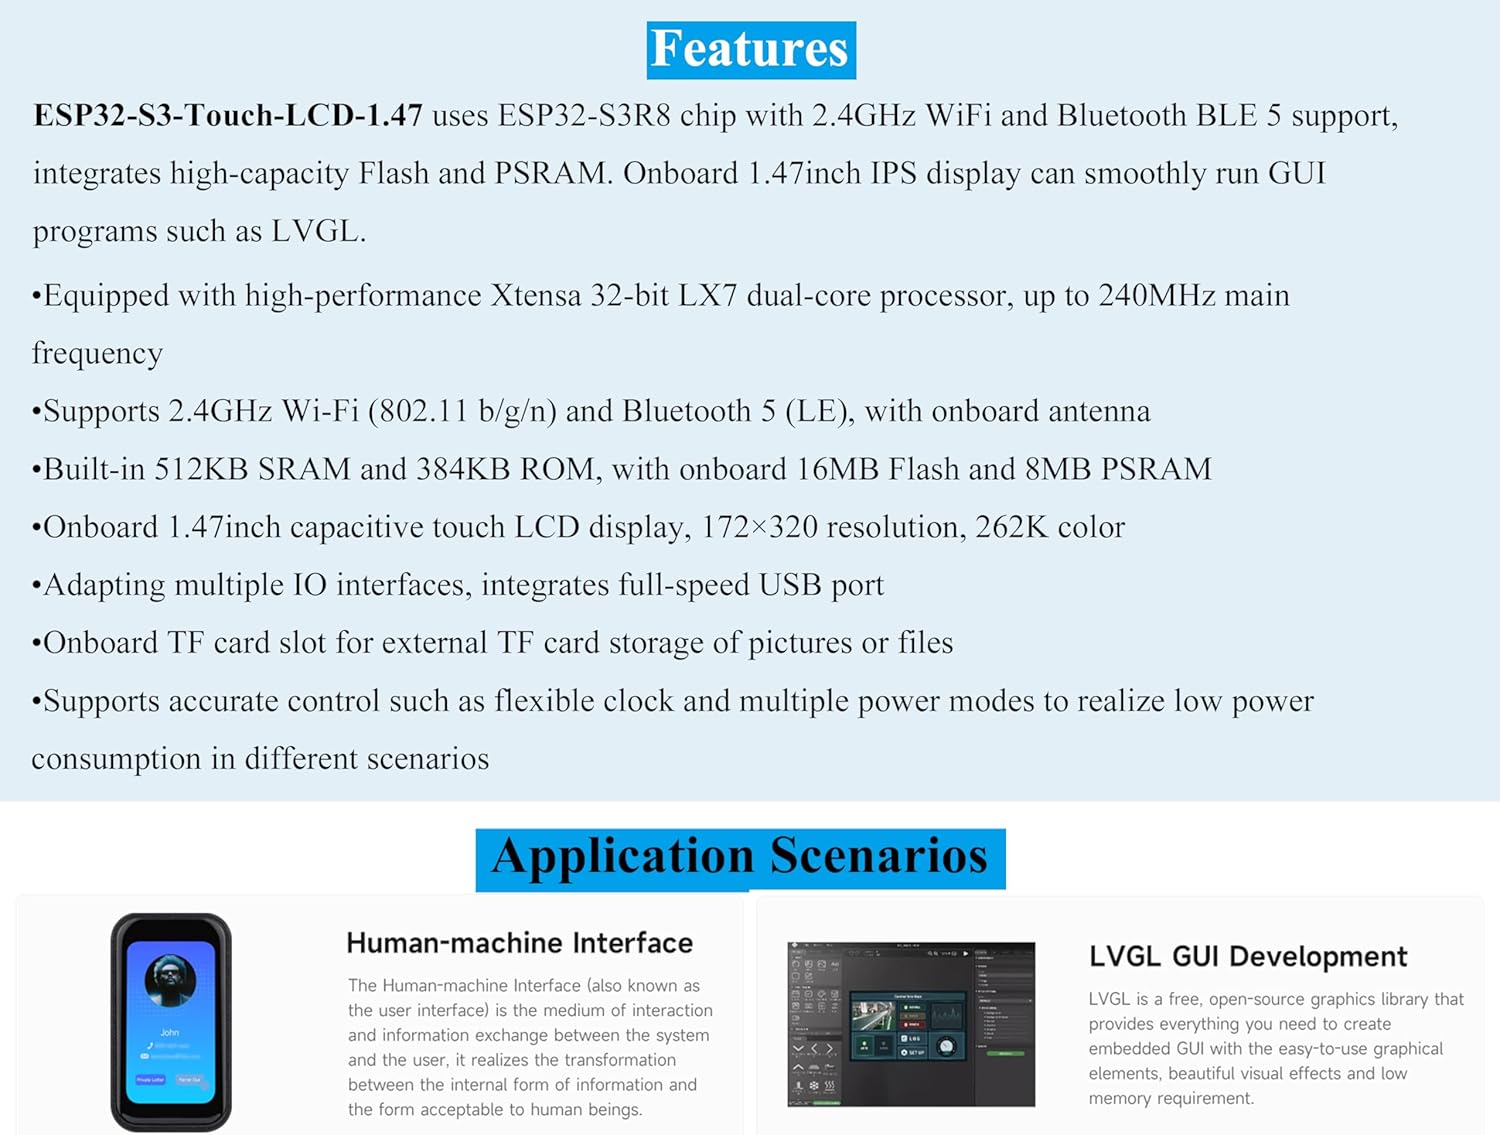
Image 2.1: Overview of the ESP32-S3 Touch LCD features.

Image 2.2: ESP32-S3 processor capabilities for AIoT applications.
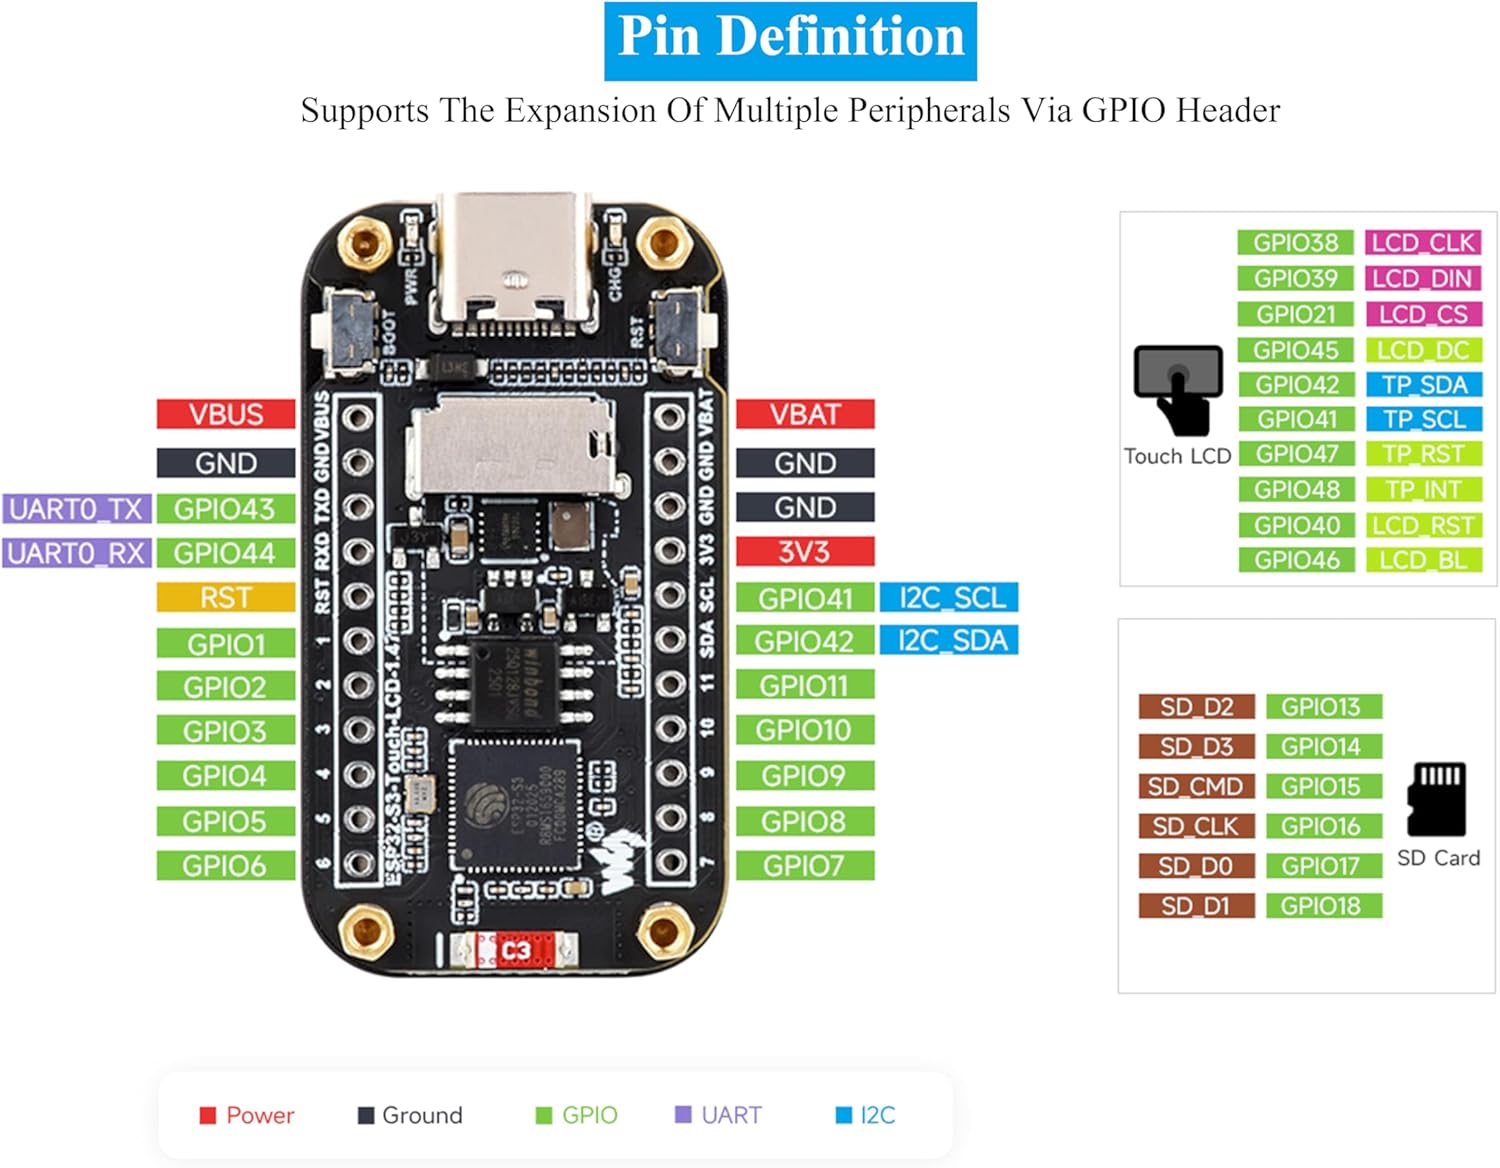
Image 2.3: Wireless connectivity features including Wi-Fi and BLE 5.
3. Setup Guide
This section outlines the initial steps to get your ESP32-S3 Development Board operational. Ensure you have the necessary software and drivers installed on your computer before proceeding.
3.1 Initial Connection
- Connect the development board to your computer using a Type-C USB cable. The board should power on.
- Verify that your computer recognizes the device. You may need to install appropriate USB-to-serial drivers if it's not automatically detected.
3.2 Software Environment Setup
To program the ESP32-S3, you will need a development environment. The manufacturer provides relevant resources and tutorials to help you get started quickly. Visit bit.ly/3SwM7tO for detailed instructions on setting up your development environment, including:
- Installing the Arduino IDE or Visual Studio Code with PlatformIO.
- Configuring the ESP32 board support package.
- Uploading your first program (e.g., a 'Hello World' example).
While Arduino IDE is often recommended for beginners, some users find Visual Studio Code with PlatformIO to be more reliable for compiling and uploading code to the board, especially for more complex projects.
3.3 Header Options
The board is available in a version with pre-soldered headers, simplifying integration into breadboards or custom PCBs.

Image 3.1: Comparison of standard and pre-soldered header versions.
3.4 Product Overview Video
Video 3.1: An official overview comparing the ESP32-S3 and ESP32-C6 development boards, highlighting their features and capabilities. This video demonstrates the touch display functionality and various applications.
4. Operation
Once the development environment is set up and firmware is uploaded, the board's functionality can be utilized. The 1.47-inch IPS capacitive touch display allows for interactive graphical user interfaces (GUIs).
4.1 Touch Display Interaction
The integrated AXS5106L touch chip provides high-sensitivity touch input. Depending on the loaded firmware, you can interact with on-screen elements, navigate menus, and input data directly on the display.
4.2 GPIO Pinout
The board offers numerous General Purpose Input/Output (GPIO) pins for connecting external peripherals and sensors. Refer to the pin definition diagram for detailed information on each pin's function.

Image 4.1: Detailed pinout diagram for the ESP32-S3 development board, showing power, ground, GPIO, UART, and I2C connections.
4.3 Onboard Components
Familiarize yourself with the key components on the board for effective development and debugging.
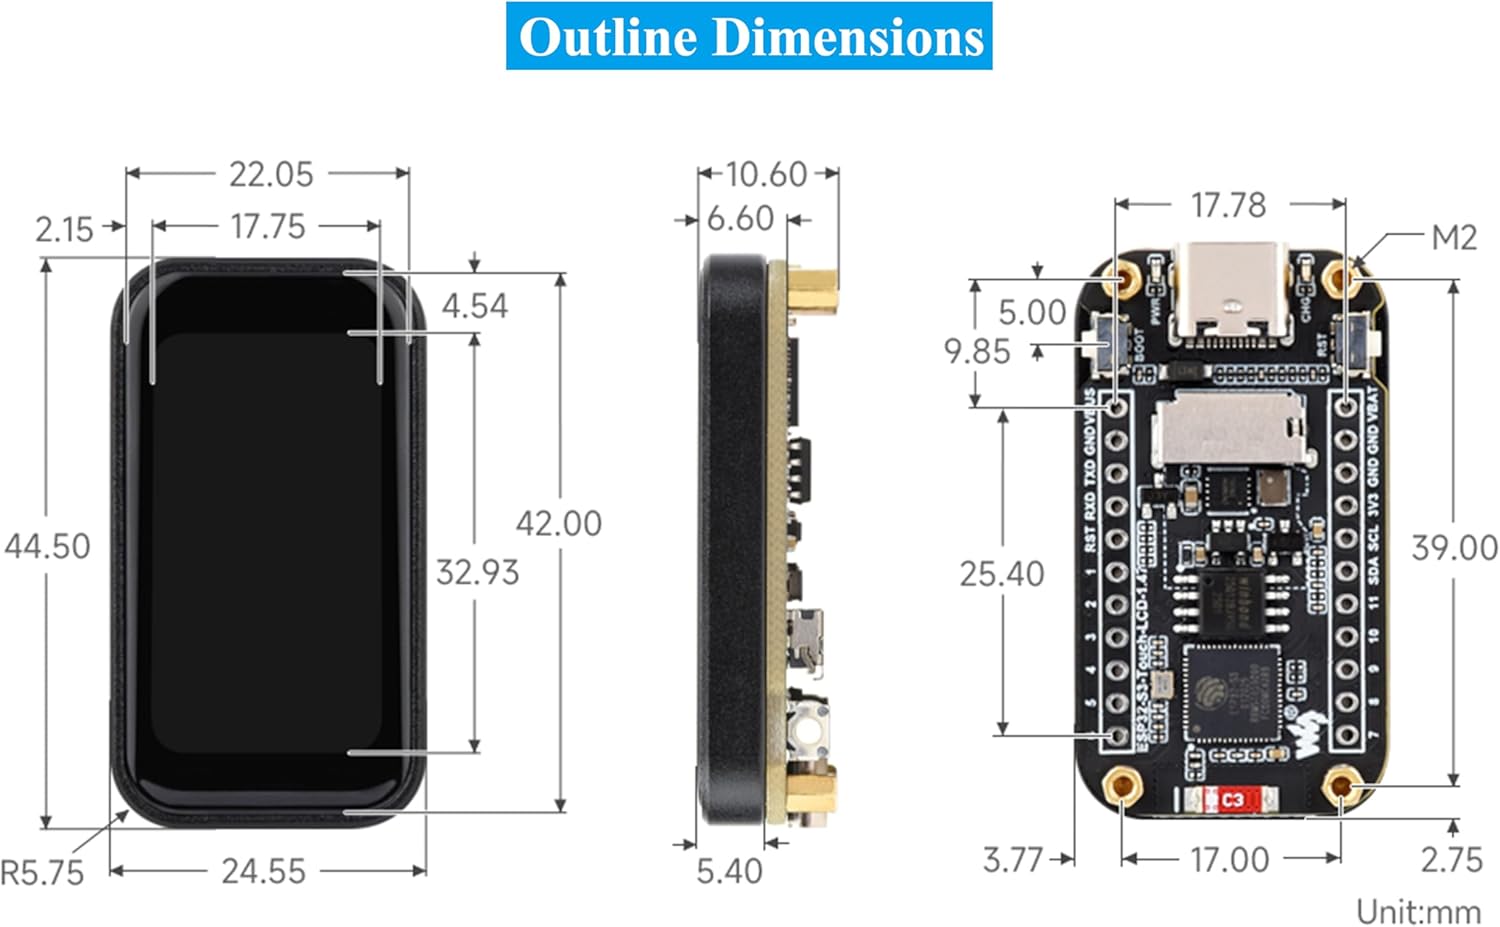
Image 4.2: Labeled diagram of the onboard components, including the ESP32-S3R8 chip, ceramic antenna, Flash memory, voltage regulator, TF card slot, RESET button, BOOT button, and Type-C interface.
5. Maintenance
To ensure the longevity and optimal performance of your ESP32-S3 development board, follow these maintenance guidelines:
- Handle with Care: Avoid dropping the board or subjecting it to physical shock.
- Keep Clean: Regularly clean the board with a soft, dry, anti-static brush to remove dust and debris. Avoid using liquids.
- Environmental Conditions: Store and operate the board in a dry environment, away from extreme temperatures, humidity, and direct sunlight.
- Power Supply: Use a stable and appropriate power supply (via the Type-C port) to prevent damage to the components.
- Static Discharge: Take precautions against electrostatic discharge (ESD) when handling the board, as static electricity can damage sensitive electronic components.
6. Troubleshooting
If you encounter issues with your ESP32-S3 development board, consider the following troubleshooting steps:
- Board Not Powering On:
- Ensure the Type-C USB cable is securely connected to both the board and a working USB port on your computer or power adapter.
- Try a different USB cable or USB port.
- Verify that the power source is providing sufficient power.
- Computer Not Recognizing Board:
- Install or update the necessary USB-to-serial drivers (e.g., CP210x or CH340 drivers, depending on the board's specific USB-to-serial chip).
- Check Device Manager (Windows) or `ls /dev/tty*` (Linux/macOS) to see if a new serial port appears when the board is connected.
- Firmware Upload Failure:
- Ensure the correct board type and serial port are selected in your IDE (Arduino IDE, PlatformIO).
- Hold down the BOOT button, press and release the RESET button, then release the BOOT button to put the ESP32 into bootloader mode before uploading.
- Check for correct library installations and dependencies in your project.
- If using Arduino IDE, consider trying Visual Studio Code with PlatformIO, as some users report better reliability for uploads.
- Display Not Working or Unresponsive Touch:
- Verify that the display and touch drivers are correctly initialized in your firmware.
- Ensure there are no loose connections if you are using a version without pre-soldered headers.
- Test with a known working example sketch to rule out software issues.
7. Technical Specifications
| Feature | Specification |
|---|---|
| Brand | UeeKKoo |
| Model Number | ESP32-S3-Touch-LCD-1.47-M |
| Processor | Xtensa 32-bit LX7 Dual-Core, up to 240MHz |
| Display Size | 1.47 inches |
| Display Type | IPS Capacitive Touch LCD |
| Resolution | 172x320 pixels |
| Display Color | 262K |
| Wi-Fi | 2.4GHz (802.11 b/g/n) |
| Bluetooth | BLE 5 |
| SRAM | 512KB |
| ROM | 384KB |
| Flash | 16MB (onboard) |
| PSRAM | 8MB (onboard) |
| Interfaces | Type-C USB, TF Card Slot, GPIO, SPI, I2C |
| Item Weight | 0.32 ounces |
| Product Dimensions | 0.08 x 0.79 x 1.57 inches |
7.1 Outline Dimensions
The following diagram provides the physical dimensions of the development board in millimeters.

Image 7.1: Outline dimensions of the ESP32-S3 development board (Unit: mm).
8. Package Contents
The product package includes the following items:
- ESP32-S3-Touch-LCD-1.47 with Pre-Soldered Header x 1
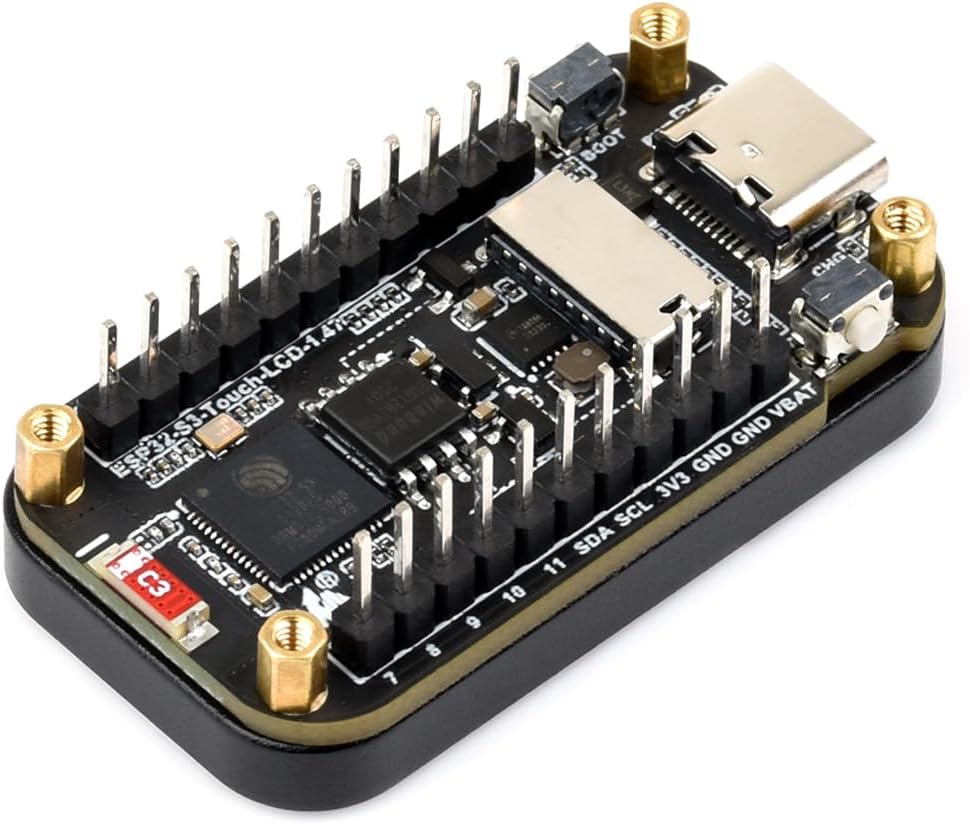
Image 8.1: Contents of the product package.
9. Warranty and Support
For warranty information, technical support, or further assistance, please refer to the official UeeKKoo website or contact their customer service. Keep your purchase receipt for warranty claims.


