1. Introduction
The TESmart MST USB-C/HDMI/DP KVM Switch (Model: HDC202-P23-USBK-V1) is designed to allow two computers to share two monitors and a single set of USB peripherals (keyboard, mouse, etc.). This device supports high-resolution video output up to 4K@60Hz, provides 60W Power Delivery for laptops, and includes a Gigabit Ethernet port. It is suitable for environments requiring seamless switching between a desktop computer and a laptop, enhancing workspace efficiency.

Image: The TESmart KVM Switch unit shown with its various included cables.
2. Package Contents
Please verify that all items listed below are included in your package. If any items are missing or damaged, please contact customer support.
- 1 x 2x2 Hybrid KVM Switch (HDC202-P23-USBK-V1)
- 1 x KVM Cable
- 1 x DisplayPort Cable
- 2 x USB-C Cables
- 1 x IR Remote Control
- 1 x DC 20V Power Adapter
- 1 x User Manual

Image: All components included in the TESmart KVM Switch package, laid out for inspection.
3. Product Overview
3.1 Front and Rear Panel Layout
Familiarize yourself with the ports and controls on the KVM switch before beginning installation.

Image: A detailed diagram illustrating the front and rear panel ports of the KVM switch, including connections for monitors, computers, and peripherals.
Front Panel:
- USB 3.0 Ports: For connecting USB peripherals such as keyboards, mice, USB drives, or printers.
- Select Button: Manually switch between connected computers.
- IR Receiver: For receiving signals from the included IR remote control.
Rear Panel:
- DC 20V Power Input: Connect the provided power adapter.
- Display A/B Outputs (HDMI): Connect to your two monitors.
- Gigabit Ethernet Port: For network connectivity shared between computers.
- USB 3.0 Ports: Additional ports for USB peripherals.
- PC1 Inputs: USB-C (for laptop), HDMI, DisplayPort (for desktop).
- PC2 Inputs: USB-C (for laptop), HDMI, DisplayPort (for desktop).
4. Setup Instructions
Follow these steps to connect your computers and monitors to the KVM switch.
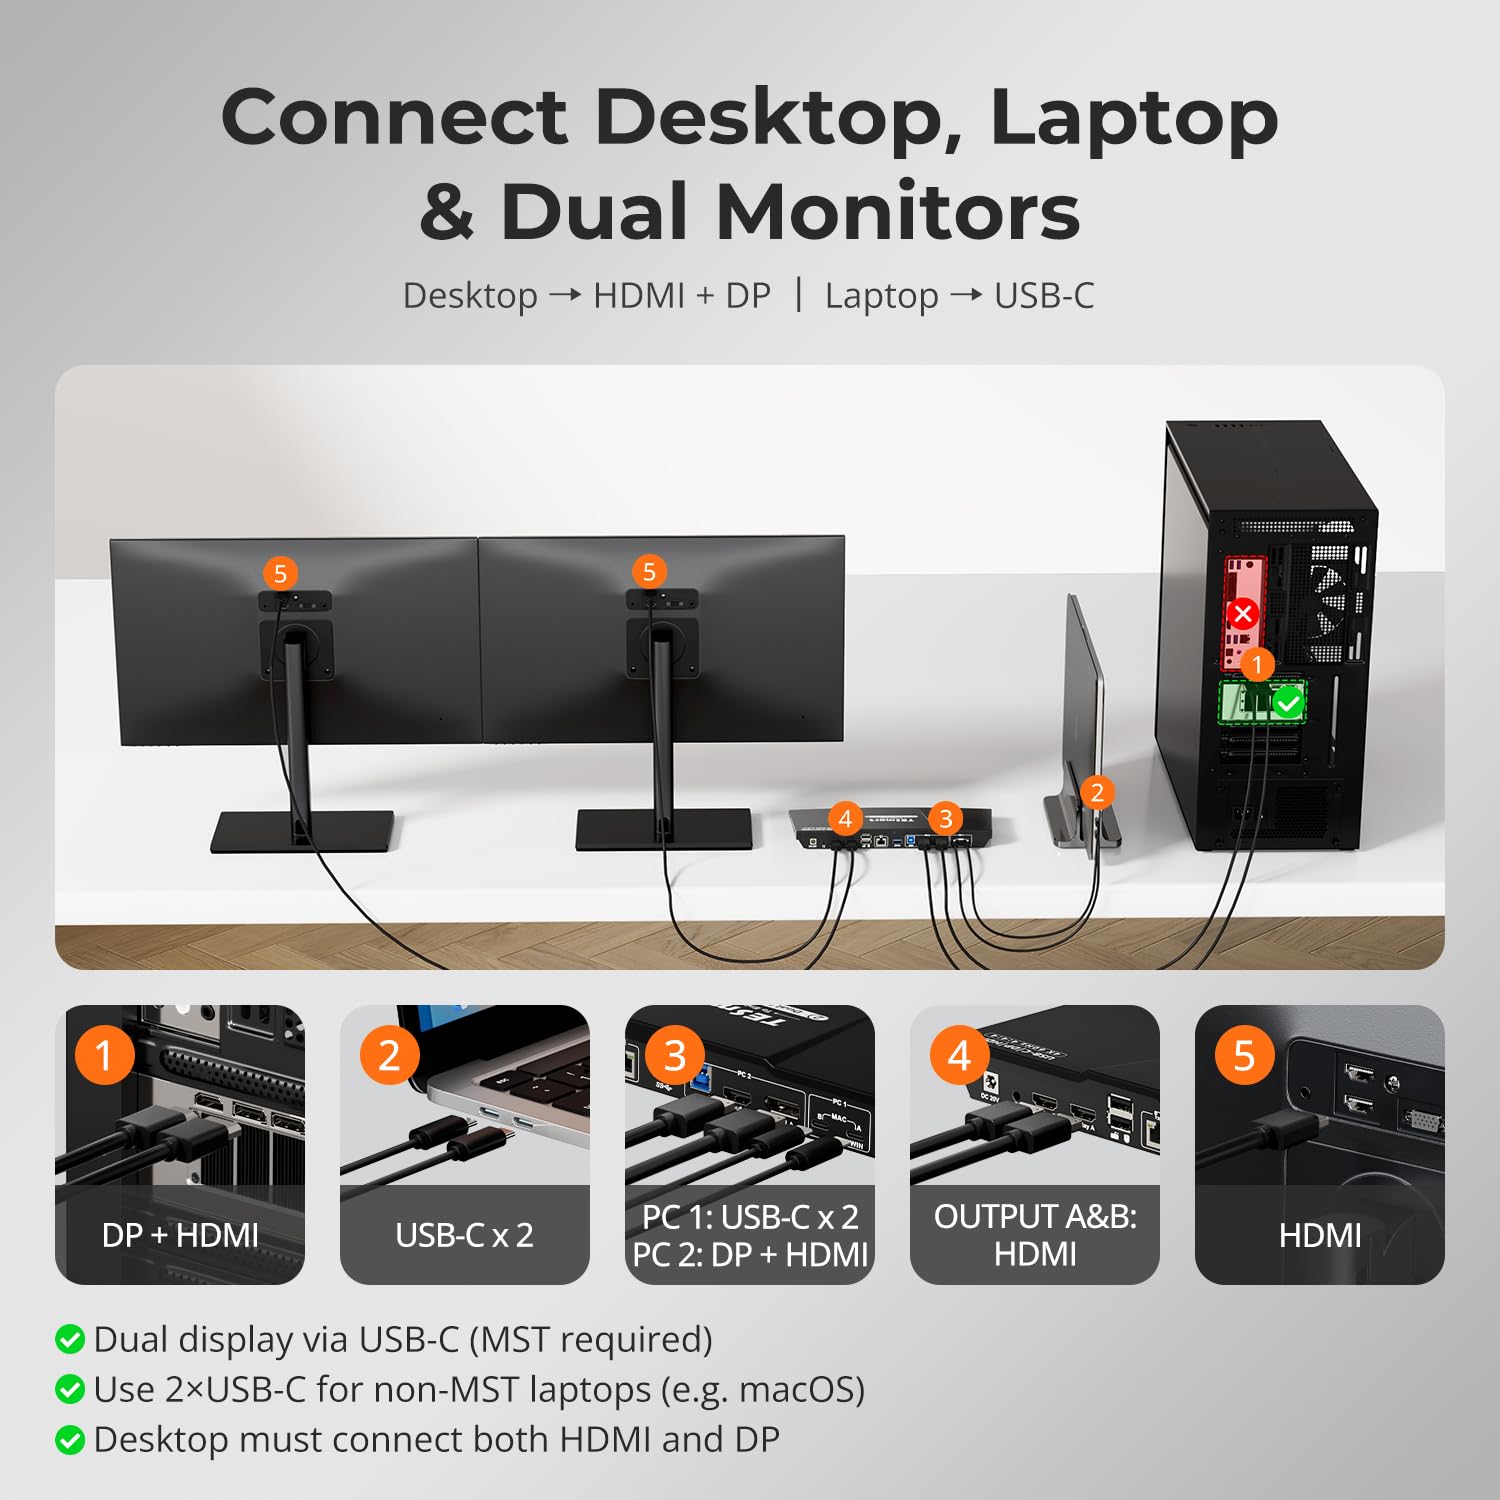
Image: Visual guide for connecting a desktop (HDMI+DP) and a laptop (USB-C) to the KVM switch for dual monitor output.
- Power Off Devices: Ensure all computers and monitors are powered off before making connections.
- Connect Monitors: Connect your two monitors to the KVM switch's Display A and Display B HDMI output ports using HDMI cables.
- Connect Desktop PC:
- Connect the desktop's HDMI output to one of the KVM's PC input HDMI ports.
- Connect the desktop's DisplayPort output to one of the KVM's PC input DisplayPort ports.
- Connect the KVM cable (USB-A to USB-B) from the desktop's USB port to the corresponding PC input USB-B port on the KVM.
- Connect Laptop:
- Connect the laptop to the KVM switch using the provided USB-C cables. For dual display on Windows, ensure your laptop supports Multi-Stream Transport (MST). For macOS, use both included USB-C cables to achieve dual extended displays, provided your Mac supports multi-display output.
- Connect Peripherals: Connect your USB keyboard, mouse, and other USB devices to the USB 3.0 ports on the KVM switch.
- Connect Network (Optional): Connect an Ethernet cable from your router to the KVM switch's Gigabit Ethernet port.
- Power On: Connect the DC 20V power adapter to the KVM switch and then plug it into a power outlet. Power on your monitors and computers.
4.1 USB-C Port Compatibility
Before connecting your laptop via USB-C, ensure its USB-C port supports video output and data transfer. Not all USB-C ports have full functionality.
- Thunderbolt 3/4/5: Full function (Power, Video, Data).
- Full-Featured USB-C Port: Supports Power, Video, Data.
- USB-C with DisplayPort Alternate Mode: Supports Data Transfer & Video Output.
- USB-C (Data Transfer Only): Not compatible for video output.
- USB-C (Charging Only): Not compatible for video or data transfer.
5. Operation
5.1 Switching Between Computers
The KVM switch offers multiple methods for switching between connected computers:

Image: Illustration of the four available switching methods: Custom Hotkey, Front Panel Button, IR Remote Control, and Mouse Wheel Switching.
- Front Panel Button: Press the 'Select' button on the front of the KVM switch to cycle through connected computers.
- Hotkey Switching: Use predefined keyboard hotkeys to switch inputs. Refer to the detailed user manual for specific hotkey combinations.
- IR Remote Control: Use the included IR remote control to switch between computers.
- Mouse Wheel Switching: Double-click the middle scroll wheel of your mouse to switch inputs.
5.2 Display Modes
The KVM switch supports two primary display configurations:

Image: Visual representation of Mode 1 (one PC extending or mirroring across two monitors) and Mode 2 (two separate PCs each using one monitor).
- Mode 1: One PC Across Two Monitors: A single computer can extend or mirror its display across both connected monitors.
- Mode 2: Two PCs on Two Monitors: Each connected computer utilizes one dedicated monitor.
5.3 EDID Emulation
The KVM switch features EDID (Extended Display Identification Data) emulation to prevent issues such as desktop icon rearrangement, screen flickering, and window clutter when switching between computers or after a computer wakes from sleep.

Image: A comparison showing how EDID emulation maintains desktop icon and window positions after switching, unlike systems without it.
5.4 Independent USB & Audio Focus Lock
This feature allows USB and audio connections to remain active with the current source even when the display is switched to another computer. This is useful for maintaining ongoing tasks like video calls or file transfers without interruption.
6. Maintenance
To ensure optimal performance and longevity of your TESmart KVM Switch, follow these maintenance guidelines:
- Cleaning: Use a soft, dry cloth to clean the exterior of the device. Avoid using liquid cleaners or solvents, as they may damage the finish or internal components.
- Ventilation: Ensure the KVM switch is placed in a well-ventilated area to prevent overheating. Do not block any ventilation openings.
- Cable Management: Keep cables organized and free from kinks or excessive bending to prevent damage and ensure stable connections.
- Power Supply: Use only the original power adapter provided with the device.
7. Troubleshooting
If you encounter issues with your KVM switch, refer to the following common problems and solutions:
7.1 No Display on Monitors
- Check Power: Ensure the KVM switch is properly powered on and the power adapter is securely connected.
- Verify Cable Connections: Confirm that all HDMI, DisplayPort, and USB-C cables are securely connected between the computers, KVM switch, and monitors.
- Input Selection: Ensure the correct computer input is selected on the KVM switch using the front panel button, hotkey, or remote control.
- Monitor Input: Verify that your monitors are set to the correct HDMI input source.
- Computer Output: Check your computer's display settings to ensure it is configured to output to the connected monitors.
7.2 USB Peripherals Not Responding
- Check USB Cables: Ensure the USB-B cable (for desktop) or USB-C cables (for laptop) are securely connected from the computers to the KVM switch.
- Try Different USB Ports: If a peripheral (e.g., a wireless mouse dongle) is not working correctly in the dedicated K&M ports, try connecting it to one of the USB 3.0 hub ports on the KVM switch.
- Power Cycle KVM: Disconnect and reconnect the KVM's power adapter.
- Driver Issues: Ensure your computer has the necessary drivers for the USB peripherals.
7.3 Desktop Icons Rearrange or Screen Flickers
- EDID Emulation: The KVM switch is designed with EDID emulation to prevent these issues. Ensure your system is configured to utilize this feature.
- Cable Quality: Use high-quality HDMI/DisplayPort cables, especially for 4K resolutions.
7.4 Laptop Issues After Sleep (macOS)
- Some macOS systems may require a power cycle of the KVM switch after waking from sleep to restore full functionality. Disconnect and reconnect the KVM's power adapter if issues persist.
8. Specifications
| Feature | Detail |
|---|---|
| Model Number | HDC202-P23-USBK-V1 |
| Product Dimensions | 11.81 x 4.33 x 1.18 inches |
| Item Weight | 3.88 Pounds |
| Manufacturer | TESmart |
| Operation Mode | ON-OFF |
| Current Rating | 5 Amps |
| Operating Voltage | 20 Volts |
| Connector Type | Plug In |
| Video Resolution Support | Up to 4K@60Hz 4:4:4 |
| Refresh Rate Support | 1080P@240Hz/165Hz/144Hz/120Hz, 2560x1440@120Hz |
| Power Delivery | 60W for laptop charging |
| Network | 1000 Mbps Gigabit LAN |
| USB Ports | USB 3.0, USB 2.0 |
9. Warranty and Support
TESmart products are designed for reliability and performance. For information regarding warranty coverage, technical support, or service, please refer to the warranty card included in your package or visit the official TESmart website. Please have your product model number (HDC202-P23-USBK-V1) and purchase details ready when contacting support.


