1. Introduction
The Thermalright ARGB and Fan HUB X12 IR Black is a versatile controller designed to manage both Addressable RGB (ARGB) lighting and Pulse Width Modulation (PWM) fan speeds for your PC components. This hub supports up to 12 groups of CPU fans and ARGB devices, providing centralized control and efficient cable management. It features a SATA power input for stable operation and includes an infrared (IR) remote control for convenient lighting adjustments. This manual provides detailed instructions for installation, operation, and troubleshooting to ensure optimal performance of your hub.

Figure 1: Thermalright ARGB and Fan HUB X12 IR Black Controller
2. Safety Information
Please read and understand the following safety precautions before installing or operating the device:
- Ensure your PC is powered off and unplugged from the wall outlet before installation.
- Handle all components with care to prevent damage from electrostatic discharge.
- This hub supports 5V 3-pin ARGB devices only. Do not connect 12V 4-pin RGB devices, as this may cause damage to the hub or connected components.
- Ensure correct pin alignment when connecting cables. Forcing connectors can cause damage.
- Keep the device away from liquids and extreme temperatures.
3. Setup and Installation
3.1. Package Contents
Before you begin, verify that all components are present:
- Thermalright ARGB and Fan HUB X12 IR Black Controller
- IR Remote Control
- PWM & ARGB 2-in-1 Signal Cable
- SATA Power Cable
- Double-sided adhesive tape (for mounting)

Figure 2: Package Contents (Hub, Remote, Cables)
3.2. Initial Fan Installation (Optional, if installing new fans)
If you are installing new fans, follow these general steps. For detailed fan-specific instructions, refer to your fan's manual.
Video 1: Fan Installation Guide (General steps for installing a fan into a PC case and connecting its ARGB/PWM headers).
3.3. Connecting the Hub
Follow these steps to connect the ARGB and Fan Hub:
- Connect the 2-in-1 Signal Cable: Plug one end of the provided 2-in-1 signal cable into the ARGB&PWM INPUT header on the hub.
- Connect to Motherboard: Connect the other end of the 2-in-1 signal cable to your motherboard. The 4-pin PWM connector goes into a motherboard fan header (e.g., CPU_FAN or SYS_FAN), and the 3-pin ARGB connector goes into a 5V_ARGB 3-pin header on your motherboard. Ensure it is a 5V 3-pin ARGB header, not a 12V 4-pin RGB header.
- Connect SATA Power: Connect the SATA power cable to the POWER INPUT connector on the hub. Then, connect the other end of the SATA power cable to a free SATA power connector from your Power Supply Unit (PSU). It is recommended to use the SATA port closest to the PSU for stable power delivery.
- Connect Fans and ARGB Devices: Plug your 4-pin PWM fans into the labeled "FAN" sockets on the hub. Connect your 3-pin ARGB devices (fans, light strips, etc.) to the labeled "ARGB" sockets. The red "CPU-FAN" socket is designated for your CPU cooler fan, as it is the only port from which the motherboard can read fan speed.

Figure 3: Hub with connected fans and ARGB devices
Video 2: Fan Hub Installation Guide (Demonstrates connecting ARGB and PWM headers to the motherboard and syncing multiple fans).
3.4. Mounting the Hub
The hub can be mounted inside your PC case using the included double-sided adhesive tape or its magnetic backing. Choose a discreet location that allows for good cable management.
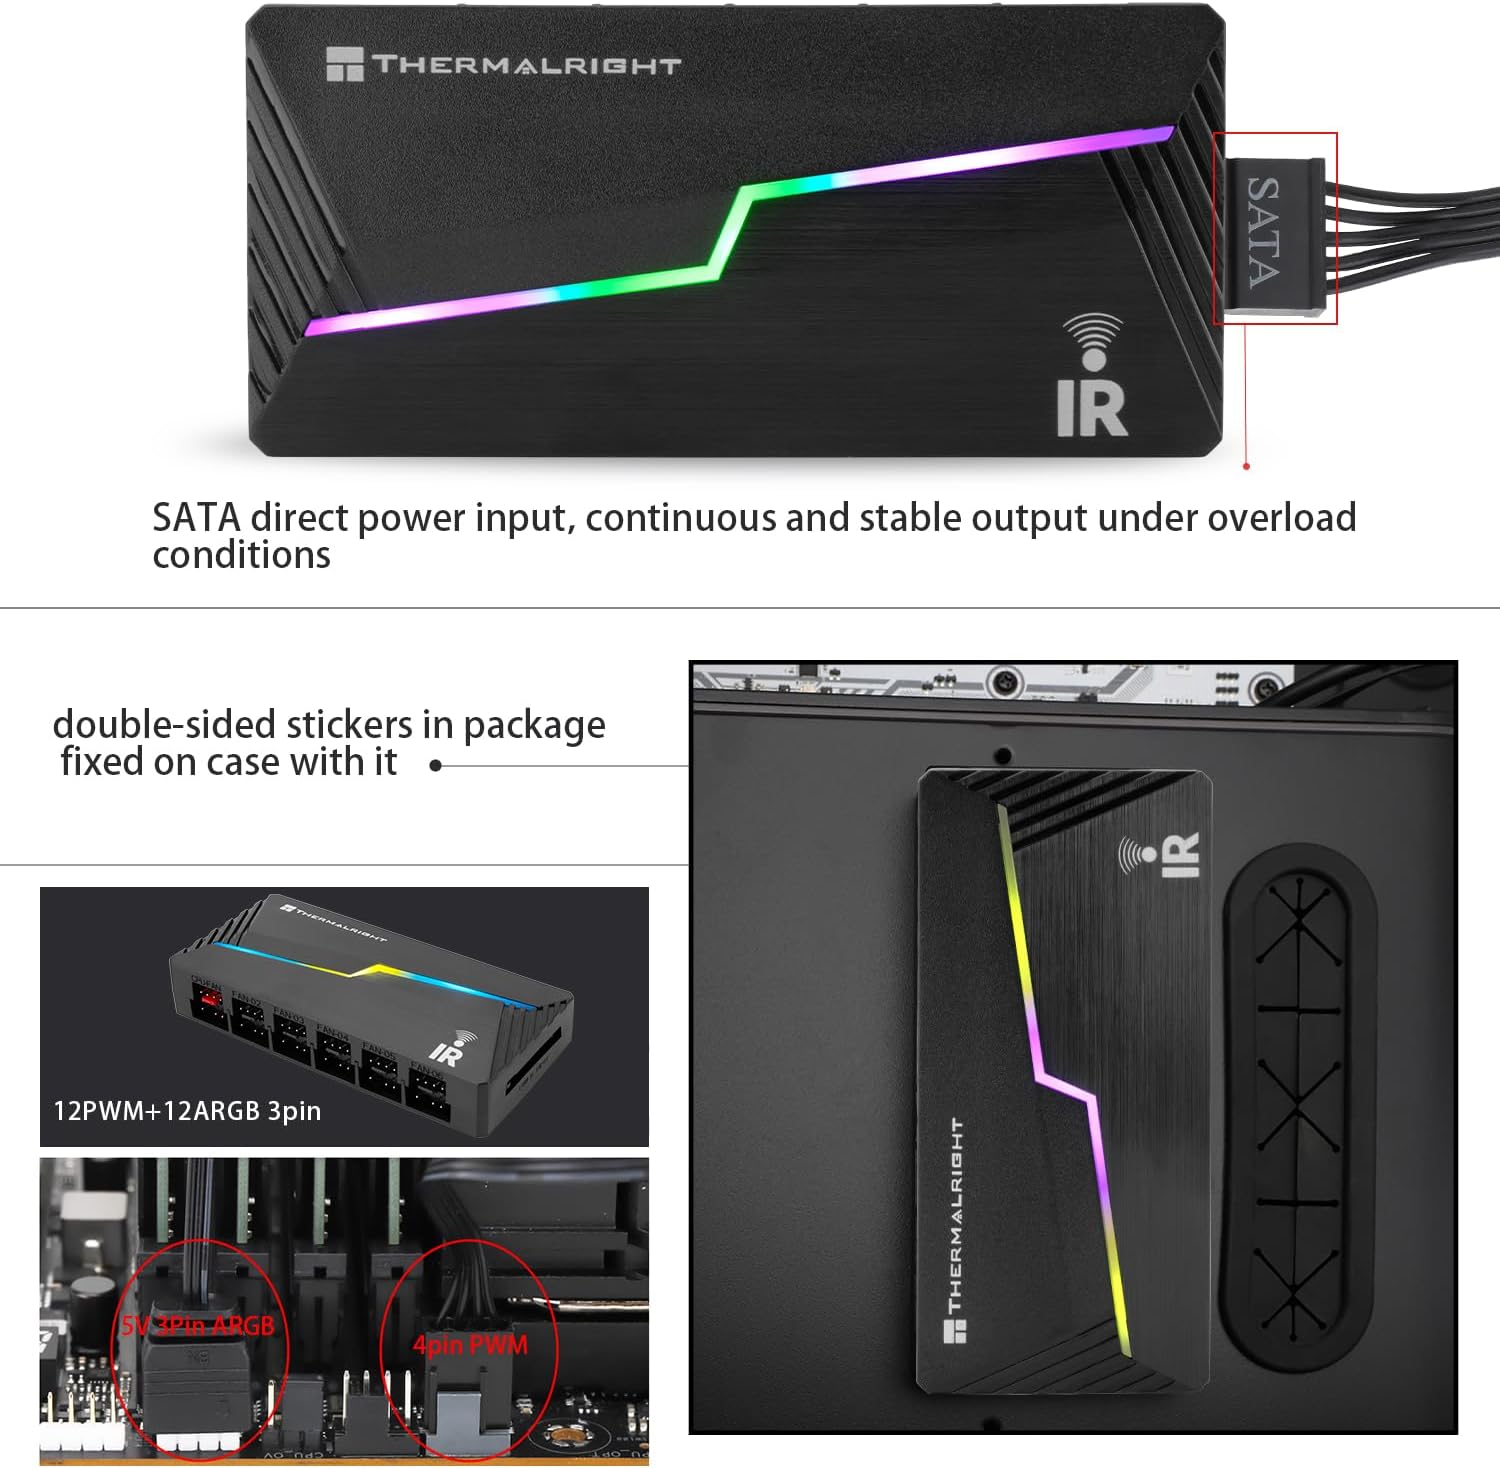
Figure 4: Double-sided adhesive for mounting

Figure 5: Hub mounted inside PC case for easy cable management
4. Operating Instructions
The Thermalright ARGB and Fan HUB X12 IR Black can be controlled via the included IR remote or synchronized with your motherboard's ARGB software.
4.1. Remote Control Functions
Before using the remote, remove the clear plastic tab from the battery compartment.

Figure 6: Wireless Remote Control Button Description
- Power Button: Turns ARGB lighting ON/OFF.
- R/M Button: Switches control between the hub's internal effects (Remote Control) and motherboard synchronization (Motherboard Control).
- Speed +/-: Adjusts the speed of dynamic lighting effects.
- Mode +/-: Cycles through different lighting modes/effects.
- Brightness +/-: Adjusts the brightness of the ARGB lighting.
- Color Shortcut Buttons: Provides quick access to static colors (Red, Green, Blue, White, and various mixed colors).
4.2. Motherboard Synchronization
To synchronize the ARGB lighting with your motherboard's software (e.g., ASUS Aura Sync, MSI Mystic Light Sync, Gigabyte RGB Fusion, ASRock Polychrome Sync), press the R/M button on the remote control until the hub switches to motherboard control mode. The lighting effects will then be managed by your motherboard's ARGB software.
Note: This device does not support fan speed regulation via the remote control. PWM fan speed is controlled by the motherboard.
5. Maintenance
To ensure the longevity and optimal performance of your Thermalright ARGB and Fan HUB X12 IR Black, follow these maintenance guidelines:
- Cleaning: Periodically clean the hub and connected components using compressed air to remove dust buildup. Ensure the PC is powered off and unplugged before cleaning.
- Cable Management: Regularly check and organize cables to prevent obstruction of airflow and ensure secure connections.
- Environmental Conditions: Operate the PC in a well-ventilated area and avoid exposing the hub to excessive heat or humidity.
6. Troubleshooting
If you encounter issues with your ARGB and Fan Hub, refer to the following troubleshooting tips:
- Lights Not Working:
- Check if the SATA power cable is securely connected to both the hub and the PSU.
- Verify that the 3-pin ARGB cable from the hub is correctly connected to a 5V_ARGB 3-pin header on your motherboard. Ensure it is not connected to a 12V 4-pin RGB header.
- If using the remote, ensure the plastic battery tab has been removed and the remote is pointed towards the hub's IR receiver.
- Press the Power button on the remote to ensure lighting is turned on.
- If using motherboard sync, ensure the R/M button on the remote is set to motherboard control mode and your motherboard's ARGB software is running and configured correctly.
- Fans Not Spinning:
- Check if the SATA power cable is securely connected to both the hub and the PSU.
- Ensure all 4-pin PWM fan cables are securely plugged into the fan sockets on the hub.
- Verify that the 4-pin PWM cable from the hub is connected to a functional fan header on your motherboard.
- Fan Speed Not Detected by Motherboard:
- Due to motherboard IC reading principles, only the fan connected to the red "CPU-FAN" socket on the hub will have its speed recognized by the motherboard. Ensure your primary CPU fan is connected to this port if you wish to monitor its speed.
- Remote Control Not Responding:
- Ensure the plastic battery tab has been removed from the remote.
- Check if the remote's battery needs replacement.
- Ensure there are no obstructions between the remote and the hub's IR receiver.
7. Specifications
| Feature | Specification |
|---|---|
| Model | FAN and ARGB HUB X12 IR Black |
| Dimensions (L x W x H) | 108mm x 50mm x 21mm (4.25"L x 1.97"W x 0.83"H) |
| Material | Plastic |
| Fan Ports | 12 x 4-Pin PWM (1 dedicated for CPU fan speed monitoring) |
| ARGB Ports | 12 x 3-Pin 5V ARGB |
| Power Connector | SATA |
| Control Method | IR Remote Control / Motherboard ARGB Sync |
| Cable Length | 500mm (approx.) |
| Compatible Devices | Desktop PCs with 5V 3-pin ARGB headers |
Figure 7: Product Dimensions
8. Warranty and Support
The Thermalright ARGB and Fan HUB X12 IR Black is covered by a standard manufacturer's warranty. For specific warranty terms, technical support, or service inquiries, please visit the official Thermalright website or contact their customer support directly.
Official Thermalright Website: www.thermalright.com


