1. Introduction
This manual provides essential information for the installation, operation, and maintenance of the FFGHUI C1U-H60 carburetor. Proper understanding and adherence to these instructions will ensure optimal performance and longevity of your equipment. This carburetor is designed as a replacement part for various Ryobi and Homelite outdoor power tools.
2. Compatibility
The FFGHUI C1U-H60 carburetor is compatible with the following models. Please verify your equipment's model number before installation.
Ryobi Models:
- 26cc Trimmer Models: RY26500, RY26520, RY26540, RY26901, RY26921, RY26941, CS30 (RY26500)
- 30cc Trimmer Models: RY29550, RY30120, RY30140, RY30160, RY30220, RY30240, RY30260, RY30522, RY30542, RY30562, RY30000, RY30000A, RY30000B, RY30002, RY30002A, RY30002B, RY30021A, RY30041A, RY30963, RY30542, RY30943, RY30522, RY30923, RY30562, RY30530, RY30550, RY30570, RY30931, RY30951, RY30971
- Hedge Trimmer: RY39500
- Backpack Blower: RY09600, RY09701
- Pole Pruner Models: RY52014, RY52502, RY52504, RY52903, RY52905, RY52001, RY52001A
- Brush Cutter Models: BC30 (RY30160), RY30260, RY30260B, RY30004, RY30004A, RY30004B, RY30004D, RY30061A, RY26540, RY26941
- Other Models: RY28000, RY28020, RY28040, RY28060, RY09053, RY09800
Homelite Models:
- UT20002, UT20002A, UT20003A, UT20004A, UT20004B, UT20006, UT20022, UT20022A, UT20023A, UT20024, UT20024A, UT20024B, UT20026, UT20042A, UT20046, UT20043A, UT20044A, UT20044B, UT20046
- UT-21004, UT21006, UT-21044, UT21046
- UT22600, UT22650
- UT-29005, UT29007, UT-29045, UT29047
- UT32600, UT32601, UT32601A, UT32605, UT32650, UT32651, UT32651A, UT32655
- Specific Trimmer Models: 25cc EZ Reach String Trimmer (UT20042A, UT20043A), 25cc Trim 'N Edge String Trimmer (UT20022, UT20022A, UT20023-A), 25cc TrimLite String Trimmer (UT20002, UT20002A, UT20003A), String Trimmer (UT20006, UT20026, UT20046, UT21006, UT29007, UT21046, UT2904)
3. Product Overview
The FFGHUI C1U-H60 carburetor is a precision-engineered component designed to mix air and fuel in the correct ratio for internal combustion engines found in various outdoor power equipment. It features a durable metal construction for reliable performance and long service life.

Figure 1: Front-side view of the FFGHUI C1U-H60 carburetor, showing the primer bulb and throttle linkage.
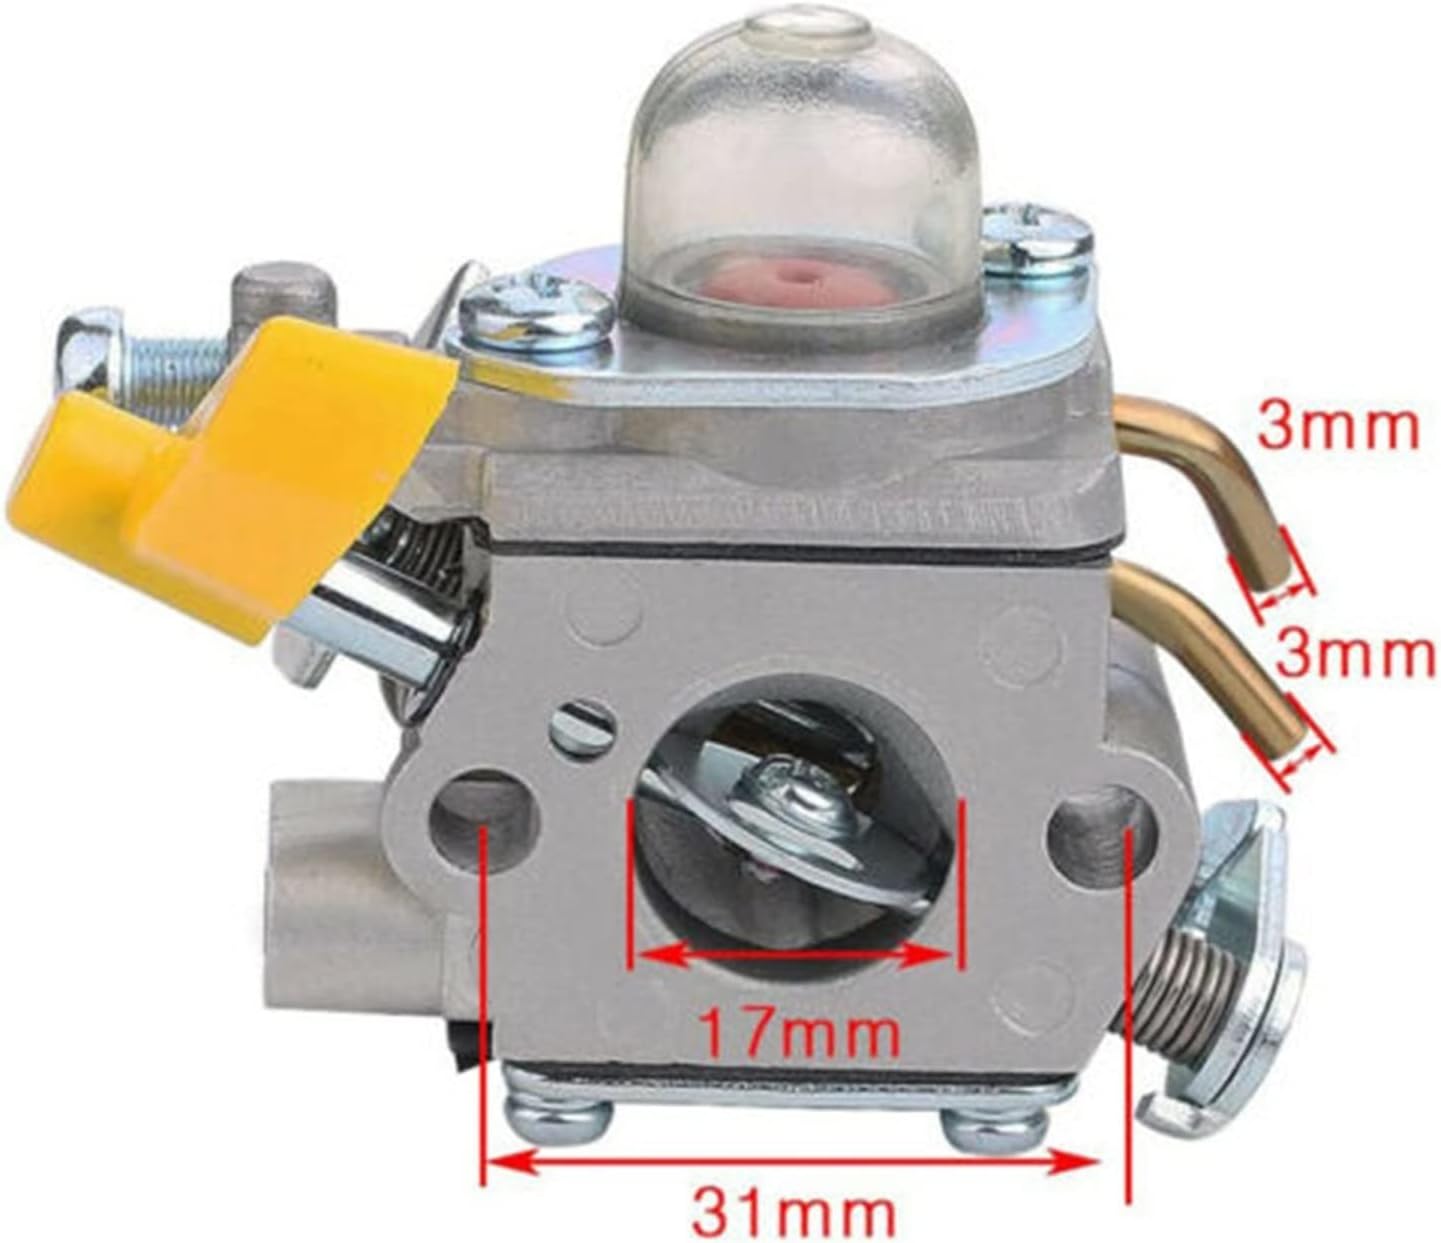
Figure 2: Side view of the carburetor with key dimensions indicated, including air intake diameter (17mm) and overall width (31mm).
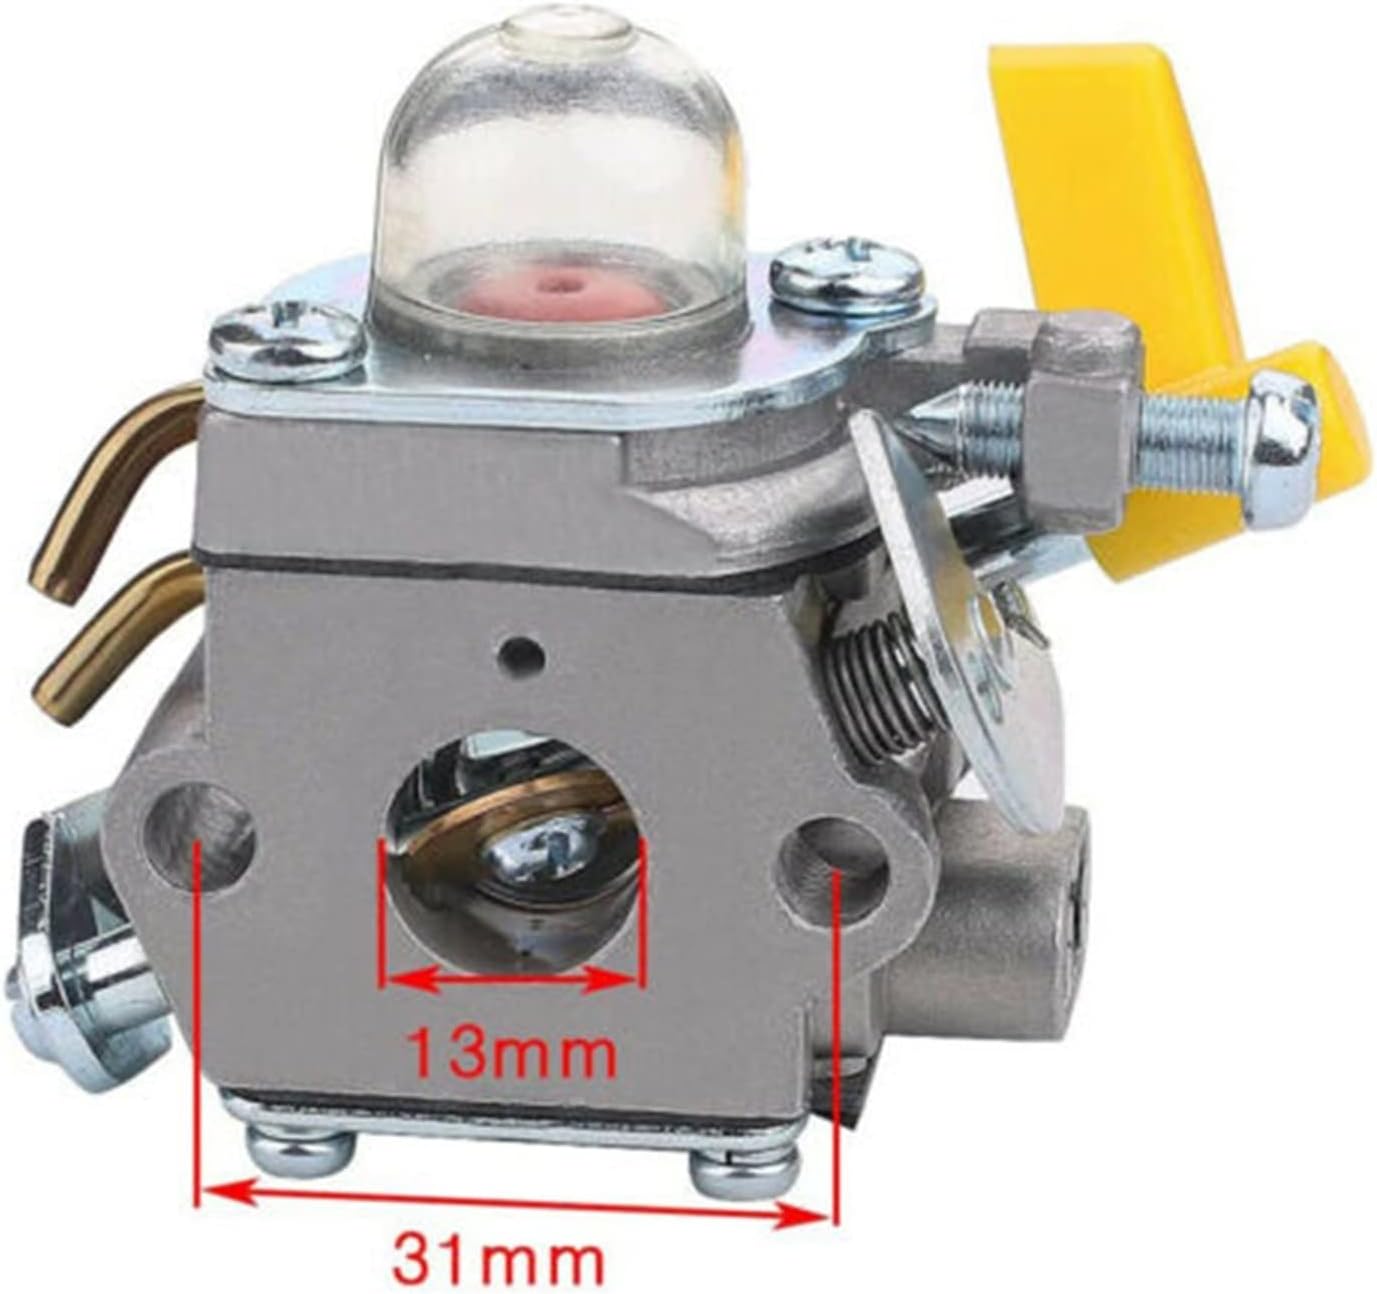
Figure 3: Another side view of the carburetor highlighting additional dimensions, such as the fuel intake diameter (13mm) and overall width (31mm).

Figure 4: Rear view of the carburetor, showing the mounting plate and fuel lines.

Figure 5: Top view of the carburetor, displaying the primer bulb and adjustment screws.

Figure 6: Bottom view of the carburetor, showing the fuel inlet and outlet ports.
4. Setup and Installation
Installation of a carburetor requires mechanical aptitude. If you are unsure about any steps, it is recommended to seek assistance from a qualified service technician.
- Safety First: Ensure the engine is cool and disconnected from any power source (e.g., spark plug wire removed) before beginning work. Wear appropriate personal protective equipment, including gloves and eye protection.
- Preparation: Drain any fuel from the fuel tank. Have appropriate tools ready, such as screwdrivers, wrenches, and pliers.
- Removal of Old Carburetor:
- Carefully disconnect the fuel lines, noting their original positions.
- Disconnect any throttle linkages or choke cables.
- Unbolt the old carburetor from the engine and air filter housing.
- Comparison: Crucially, compare your old carburetor with the new FFGHUI C1U-H60 carburetor shown in the pictures to ensure it is the correct replacement part. Pay attention to mounting holes, fuel line connections, and linkage points.
- Installation of New Carburetor:
- Install new gaskets (if provided) between the carburetor and the engine/air filter housing.
- Mount the new carburetor, ensuring all bolts are tightened securely but not over-tightened.
- Reconnect the throttle linkages, choke cables, and fuel lines to their correct positions.
- Final Checks: Reconnect the spark plug wire. Refill the fuel tank with the appropriate fuel mixture.
The carburetor is designed for easy installation, but precision is key for proper function.
5. Operation
After installation, the engine should start and run. Carburetors are typically pre-adjusted, but minor adjustments may be necessary for optimal performance, especially at different altitudes or with varying fuel types. Refer to your equipment's specific engine manual for detailed carburetor adjustment procedures.
- Priming: Press the primer bulb several times until fuel is visible in the bulb and flows freely.
- Choke: Use the choke lever as instructed by your equipment's manual for cold starts.
- Starting: Follow your equipment's starting procedure.
6. Maintenance
Regular maintenance of your carburetor and fuel system is crucial for reliable operation and extended lifespan of your outdoor power equipment.
- Fuel Quality: Always use fresh, clean fuel mixed according to your engine manufacturer's specifications (if applicable). Stale or contaminated fuel is a common cause of carburetor issues.
- Fuel Filter: Regularly inspect and replace the fuel filter to prevent debris from reaching the carburetor.
- Air Filter: Ensure the air filter is clean and properly installed to prevent dirt from entering the carburetor and engine.
- Storage: Before long-term storage, run the engine until it runs out of fuel, or use a fuel stabilizer to prevent fuel degradation and gumming in the carburetor.
- Cleaning: If performance issues arise, the carburetor may require cleaning. This typically involves disassembling, cleaning with carburetor cleaner, and reassembling with new gaskets. This procedure is best performed by experienced individuals or professionals.
7. Troubleshooting
If your equipment experiences issues after carburetor installation, consider the following common problems and solutions:
| Problem | Possible Cause | Solution |
|---|---|---|
| Engine won't start | No fuel, clogged fuel filter, incorrect choke setting, spark plug issue, incorrect installation. | Check fuel level and filter. Verify choke position. Inspect spark plug. Re-check all connections and installation steps. |
| Engine runs rough/stalls | Improper fuel-air mixture, dirty air filter, fuel contamination, vacuum leak. | Clean/replace air filter. Use fresh fuel. Check for loose connections or damaged gaskets. Carburetor adjustment may be needed. |
| Fuel leaks | Loose fuel lines, damaged gaskets, faulty primer bulb. | Inspect all fuel line connections. Replace damaged gaskets or primer bulb. |
For persistent issues, consult a professional service technician.
8. Specifications
- Model: C1U-H60
- Replaces Part Numbers: 3074504, 308054003, 308054013, 308054004, 308054008, 308054012, 308054015, 308054028, 308054034, 308054043, 985624001, C1U-H60D, C1U-H60E, C1U-H60
- Material: High-quality metal construction
- Item Weight: Approximately 1.76 ounces (50 grams)
- Package Dimensions: Approximately 0.39 x 0.39 x 0.39 inches (1 x 1 x 1 cm) - Note: These dimensions appear to be placeholder values and may not reflect the actual product size. Refer to product images for visual scale.
- Features: Stable performance, high reliability, durable, easy to install.
9. Important Notes
Always compare your existing carburetor with the images and specifications provided in this manual to ensure compatibility before purchase and installation.
This product is a replacement part. Refer to your original equipment manufacturer's manual for specific safety warnings and detailed repair procedures.