1. Introduction
Thank you for choosing the Anweller Smart Deadbolt Lock. This manual provides detailed instructions for the installation, operation, and maintenance of your new smart lock. Designed for enhanced security and convenience, the MD1 features multiple unlocking methods, a built-in display screen, and robust construction. Please read this manual thoroughly before installation and use to ensure proper function and safety.
2. Product Overview
2.1. Package Contents
The Anweller Smart Deadbolt Lock package includes the following components:
- 1 x 10000mAh Li-ion Battery
- 1 x MD1 Smart Deadbolt Lock (All Parts)
- 1 x Smart Sensor
- 2 x Mechanical Keys
- 4 x RFID Cards
2.2. Key Features
The MD1 Smart Deadbolt Lock offers advanced features for modern home security:
- Exclusive Display Screen: Real-time display of lock modes, date, time, battery level, passcode input, auto-lock countdown, and low battery reminder.
- Enhanced Security and Smart Functions: Magnetic Sensor for auto-lock upon door closure, app reminders for open doors, and smartphone proximity unlock.
- WiFi and Bluetooth Dual-Mode: Built-in WiFi for remote control (2.4GHz only), with an option to switch to Bluetooth mode for power saving.
- 10000mAh Rechargeable Battery: High-capacity Li-ion battery provides up to 180 days standby time, rechargeable via Type-C in 4 hours.
- High-Security and Durable: Complies with ANSI/BHMA Grade 2 safety standards, made of aluminum alloy and zinc alloy, IP65 Waterproof, and tested for 10+ years of use.
- Easy DIY Installation: Simple installation with a screwdriver in 15 minutes, no drilling or extra batteries required. Reversible for left and right-handed doors.
- 6 Ways to Unlock: Fingerprint, Passcode, RFID Card, Mobile App, Apple Watch, and Spare Key.
2.3. Product Diagram

The image above shows the main components of the Anweller Smart Deadbolt Lock: the exterior keypad with display, the interior unit with the manual turn knob, and the separate magnetic sensor.
3. Setup and Installation
The Anweller MD1 Smart Deadbolt Lock is designed for easy DIY installation. No drilling is required for standard door preparations.
3.1. Pre-Installation Check
Before beginning installation, ensure your door meets the following specifications:
- Backset: 2-3/8" or 2-3/4" (60mm or 70mm)
- Hole Diameter: 2-1/8" (54mm) or 1-1/2" (38mm)
- Door Thickness: 1-3/8" to 2-1/8" (35mm to 55mm)
- Suitable for single cylinder deadbolts. Not compatible with mortise locks.
- Reversible for both left-handed and right-handed doors.

This diagram illustrates the necessary door measurements to ensure proper fit and function of the smart deadbolt lock.
3.2. Installation Steps
Follow these steps for physical installation. A screwdriver is the only tool required.
- Check Deadbolt Adjustment: Verify if the deadbolt requires adjustment for your door's backset.
- Fix Latch Lock Body: Ensure the "UP" marking on the latch faces upward and the latch is in the unlocked position before inserting into the door.
- Install Front Lock: Position the exterior keypad unit onto the door.
- Install Rear Lock Bracket: Secure the mounting plate on the interior side of the door.
- Install Rear Lock: Connect the cable from the front lock to the rear lock unit and secure it to the mounting plate.
- Install Battery: Insert the 10000mAh Li-ion battery into the interior unit.
- Install Magnetic Sensor: Attach the magnetic sensor to the door frame, aligning it with the main lock unit. This sensor enables auto-lock and door status detection.
The video above demonstrates the complete installation process, including how to check door dimensions, install the latch, front and rear lock units, battery, and the magnetic sensor. It is highly recommended to watch this video before starting the installation.
3.3. App Setup
After physical installation, download the eSmartLock app (or similar, based on product details) to configure your smart lock. The app allows for remote control, user management, and access to advanced features. Ensure your home router supports 2.4GHz WiFi for direct connection.

This image illustrates the mobile application interface, highlighting its ability to control the lock remotely via Wi-Fi, manage users, and view lock history.
4. Operating Instructions
4.1. Unlocking Methods
The MD1 Smart Deadbolt Lock offers six convenient ways to unlock:
- Fingerprint: Register your fingerprints through the app for quick and secure access.
- Passcode: Create temporary or permanent passcodes via the keypad or app.
- RFID Card: Use the provided RFID cards for tap-to-unlock convenience.
- Mobile App: Unlock remotely from anywhere using the eSmartLock app (requires WiFi connection).
- Apple Watch: Unlock directly from your Apple Watch for seamless entry.
- Spare Key: Traditional mechanical keys are provided for emergency backup.

This image visually represents all six unlocking methods available for the Anweller MD1 lock, emphasizing its versatility and user-friendliness.
4.2. Display Screen Functions
The integrated display screen provides real-time information and feedback:
- Date and Time: Current date and time display.
- Battery Level: Indicates remaining battery power.
- Passcode Input Display: Shows entered digits for verification.
- Mode Display: Shows current lock mode (e.g., Passage Mode).
- Auto-Lock Countdown: Displays the countdown before automatic locking.
- Low Battery Reminder: Alerts when battery is low.
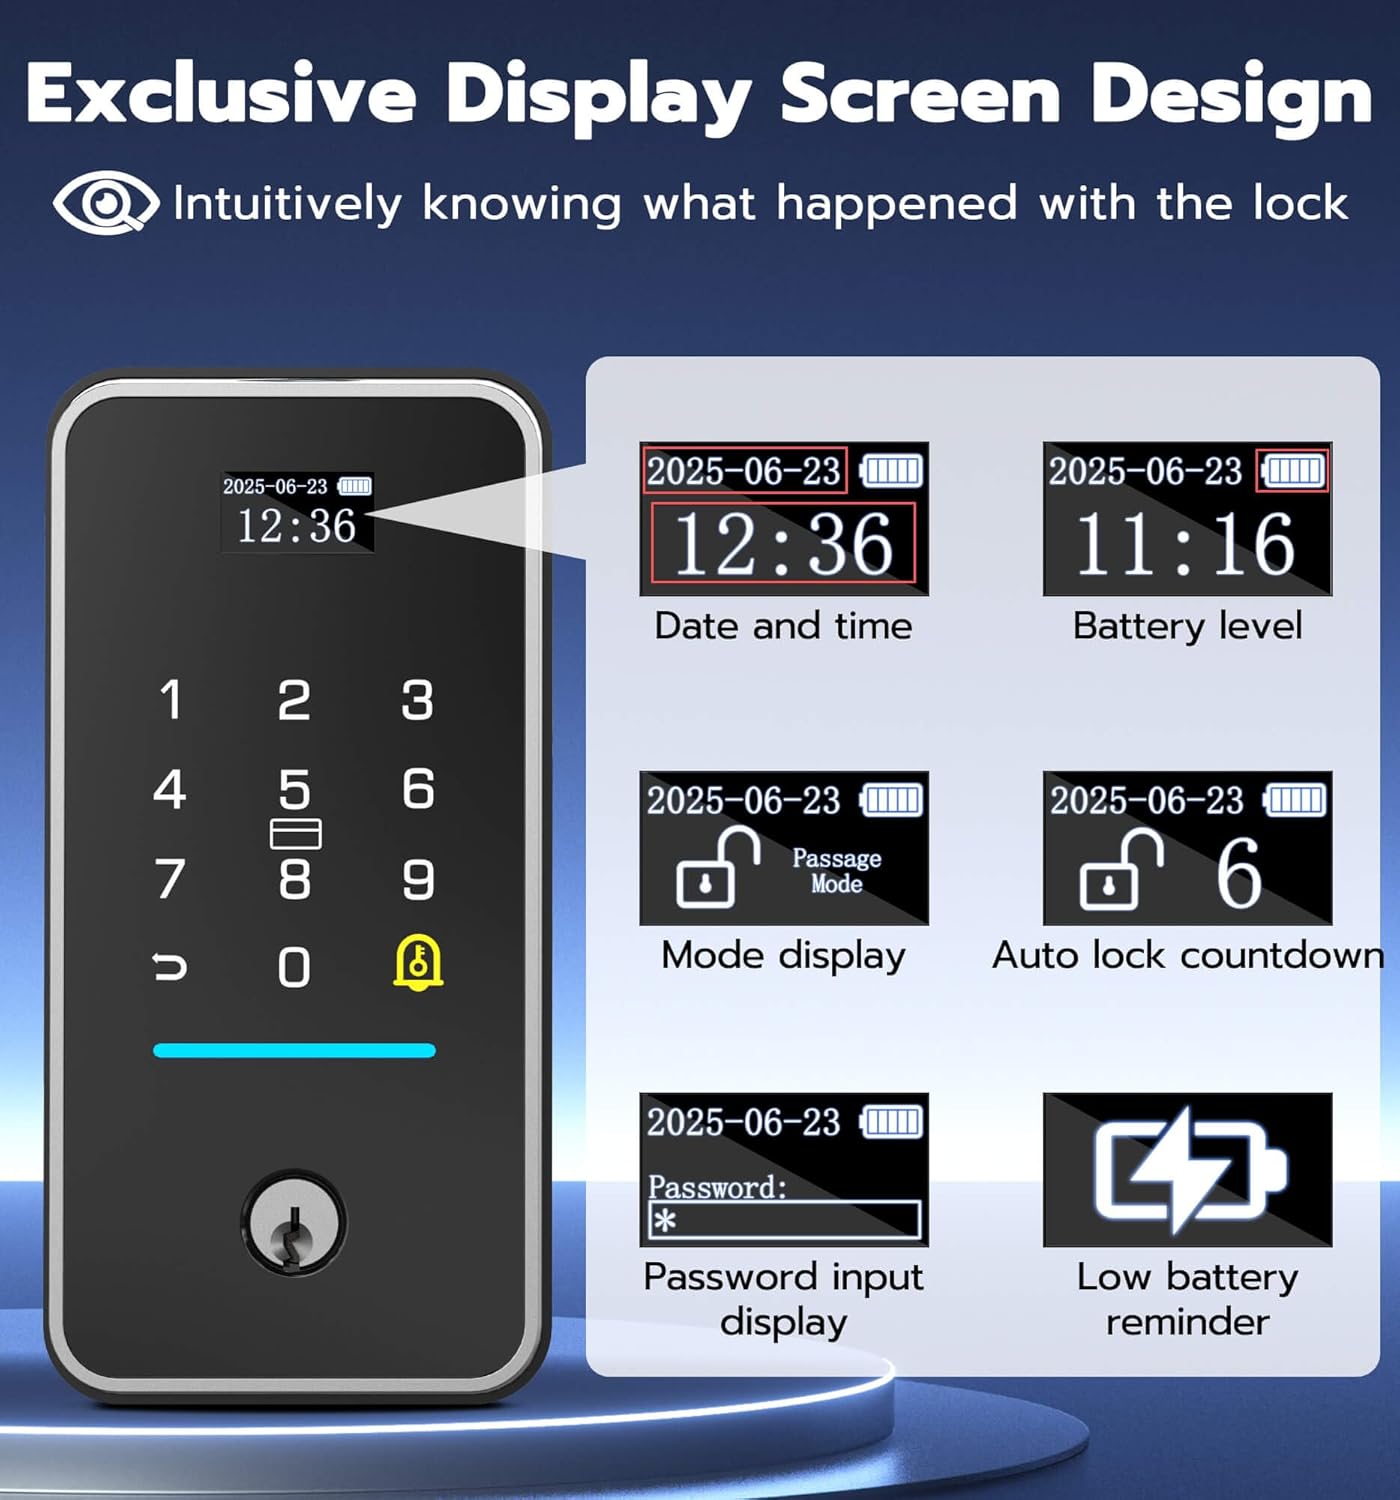
The image above highlights the various pieces of information displayed on the lock's screen, providing users with immediate status updates.
4.3. Smart Sensor and Auto-Lock
The magnetic sensor enhances security and convenience:
- The lock automatically locks when the door is closed.
- The app will send a reminder if the door has been open for over 60 seconds.

This image demonstrates how the smart sensor works, providing both app notifications for open doors and automatic locking when the door is closed.
4.4. Lock Modes
The MD1 offers different operational modes for various needs:
- Normal Mode: Auto-locks after a set time (15/30/45 seconds).
- Passage Mode: Keeps the lock continuously unlocked, ideal for high-traffic periods.
- Anti-Unlock Mode: Only the administrator can unlock, providing maximum security.

This image illustrates the different operational modes of the lock, including Normal, Passage, and Anti-Unlock modes, and how they can be selected.
5. Maintenance
5.1. Battery Management
The MD1 Smart Deadbolt Lock is powered by a 10000mAh rechargeable Li-ion battery, offering extended usage and environmental benefits.
- Battery Life: Up to 180 days of standby time on a single charge.
- Charging: Recharge via Type-C port in approximately 4 hours.
- Low Battery Alert: The display screen will show a low battery reminder.
This image details the lock's rechargeable battery, its capacity, and charging method, along with options for emergency power via a power bank or mechanical key.
5.2. Emergency Unlock
In case the battery runs out, you can still access your home:
- Mechanical Key: Use one of the provided spare mechanical keys.
- Emergency Power: Connect a power bank via the USB-C port on the lock to temporarily power it and unlock.
5.3. Cleaning
To maintain the appearance and functionality of your lock, wipe it with a soft, damp cloth. Avoid using abrasive cleaners or solvents.
6. Troubleshooting
This section addresses common issues you might encounter with your Anweller Smart Deadbolt Lock.
| Problem | Possible Cause | Solution |
|---|---|---|
| Lock not responding / No power. | Battery is depleted. | Recharge the 10000mAh Li-ion battery using the Type-C port. Use a mechanical key or external power bank for immediate access. |
| Difficulty with app setup or WiFi connection. | Incorrect WiFi credentials, weak 2.4GHz signal, or app synchronization issue. | Ensure you are connecting to a 2.4GHz WiFi network. Verify WiFi password. Try restarting your router and the lock. Re-attempt app pairing. If issues persist, contact customer support. |
| Fingerprint not recognized. | Finger not placed correctly, dirty sensor, or fingerprint not properly enrolled. | Ensure your finger covers the sensor completely. Clean the sensor with a soft cloth. Re-enroll your fingerprint in the app, ensuring multiple angles are captured. |
| Lock repeatedly locks/unlocks or makes clicking noises. | Door frame or strike plate misalignment, or deadbolt obstruction. | Check for any obstructions in the door frame or strike plate. Ensure the strike plate is perfectly aligned with the deadbolt. Adjust the strike plate if necessary. |
| Auto-lock not functioning. | Magnetic sensor misalignment or not installed. | Verify the magnetic sensor is correctly installed and aligned with the main lock unit on the door frame. Ensure it is within the recommended distance. Check app settings for auto-lock feature activation. |
7. Product Specifications
| Feature | Detail |
|---|---|
| Brand | Anweller |
| Model Number | MD1 |
| Color | Black |
| Power Source | Battery Powered (10000mAh Li-ion) |
| Connectivity Technology | WiFi (2.4GHz), Bluetooth |
| Compatible Devices | Smartphone |
| Item Dimensions (L x W x H) | 2.9 x 1.1 x 6 inches |
| Item Weight | 2.9 Pounds |
| Control Method | App |
| Recommended Uses | Front Doors, Side Doors, Exterior Doors, Garage Door, etc. |
| Battery Life | Up to 180 days standby time |
| Included Components | 1 x 10000mAh Li-ion Battery, 1 x MD1 Smart Deadbolt Lock (All Parts), 1 x Smart Sensor, 2 x Mechanical Keys, 4 x RFID Cards |
| Sensor Technology | Magnetic Sensor |
| Connector Type | USB Type C |
| Material | Aluminum Alloy, Zinc Alloy |
| Waterproof Rating | IP65 |
| Safety Standards | ANSI/BHMA Grade 2 |
8. Warranty and Customer Support
Anweller is committed to providing high-quality products and excellent customer service.
- Warranty: Anweller provides an 18-month warranty.
- Technical Support: Free lifetime technical support is available.
- Replacements/Refunds: Hassle-free replacements or refunds are available within the warranty period.
- Contact: For any queries or support, please contact us at hongjdzwj@outlook.com.


