
Introduction
Thank you for choosing the XREXS 3-Channel Digital Kitchen Timer. This versatile timer is designed to assist you with various timing needs in the kitchen and beyond, featuring a large display, magnetic back, stand, and adjustable volume. Please read this manual carefully to ensure proper use and maintenance of your device.

Image: The XREXS 3-Channel Digital Kitchen Timer, showing its large display with three separate timer readouts, along with two AAA batteries.
Product Features
- 3-Channel Design: Simultaneously track three different events or tasks.
- Large LCD Display: Clear and easy-to-read digits for all three timers.
- Adjustable Volume: Customize the alarm sound level (High/Low).
- Multiple Placement Options: Features a magnetic back for metal surfaces, a foldable stand for tabletop use, and a hanging hole for hooks.
- Memory Function: Recalls the last set time for quick reuse.
- Countdown and Count-up: Functions as both a countdown timer and a stopwatch.
Package Contents
- 1 x XREXS 3-Channel Digital Kitchen Timer
- 2 x AAA Batteries (included)
- 1 x Lanyard/Cord
Product Overview
Familiarize yourself with the timer's components and controls.

Image: Front view of the XREXS timer, highlighting the Hour (HR), Minute (MIN), Second (SEC) buttons, Timer selection buttons (TIMER 1, TIMER 2, TIMER 3), ON/OFF, CLEAR, and START/STOP buttons.
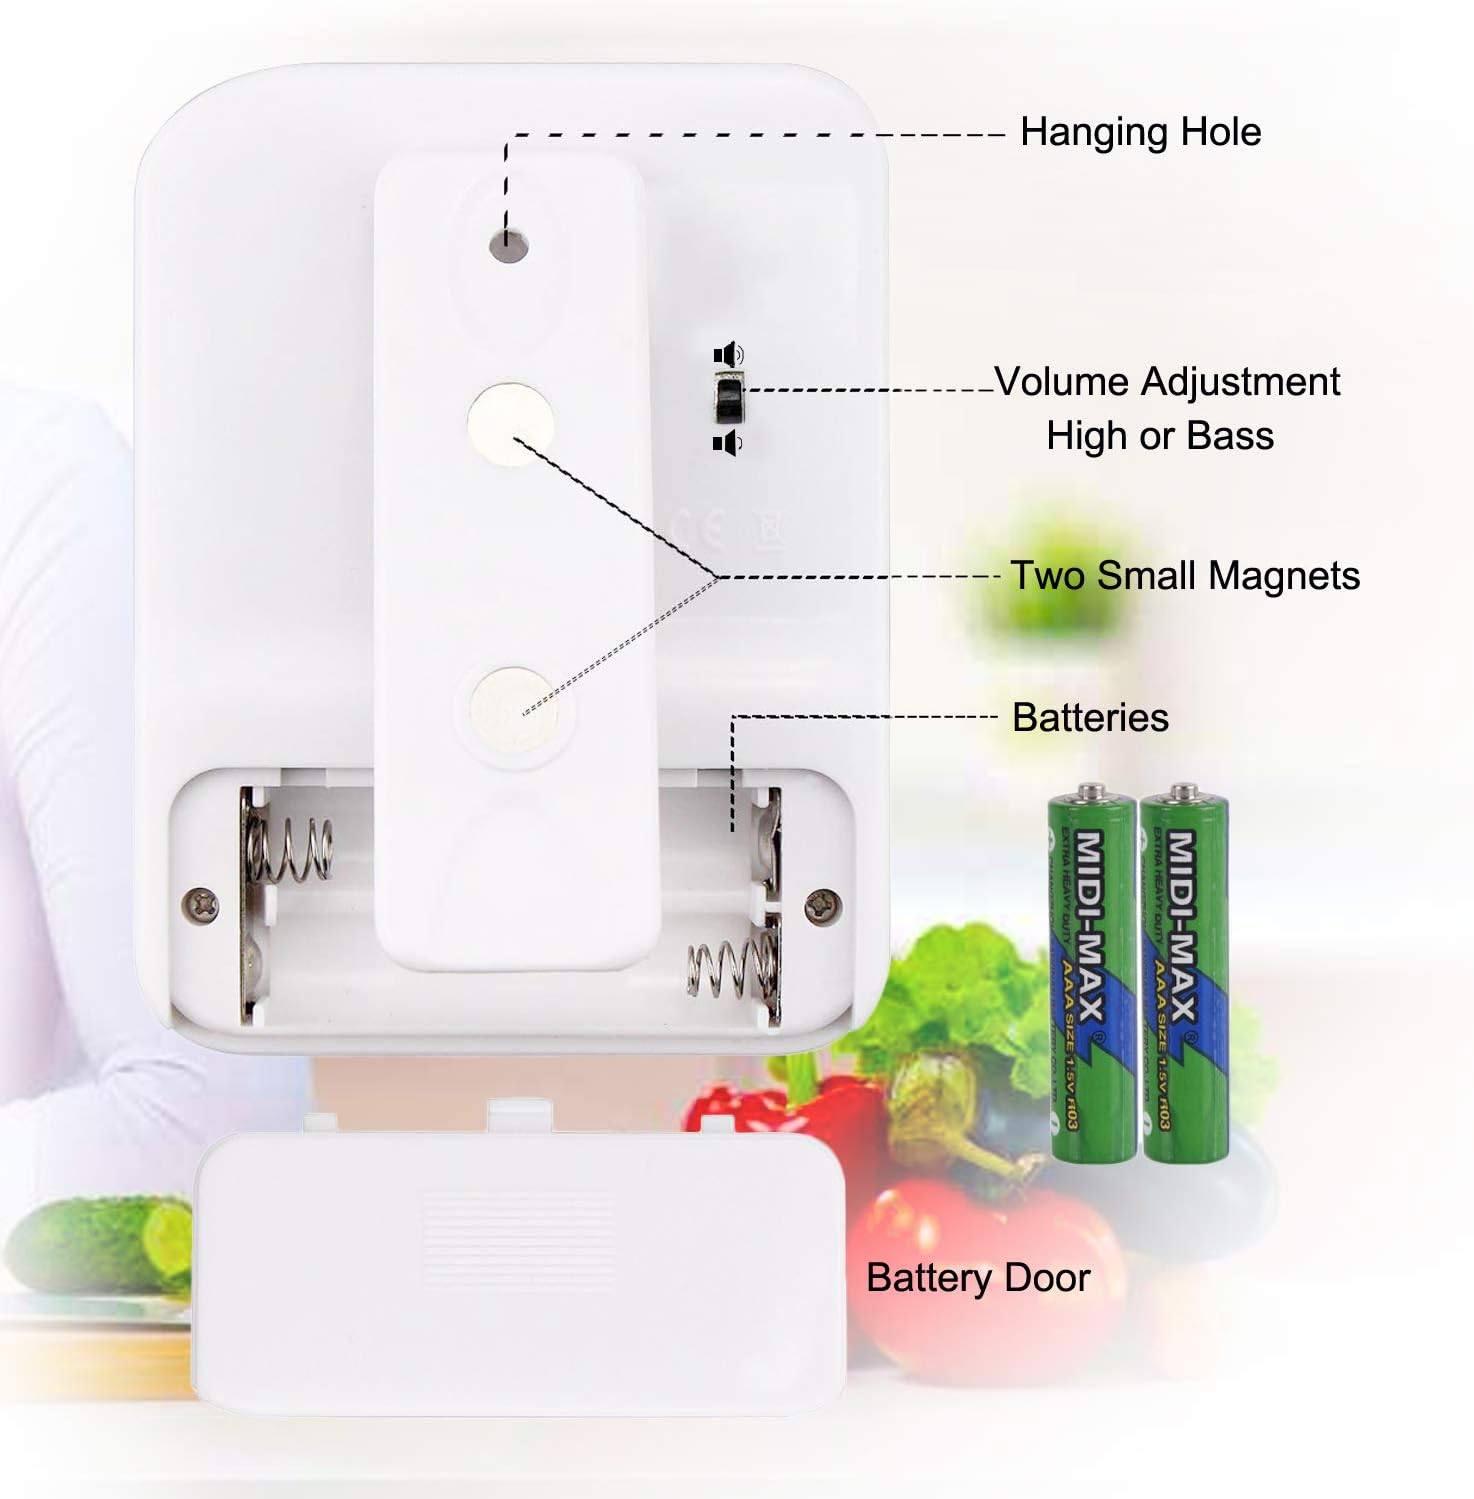
Image: Rear view of the XREXS timer, illustrating the battery door, two small magnets, the hanging hole, and the volume adjustment switch (High or Bass).
Button Functions:
- TIMER 1/2/3: Selects the desired timer channel (Timer 1, Timer 2, or Timer 3) for setting or operation.
- HR: Press to set hours. Long press to fast forward.
- MIN: Press to set minutes. Long press to fast forward.
- SEC: Press to set seconds. Long press to fast forward.
- ON/OFF: Long press for 3 seconds to turn the timer on or off (standby mode).
- CLEAR: Clears the current timer setting to zero.
- START/STOP: Starts or stops the countdown/count-up operation for the selected timer.
Setup
1. Battery Installation
- Locate the battery compartment on the back of the timer.
- Slide open the battery door.
- Insert two (2) AAA batteries, ensuring correct polarity (+/-).
- Close the battery door securely.
2. Initial Power On
After installing batteries, long press the ON/OFF button for 3 seconds to activate the timer. The display will light up.
3. Volume Adjustment
On the back of the timer, locate the small switch for volume adjustment. Slide it to select between High or Low alarm volume.
4. Placement Options
- Magnetic Back: Attach the timer to any metal surface, such as a refrigerator door.
- Foldable Stand: Pull out the integrated stand on the back to place the timer on a countertop or desk.
- Hanging Hole: Use the hole at the top of the timer to hang it on a hook or with the included lanyard.

Image: Demonstrates the versatility of the XREXS timer, showing it magnetically attached to a refrigerator, standing on a countertop, hanging from a hook, and clipped to a belt for portability.
Operating Instructions
Setting a Countdown Timer:
- Press TIMER 1, TIMER 2, or TIMER 3 to select the desired timer channel. The selected timer's display will flash.
- Press the HR button to set the hours, MIN to set the minutes, and SEC to set the seconds. Long press these buttons for faster setting. The maximum setting is 99 hours, 59 minutes, 59 seconds.
- Once the desired time is set, press the START/STOP button to begin the countdown. The timer will start counting down, and the colon (:) will flash.
- To pause the countdown, press START/STOP again. Press it once more to resume.
- When the countdown reaches zero, the timer will beep and automatically start counting up (as a stopwatch) to indicate elapsed time since the alarm.
- To stop the alarm, press any button.
- To clear the timer setting to zero, press the CLEAR button.
Using as a Stopwatch (Count-up Timer):
- Select a timer channel (TIMER 1/2/3).
- Ensure the selected timer is cleared to "00:00:00" by pressing CLEAR if necessary.
- Press START/STOP to begin counting up.
- Press START/STOP again to pause the count-up. Press again to resume.
- Press CLEAR to reset the stopwatch to zero.
Maintenance
- Cleaning: Wipe the timer with a soft, damp cloth. Do not use abrasive cleaners or immerse the device in water.
- Storage: Store the timer in a cool, dry place when not in use.
- Battery Care: If the timer will not be used for an extended period, remove the batteries to prevent leakage and damage.
Troubleshooting
| Problem | Possible Cause | Solution |
|---|---|---|
| Timer does not turn on. | Batteries are dead or incorrectly installed. | Check battery polarity. Replace with new AAA batteries. Long press ON/OFF button for 3 seconds. |
| Display is dim or flickering. | Low battery power. | Replace batteries. |
| Alarm is too quiet/loud. | Volume setting is incorrect. | Adjust the volume switch on the back of the timer. |
| Timer does not start/stop. | Incorrect button press or timer not selected. | Ensure a timer channel (1, 2, or 3) is selected. Press START/STOP firmly. |
| Cannot set time. | Timer not in setting mode or wrong channel selected. | Select the desired timer channel (TIMER 1/2/3) first. Ensure the timer is not currently running. |
Specifications
| Brand | XREXS |
| Model Number | PS-382 |
| Color | White |
| Dimensions (L x W x H) | 7 x 2 x 10 cm (approx. 2.76 x 0.79 x 3.94 inches) |
| Item Weight | 100 grams (approx. 0.22 lbs) |
| Power Source | 2 x AAA Batteries (included) |
| Max Time Setting | 99 Hours, 59 Minutes, 59 Seconds |
| Channels | 3 Independent Channels |

Image: The XREXS timer with its approximate dimensions indicated: 6.7 cm width, 9 cm height, and 4.3 cm display height.
Safety Information
- Do not expose the timer to extreme temperatures, direct sunlight, or high humidity.
- Avoid dropping the timer or subjecting it to strong impacts.
- Keep out of reach of small children.
- Do not attempt to disassemble or repair the timer yourself. Contact customer support if issues arise.
- Dispose of used batteries responsibly according to local regulations.