1. Introduction
This manual provides essential information for the safe and effective installation, operation, and maintenance of your ETEK WiFi Smart Residual Current Circuit Breaker with Overcurrent Protection (RCBO) EKR3L. Please read this manual thoroughly before installation and retain it for future reference.
1.1. Safety Information
- Installation and maintenance must be performed by qualified electricians only.
- Ensure the main power supply is disconnected before any installation or wiring work.
- Do not operate the device if it appears damaged.
- Adhere to all local electrical codes and regulations.
- The "Test Monthly" button should be pressed regularly to ensure proper functioning of the residual current protection.
2. Product Features
- WiFi Connectivity: Remote control and monitoring via a smartphone application.
- Auto Reclosing Function: Automatically resets the circuit breaker after a temporary fault, minimizing downtime.
- Residual Current Protection (RCBO): Protects against earth leakage faults (30mA sensitivity).
- Overcurrent Protection: Safeguards against short circuits and overloads (e.g., 16A rating for this variant).
- High-Quality Construction: Made with insulating, flame-retardant, and UV-resistant materials for durability.
- Secure Connections: Screw-type terminals ensure stable electrical connections.
- Versatile Application: Suitable for solar inverters, charge controllers, and battery banks.
3. Product Overview and Components
Familiarize yourself with the components of the ETEK WiFi Smart RCBO EKR3L:
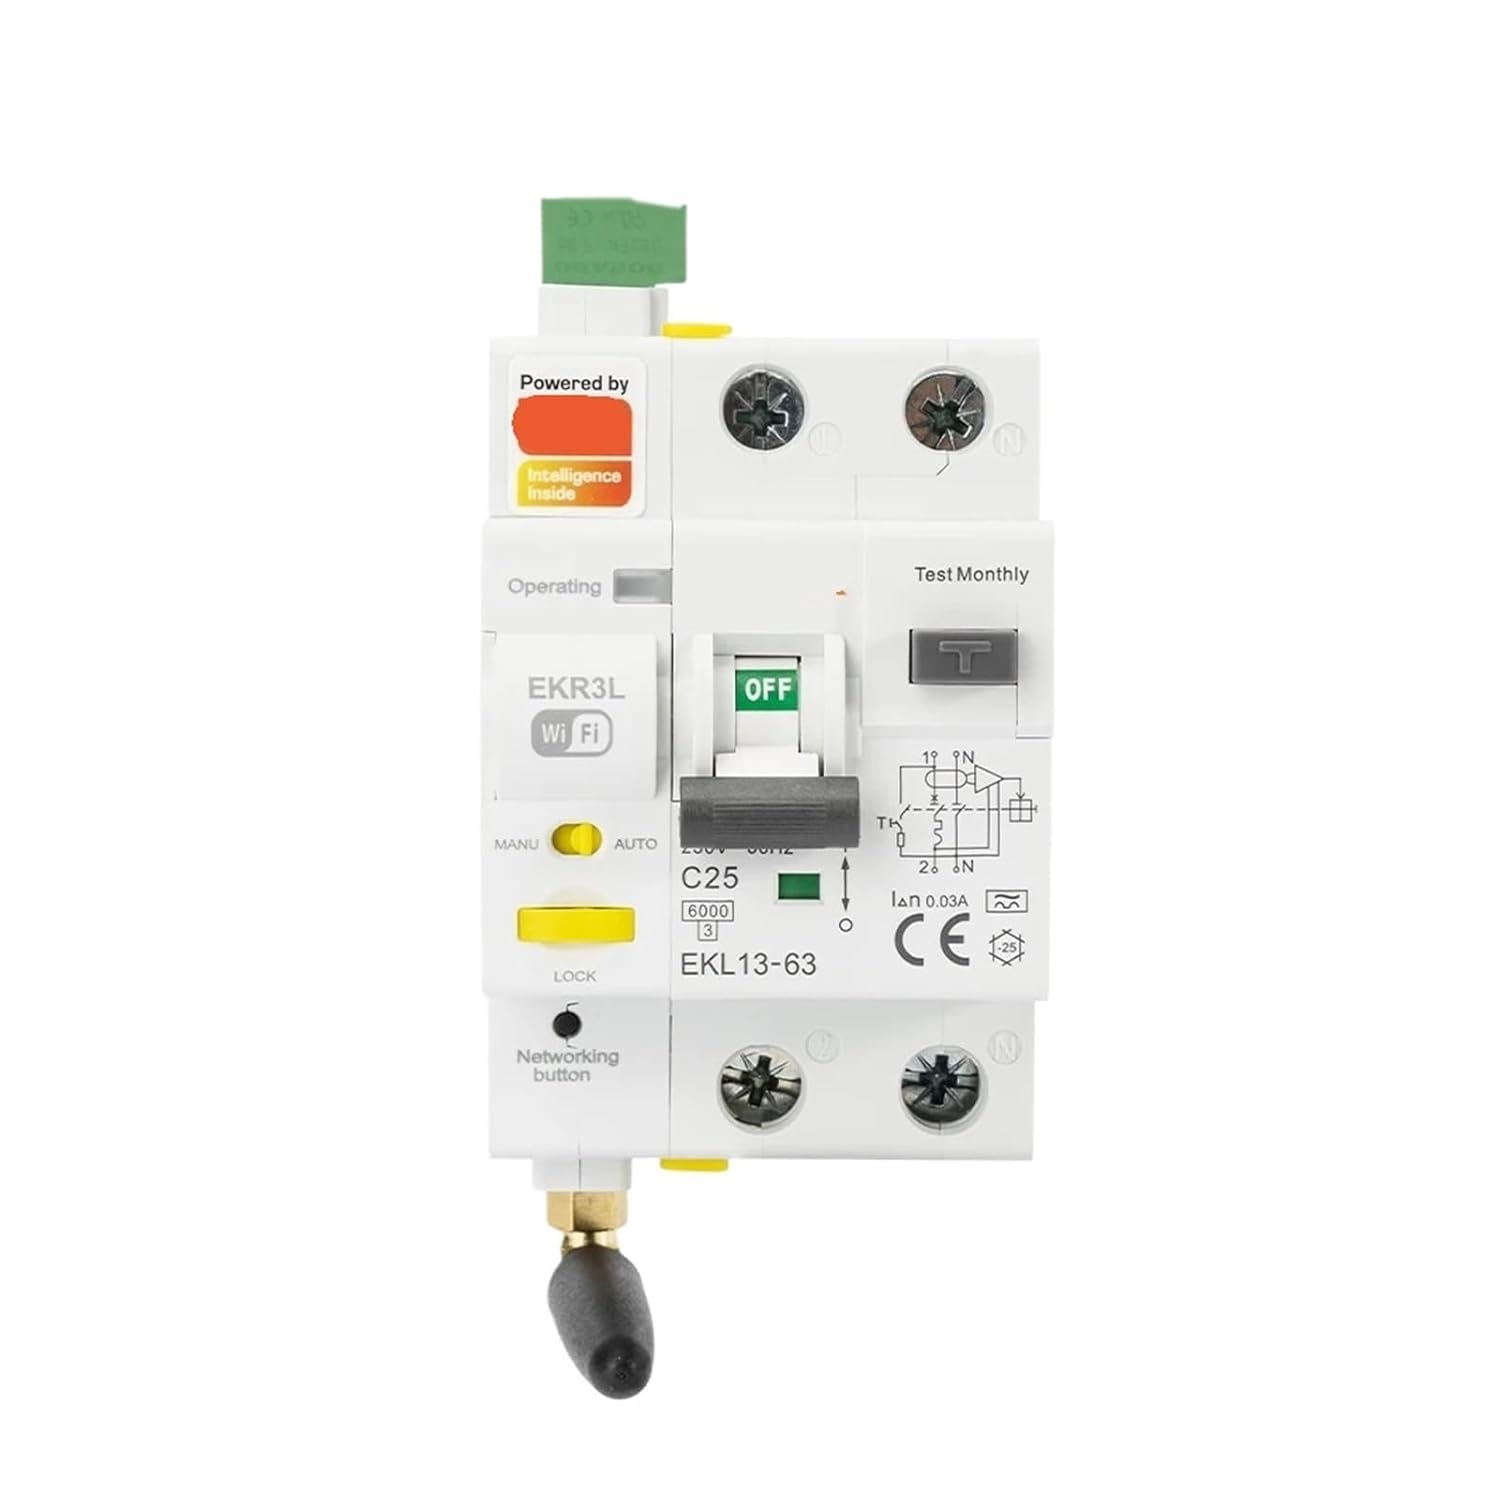
Figure 1: Front view of the ETEK WiFi Smart RCBO EKR3L Circuit Breaker. Key components include the main switch (OFF/ON), Test Monthly button, MANU/AUTO selector, Networking button, and WiFi indicator.
- Main Switch (OFF/ON): Manually disconnects or connects the circuit.
- Test Monthly Button: Initiates a self-test for the residual current protection function.
- MANU/AUTO Selector: Switches between manual operation and automatic reclosing mode.
- Networking Button: Used for pairing the device with the WiFi network.
- WiFi Indicator: Shows the status of the WiFi connection.
- Operating Indicator: Displays the operational status of the device.
- Lock Indicator: Indicates if the device is in a locked state.
- Specifications Label: Displays electrical ratings such as C25 (25A rated current, though this variant is 16A, the image shows C25), 6000 (breaking capacity), IΔn 0.03A (residual operating current), and CE certification.
4. Setup and Installation
4.1. Wiring Instructions
Refer to the wiring diagram on the device and follow these steps:
- Ensure all power is OFF at the main distribution board.
- Connect the incoming live (L) and neutral (N) wires to the top terminals (1 and N) of the RCBO.
- Connect the outgoing live (L) and neutral (N) wires to the bottom terminals (2 and N) of the RCBO, leading to the protected circuit.
- Tighten all screw terminals securely to prevent loose connections and overheating.
4.2. WiFi Pairing
To enable remote control and monitoring:
- Download the compatible smartphone application (refer to product packaging or manufacturer's website for app details).
- Ensure the RCBO is powered ON.
- Press and hold the "Networking button" until the WiFi indicator starts flashing, indicating pairing mode.
- Follow the in-app instructions to connect the device to your 2.4GHz WiFi network.
- Once successfully paired, the WiFi indicator will remain steadily lit.
5. Operating Instructions
5.1. Manual Operation
- To turn the circuit ON, push the main switch lever upwards.
- To turn the circuit OFF, push the main switch lever downwards.
5.2. Auto Reclosing Function
- Set the MANU/AUTO selector to "AUTO" for automatic reclosing functionality.
- In AUTO mode, if the RCBO trips due to a temporary fault, it will attempt to reclose the circuit after a short delay.
- If the fault persists, the device will remain tripped for safety.
- Set the selector to "MANU" to disable auto-reclosing and operate the device manually.
5.3. Remote Control via App
- Open the paired smartphone application.
- From the app interface, you can remotely switch the RCBO ON or OFF.
- The app may also provide status updates and fault notifications.
6. Maintenance
6.1. Monthly Test
It is crucial to test the residual current protection function monthly:
- Ensure the RCBO is in the ON position.
- Press the "Test Monthly" button. The RCBO should immediately trip to the OFF position.
- If the RCBO does not trip, it indicates a malfunction, and the device should be replaced immediately.
- Reset the RCBO by pushing the main switch lever upwards after the test.
6.2. Cleaning
Clean the exterior of the device with a dry, soft cloth. Do not use abrasive cleaners or solvents.
7. Troubleshooting
| Problem | Possible Cause | Solution |
|---|---|---|
| RCBO trips frequently. | Overload, short circuit, or earth leakage fault. | Identify and rectify the fault in the circuit. Reduce load, check for damaged wiring or appliances. |
| RCBO does not reclose in AUTO mode. | Persistent fault, or selector is in MANU mode. | Check for persistent faults. Ensure MANU/AUTO selector is set to AUTO. |
| Cannot connect to WiFi. | Incorrect WiFi password, 5GHz network, or device too far from router. | Ensure correct 2.4GHz WiFi network and password. Move device closer to router or use a WiFi extender. Re-initiate pairing mode. |
| "Test Monthly" button does not trip the RCBO. | Malfunction of the residual current protection. | Immediately replace the device. This indicates a critical safety failure. |
8. Specifications
| Parameter | Value |
|---|---|
| Model | EKR3L |
| Rated Voltage | 230V AC |
| Rated Current (for 16A variant) | 16A (C-curve) |
| Residual Operating Current (IΔn) | 0.03A (30mA) |
| Type | A Type (for AC and pulsating DC residual currents) |
| Poles | 1P+N |
| Breaking Capacity | 6000A (6kA) |
| Smart Features | WiFi Remote Control, Auto Reclosing |
| Operating Frequency | 50/60Hz |
| Certification | CE, WEEE |
9. Warranty and Support
For warranty information and technical support, please refer to the product packaging or contact your retailer. Keep your purchase receipt as proof of purchase.


