1. Introduction
The Raddy WF-50V is a versatile indoor and outdoor thermometer and hygrometer designed to provide precise real-time environmental data. Featuring a clear 5-inch VA display, it offers instant data overview including indoor and outdoor temperature and humidity, pressure trends, time, weather forecast, and daily MAX/MIN records. Its stable wireless transmission ensures easy installation and reliable data transfer. The device supports flexible power options via USB-C or AAA batteries, with adjustable brightness levels for optimal viewing.
2. Package Contents
- 1 x Raddy WF-50V Main Display Unit
- 1 x Wireless Remote Sensor
- 1 x USB-C Power Cable
- 1 x User Manual
3. Product Overview

Figure 3.1: The Raddy WF-50V main display unit (left) and its accompanying wireless remote sensor (right).
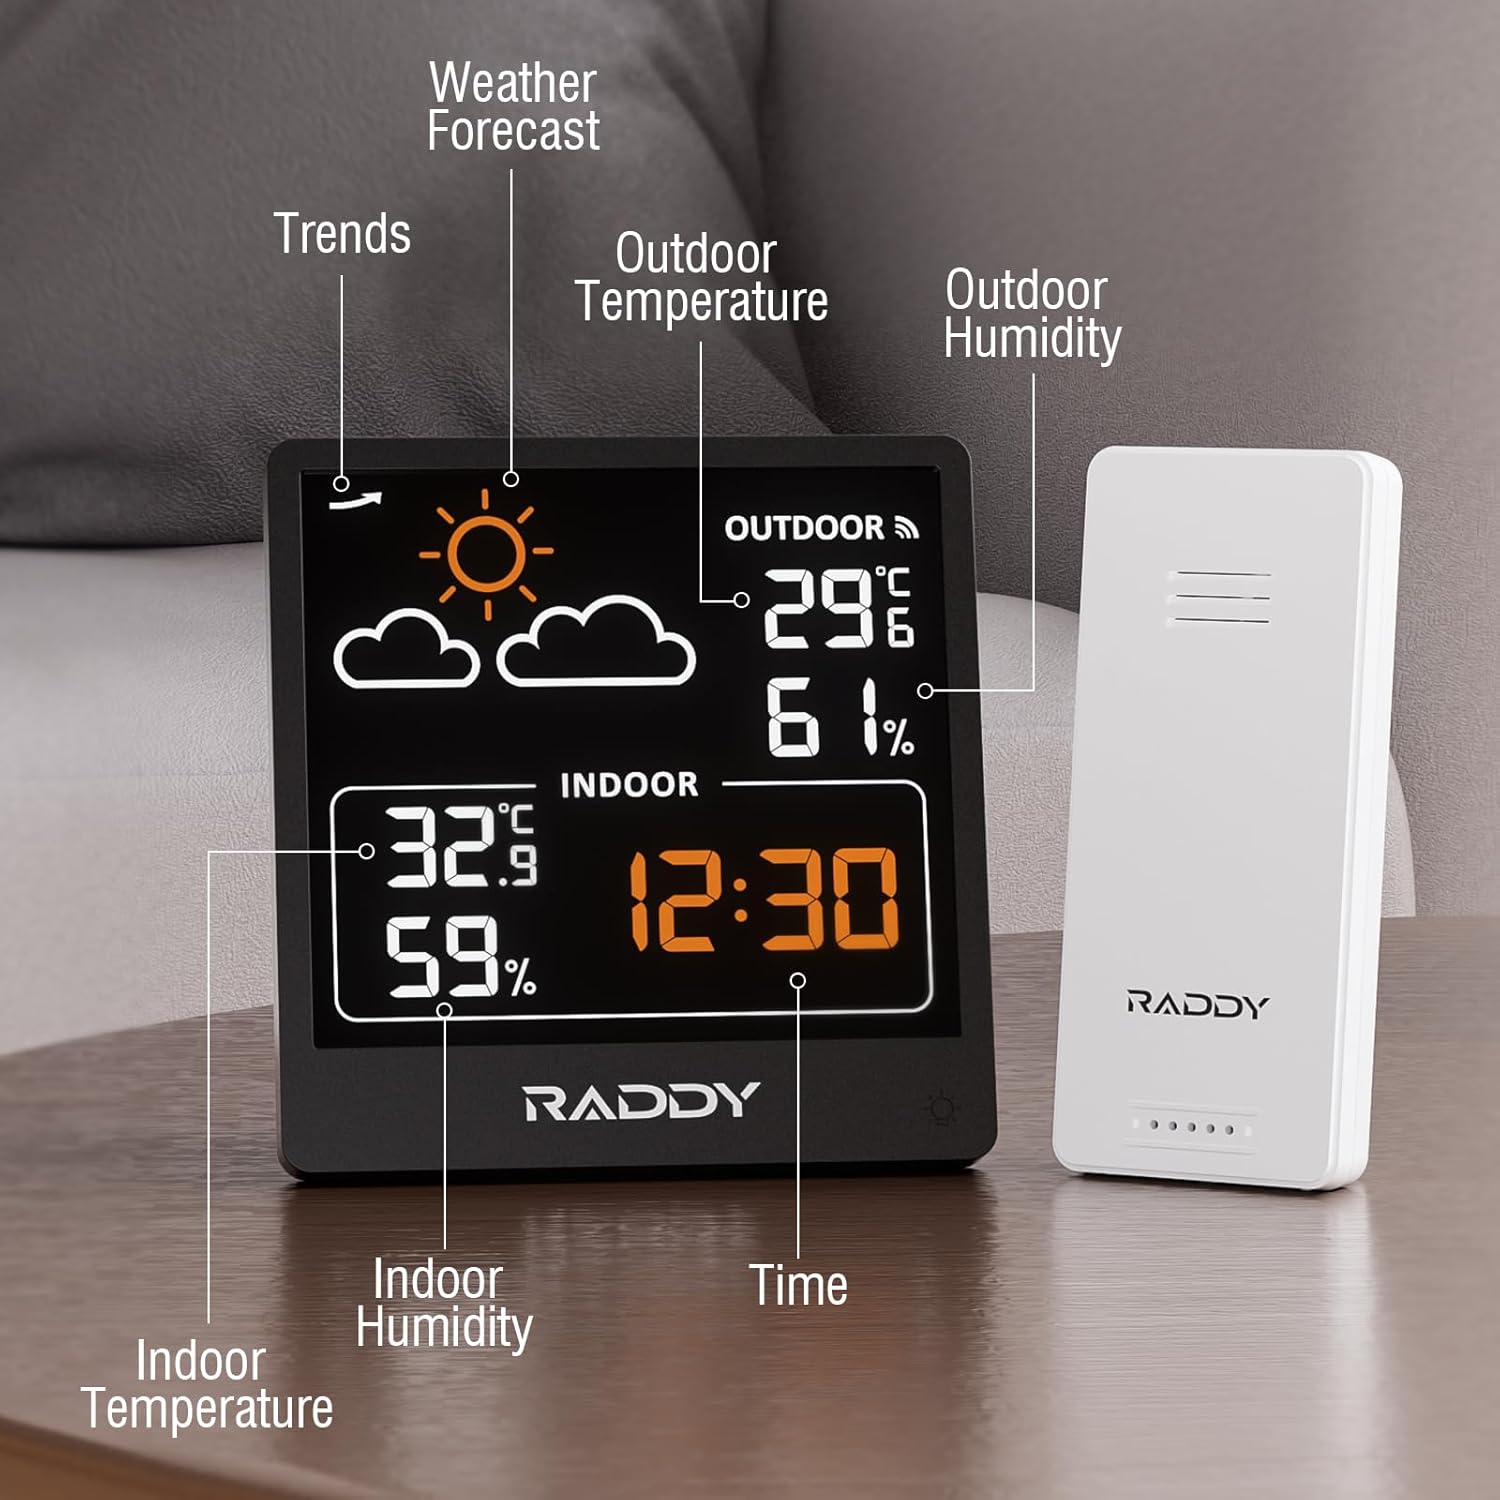
Figure 3.2: Detailed view of the WF-50V display, highlighting key information areas such as weather forecast, indoor/outdoor temperature and humidity, and current time.

Figure 3.3: Rear view of the main display unit, showing the control buttons (SET, MEM, +, -) and the USB-C power input.

Figure 3.4: Physical dimensions of both the main display unit and the wireless remote sensor for placement planning.
4. Setup
4.1 Battery Installation
The Raddy WF-50V main unit can be powered by USB-C or 2 x AAA batteries (not included). The remote sensor requires 2 x AAA batteries (not included).
- Main Display Unit: Open the battery compartment on the back of the main unit. Insert 2 x AAA batteries, ensuring correct polarity (+/-). Close the compartment. For continuous backlight, connect the USB-C cable to a power adapter (not included).
- Wireless Remote Sensor: Open the battery compartment on the back of the remote sensor. Insert 2 x AAA batteries, ensuring correct polarity (+/-). Close the compartment.
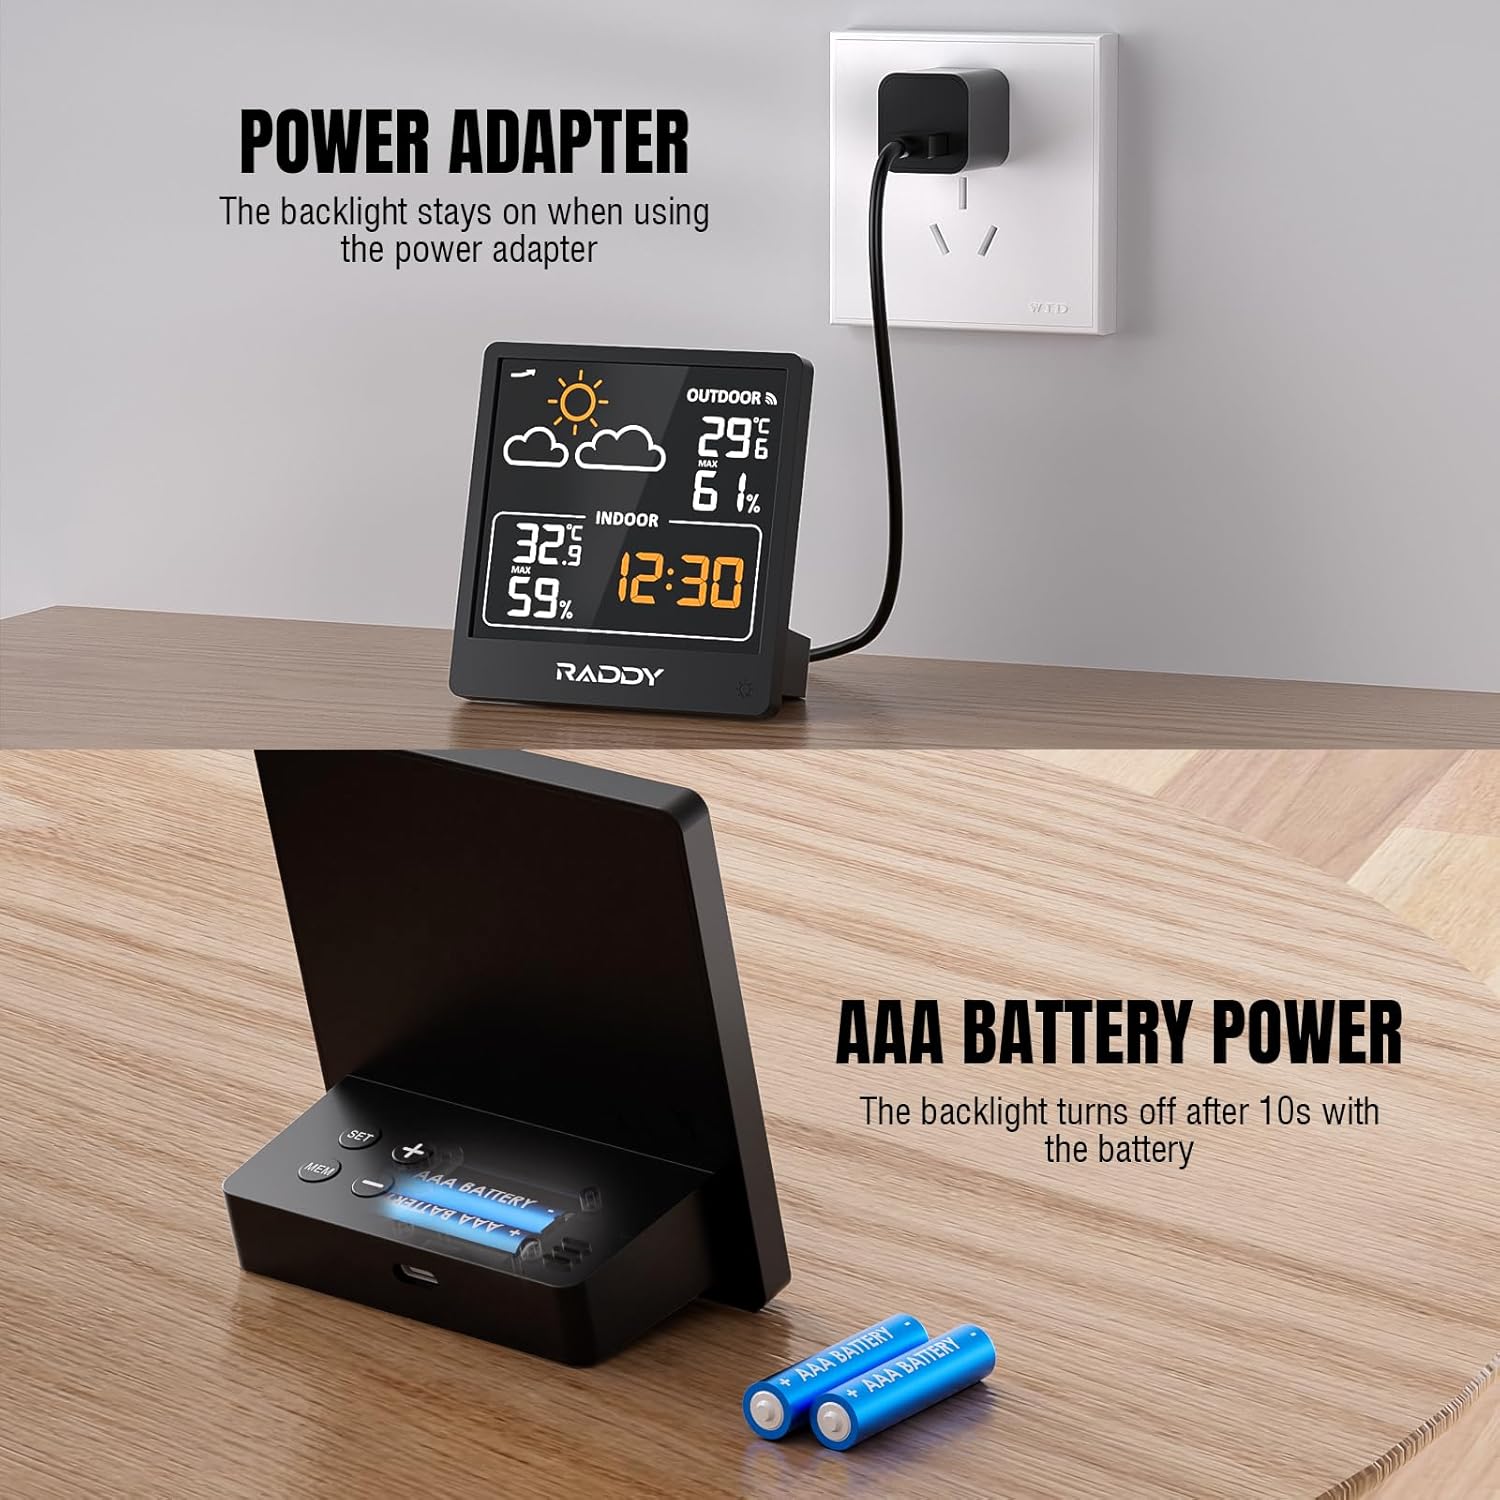
Figure 4.1: Illustration of the flexible power options for the main unit, including USB-C adapter and AAA battery power.
4.2 Sensor Pairing
The main unit and remote sensor should pair automatically upon battery installation. If pairing does not occur, follow these steps:
- Ensure both the main unit and remote sensor have fresh batteries installed.
- Place the main unit and sensor close to each other.
- On the main unit, press and hold the 'MEM' button for 3 seconds to initiate a search for the remote sensor. The outdoor temperature and humidity display will flash.
- On the remote sensor, press the 'TX' button (usually located inside the battery compartment or on the back) to send a signal.
- Once connected, the outdoor readings will appear steadily on the main unit's display.
4.3 Placement
Proper placement is crucial for accurate readings and optimal wireless transmission.
- Main Display Unit: Place the main unit indoors, away from direct sunlight, heat sources, or vents that could affect indoor temperature readings. It can be placed on a tabletop or mounted on a wall.
- Wireless Remote Sensor: Place the remote sensor outdoors in a shaded, dry location, protected from direct rain and sunlight. Ensure it is within the 330-foot (100m) transmission range of the main unit. Avoid placing it near large metal objects or strong electromagnetic interference sources.

Figure 4.2: The Raddy WF-50V system demonstrating its 328ft (100m) wireless transmission range, allowing flexible placement of the remote sensor.
5. Operating Instructions
5.1 Display Overview
The 5-inch VA display provides a comprehensive overview of environmental data:
- Weather Forecast: Icons indicating predicted weather conditions (sunny, cloudy, rainy, etc.).
- Outdoor Temperature & Humidity: Current readings from the remote sensor.
- Indoor Temperature & Humidity: Current readings from the main unit's built-in sensors.
- Time: Current time in 12/24 hour format.
- Pressure Trend: An arrow indicating rising, falling, or stable barometric pressure.
5.2 Setting Time and Units
To adjust settings on the main unit:
- Enter Setting Mode: Press and hold the 'SET' button for 3 seconds. The hour digit will flash.
- Adjust Values: Use the '+' or '-' buttons to change the flashing value.
- Navigate Settings: Press the 'SET' button repeatedly to cycle through settings: Hour → Minute → 12/24 Hour Format → Temperature Unit (°C/°F).
- Save Settings: After adjusting all desired settings, press the 'SET' button one last time to exit setting mode, or wait 15 seconds for it to automatically exit.
5.3 Weather Forecast
The built-in pressure sensor predicts 12-24 hour weather trends. The display will show one of the following icons:
- Sunny
- Slightly Cloudy
- Cloudy
- Rainy
- Heavy Rain
- Snowy

Figure 5.1: The different weather icons displayed by the WF-50V to indicate future weather conditions.
5.4 MAX/MIN Records
The unit automatically tracks and stores the maximum and minimum temperature and humidity readings from the past 24 hours.
- View MAX Records: Press the 'MEM' button once to display the maximum recorded indoor and outdoor temperature and humidity.
- View MIN Records: Press the 'MEM' button again to display the minimum recorded indoor and outdoor temperature and humidity.
- Clear Records: Press and hold the 'MEM' button for 3 seconds while viewing MAX or MIN records to clear them.

Figure 5.2: The display showing the maximum and minimum temperature and humidity records over a 24-hour period.
5.5 Backlight Control
The main unit features three adjustable backlight levels when powered by batteries, and a continuous backlight when powered via USB-C.
- Adjust Brightness: Briefly press the light bulb icon button on the front of the unit to cycle through backlight levels (Off → Low → High).
- When powered by USB-C, the backlight remains continuously on.

Figure 5.3: Visual representation of the three adjustable backlight levels for the main display unit.
6. Maintenance
- Cleaning: Wipe the display and unit surfaces with a soft, damp cloth. Do not use abrasive cleaners or solvents.
- Battery Replacement: Replace batteries in both the main unit and remote sensor when the low battery indicator appears on the display. Ensure to use fresh AAA batteries.
- Storage: If storing the device for an extended period, remove all batteries to prevent leakage.
7. Troubleshooting
| Problem | Possible Cause | Solution |
|---|---|---|
| No outdoor reading | Sensor not paired or out of range; low sensor battery. | Re-pair sensor (Section 4.2); move sensor closer to main unit; replace sensor batteries. |
| Inaccurate readings | Unit/sensor exposed to direct sunlight, heat, or moisture. | Relocate unit/sensor to a shaded, protected area (Section 4.3). |
| Display is dim or off | Low main unit battery; USB-C cable disconnected. | Replace main unit batteries; ensure USB-C cable is securely connected. |
| Weather forecast inaccurate | Unit needs time to calibrate pressure changes. | Allow 24-48 hours for the unit to learn local atmospheric pressure patterns. |
8. Specifications
- Model: WF-50V
- Indoor Temperature Range: +14.2°F to +122°F (-9.9°C to 50°C)
- Outdoor Temperature Range: -40°F to +158°F (-40°C to 70°C)
- Humidity Range: 20% to 95% RH
- Temperature Accuracy: ±1°C
- Wireless Transmission Range: 330 feet (100 meters) in open air
- Power Source (Main Unit): USB-C (DC 5V) or 2 x AAA batteries
- Power Source (Remote Sensor): 2 x AAA batteries
- Display Type: 5.0'' VA LCD
- Product Dimensions (Main Unit): 3.5 x 1.5 x 5.0 inches (approx. 8.9 x 3.9 x 12.7 cm)
- Product Dimensions (Remote Sensor): 1.5 x 0.9 x 3.7 inches (approx. 3.9 x 2.3 x 9.3 cm)
- Special Feature: Alarm, Weather Forecast, MAX/MIN Records
9. Warranty and Support
Raddy products are designed for reliability and performance. For warranty information, technical support, or customer service inquiries, please refer to the contact details provided on the Raddy official website or the product packaging. Please retain your purchase receipt as proof of purchase for any warranty claims.
You can visit the Raddy Store on Amazon for more information and product support.


