
Ruitoo M5 Pro
Ruitoo M5 Pro Electric Scooter User Manual
Model: M5 Pro
1. Important Safety Instructions
Read this manual carefully before operating your Ruitoo M5 Pro electric scooter. Failure to follow the instructions can lead to serious injury or damage to the scooter.
- Always wear a helmet and appropriate protective gear (knee pads, elbow pads) when riding.
- Ensure all screws and quick-release mechanisms are securely fastened before each ride.
- Do not ride in heavy rain, on icy surfaces, or through deep puddles. The scooter has an IPX4 water resistance rating, meaning it is protected against splashing water from any direction, but it is not waterproof.
- Observe local traffic laws and regulations.
- Do not allow children under 16 years old to operate the scooter.
- Do not exceed the maximum weight limit of 120 kg (265 lbs).
- Maintain a safe speed and distance from other vehicles and pedestrians.
- Use the horn and lights to ensure visibility, especially at night or in low-light conditions. The scooter is equipped with front lights, rear lights, and turn signals.
- Avoid sudden braking, especially at high speeds, to prevent loss of control.
- Do not operate the scooter under the influence of alcohol or drugs.
2. Package Contents
Upon unpacking, please verify that all items are present and in good condition. If any items are missing or damaged, contact customer support.
- Ruitoo M5 Pro Electric Scooter
- Power Adapter/Charger
- User Manual (this document)
- Tool Kit (for assembly and maintenance)
3. Product Overview
3.1 Scooter Components
Familiarize yourself with the main parts of your Ruitoo M5 Pro electric scooter.
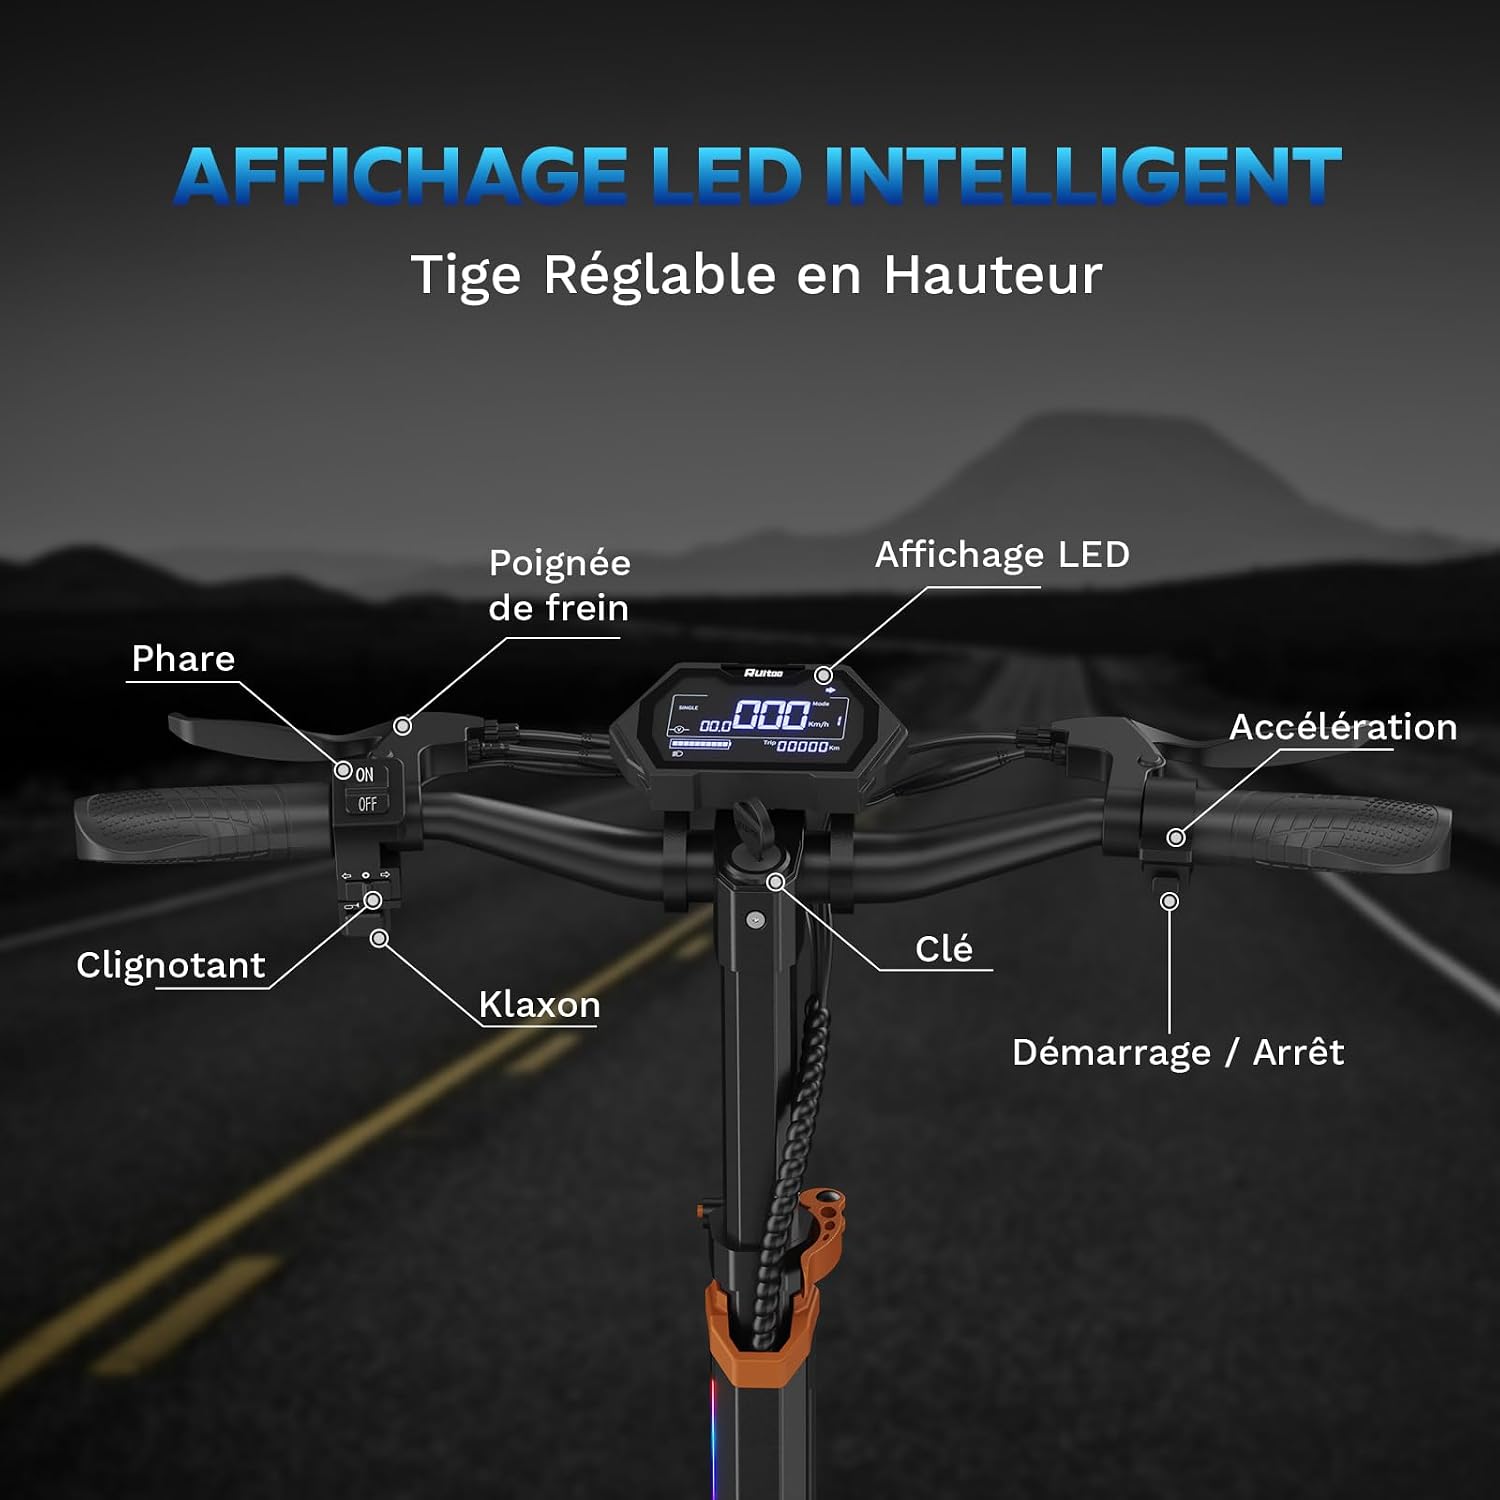
Image 3.1: Overview of the Ruitoo M5 Pro handlebar controls and intelligent LED display.
- 1. Headlight: Front illumination for visibility.
- 2. Turn Signal Switch: Activates left or right turn signals.
- 3. Horn Button: Sounds the horn for alerts.
- 4. Brake Lever: Activates the hydraulic disc brakes.
- 5. Intelligent LED Display: Shows speed, battery level, and riding mode.
- 6. Key Ignition: To power on/off the scooter.
- 7. Accelerator: Thumb throttle to control speed.
- 8. Adjustable Handlebar Stem: Allows height adjustment for rider comfort.
- 9. Front Hydraulic Suspension: Absorbs shocks for a smoother ride.
- 10. 11-inch All-Terrain Tires: Provides grip and stability on various surfaces.
- 11. Rear Hydraulic Suspension: Further enhances ride comfort.
- 12. Rear Disc Brake: Part of the dual braking system.
- 13. Folding Mechanism: For compact storage and transport.
- 14. Wide Anti-slip Deck: Provides stable footing.

Image 3.2: Close-up of the dual hydraulic suspension system and dual disc braking system for enhanced safety and comfort.
4. Setup
4.1 Assembly
- Unfold the Scooter: Carefully lift the handlebar stem until it locks into place. Ensure the folding mechanism is securely latched.
- Attach the Handlebar: Insert the handlebar into the stem and secure it with the provided screws using the tool kit. Ensure it is centered and tight.
- Adjust Handlebar Height: Loosen the quick-release clamp on the handlebar stem, adjust to your preferred height, and securely tighten the clamp.
- Check Connections: Verify that all cables (brake lines, electrical wires) are properly connected and not pinched.
- Tire Pressure: Check the tire pressure. Ensure both 11-inch pneumatic tires are inflated to the recommended PSI (refer to tire sidewall for details).
4.2 Initial Charging
Before your first ride, fully charge the scooter's battery.
- Locate the charging port, usually covered by a rubber flap, on the scooter's deck.
- Connect the charger to the charging port, then plug the charger into a standard wall outlet.
- The indicator light on the charger will typically turn red during charging and green when fully charged.
- A full charge takes approximately 7 hours. Do not overcharge the battery.
- Once fully charged, disconnect the charger and securely close the charging port flap.

Image 4.1: The 48V/20.8Ah Li-ion battery provides a maximum range of 70-80KM per charge.
5. Operating Instructions
5.1 Power On/Off
- To Power On: Insert the key into the ignition and turn it to the "ON" position. The LED display will light up.
- To Power Off: Turn the key to the "OFF" position. The LED display will turn off.
5.2 Riding
- Starting: Place one foot on the deck and use the other foot to push off gently to gain some initial momentum.
- Accelerating: Once moving, place both feet on the deck and gently press the thumb accelerator to engage the motor. Increase pressure for more speed.
- Braking: Release the accelerator and gently squeeze the brake levers. The scooter features dual hydraulic disc brakes for effective stopping.
- Turning: Lean slightly in the direction you wish to turn and steer the handlebars. Use turn signals to indicate your direction.
5.3 Speed Modes
The Ruitoo M5 Pro offers 3 adjustable speed modes (Low/Medium/High) for different riding conditions and preferences. Refer to the display manual (if separate) or experiment safely to switch between modes using the controls on the handlebar.
5.4 Intelligent LED Display
The intuitive LCD screen displays real-time data:
- Current Speed
- Battery Level Indicator
- Riding Mode (Low, Medium, High)
- Odometer/Trip Meter
5.5 Folding and Transport
The scooter can be easily folded for portability and storage.
- Ensure the scooter is powered off.
- Locate the folding mechanism at the base of the handlebar stem.
- Follow the instructions on the mechanism to release the latch and fold the stem downwards until it clicks into its folded position.
- The compact design makes it suitable for placing in a car trunk or taking on public transport.

Image 5.1: The Ruitoo M5 Pro in its folded and unfolded states, showing dimensions and transport options.

Image 5.2: Visual guide demonstrating the easy folding mechanism of the scooter.
6. Maintenance
6.1 Cleaning
- Wipe the scooter with a soft, damp cloth. Do not use high-pressure water jets or corrosive cleaning agents.
- Ensure the charging port is always covered when not charging to prevent dust and water ingress.
6.2 Tire Care
- Regularly check tire pressure and inflate to the recommended PSI.
- Inspect tires for wear, punctures, or damage before each ride.
6.3 Battery Care
- Charge the battery fully after each use, or at least once a month if not used regularly, to prolong its lifespan.
- Do not store the scooter in extreme temperatures (very hot or very cold).
- If the scooter will not be used for an extended period, store it with the battery charged to about 50-70%.
6.4 General Inspection
- Periodically check all bolts and screws for tightness.
- Inspect brake cables and pads for wear and proper function.
- Ensure the folding mechanism operates smoothly and locks securely.
7. Troubleshooting
| Problem | Possible Cause | Solution |
|---|---|---|
| Scooter does not power on | Battery is depleted; Key not fully turned; Loose connection. | Charge the battery; Ensure key is in "ON" position; Check all visible connections. |
| Motor not engaging | Scooter not pushed off initially; Accelerator fault; Low battery. | Push off to gain initial speed; Check accelerator for damage; Charge battery. |
| Reduced range or power | Low tire pressure; Battery degradation; Riding uphill frequently; Heavy load. | Inflate tires to correct pressure; Ensure full charge; Adjust riding style. |
| Brakes feel weak | Brake pads worn; Brake cable loose; Air in hydraulic system. | Inspect and replace brake pads; Adjust brake cable tension; Consult a professional for hydraulic system. |
| Unusual noises | Loose components; Debris in wheels; Motor issue. | Check all fasteners; Inspect wheels for obstructions; Contact support if motor noise persists. |
If you encounter issues not listed here or if solutions do not resolve the problem, please contact Ruitoo customer support.
8. Specifications
| Brand | Ruitoo |
| Model Name | M5 Pro |
| Motor Power | 1200W (as per color variant description) |
| Battery | 48V / 20.8Ah Li-ion |
| Max Range | 70-80 KM (43-50 miles) |
| Tires | 11-inch All-Terrain Pneumatic |
| Braking System | Dual Hydraulic Disc Brakes (Front & Rear) |
| Suspension | Dual Hydraulic Suspension (Front & Rear) |
| Max Load Capacity | 120 kg (265 lbs) |
| Product Dimensions (Unfolded) | 128L x 60W x 126H cm (50.4L x 23.6W x 49.6H inches) |
| Product Weight | 36.2 kg (79.8 lbs) |
| Charging Time | Approx. 7 hours |
| Special Features | Intelligent LED Display, Adjustable Handlebar Height, Wide Platform, Foldable, Dual Braking System, IPX4 Water Resistance |
| Frame Material | Alloy Steel |
9. Warranty and Support
9.1 Warranty Information
The Ruitoo M5 Pro Electric Scooter comes with a 1-year manufacturer's limited warranty from the date of purchase. This warranty covers manufacturing defects in materials and workmanship under normal use.
The warranty does not cover:
- Damage caused by misuse, abuse, neglect, or accident.
- Normal wear and tear (e.g., tires, brake pads).
- Damage caused by unauthorized modifications or repairs.
- Damage from improper storage or maintenance.
Please retain your proof of purchase for warranty claims.
9.2 Customer Support
For technical assistance, warranty claims, or any questions regarding your Ruitoo M5 Pro electric scooter, please contact Ruitoo customer support through the retailer where you purchased the product or visit the official Ruitoo website for contact information.
For more information, you can visit the Ruitoo Brand Store.
Related documentsM5 Pro


Ask a question about this manual
Ask about setup, troubleshooting, compatibility, parts, safety, or missing instructions. Manuals+ will review the question and use this page’s manual context to help answer it.