1. Introduction
This manual provides essential information for the installation, operation, and maintenance of your new FTYHFEFH carburetor. This carburetor is designed as a direct replacement for specific Briggs & Stratton engines. Please read these instructions carefully before proceeding with installation to ensure proper function and safety.
1.1 Package Contents
Verify that all components listed below and shown in the image are present in your package:
- 1x Carburetor Assembly
- 1x Mounting Gasket
- 1x Fuel Filter (Red)
- 1x Fuel Shut-off Valve (Black)

Image 1.1: Complete package contents including the carburetor, gasket, fuel filter, and shut-off valve.
2. Compatibility
This FTYHFEFH carburetor is specifically designed to be compatible with the following Briggs & Stratton engine models:
- Briggs & Stratton 170402
- Briggs & Stratton 390323
- Briggs & Stratton 394228
It is suitable for 7HP, 8HP, and 9HP engines that utilize these carburetor part numbers. Always verify your engine's specific part requirements before installation.
3. Setup and Installation
Safety First: Before beginning any work, ensure the engine is turned off, cooled down, and the spark plug wire is disconnected to prevent accidental starting. Work in a well-ventilated area.
3.1 Tools Required
- Socket/Wrench Set
- Screwdriver Set
- Pliers
- Fuel Line Clamps (optional, for preventing fuel leaks)
3.2 Installation Steps
- Drain Fuel: If necessary, drain the fuel tank or clamp the fuel line to prevent spillage.
- Remove Air Filter Assembly: Carefully detach the air filter housing and any associated components to gain access to the carburetor.
- Disconnect Linkages and Fuel Line: Disconnect the throttle and choke linkages from the old carburetor. Use pliers if necessary. Detach the fuel line from the carburetor. Be prepared for minor fuel leakage.
- Remove Old Carburetor: Unscrew the mounting bolts that secure the carburetor to the engine intake manifold. Remove the old carburetor and gasket.
- Install New Gasket: Place the new mounting gasket onto the intake manifold. Ensure it is correctly oriented.
- Mount New Carburetor: Position the new FTYHFEFH carburetor onto the mounting studs, aligning it with the gasket. Secure it with the mounting bolts, tightening them evenly.
- Connect Linkages and Fuel Line: Reattach the throttle and choke linkages to the new carburetor. Connect the fuel line. If replacing the fuel filter and shut-off valve, install them in the fuel line between the tank and the carburetor, ensuring correct flow direction.
- Reinstall Air Filter Assembly: Reattach the air filter housing and any other components removed earlier.
- Reconnect Spark Plug: Reconnect the spark plug wire.

Image 3.1: Side view of the carburetor, highlighting the mounting flange and fuel inlet connection.
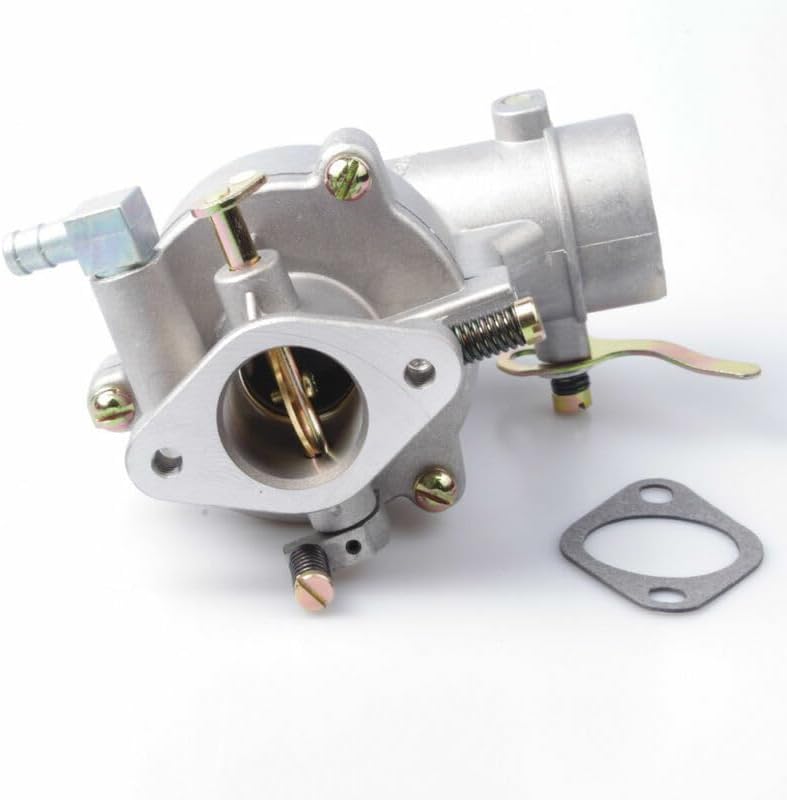
Image 3.2: Front view of the carburetor, showing the throttle and choke linkage points.
4. Operating Principles
The carburetor's primary function is to mix air and fuel in the correct ratio for combustion in the engine. Once installed, the carburetor operates automatically based on engine demand, controlled by the throttle and choke linkages. Ensure the fuel shut-off valve (if installed) is in the 'ON' position before attempting to start the engine.
After installation, it is recommended to start the engine and allow it to warm up. Check for any fuel leaks around the carburetor and fuel lines. Minor adjustments to the idle speed screw may be necessary for optimal performance, referring to your engine's service manual for specific settings.
5. Maintenance
Regular maintenance ensures the longevity and optimal performance of your carburetor and engine.
5.1 Cleaning
- External Cleaning: Periodically clean the exterior of the carburetor to remove dirt, dust, and debris. Use a soft brush and carburetor cleaner if necessary, avoiding contact with rubber or plastic components.
- Internal Cleaning: If performance issues arise, internal cleaning may be required. This typically involves disassembling the carburetor, cleaning jets and passages with carburetor cleaner, and replacing gaskets. This procedure should only be performed by individuals with appropriate mechanical knowledge.
5.2 Fuel Filter Replacement
The included fuel filter helps prevent contaminants from reaching the carburetor. Inspect the fuel filter regularly for discoloration or debris. Replace it annually or more frequently if operating in dusty conditions or with questionable fuel quality.

Image 5.1: Top view of the carburetor, illustrating potential adjustment screw locations and the fuel bowl area.
6. Troubleshooting
If you experience issues after installing the new carburetor, consider the following common problems and solutions:
| Problem | Possible Cause | Solution |
|---|---|---|
| Engine will not start | No fuel, clogged fuel filter, incorrect choke position, improper installation. | Check fuel level, replace fuel filter, ensure choke is set correctly, re-check all connections. |
| Engine runs rough or stalls | Clogged carburetor jets, air leak, old fuel, incorrect idle adjustment. | Clean carburetor, check for air leaks around gaskets, use fresh fuel, adjust idle screw. |
| Fuel leaks from carburetor | Improperly seated gasket, loose bolts, damaged fuel line. | Ensure gasket is correctly installed, tighten mounting bolts, inspect fuel lines for damage. |
7. Specifications
- Brand:
- FTYHFEFH
- Compatible Engine Models:
- Briggs & Stratton 170402, 390323, 394228 (7HP, 8HP, 9HP)
- Item Weight:
- Approximately 1 pound
- Product Dimensions:
- Approximately 1 x 1 x 1 inches (packaging dimensions)
- Manufacturer Part Number:
- 1
- UPC:
- 779603349754
8. Warranty and Support
For any questions regarding the FTYHFEFH carburetor, including installation assistance or troubleshooting, please contact the seller or manufacturer directly through your purchase platform. Please refer to your purchase documentation for specific warranty terms and conditions.