1. Introduction
This user manual provides comprehensive instructions for the installation, operation, and maintenance of your KEDIERS P4 ATX PC Case. Please read this manual carefully before beginning installation to ensure proper setup and optimal performance.
2. Product Overview
The KEDIERS P4 is a mid-tower ATX PC case designed for high-performance gaming and computing environments. It features a panoramic design with dual tempered glass panels, pre-installed cooling fans, and extensive compatibility for various PC components.
2.1 Key Features
- Panoramic Design: 270° wide-angle view with full-view dual tempered glass panels.
- Pre-installed Cooling: Comes with 4 pre-installed 120mm fans (3 intake, 1 exhaust) for efficient airflow.
- High-Speed I/O Panel: Includes 1x Type-C, 1x USB 3.0, 1x USB 2.0, HD Audio, Power, Reset, and LED switch buttons.
- Extensive Expansion: Supports ATX, Micro-ATX, Mini-ITX motherboards, 360mm radiators, CPU coolers up to 180mm, GPUs up to 440mm, and multiple storage drives.
- Durable Construction: Made from metal and tempered glass.
2.2 Package Contents
Upon unpacking, please verify that all components listed below are present:
- KEDIERS P4 ATX PC Case x 1
- Pre-installed 120mm Case Fans x 4
- Accessory Box (Screws, Cable Ties, etc.) x 1
- User Manual x 1 (This document)

Figure 2.2.1: Included components with the KEDIERS P4 ATX PC Case. This image shows an exploded view of the case, highlighting the main chassis, side panels, and individual fans, along with a representation of the accessory box.
3. Setup and Installation
Follow these steps to install your PC components into the KEDIERS P4 case.
3.1 Preparing the Case
Before installing components, you may need to remove the tempered glass side panel.
- Locate the tempered glass side panel.
- Gently push the panel outwards in the direction indicated by the arrow (if present on the panel or in diagrams) to disengage it from its magnetic hinges.
- Carefully lift and remove the panel. Place it on a soft, flat surface to prevent scratches.

Figure 3.1.1: Tempered Glass Side Panel Removal. This image illustrates the method for removing the tempered glass side panel by pushing it outwards, revealing the interior of the PC case.
3.2 Motherboard Installation
The KEDIERS P4 supports ATX, Micro-ATX, and Mini-ITX motherboards.
- Install the I/O shield that came with your motherboard into the rear opening of the case.
- Align your motherboard with the standoffs inside the case. Ensure the screw holes on the motherboard match the standoffs.
- Secure the motherboard using the appropriate screws from the accessory box.

Figure 3.2.1: Motherboard Installation Layout. This diagram highlights the internal structure of the case, showing designated areas for ATX, M-ATX, and ITX motherboards, along with cable routing cutouts for clean installation.
3.3 Graphics Card (GPU) Installation
The case supports GPUs up to 440mm in length.
- Remove the necessary PCIe slot covers from the rear of the case.
- Insert your graphics card into the appropriate PCIe slot on the motherboard.
- Secure the graphics card with screws.
3.4 Storage Drive Installation (HDD/SSD)
The KEDIERS P4 case is equipped with trays for 2.5-inch SSDs and 3.5-inch HDDs.
- Locate the drive trays/mounts within the case (typically behind the motherboard tray or in the PSU shroud area).
- For 2.5" SSDs: Secure the SSD to the designated 2.5" mounts using screws.
- For 3.5" HDDs: Slide the HDD into the 3.5" drive cage/tray and secure it, often tool-free or with screws.
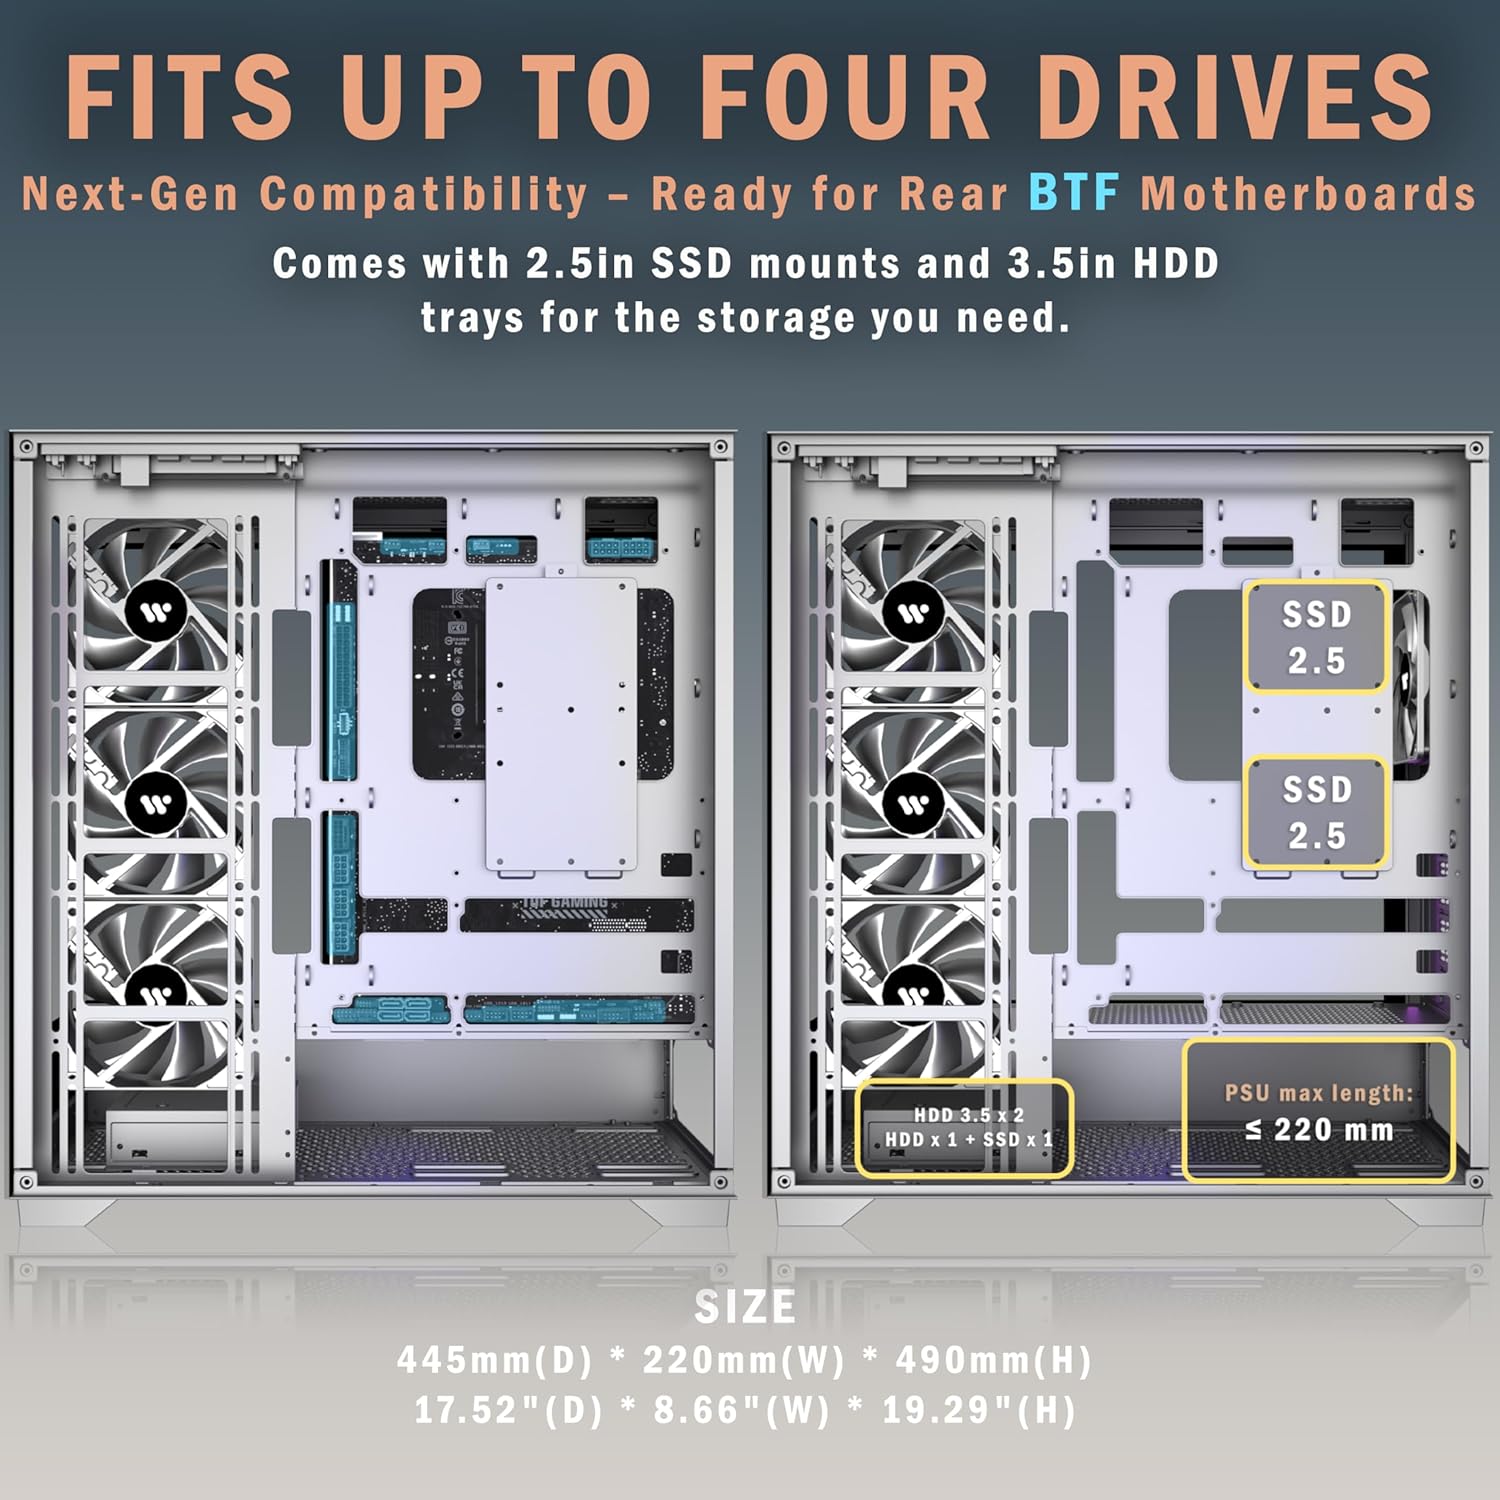
Figure 3.4.1: Storage Drive Locations. This image displays the internal layout, indicating where 2.5-inch SSDs and 3.5-inch HDDs can be mounted for optimal storage configuration.

Figure 3.4.2: Large Back Space for Drives and Cable Management. This image shows the rear side of the motherboard tray, highlighting the mounting points for two 2.5" SSDs and two 3.5" HDDs, along with ample space for cable routing.
3.5 Power Supply Unit (PSU) Installation
The case supports ATX power supplies up to 220mm.
- Slide the PSU into its designated compartment at the bottom rear of the case.
- Secure the PSU to the case using screws from the rear.
3.6 Fan and Radiator Installation
The KEDIERS P4 comes with 4 pre-installed 120mm fans. Additional fans and radiators can be installed as follows:
- Top: 3 x 120mm or 2 x 140mm fans; 360mm, 280mm, 240mm, or 120mm radiator.
- Rear: 1 x 120mm or 1 x 140mm fan; 120mm radiator.
- Bottom: 2 x 120mm fans.
- Side: 3 x 120mm or 3 x 140mm fans; 360mm, 280mm, 240mm, or 120mm radiator.
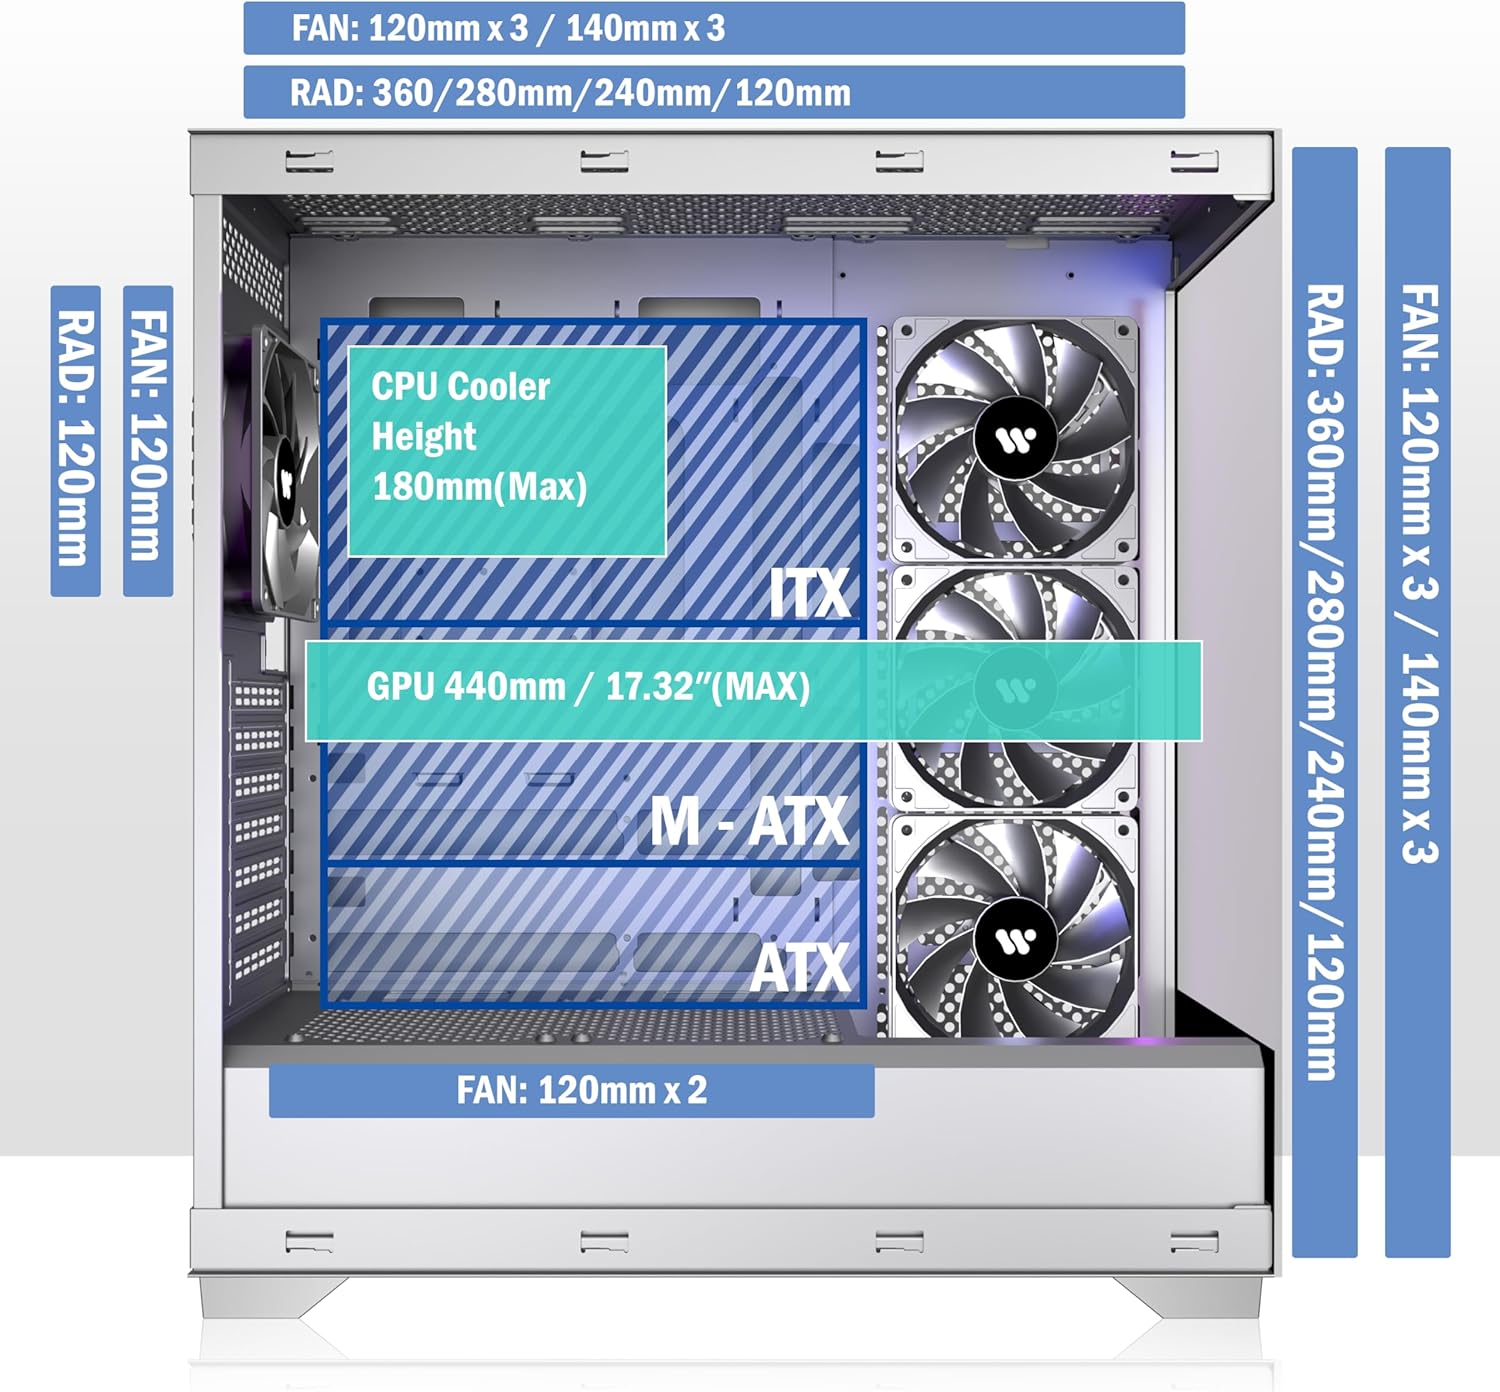
Figure 3.6.1: Fan and Radiator Compatibility. This diagram shows the various mounting points for fans and radiators (120mm, 140mm, 240mm, 280mm, 360mm) on the top, rear, bottom, and side of the case.

Figure 3.6.2: Powerful Cooling Capacity Support. This image provides a comprehensive overview of fan and radiator placements, including specific sizes supported for rear, top, bottom, and side installations, along with a visual representation of the case's interior.
Fan Connection
Ensure that the pre-installed fans and any additional fans are properly connected to your motherboard's fan headers or a fan controller. The case fans support motherboards with appropriate fan interfaces.

Figure 3.6.3: 120mm Case Fan Connection. This image illustrates the connection of case fans to a motherboard, emphasizing that fans require a compatible interface on the motherboard for proper operation.
3.7 Connecting Front I/O Panel Cables
Connect the cables from the front I/O panel to the corresponding headers on your motherboard. Refer to your motherboard's manual for specific header locations.
- Power Button: Connect to the F_PANEL header.
- Reset Button: Connect to the F_PANEL header.
- Type-C / USB 3.1: Connect to the appropriate USB-C header.
- USB 3.0: Connect to the USB 3.0 header.
- USB 2.0: Connect to the USB 2.0 header.
- HD Audio (2 x 3.5mm): Connect to the AUDIO header.
- LED Button: Connect to the RGB/LED header if applicable, or a dedicated LED controller.
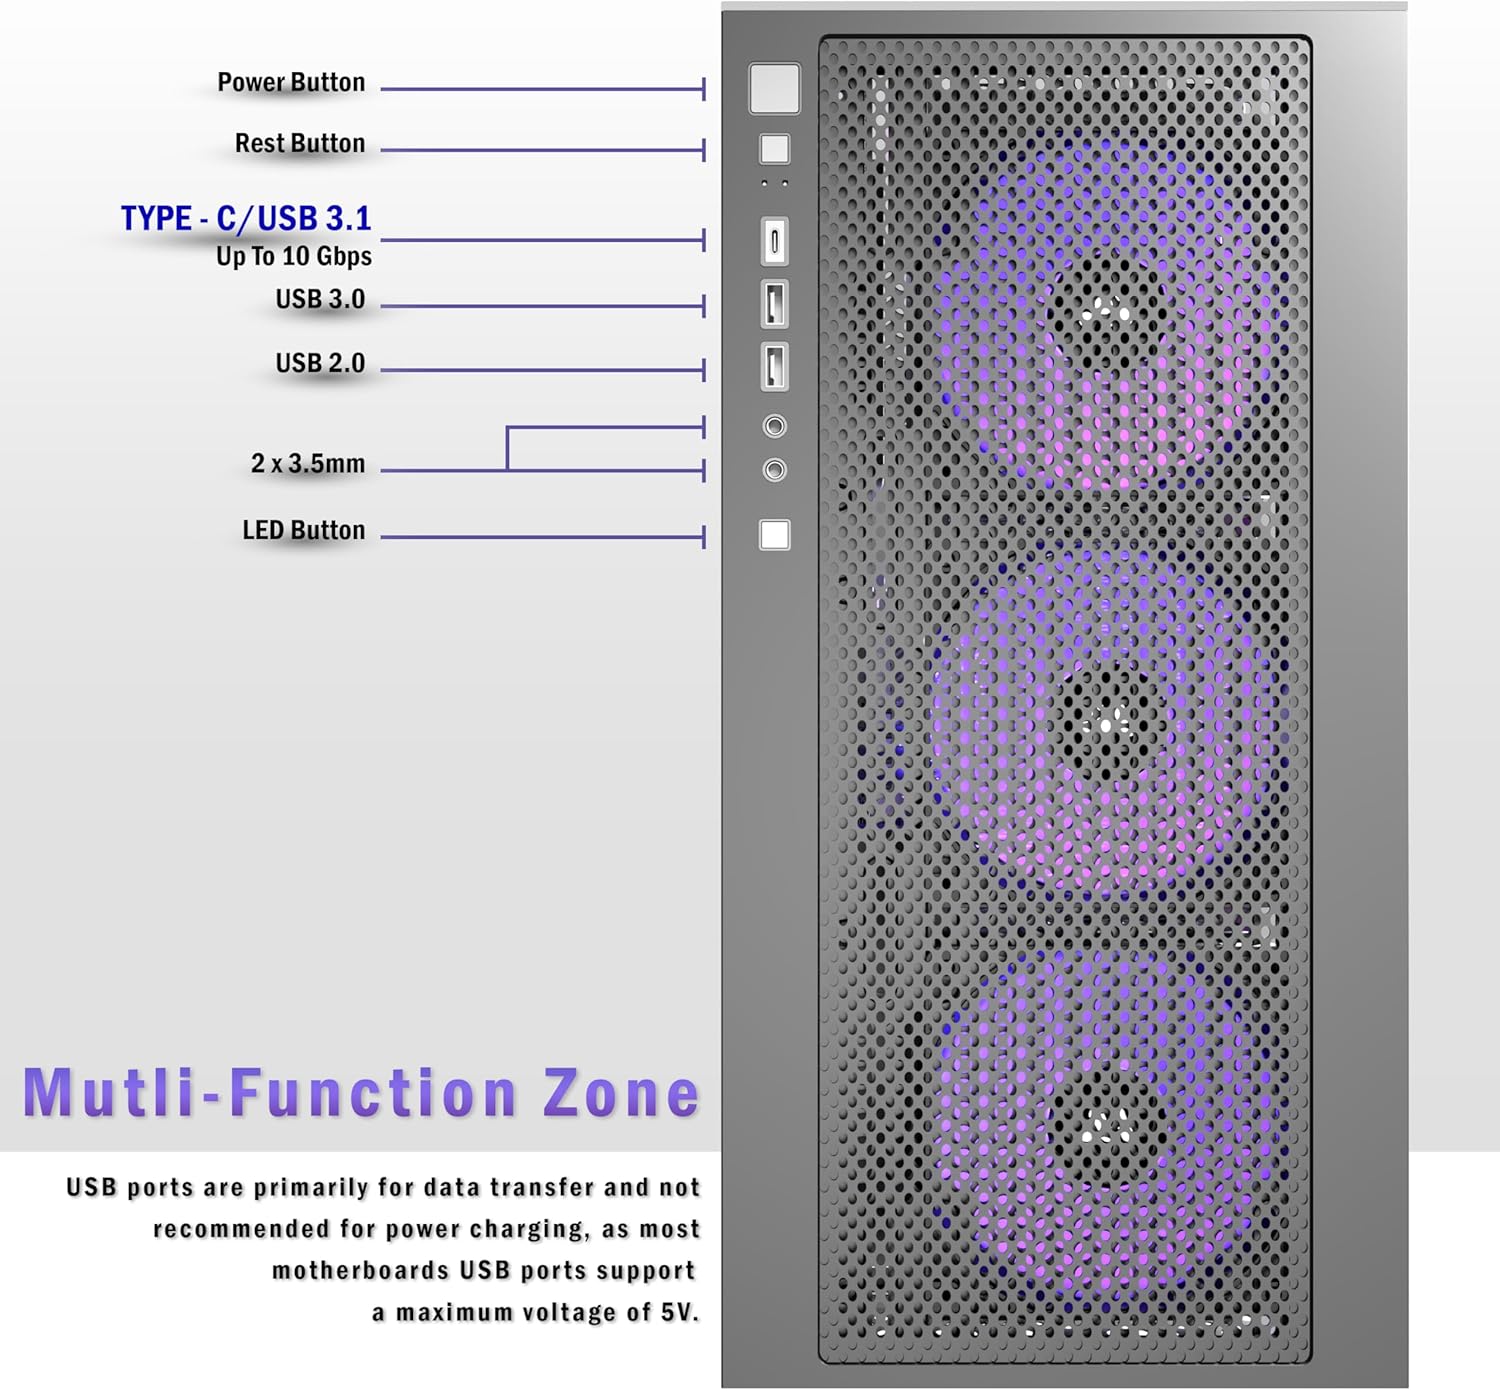
Figure 3.7.1: Multi-Function Zone (Front I/O Panel). This image clearly labels the Power Button, Reset Button, Type-C/USB 3.1, USB 3.0, USB 2.0, 2x 3.5mm audio jacks, and LED Button on the front I/O panel of the case.
Note: USB ports are primarily for data transfer and are not recommended for power charging, as most motherboards USB ports support a maximum voltage of 5V.
4. Operation
Once all components are installed and connected, you can power on your system.
4.1 Powering On/Off
- Press the Power Button on the front I/O panel to turn on your PC.
- To turn off, use the operating system's shutdown function or press and hold the Power Button for several seconds.
4.2 Resetting the System
- Press the Reset Button on the front I/O panel to restart your PC.
4.3 Fan and Lighting Control
The pre-installed fans provide optimal cooling. If your fans have RGB lighting, the LED Button on the front I/O panel may cycle through different lighting modes or turn the lighting on/off, depending on how the fans are connected to your motherboard or a dedicated RGB controller.

Figure 4.3.1: Pre-installed 4-Fan System. This image showcases the KEDIERS P4 case with its four pre-installed 120mm fans, emphasizing their role in providing optimized airflow with three front intake fans and one rear exhaust fan.

Figure 4.3.2: Multiple Cooling Channels. This diagram visually represents the airflow within the KEDIERS P4 case, showing how air enters from the front and bottom and exits from the top and rear, ensuring efficient heat dissipation.
5. Maintenance
Regular maintenance helps ensure the longevity and optimal performance of your PC case and components.
5.1 Cleaning Dust Filters
The KEDIERS P4 case features high-quality dust filters to prevent dust accumulation. It is recommended to clean these filters periodically.
- Turn off and unplug your PC.
- Locate the dust filters (typically on the top, front, and bottom of the case).
- Gently remove the filters. Many are magnetic for easy removal.
- Clean the dust from the filters using a soft brush, vacuum cleaner, or by rinsing with water (ensure they are completely dry before re-installing).
- Re-attach the dust filters to their respective positions.

Figure 5.1.1: Thoughtfully Designed High Quality Dust Filters. This image highlights the magnetic dust filters on the KEDIERS P4 case, emphasizing their role in preventing dust accumulation and maintaining normal ventilation for a long service life.
5.2 General Cleaning
- Use a soft, damp cloth to wipe down the exterior surfaces of the case, including the tempered glass panels. Avoid abrasive cleaners.
- For interior cleaning, use compressed air to remove dust from components and fan blades. Ensure the system is powered off and unplugged.
6. Troubleshooting
This section addresses common issues you might encounter.
6.1 System Not Powering On
- Check Power Connections: Ensure the PSU is properly connected to the wall outlet and the motherboard (24-pin ATX, 8-pin CPU).
- Front Panel Connectors: Verify that the Power Button cable is correctly connected to the motherboard's F_PANEL header.
- PSU Switch: Ensure the power switch on the back of the PSU is in the 'ON' position.
6.2 Fans Not Spinning / No RGB Lighting
- Fan Connections: Check if the fan power cables are securely connected to the motherboard fan headers or a fan controller.
- RGB Connections: If applicable, ensure RGB cables are connected to the motherboard's RGB header or a dedicated RGB controller.
- Motherboard Settings: Some motherboards require fan headers to be enabled or configured in the BIOS/UEFI.
6.3 USB Ports Not Functioning
- Internal USB Headers: Verify that the USB 2.0, USB 3.0, and Type-C cables from the front I/O panel are correctly connected to their respective headers on the motherboard.
- Driver Issues: Ensure your motherboard's USB drivers are installed and up to date.
7. Specifications
Detailed technical specifications for the KEDIERS P4 ATX PC Case.
| Feature | Specification |
|---|---|
| Model Name | P4 |
| Case Type | Mid Tower |
| Dimensions (L x W x H) | 445mm x 220mm x 490mm (17.52" x 8.66" x 19.29") |
| Material | Metal, Tempered Glass |
| Motherboard Compatibility | ATX, Micro-ATX, Mini-ITX |
| Expansion Slots | 7 |
| GPU Length Clearance | Up to 440mm |
| CPU Cooler Height Clearance | Up to 180mm |
| PSU Length Clearance | Up to 220mm (ATX) |
| Drive Bays | 2 x 2.5" SSD, 2 x 3.5" HDD (or 1 x 2.5" SSD + 1 x 3.5" HDD) |
| Pre-installed Fans | 4 x 120mm (3 front intake, 1 rear exhaust) |
| Fan Support (Total) |
|
| Radiator Support |
|
| Front I/O Ports | 1 x Type-C, 1 x USB 3.0, 1 x USB 2.0, 1 x HD Audio, Power Button, Reset Button, LED Switch Button |
| Special Features | 270° Panoramic Tempered Glass, Magnetic Dust Filters, Tool-Free Side Panel Removal |

Figure 7.1.1: Product Dimensions. This image provides the length, width, and height measurements of the KEDIERS P4 PC case in both millimeters and inches.

Figure 7.1.2: ATX Tower Case Powerful Space Layout. This diagram illustrates the maximum clearances for CPU cooler height (180mm), GPU length (440mm), and PSU length (200mm), along with motherboard compatibility zones (ATX, M-ATX, ITX).

Figure 7.1.3: 120mm Case Fan Specifications. This image details the performance metrics of the included 120mm fans, including fan speed (400-1500 RPM), max air flow (55.37 CFM), max static pressure (1.36 mmH2O), noise level (4-25 dB(A)), voltage (12V), and current (0.15A).
8. Warranty and Support
KEDIERS is committed to providing high-quality products and excellent customer support.
- Worry-Free Purchase: KEDIERS aims to meet all your needs for computer cases, offering various series and designs.
- Customer Support: If you have any questions or require assistance, please contact KEDIERS customer support. Refer to the product packaging or the official KEDIERS website for contact information.
- Pre-installed Fans: The pre-installed high-performance fans are included, eliminating the need for separate purchases.


