1. Important Safety Instructions
Please read all instructions carefully before using this appliance. Keep this manual for future reference. Improper installation, adjustment, alteration, service, or maintenance can cause injury or property damage. Refer to this manual. For assistance or additional information, consult a qualified installer, service agency, or the manufacturer.
- Do not store flammable materials near the cooktop.
- Ensure proper ventilation during use.
- Use only induction-compatible cookware.
- Keep children away from the cooktop during operation and cooling.
- Disconnect power before servicing.
2. Product Overview
The BIGoods 36 Inch Induction Cooktop offers efficient and precise cooking with its flat glass top and multiple cooking zones. It features advanced controls and safety mechanisms for a modern kitchen experience.

Image: Top-down view of the BIGoods 36 Inch Induction Cooktop, showcasing its five induction zones and digital touch controls.
Video: An overview of the BIGoods 36 Inch Induction Cooktop, demonstrating its features and cooking capabilities in a kitchen setting.
3. Key Features
3 Preset Modes for Everyday Cooking
Easily achieve desired cooking results with three dedicated modes: Melt, Keep Warm, and Simmer. These modes maintain steady temperatures, preventing overheating or burning. Ideal for delicate tasks like melting butter or keeping dishes warm.

Image: Visual representation of the cooktop's three preset temperature modes: Melt, Keep Warm, and Simmer, with corresponding temperature and duration settings.
Flexible Bridge Zone Design
Connect two cooking zones to create a larger heating area, perfect for oversized pans, griddles, or specialty cookware. This feature ensures even heat distribution across the combined zone, enhancing cooking flexibility.

Image: The cooktop's flexible bridging feature, showing how two zones can be combined to accommodate larger cookware like a griddle.
Booster Mode for Rapid Heating
Activate the Booster function to quickly increase power to a selected cooking zone, significantly reducing heat-up times. This is ideal for boiling water or searing meats when time is limited.

Image: The cooktop's control panel with the Power Boost function illuminated, indicating its activation for rapid heating.
Smart Pan Detection
The cooktop automatically detects the presence and compatibility of cookware. Heat is only applied when a suitable pan is in place, optimizing energy use and preventing overheating if a pan is removed or incompatible.
Integrated Safety Features
This cooktop includes Residual Heat Indicators to warn when surfaces are hot, an Auto Shutdown feature for unattended operation, Overheat Protection, and a Child Lock for enhanced kitchen safety.

Image: A collage illustrating various safety and convenience features: Child Safety Lock, Timer (1-599 min), Residual Heat Warning, and Pause Function.
4. Installation Guide
4.1 Unboxing
Carefully unpack the cooktop and all accessories. Inspect for any damage during transit. Keep all packaging materials until installation is complete and the unit is confirmed to be working correctly.
Video: An unboxing video for the BIGoods 36 Inch Induction Cooktop, showing the contents and initial setup steps.
4.2 Countertop Cutout Dimensions
Ensure your countertop cutout meets the specified dimensions for a proper and secure fit. Refer to the diagram below for detailed measurements.

Image: Detailed diagram illustrating the overall cooktop dimensions and the required countertop cutout dimensions for installation.
4.3 Electrical Connection (Hardwiring)
This cooktop requires a 208-240V/50A hardwired electrical connection. Installation must be performed by a qualified electrician in accordance with local electrical codes. Ensure the power supply is disconnected before making any connections.
Video: Guidelines for hardwiring an induction cooktop, demonstrating the proper electrical connections for safe installation.
Video: An installation guide for a 36-inch electric cooktop, showing the process of dropping the unit into the countertop cutout and securing it.
5. Operating Instructions
5.1 Powering On/Off
To power on, touch the main power button. To power off, touch and hold the main power button until the display turns off. The 'All Off' button can also be used to turn off all active zones.
5.2 Adjusting Heat Levels
Select a cooking zone and use the '+' or '-' controls to adjust the heat level from 1 to 9. The cooktop features split-key level control for precise temperature adjustments.
5.3 Using Preset Modes
Press the 'Melt', 'Keep Warm', or 'Simmer' buttons to activate the corresponding preset temperature for a specific duration (e.g., 2 hours at 113°F for Melt).
5.4 Booster Function
To activate the Booster function, select a cooking zone and press the 'Power Boost' button. This provides a temporary surge of power for rapid heating, typically lasting up to 10 minutes.
5.5 Timer Function
The cooktop features a timer that can be set from 1 to 599 minutes. Use the timer to automatically turn off a cooking zone after a set period.
5.6 Pause Function
Press the 'Pause' button to temporarily halt all active cooking zones. Press it again to resume cooking with the previous settings.
5.7 Child Lock
Activate the Child Lock by pressing and holding the 'Lock' button for 3 seconds. This prevents accidental operation of the cooktop. Repeat the action to deactivate.
Video: A demonstration of the cooktop's various functions, including power levels, timer, and safety features during cooking.
6. Cookware Requirements
For optimal performance, use flat-bottomed pots and pans made from ferromagnetic materials (e.g., cast iron, enameled steel, stainless steel with a magnetic base). The base diameter should be no less than 4.7 inches. To check compatibility, a magnet should stick firmly to the bottom of your cookware.
- Compatible: Iron pan, iron plate, iron frying pan, enamel stainless steel kettle, enamel steel pot, stainless steel pot.
- Incompatible: Non-magnetic stainless steel, ceramic containers, copper, aluminum, cookware with jagged edges or a curved base, heat-resistant glass.
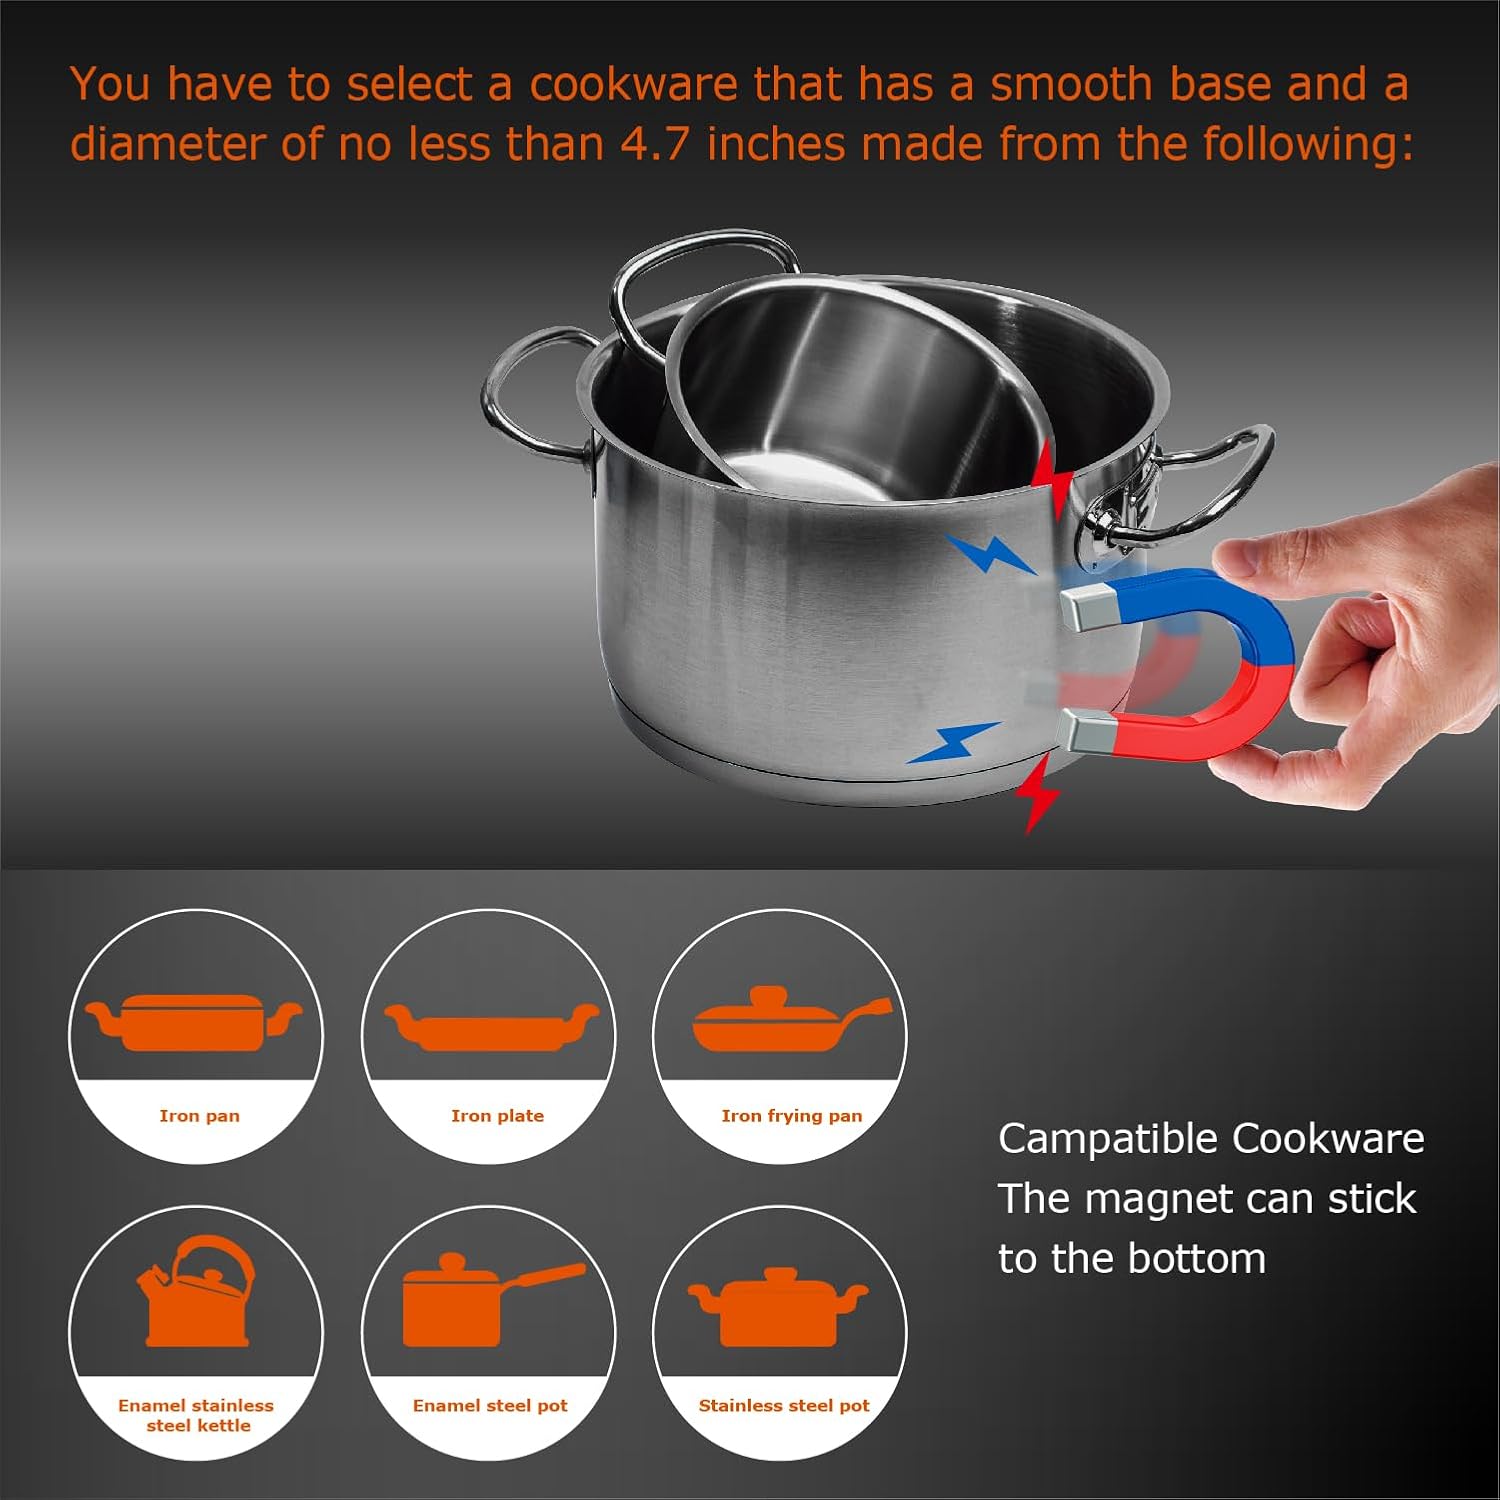
Image: Visual guide on cookware compatibility for induction cooktops, illustrating the magnet test and examples of suitable and unsuitable materials.
7. Cleaning and Maintenance
Regular cleaning helps maintain the appearance and functionality of your cooktop.
- Always ensure the cooktop is cool before cleaning.
- Wipe the glass surface with a soft cloth and a mild detergent or a specialized ceramic cooktop cleaner.
- For stubborn stains, use a non-abrasive scraper designed for glass cooktops.
- Avoid using abrasive pads, harsh chemicals, or steam cleaners.
- Clean spills immediately to prevent them from baking onto the surface.
8. Troubleshooting
If you encounter issues with your cooktop, refer to the following common problems and solutions:
| Problem | Possible Cause | Solution |
|---|---|---|
| Cooktop does not turn on. | No power supply; Child Lock active. | Check circuit breaker; Deactivate Child Lock. |
| Cooking zone not heating. | Incompatible cookware; Pan not centered. | Use induction-compatible pan; Reposition pan. |
| Error code displayed. | Specific malfunction. | Refer to the full manual for specific error code meanings and solutions. |
| Unusual noise during operation. | Normal fan operation; Cookware vibration. | This is usually normal; Ensure cookware is flat and stable. |
9. Technical Specifications
| Specification | Detail |
|---|---|
| Product Dimensions | 21 x 36 x 2.72 inches (53.34 x 91.44 x 6.91 cm) |
| Item Weight | 34.4 pounds (15.6 kg) |
| Power Source | Corded Electric (208~240V/50A) |
| Heating Elements | 5 Induction Burners |
| Control Type | Digital Touch |
| Heater Surface Material | Glass Ceramic |
| Special Features | Bridge Zone Design, Booster Function, Smart Pan Detection, Preset Modes |
| Color | Black |
| Manufacturer | BIGoods |
10. Warranty and Support
For warranty information, technical support, or service inquiries, please refer to the warranty card included with your product or contact BIGoods customer service directly. Keep your purchase receipt as proof of purchase.


