1. Important Safety Instructions
Please read all instructions carefully before using the appliance and retain them for future reference. Improper operation may cause damage to the appliance or injury to the user.
General Safety
- This appliance is intended for household use only.
- Do not touch hot surfaces. Use handles or knobs.
- Ensure proper ventilation during use.
- Keep children away from the cooktop during operation and cooling.
- Never leave the appliance unattended when in use.
- Do not store flammable materials near the cooktop.
Electrical Safety
- The cooktop must be installed by a qualified electrician in accordance with local wiring rules and regulations.
- Ensure the power supply (208-240V/40A) matches the requirements of the appliance.
- Do not use extension cords or ungrounded adapters.
- Disconnect power before servicing or cleaning.
Cookware Safety
- Only use induction-compatible cookware with a flat base and a diameter of no less than 4.7 inches (12 cm).
- Avoid using damaged or warped cookware.
- Do not place empty cookware on a hot cooking zone.
2. Product Overview
The BIGoods 24 Inch Induction Cooktop features a sleek flat glass top with four cooking zones, offering efficient and precise cooking. It includes advanced functions such as Bridge-SYNC, preset modes, booster, timer, pause, and child lock for enhanced safety and convenience.

Image 2.1: Top view of the BIGoods 24 Inch Induction Cooktop, showing the four cooking zones and touch controls.
Key Features:
- 4 Induction Burners: Provides rapid and efficient heating.
- Bridge-SYNC Function: Combines two cooking zones for larger cookware.
- 3 Preset Modes: Melt, Keep Warm, and Simmer for precise temperature control.
- Booster Mode: Delivers maximum power for quick heating.
- Timer Function: Programmable cooking time up to 599 minutes.
- Pause Function: Temporarily stops and resumes cooking.
- Child Lock: Prevents accidental operation.
- Safety Features: Residual Heat Indicators, Auto Shutdown, Overheat Protection, Smart Pan Detection.

Image 2.2: Visual representation of induction cooking benefits, including fast focused heat, rapid temperature control, easy cleaning, and energy efficiency.

Image 2.3: Illustration demonstrating that induction cooktops do not use hot coils, reducing burn risk by heating only the cookware bottom.
3. Installation
Proper installation is crucial for the safe and efficient operation of your induction cooktop. It must be installed by a qualified technician.
Cooktop and Cutout Dimensions
Refer to the diagram below for precise measurements required for installation. Ensure adequate clearance for ventilation.
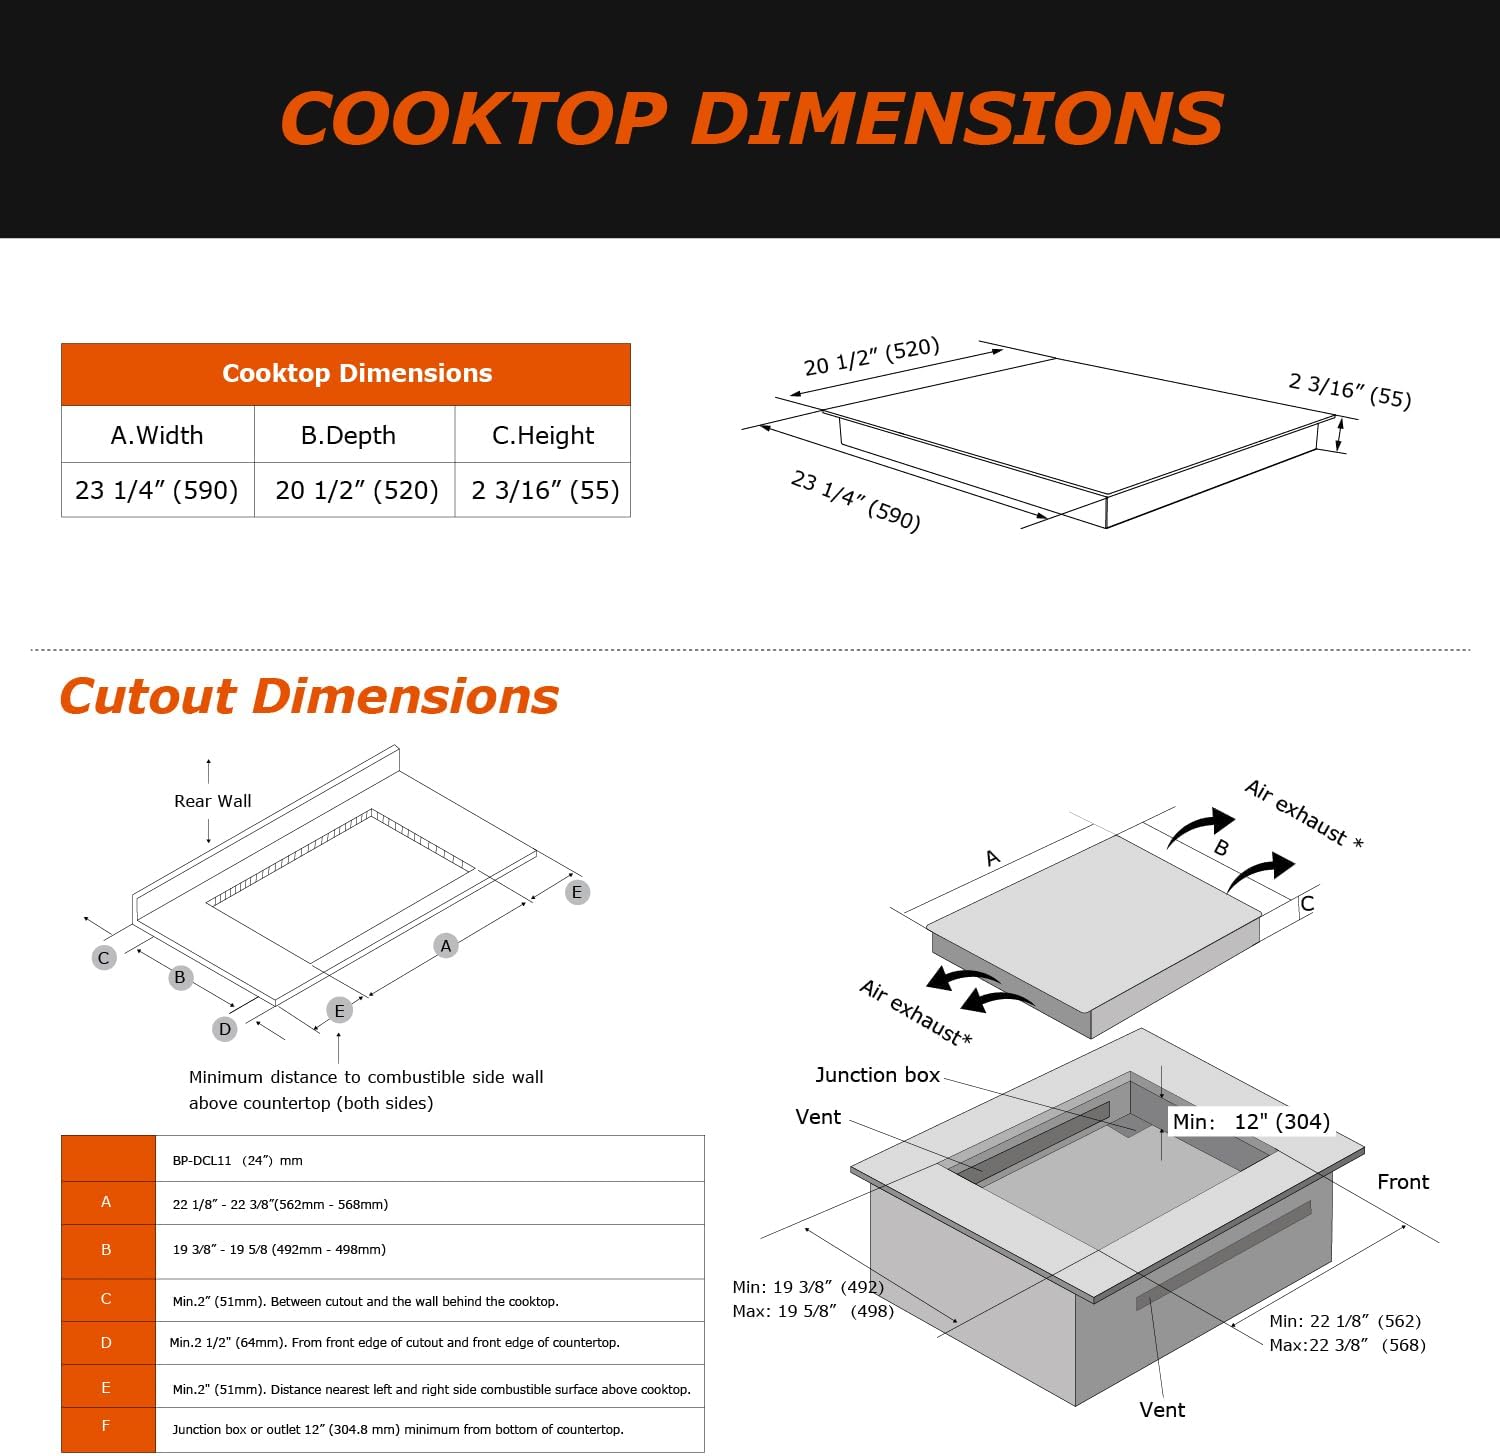
Image 3.1: Detailed diagram illustrating the cooktop's overall dimensions and the required countertop cutout dimensions for proper installation, including ventilation space.
Electrical Connection
- The appliance requires a dedicated 208-240V, 40A electrical circuit.
- Ensure the wiring is correctly connected according to the provided wiring diagram in the full installation guide (not included in this manual).
- A circuit breaker of appropriate rating must be installed.
4. Operating Instructions
This section details how to use the various functions of your induction cooktop.
Basic Operation
- Power On: Touch the Power button to turn on the cooktop. The display will show '0' for all zones.
- Select Cooking Zone: Touch the desired cooking zone selection button. The display for that zone will flash.
- Adjust Power Level: Use the '+' or '-' buttons, or slide your finger across the power level bar (0-9) to set the desired heat level.
- Power Off: Touch the Power button to turn off the entire cooktop, or touch the individual zone selection button and then '-' to '0' to turn off a specific zone.
Preset Modes (Melt, Keep Warm, Simmer)
These modes provide optimized temperatures for common cooking tasks.
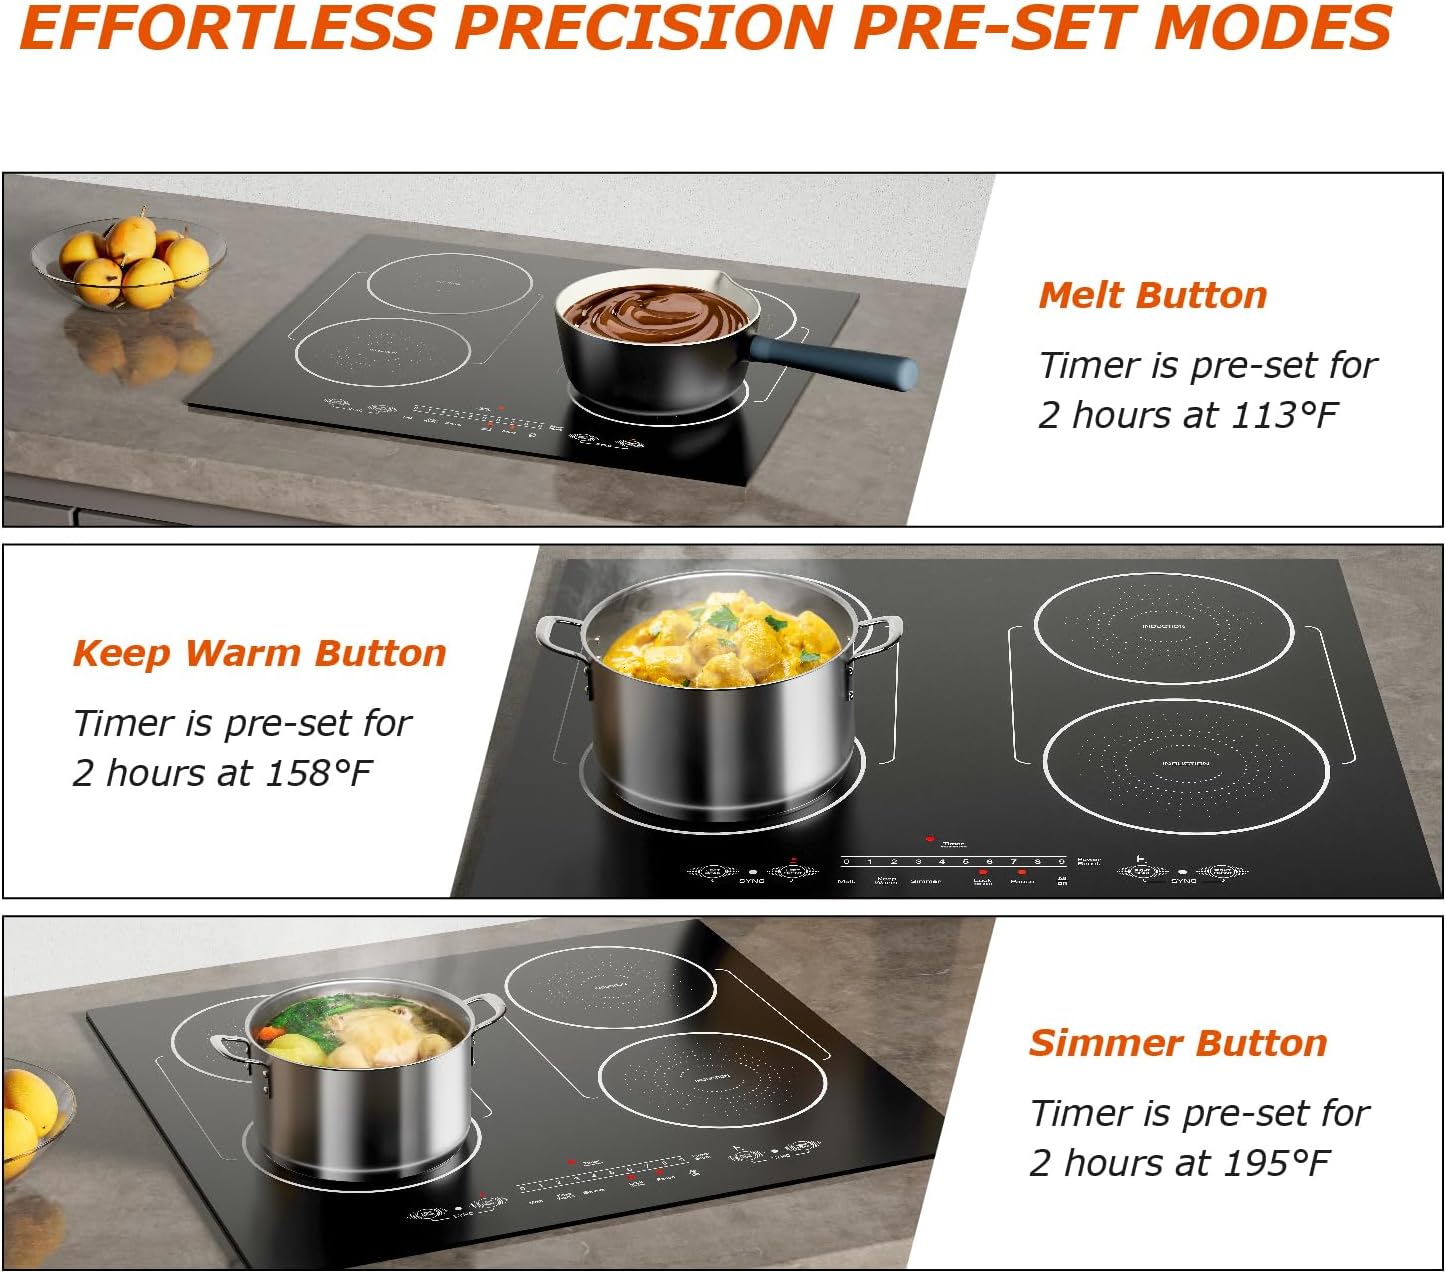
Image 4.1: Visual guide to the three preset cooking modes: Melt (113°F), Keep Warm (158°F), and Simmer (195°F), each with a pre-set timer of 2 hours.
- Melt: Ideal for melting butter or chocolate at a gentle 113°F (45°C).
- Keep Warm: Maintains food at a serving temperature of 158°F (70°C).
- Simmer: Perfect for slow cooking sauces or stews at 195°F (90°C).
To activate, select a cooking zone and then touch the corresponding preset mode button.
Bridge-SYNC Function
This feature allows you to combine two adjacent cooking zones into one large zone, suitable for oversized pots, griddles, or roasting pans.

Image 4.2: Diagram showing how the Bridge-SYNC function connects two cooking zones to create a single large heating area, ideal for large or elongated cookware.
To activate, select one of the two zones you wish to bridge, then touch the 'SYNC' button. Both zones will operate as a single unit with synchronized power settings.
Booster Mode
The Booster function provides a temporary surge of maximum power to a selected cooking zone for rapid heating, such as boiling water quickly.

Image 4.3: Illustration of the Booster function, highlighting its ability to deliver increased power for fast heat-up, such as boiling water.
To activate, select a cooking zone and then touch the 'Booster' button. The zone will operate at maximum power for a set duration (typically 10 minutes) before returning to a high power level.
Timer Function
The timer can be set for individual cooking zones or as a general minute minder.
- Cooking Zone Timer: Select a cooking zone, then touch the 'Timer' button. Use '+' or '-' to set the desired cooking duration (1-599 minutes). The zone will automatically turn off when the timer expires.
- Minute Minder: Touch the 'Timer' button without selecting a cooking zone. Set the desired time. An alarm will sound when the time expires, but the cooktop will not turn off.
Pause Function
The Pause function allows you to temporarily stop all active cooking zones and then resume with the same settings.
- To activate, touch the 'Pause' button. All active zones will pause, and the display will show 'II'.
- To resume, touch the 'Pause' button again. The cooktop will return to its previous settings.
Child Lock
The Child Lock prevents accidental operation of the cooktop, enhancing safety.
- To activate, ensure the cooktop is off, then touch and hold the 'Lock' button for a few seconds. The display will show 'Lo'.
- To deactivate, touch and hold the 'Lock' button again until 'Lo' disappears.
Image 4.4: Overview of safety and convenience features: Child Safety Lock, Timer (1-599 min), Residual Heat Warning, and Pause Function.
Cookware Compatibility
Induction cooktops require specific types of cookware. Compatible cookware must have a magnetic base.

Image 4.5: Guide to compatible cookware, including iron pans, iron plates, iron frying pans, enamel stainless steel kettles, enamel steel pots, and stainless steel pots. A magnet test is recommended to check compatibility.
- Compatible: Cast iron, enameled iron, steel, stainless steel (if magnetic), or aluminum with a magnetic base.
- Incompatible: Non-magnetic stainless steel, aluminum (without magnetic base), copper, glass, ceramic, or cookware with a base diameter less than 4.7 inches.
- Test: If a magnet sticks firmly to the bottom of your cookware, it is compatible.
5. Cleaning and Maintenance
Regular cleaning and proper maintenance will ensure the longevity and optimal performance of your cooktop.
Daily Cleaning
- Ensure the cooktop is cool before cleaning.
- Wipe the glass surface with a damp cloth and mild detergent.
- For stubborn stains, use a ceramic cooktop cleaner and a non-abrasive sponge.
- Dry thoroughly with a clean cloth to prevent water spots.

Image 5.1: A hand wearing a pink glove cleaning the flat glass surface of the induction cooktop with a sponge, demonstrating ease of cleaning.
Care Tips
- Avoid dropping heavy objects on the glass surface.
- Do not use abrasive cleaners, scouring pads, or harsh chemicals.
- Clean spills immediately, especially sugary liquids, to prevent pitting or permanent stains.
6. Troubleshooting
If you encounter issues with your cooktop, refer to the following common problems and solutions.
| Problem | Possible Cause | Solution |
|---|---|---|
| Cooktop does not turn on. | No power supply; Child Lock activated. | Check circuit breaker; Deactivate Child Lock. |
| Cooking zone not heating. | Incompatible cookware; No cookware detected; Cookware too small. | Use induction-compatible cookware; Place cookware centrally on the zone; Use cookware with a base diameter of at least 4.7 inches. |
| Display shows 'E' or error code. | Internal error; Overheat protection activated. | Turn off the cooktop, wait a few minutes, then restart. If the error persists, contact customer support. |
| Unusual noise during operation. | Normal fan noise; Cookware material. | A slight humming or buzzing sound is normal for induction cooktops. Some cookware may produce more noise than others. |
7. Specifications
| Feature | Detail |
|---|---|
| Model Number | 24 Inch Induction Cooktop |
| Brand | BIGoods |
| Product Dimensions (D x W x H) | 20.47" x 23.23" x 2.17" (52 x 59 x 5.5 cm) |
| Item Weight | 23 pounds (10.4 kg) |
| Heating Elements | 4 Induction Burners |
| Power Source | Corded Electric |
| Voltage/Amperage | 208-240V / 40A |
| Heater Surface Material | Glass Ceramic |
| Control Type | Digital Touch |
| Special Features | Bridge Zone Design, Booster Mode, Preset Modes, Timer, Pause, Child Lock, Pan Detection |
8. Warranty and Support
This BIGoods Induction Cooktop comes with a standard manufacturer's warranty. For specific warranty terms and conditions, please refer to the warranty card included with your product or visit the official BIGoods website.
Customer Support
If you have any questions, require technical assistance, or need to report an issue, please contact BIGoods customer support through their official channels. Contact information can typically be found on the product packaging or the manufacturer's website.
- Online Support: Visit the BIGoods official website for FAQs and support resources.
- Email/Phone: Refer to your product documentation for specific contact details.


