Introduction
Thank you for choosing the acer OMR241 Ergonomic Wireless Vertical Mouse. This mouse is designed to provide a comfortable and efficient user experience, reducing wrist and arm strain during prolonged use. Its vertical design promotes a natural hand posture, and the wireless connectivity ensures a clutter-free workspace. This manual provides detailed instructions for setting up, operating, maintaining, and troubleshooting your new mouse.
Setup
1. Package Contents
- acer OMR241 Ergonomic Wireless Vertical Mouse
- USB-A Receiver
- USB Charging Cable
- User Manual
2. Locating the USB-A Receiver
The USB-A receiver is conveniently stored within the mouse itself, typically in a compartment on the underside. Gently open the compartment to retrieve the receiver.

The USB-A receiver is located in a dedicated slot on the bottom of the mouse for secure storage and easy access.
3. Connecting the Mouse
- Take out the USB-A receiver from its storage slot on the mouse.
- Insert the USB-A receiver into an available USB-A port on your computer, laptop, or other compatible device.
- Turn on your mouse using the power switch located on the underside. The mouse will automatically connect to the receiver.

Visual guide for connecting the USB-A receiver to your device and powering on the mouse.
4. Charging the Mouse
The mouse is equipped with a rechargeable 300mAh lithium battery. When the battery is low, the LED indicator may flash. Use the provided USB charging cable to recharge the mouse.
- Connect the USB-C end of the charging cable to the USB-C charging port on the front of the mouse.
- Connect the USB-A end of the charging cable to a USB power source (e.g., computer USB port, USB wall adapter).
- A full charge typically takes approximately 1.5 hours and can last up to a month depending on usage.
The mouse features a USB-C charging port for convenient recharging.
Operating Instructions
1. Button Description
Familiarize yourself with the various buttons and their functions:

Detailed view of the mouse with all buttons and features clearly labeled.
- Left Button: Standard click function.
- Right Button: Standard right-click function.
- Scroll Wheel: Scroll up/down, and middle-click function.
- DPI Adjustment Button: Cycles through DPI settings (1000/1200/1600).
- Forward Button: Navigates forward in web browsers or file explorers.
- Backward Button: Navigates backward in web browsers or file explorers.
- Power Switch: Turns the mouse On or Off.
- LED Indicator: Shows connection status and battery level.
2. DPI Adjustment
The mouse offers three adjustable DPI levels (1000/1200/1600) to suit your preference and task requirements. Press the DPI adjustment button, located near the scroll wheel, to cycle through the settings. Each press will change the cursor sensitivity.

Adjust cursor sensitivity by pressing the DPI button to switch between 1000, 1200, and 1600 DPI.
3. Forward and Backward Buttons
The dedicated forward and backward buttons on the side of the mouse allow for quick navigation through web pages and folders, enhancing your workflow efficiency.

Utilize the forward and backward buttons for efficient navigation.
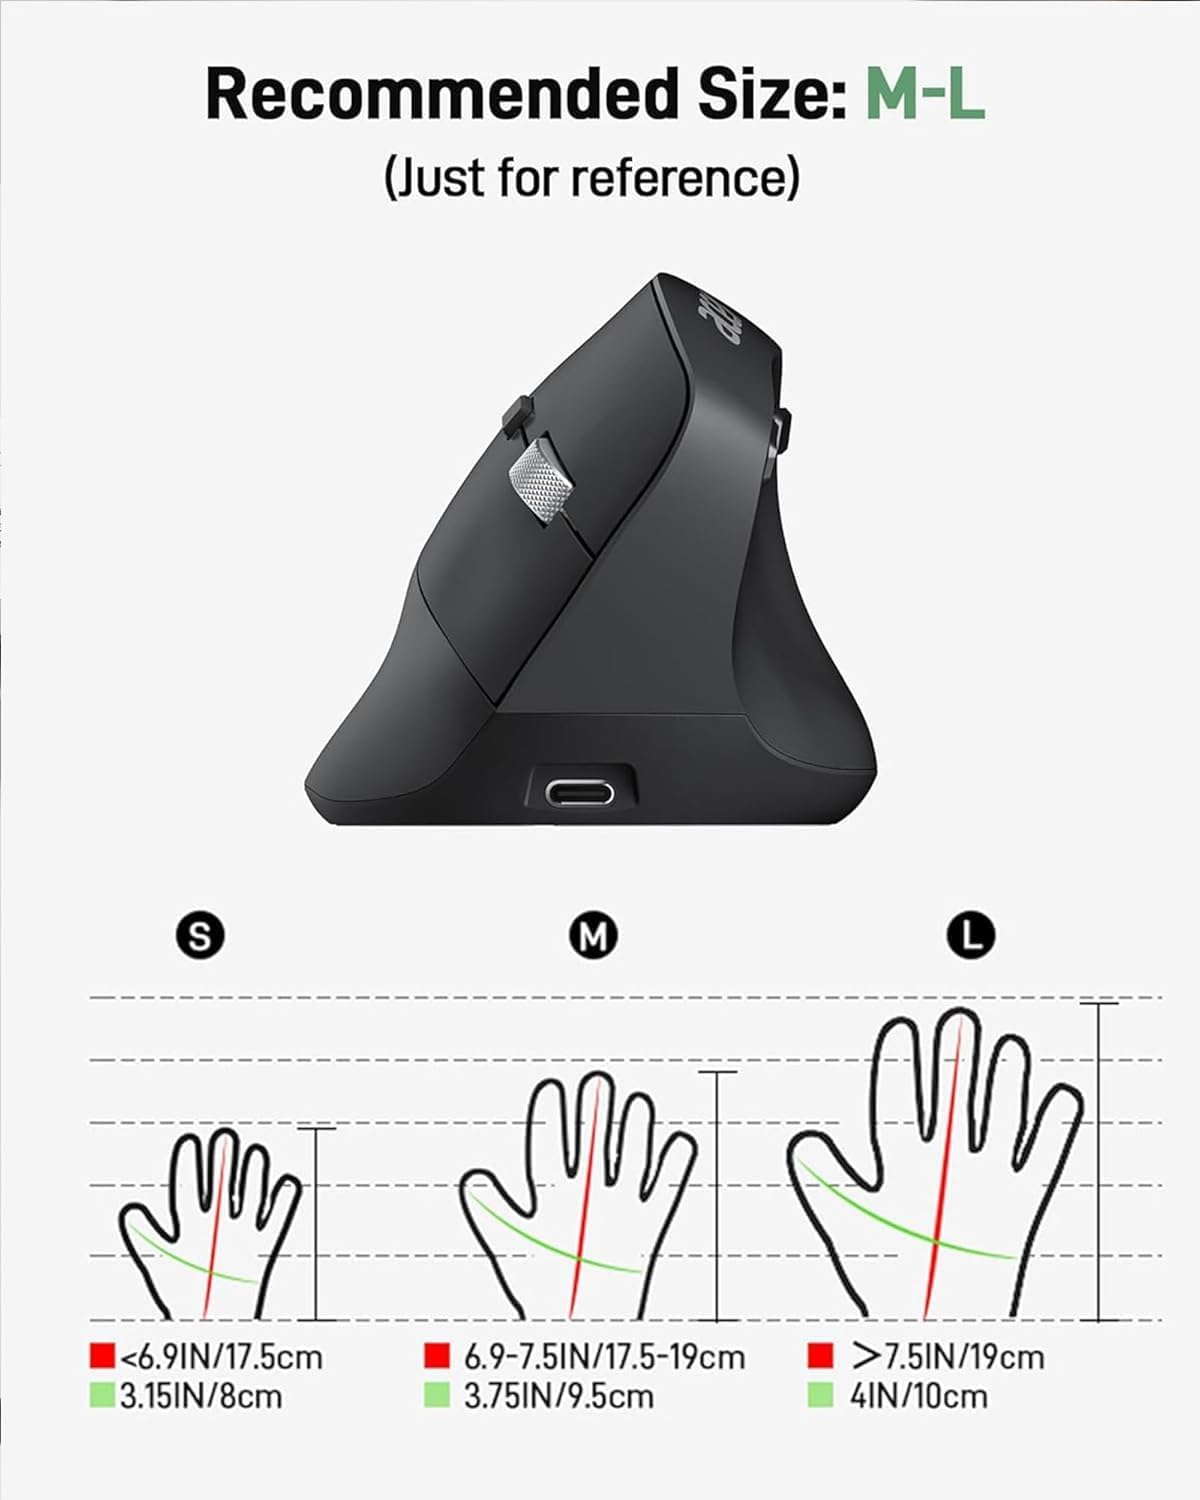
4. Ergonomic Design
The 57° vertical design of the mouse promotes a natural handshake position, reducing pronation of the forearm and wrist. This design aims to minimize muscle activity and discomfort during extended periods of use.

The 57° ergonomic design helps reduce wrist and arm pressure for greater comfort.
Maintenance
1. Cleaning
To maintain optimal performance and hygiene, regularly clean your mouse:
- Disconnect the mouse from your device and turn it off.
- Use a soft, lint-free cloth slightly dampened with water or a mild cleaning solution to wipe the surface of the mouse.
- Avoid using harsh chemicals, abrasives, or solvents.
- For the optical sensor, use a dry cotton swab to gently remove any dust or debris.
2. Battery Care
To prolong the life of the built-in rechargeable battery:
- Avoid fully discharging the battery frequently.
- Charge the mouse when the low battery indicator appears.
- If storing the mouse for an extended period, charge it to about 50% before storage and recharge every few months.
3. Storage
Store the mouse in a cool, dry place away from direct sunlight and extreme temperatures. When transporting, ensure the USB-A receiver is securely stored in its compartment to prevent loss.
Troubleshooting
| Problem | Possible Cause | Solution |
|---|---|---|
| Mouse not responding | Mouse is off or battery is low. USB receiver not properly connected. | Turn on the mouse and ensure it has sufficient charge. Reinsert the USB receiver into a different USB port. |
| Cursor movement is erratic or slow | Low battery. DPI setting is too low. Dirty optical sensor. | Charge the mouse. Press the DPI button to increase sensitivity. Clean the optical sensor. |
| Forward/Backward buttons not working on Mac | Operating system limitation. | The side buttons may not be fully functional on macOS without additional software or customization. This is a known compatibility aspect. |
| Mouse disconnects frequently | Distance from receiver too far. Interference. Low battery. | Ensure the mouse is within 32 feet (10 meters) of the receiver. Move away from other wireless devices. Charge the mouse. |
| Mouse not charging | Faulty cable or power source. | Try a different USB charging cable or a different USB power source. |
Specifications
| Feature | Detail |
|---|---|
| Model Number | OMR241 |
| Product Dimensions | 4.3 x 3.1 x 0.1 inches |
| Item Weight | 5.1 ounces |
| Connectivity Technology | 2.4GHz Wireless (USB-A Receiver) |
| DPI Settings | 1000 / 1200 / 1600 |
| Buttons | 6 (Left, Right, Scroll Wheel, DPI, Forward, Backward) |
| Battery | 300mAh Rechargeable Lithium Battery (included) |
| Charging Port | USB-C |
| Movement Detection | Optical |
| Special Features | Ergonomic Design, Vertical Orientation, Rechargeable |
Compatibility
The acer OMR241 mouse is compatible with a wide range of operating systems and devices:
- Windows (PC, Laptop)
- macOS (iMac, MacBook Pro/Air)
- Linux
- Chrome OS
The mouse offers universal compatibility across various operating systems and devices.
Warranty and Support
For warranty information, technical support, or service inquiries, please refer to the warranty card included in your product packaging or visit the official acer support website. Keep your purchase receipt as proof of purchase for warranty claims.
Video Guide
Watch this official video for a visual overview of the acer Ergonomic Wireless Mouse, demonstrating its features and usage.


