1. Introduction
This manual provides essential instructions for the safe and efficient operation, maintenance, and troubleshooting of your SAIYERUS Commercial Electric Food Warmer. Please read this manual thoroughly before initial use and retain it for future reference.
The SAIYERUS Commercial Electric Food Warmer is designed to keep various foods, such as soups, sauces, and stews, at a ready-to-serve temperature. It features a durable stainless steel construction and precise temperature control, making it suitable for commercial kitchens, restaurants, catering events, and buffets.

Figure 1: SAIYERUS Commercial Electric Food Warmer (2-pot model)
This image displays the SAIYERUS Commercial Electric Food Warmer, featuring two 7-liter round pots with lids, a control panel with power and heating indicators, and a temperature dial. The unit is constructed from stainless steel.
2. Safety Instructions
To prevent injury or damage to the appliance, always follow these safety precautions:
- Read all instructions before operating the appliance.
- Ensure the appliance is connected to a grounded power outlet with the correct voltage (110V for this model).
- Do not immerse the appliance in water or other liquids.
- Always unplug the appliance before cleaning or when not in use.
- Keep hands and utensils out of the hot water bath and food pots during operation.
- Important: Ensure the water level in the tank is at least 4cm higher than the heating tube to prevent dry burning and damage to the unit.
- Important: The water in the tank must be drained out after every use.
- Do not operate the appliance if the power cord or plug is damaged.
- Place the appliance on a stable, heat-resistant surface away from walls or other heat-sensitive materials.
- This appliance is for commercial use only and should be operated by trained personnel.
3. Product Components and Overview
Familiarize yourself with the main components of your food warmer:
- Control Panel: Includes Power Indicator, Heating Indicator, and Temperature Control Dial.
- Water Tank: The main reservoir for water, which is heated to create a bain-marie effect.
- Food Pots: Two 7-liter round stainless steel pots for holding food.
- Lids: Stainless steel lids for each food pot, designed with a notch for ladles.
- Drainage Faucet: Located on the front for easy draining of water from the tank.
- Non-Skid Feet: For stability during operation.
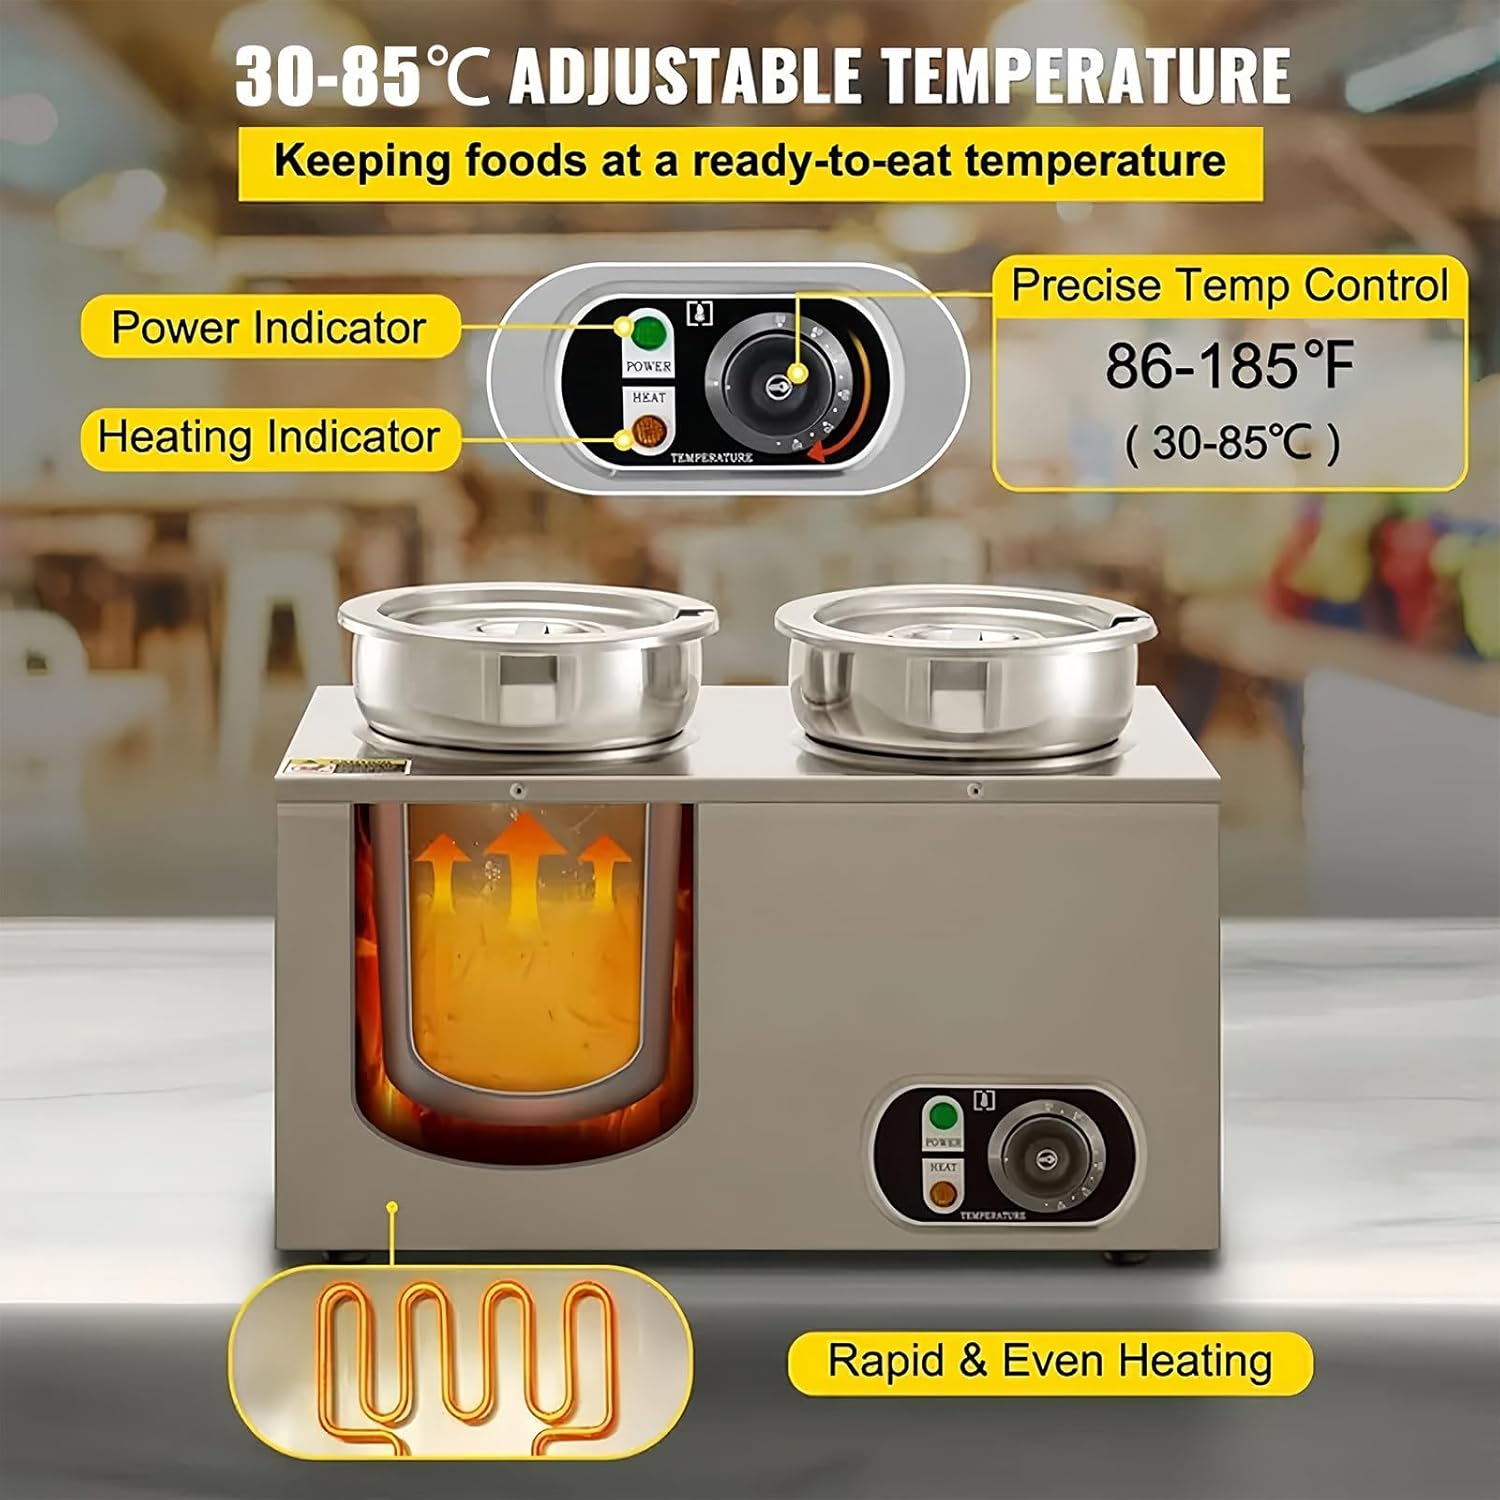
Figure 2: Control Panel Details
This image highlights the control panel of the food warmer, showing the power indicator light, heating indicator light, and the precise temperature control dial with settings from 86-185°F (30-85°C).

Figure 3: Pot Design and Drainage Faucet
This image illustrates a single food pot with its lid, noting the notch for a ladle. It also shows the temperature controller and the drainage faucet for convenient water removal.
4. Setup Instructions
- Unpacking: Carefully remove all packaging materials and inspect the unit for any damage. Retain packaging for future transport if needed.
- Placement: Place the food warmer on a stable, level, and heat-resistant surface. Ensure there is adequate ventilation around the unit.
- Cleaning: Before first use, clean the food pots, lids, and the interior of the water tank with warm soapy water. Rinse thoroughly and dry.
- Fill Water Tank: Close the drainage faucet. Fill the water tank with clean water. Ensure the water level is at least 4cm above the heating tube. Do not overfill.
- Insert Food Pots: Place the empty 7L food pots into their designated openings in the water tank.
- Connect Power: Plug the power cord into a suitable 110V grounded electrical outlet.
5. Operating Instructions
- Power On: Once the unit is plugged in, the Power Indicator light will illuminate.
- Add Food: Place your prepared food into the 7L stainless steel pots. Cover the pots with their respective lids.
- Set Temperature: Turn the Temperature Control Dial to your desired holding temperature, ranging from 30°C to 85°C (86°F to 185°F).
- Heating: The Heating Indicator light will turn on, indicating that the unit is actively heating the water bath. Once the set temperature is reached, the heating indicator will cycle on and off to maintain the temperature.
- Serving: Use appropriate serving utensils. The lids are designed with a notch to accommodate ladles.
- Monitoring: Periodically check the water level in the tank and refill if necessary, ensuring it remains above the heating tube.
- Power Off: When finished, turn the Temperature Control Dial to the "OFF" position and unplug the unit from the power outlet.
6. Maintenance and Cleaning
Regular cleaning and maintenance will ensure the longevity and hygienic operation of your food warmer.
- Drain Water: After each use, ensure the unit is unplugged and has cooled down. Open the drainage faucet to completely empty the water tank.
- Clean Pots and Lids: Remove the food pots and lids. Wash them with warm soapy water, rinse thoroughly, and dry completely. They are dishwasher safe.
- Clean Water Tank: Wipe the interior of the water tank with a damp cloth. For stubborn residue, use a mild detergent and a non-abrasive sponge. Rinse thoroughly to remove all soap residue.
- Exterior Cleaning: Wipe the exterior stainless steel surfaces with a damp cloth and a mild stainless steel cleaner if necessary. Dry immediately to prevent water spots.
- Descaling: Over time, mineral deposits may accumulate in the water tank. Descale the unit periodically using a commercial descaling solution suitable for stainless steel appliances, following the product's instructions.
- Storage: Store the clean and dry food warmer in a cool, dry place.

Figure 4: Stainless Steel Construction
This image illustrates the durable stainless steel construction of the food warmer, highlighting its corrosion-proof exterior, food-grade interior, thickened steel, reinforced layer, and rustproof layer. It also shows the non-skid rubber feet for stability.
7. Troubleshooting
If you encounter issues with your food warmer, refer to the following common problems and solutions:
| Problem | Possible Cause | Solution |
|---|---|---|
| Unit does not power on. | Not plugged in; power outlet malfunction; faulty power cord. | Ensure the power cord is securely plugged into a working 110V outlet. Check the circuit breaker. If the cord is damaged, contact support. |
| Food is not heating or not hot enough. | Temperature dial set too low; insufficient water in tank; heating element issue. | Increase the temperature setting. Check and ensure the water level in the tank is above the heating tube (at least 4cm). Allow sufficient time for heating. |
| Heating indicator light is off, but unit is on. | Unit has reached set temperature; heating element malfunction. | This is normal if the unit has reached the set temperature and is maintaining it. If the food is cold, check water level and temperature setting. |
| Water is leaking from the unit. | Drainage faucet not fully closed; damaged water tank. | Ensure the drainage faucet is tightly closed. If leaking persists, discontinue use and contact support. |
If the problem persists after attempting these solutions, please contact customer support.
8. Specifications
| Feature | Detail |
|---|---|
| Model | 2 Barrel (7L x 2) |
| Material | 201 Stainless Steel |
| Color | Silver |
| Voltage | 110V (50-60Hz) |
| Power | 600W |
| Temperature Range | 30-85°C (86-185°F) |
| Pot Capacity | 7 Liters (per pot) |
| Total Capacity | 14 Liters (7L x 2) |
| Power Cord Length | 1.3m |
| Net Weight | 7.5 KG |
| Dimensions (L x W x H) | 535 x 275 x 320 mm |
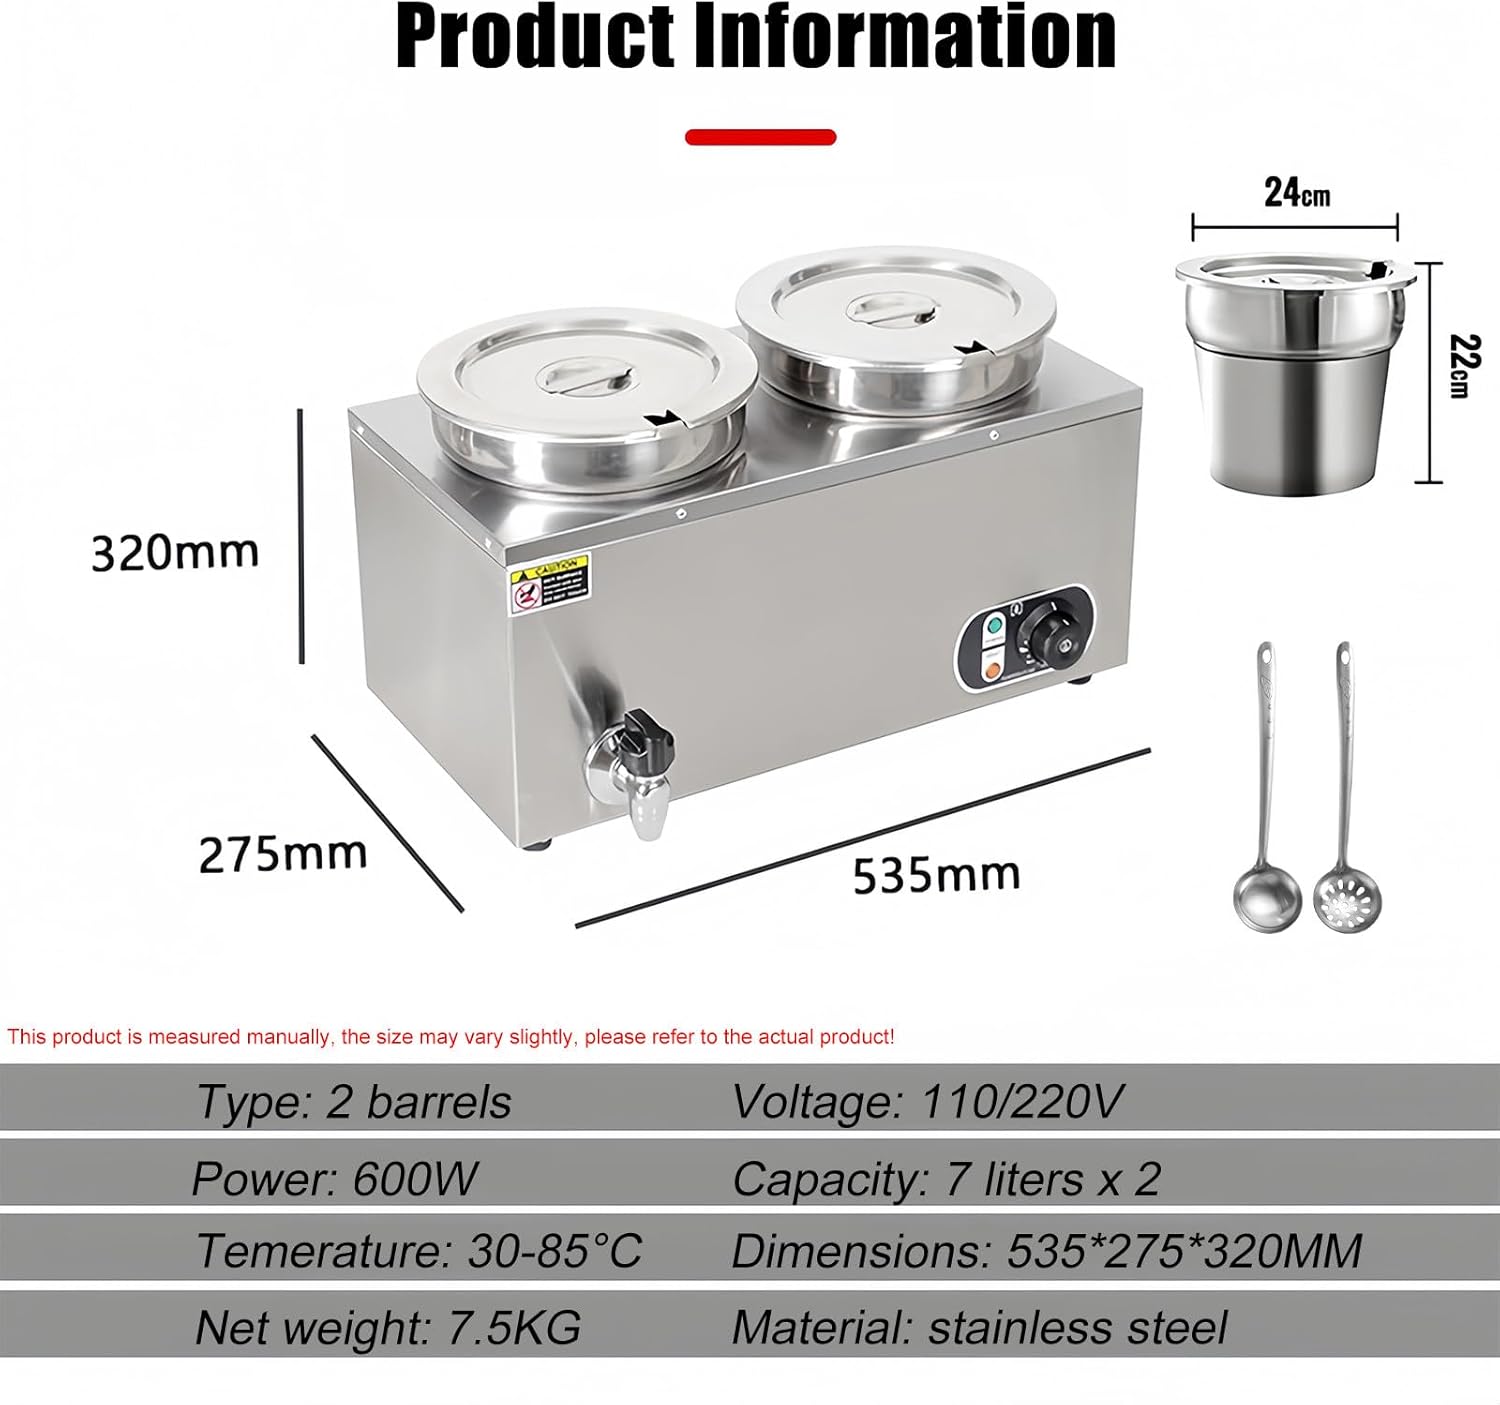
Figure 5: Product Dimensions and Included Items
This image provides a visual representation of the product's dimensions (535mm length, 275mm width, 320mm height) and illustrates the included 7L round pots and ladles. It also lists key specifications like voltage, power, temperature range, and material.
9. Warranty and Support
This SAIYERUS Commercial Electric Food Warmer comes with a one-year warranty from the date of purchase, covering manufacturing defects under normal use.
For any questions, technical assistance, or warranty claims, please contact our customer support team. You can send us an email, and we commit to replying within 24 hours.
Please have your model number (7L x 2) and purchase information ready when contacting support.


