
Introduction
This manual provides instructions for the installation, operation, and maintenance of the Fortinet FortiAP 243K Wi-Fi 7 Indoor Access Point. The FortiAP 243K is designed for enterprise-grade wireless networking, offering advanced Wi-Fi 7 capabilities, quad-radio architecture, and support for external antennas. It integrates with Fortinet's security ecosystem for centralized management and robust security features.

Image: Top view of the Fortinet FortiAP 243K access point, showing its sleek white design and multiple external antennas.
Setup
1. Package Contents
Verify that your package contains the following items:
- FortiAP 243K Access Point
- Mounting bracket (if included)
- External antennas (if included separately)
- Quick Start Guide
2. Physical Installation
The FortiAP 243K is designed for indoor deployment. Consider mounting locations that provide optimal Wi-Fi coverage and are away from obstructions or sources of interference.
- Antenna Connection: The FortiAP 243K features six RP-SMA connectors for external antennas. Carefully screw each antenna onto its designated connector until finger-tight. Ensure proper orientation for optimal signal.
- Mounting: Use the provided mounting bracket to secure the access point to a wall or ceiling. Refer to the Quick Start Guide for detailed mounting instructions.
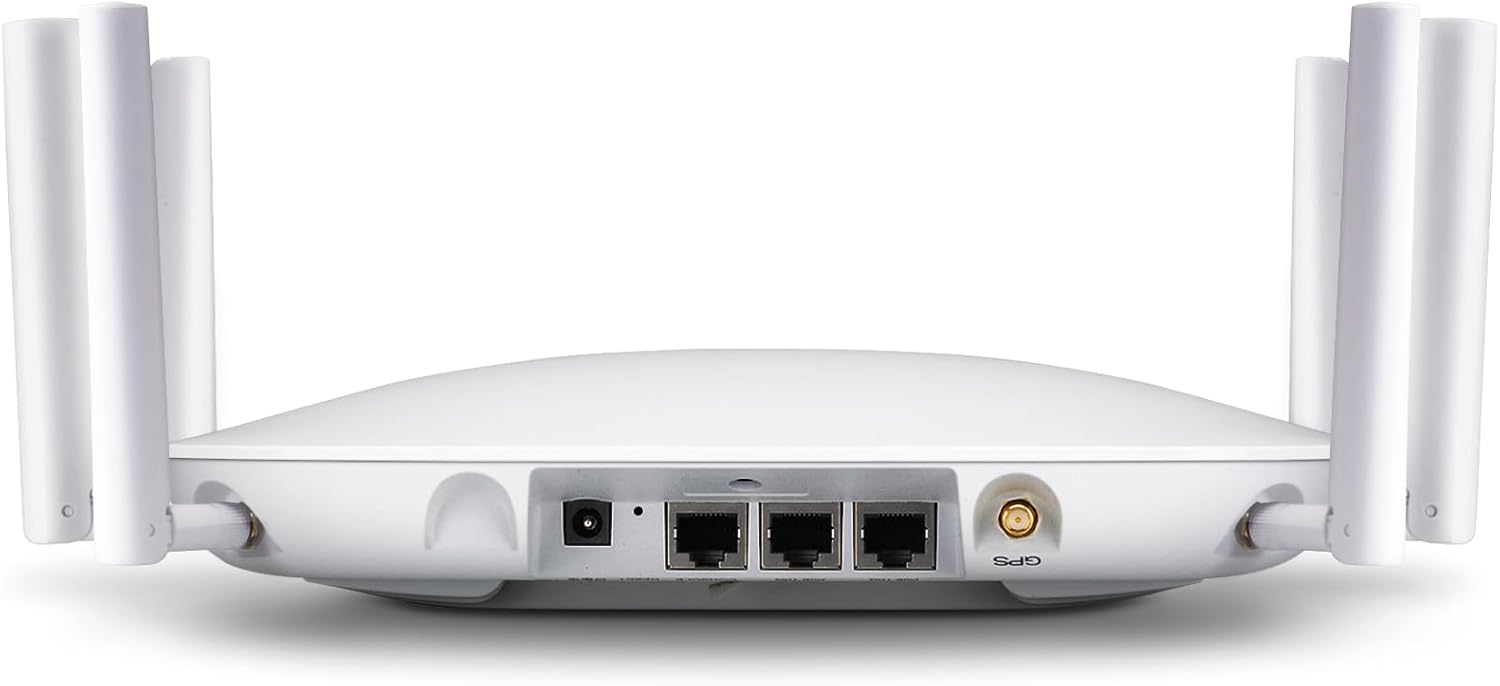
Image: Rear view of the FortiAP 243K, highlighting the power input, Ethernet ports, and RP-SMA antenna connectors.
3. Powering On
The FortiAP 243K can be powered via Power over Ethernet (PoE+) or an external power adapter (sold separately).
- PoE+: Connect an Ethernet cable from a PoE+ enabled switch or injector to the 10 Gigabit Ethernet port (Port 1) on the access point.
- External Power Adapter: If not using PoE+, connect a compatible 12V DC power adapter to the power input port.
Once powered, the LED indicators on the front panel will illuminate, indicating the device status.
4. Network Connection
Connect the FortiAP 243K to your network infrastructure using one of the Ethernet ports:
- Port 1 (10 Gigabit Ethernet): Primary connection for data and PoE+.
- Port 2 (1 Gigabit Ethernet): Secondary connection, can be used for data or link aggregation.
5. Initial Configuration
The FortiAP 243K is managed centrally through a FortiGate security appliance, FortiEdge Cloud, or SASE solutions. Refer to your FortiGate or FortiEdge Cloud documentation for specific steps on discovering and provisioning the access point.
- Ensure the FortiAP can reach the FortiGate or FortiEdge Cloud management interface.
- Authorize the FortiAP within the management platform.
- Apply desired Wi-Fi network (SSID) configurations, security settings (WPA3), and other advanced features.
Operating Instructions
1. Wi-Fi Operation
The FortiAP 243K operates across 2.4GHz, 5GHz, and 6GHz bands, providing Wi-Fi 7 (802.11ax) connectivity. A dedicated fourth radio performs continuous scanning for security and spectral analysis.
- 2.4GHz Band: Offers wider coverage, suitable for older devices and general internet browsing.
- 5GHz Band: Provides higher speeds and lower latency, ideal for demanding applications.
- 6GHz Band: Utilizes the new Wi-Fi 6E/7 spectrum for maximum throughput and minimal interference (subject to regional regulatory approval).

Image: FortiAP 243K with icons illustrating key features like Wi-Fi 7 (802.11ax), 2x2 MU-MIMO, OFDMA, and Enhanced Target Wake Time.
2. BLE/ZigBee Functionality
The integrated BLE (Bluetooth Low Energy) and ZigBee radio enables IoT functionality, such as beaconing and location-based services. Configuration for these features is performed through the central management platform.
3. Security Features
The FortiAP 243K integrates with Fortinet's security fabric to provide comprehensive wireless security:
- WPA3 Security: Supports the latest Wi-Fi Protected Access 3 standard for enhanced encryption and authentication.
- WIDS/WIPS: Wireless Intrusion Detection/Prevention System for detecting and mitigating wireless threats.
- Captive Portal: For guest access and network authentication.
- Integrated Firewall, IPS, Application Control, and Web Filter: Protects the wireless LAN from various security threats.
Maintenance
1. Firmware Updates
Firmware updates are managed centrally through your FortiGate or FortiEdge Cloud platform. Regularly check for and apply updates to ensure optimal performance, security, and access to new features.
- Always back up your configuration before performing a firmware upgrade.
- Follow the specific upgrade procedures outlined in your FortiGate or FortiEdge Cloud documentation.
2. Cleaning
To maintain proper airflow and prevent overheating, periodically clean the exterior of the access point. Use a soft, dry cloth. Do not use liquid cleaners or aerosols directly on the device.
3. Environmental Considerations
Ensure the access point is operated within its specified environmental conditions (temperature, humidity) to prevent damage and ensure reliable operation.
Troubleshooting
1. LED Indicators
The FortiAP 243K features LED indicators on its front panel to provide status information:
- Power LED: Indicates power status. Solid green typically means powered on.
- Wi-Fi LED: Indicates wireless activity. Blinking or solid green indicates active Wi-Fi.
- Status LED: Provides general device status, often indicating boot-up, operational status, or errors. Refer to the FortiAP documentation for specific LED patterns.
2. Common Issues
- No Power:
- Verify power source (PoE+ switch or power adapter) is connected and functional.
- Check Ethernet cable connection if using PoE+.
- No Network Connectivity:
- Ensure Ethernet cables are securely connected to both the FortiAP and the network switch.
- Verify network switch port is active and configured correctly.
- Check FortiGate/FortiEdge Cloud for AP status and network configuration.
- Wi-Fi Clients Cannot Connect:
- Confirm SSIDs are broadcasted and visible.
- Verify Wi-Fi password/security settings are correct.
- Check client device compatibility with Wi-Fi 7 or specific bands (2.4/5/6GHz).
- Ensure the FortiAP is authorized and provisioned correctly in the management platform.
3. Factory Reset
If the device is unresponsive or requires a complete reset, a factory reset can be performed. This will revert all settings to their default values. Consult the FortiAP Quick Start Guide or Fortinet documentation for the exact procedure, which typically involves pressing a reset button for a specified duration.
Specifications
| Feature | Detail |
|---|---|
| Model | FAP-243K-A |
| Brand | FORTINET |
| Wireless Communication Standard | 802.11ax (Wi-Fi 7) |
| Frequency Band Class | Quad-Band (2.4GHz, 5GHz, 6GHz + Scan) |
| Antennas | 6 Internal Antennas / (2 External RPSMA dual band Connectors + 2 Tri-band External RPSMA connectors + 2 6Ghz External RPSMA antennas) + 1 BLE/Zigbee internal antenna |
| Ethernet Ports | 1x 10 Gigabit Ethernet, 1x 1 Gigabit Ethernet |
| Connectivity Technology | Ethernet, Wi-Fi 7, BLE, ZigBee |
| Security Protocol | WPA3 |
| Operating System | FortiOS |
| Recommended Uses | Business, Enterprise Deployments |
| Special Features | Internet Security, Wireless, Parental Control, QoS, Access Point Mode, LED Indicator, Remote Access, ZTNA/SASE foundation |

Image: A table summarizing key specifications of the FortiAP 243K, including data rates, Wi-Fi standard, MU-MIMO, antennas, and GE RJ45 ports.
Warranty and Support
1. Product Warranty
Fortinet products are covered by a limited warranty. For detailed information regarding the warranty period and terms, please refer to the warranty statement included with your product or visit the official Fortinet website.
2. Technical Support
For technical assistance, product documentation, or to report issues, please contact Fortinet Technical Support. You can find support resources, knowledge base articles, and contact information on the official Fortinet support portal.
Online Resources: www.fortinet.com/support
Ensure you have your product model number (FAP-243K-A) and serial number available when contacting support.


