1. Introduction
Thank you for choosing the Fulealfly 4K Digital Camera DC101. This manual provides detailed instructions for the proper setup, operation, and maintenance of your camera. Please read this manual thoroughly before using the camera to ensure optimal performance and to prevent damage.
1.1 What's in the Box
- 4K Digital Camera (DC101) x 1
- User Manual x 1
- USB Cable x 1
- Lens Cap x 1
- Rechargeable Battery x 2
- 32GB Micro SD Card x 1
- Camera Bag x 1
- Cleaning Cloth x 1
- Wrist Strap x 1
2. Safety Information
- Do not expose the camera to water or moisture.
- Avoid dropping the camera or subjecting it to strong impacts.
- Keep the camera away from extreme temperatures.
- Use only specified batteries and chargers.
- Do not attempt to disassemble or modify the camera.
- Keep out of reach of children.
3. Product Overview
3.1 Camera Components
Familiarize yourself with the main parts of your Fulealfly DC101 camera:

Front view of the Fulealfly DC101 camera, highlighting the lens, built-in flash, and the 180-degree flip-out screen.
3.2 Key Features
- High Resolution Imaging: Captures 4K UHD videos and 64MP still photos.
- Wireless Connectivity: Built-in WiFi for instant photo/video transfer and remote control via smartphone.
- Advanced Focusing: Features fast autofocus and anti-shake technology for clear images and stable videos.
- Versatile Display: 3-inch 180° flip screen suitable for self-portraits and vlogging.
- Digital Zoom: 16X digital zoom capability.
- Integrated Flash: Built-in flash with exposure compensation for various lighting conditions.
- Multi-functional: Supports continuous shooting, time-lapse, slow motion, face detection, and various filters.
4. Setup
4.1 Battery Installation and Charging
- Open the battery compartment cover located on the bottom of the camera.
- Insert the two rechargeable batteries according to the polarity indicators (+/-).
- Close the battery compartment cover securely.
- To charge, connect the camera to a standard DC 5V power source using the provided Type-C USB cable. The charging indicator will illuminate.
4.2 Memory Card Installation
The camera supports Micro SD cards from 4GB to 128GB. A 32GB Micro SD card is included.
- Locate the Micro SD card slot, usually near the battery compartment.
- Insert the Micro SD card with the gold contacts facing down until it clicks into place.
- To remove, gently press the card until it springs out.
4.3 Initial Power On and Basic Settings
- Press and hold the Power button to turn on the camera.
- Upon first use, you may be prompted to set the date and time. Navigate using the directional buttons and confirm with the OK button.
5. Operating Instructions
5.1 Powering On/Off
- Power On: Press and hold the Power button.
- Power Off: Press and hold the Power button again.
5.2 Photo Mode
- Turn on the camera. The camera typically defaults to photo mode. If not, press the Mode button to select photo mode.
- Autofocus: Half-press the Shutter button to allow the camera to focus on your subject. A green frame will indicate successful focus.
- Capture: Fully press the Shutter button to take a photo.
- Zoom: Use the Zoom In/Out buttons (often labeled T/W) to adjust the 16X digital zoom.
- Flash: Press the Flash button to cycle through flash settings (Auto Flash, Forced Flash, Flash Off).

Demonstration of the camera's autofocus capability, showing a clear subject in focus compared to an out-of-focus image.
5.3 Video Recording
- Press the Mode button to select video recording mode.
- Press the Shutter button to start recording. A red indicator will typically appear on the screen.
- Press the Shutter button again to stop recording.
- Video resolutions include 4K, 2.7K 30fps, 1080P 30fps, and 720P. These can be adjusted in the camera settings menu.
- Available video modes include Slow Motion, Loop Recording, and Time-Lapse.
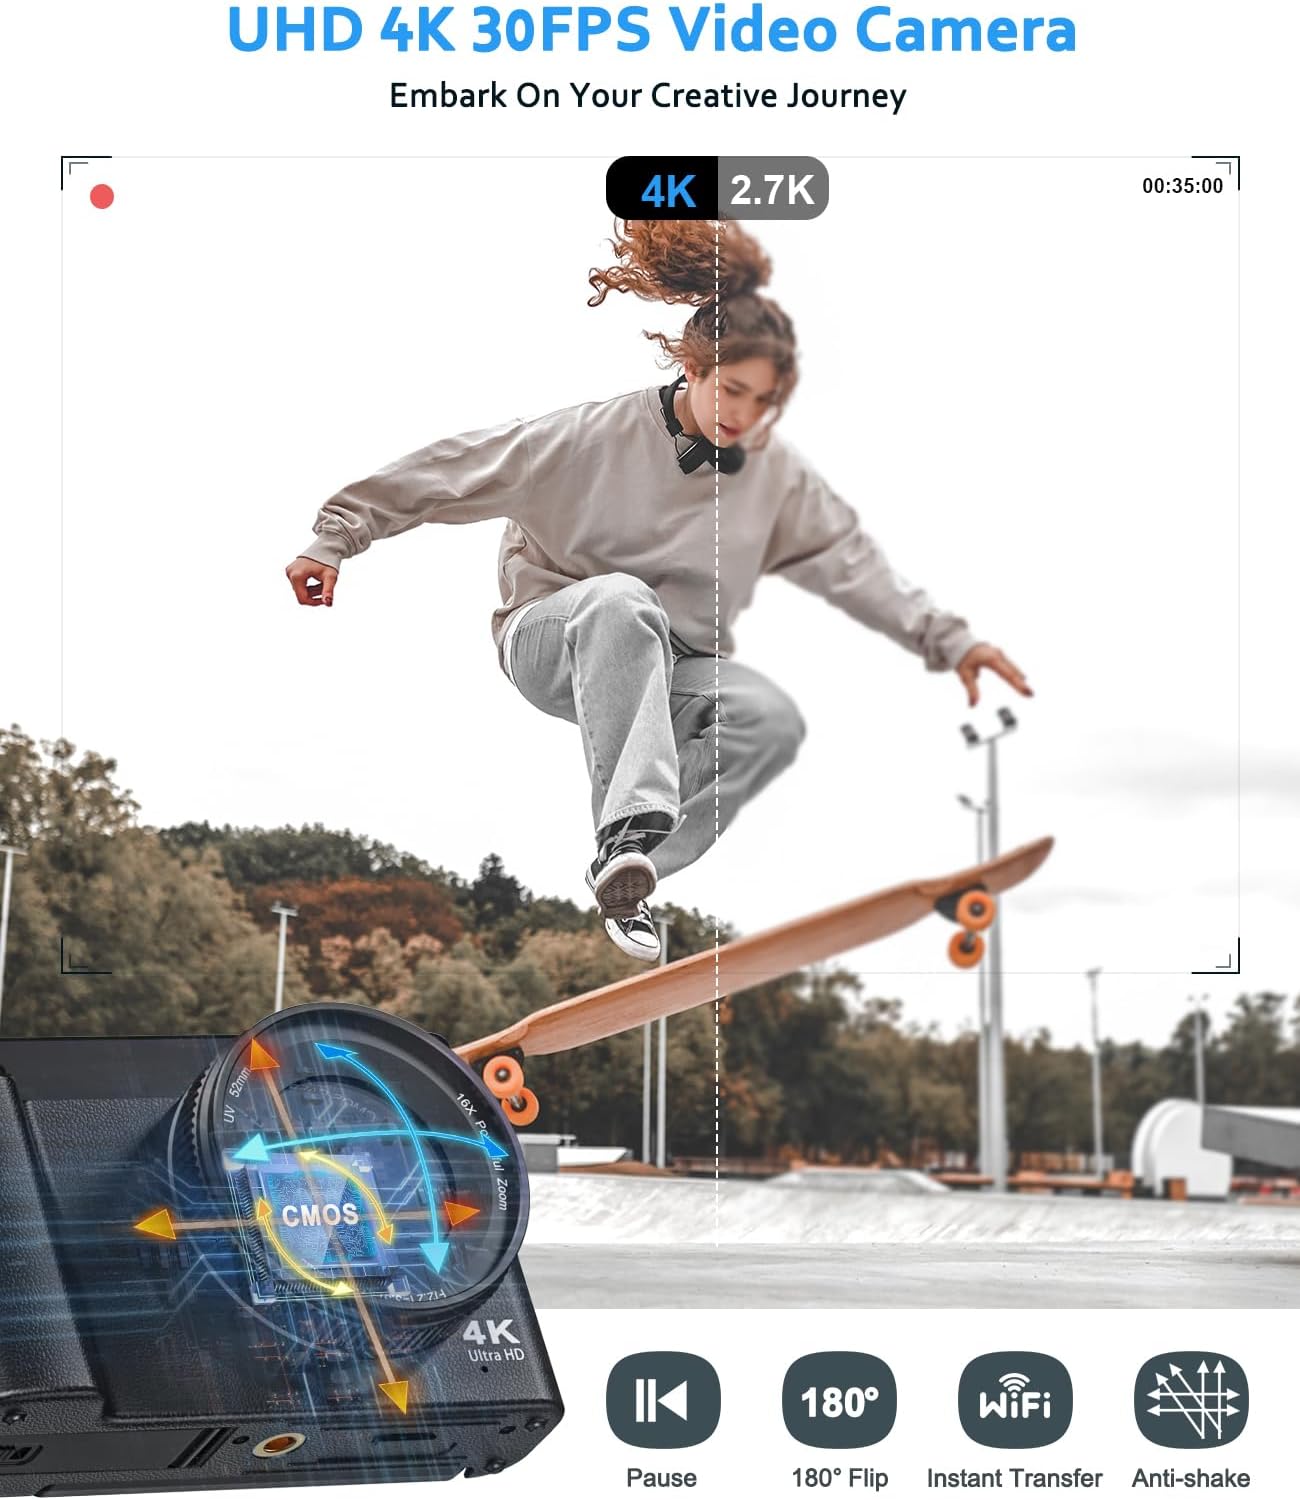
An action scene demonstrating the camera's video recording capabilities, highlighting 4K and 2.7K resolution options.
5.4 Using the 180° Flip Screen
The camera features a 3-inch screen that can rotate 180 degrees, allowing for easy self-portraits and vlogging.
- Gently pull the screen out from the side of the camera.
- Rotate the screen 180 degrees to face forward.
- The display will automatically adjust for self-viewing.

The camera set up as a webcam for video calls and a user demonstrating the 180-degree flip screen for easy selfies.
5.5 WiFi Connectivity and App Transfer
The built-in WiFi allows for seamless transfer of media to your smartphone and remote control of the camera.
- On the camera, navigate to the WiFi settings in the menu and enable WiFi. A QR code or network name (SSID) and password will be displayed.
- Download the designated camera app on your smartphone (refer to the Quick Operation Guide for app name).
- Open the app and connect to the camera's WiFi network using the provided SSID and password, or by scanning the QR code.
- Once connected, you can view photos, transfer files, and remotely control the camera's functions from your smartphone.

The camera's WiFi interface displaying a QR code for connection, and a smartphone receiving an image wirelessly from the camera.
5.6 Advanced Features and Settings
Explore the camera's menu for additional settings and features:
- Anti-Shake: Digital image stabilization to reduce blur from camera movement.
- Continuous Shooting: Captures a rapid sequence of photos.
- Face & Smile Detection: Automatically detects faces and smiles for optimal focus and capture.
- Filters: Apply various creative filters to your photos.
- Exposure Compensation: Adjust the brightness of your images.

A collage illustrating various camera features including its compact size, continuous shooting, face and smile detection, anti-shake technology, and available creative filters.
5.7 Flash Usage
The built-in flash can be configured for different lighting scenarios:
- Automatic Flash: The camera determines when to use the flash based on ambient light.
- Forced Flash: The flash fires with every shot.
- Flash Off: The flash will not fire.
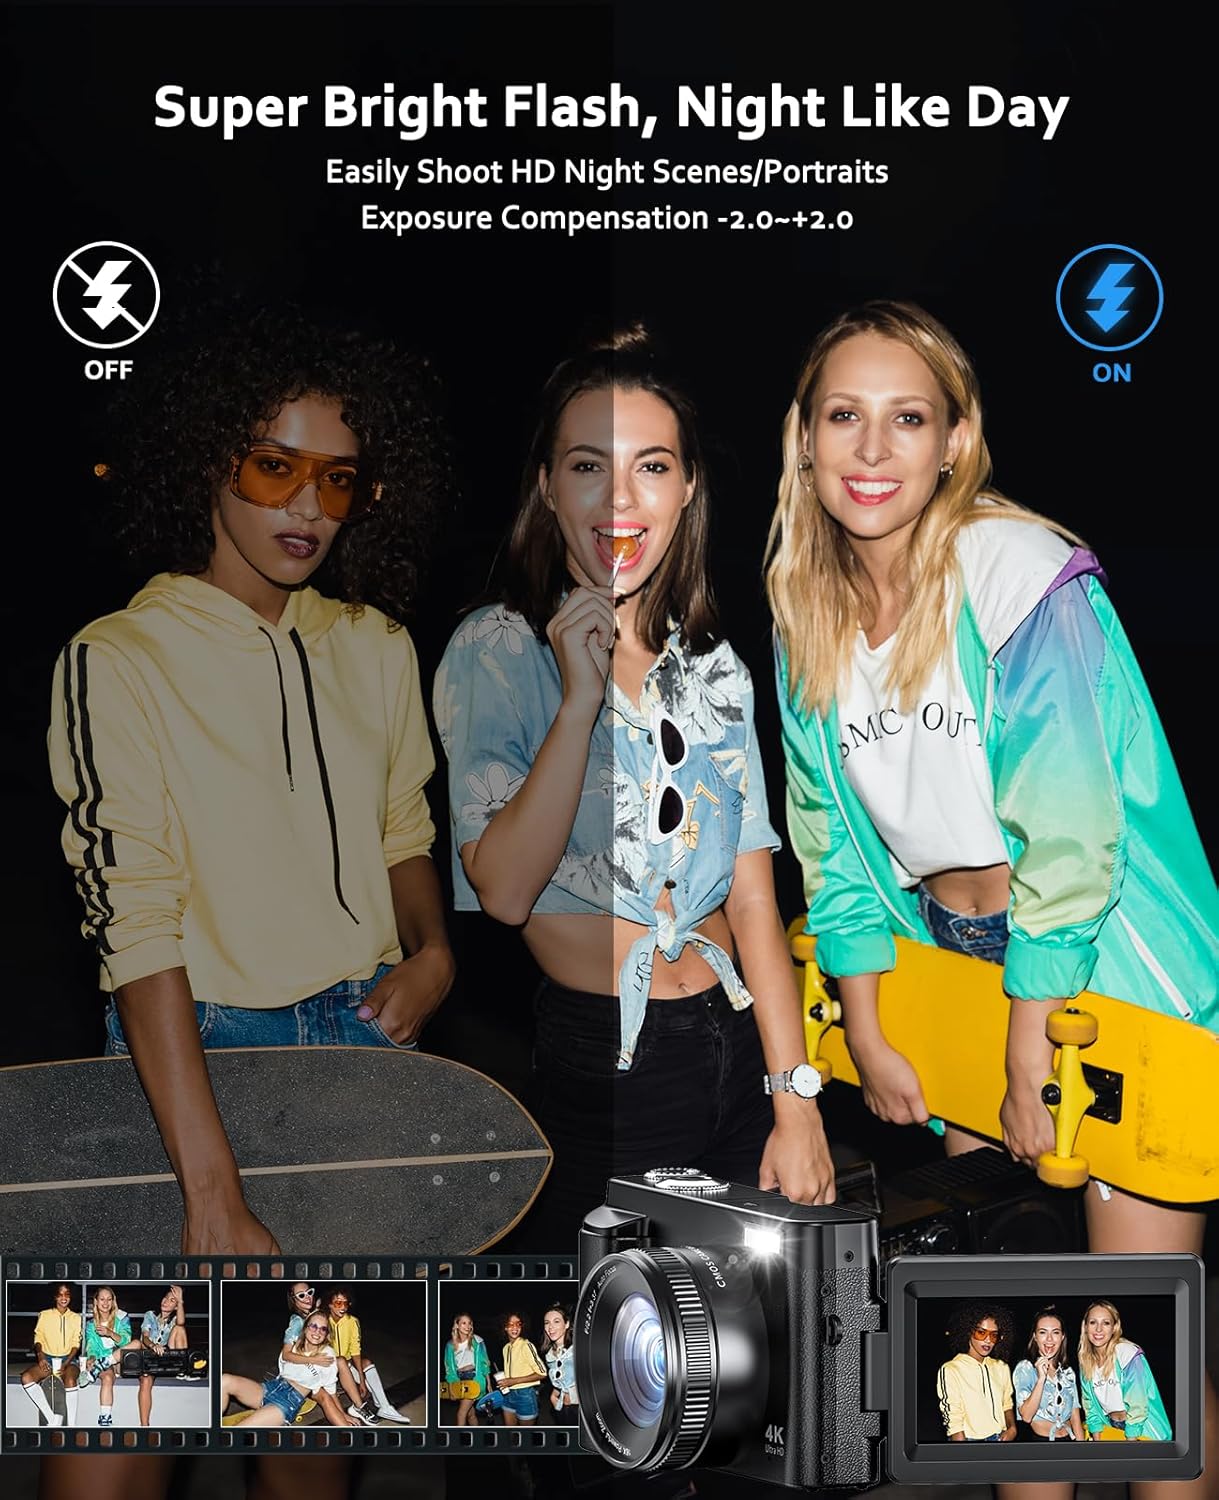
A visual comparison demonstrating the effect of the built-in flash, showing a scene without flash and the same scene illuminated with flash.
6. Maintenance
- Cleaning the Lens and Screen: Use the provided cleaning cloth or a soft, lint-free cloth to gently wipe the lens and screen. Avoid harsh chemicals.
- Battery Care: Store batteries in a cool, dry place when not in use. Do not expose them to extreme heat.
- Storage: When storing the camera for extended periods, remove the batteries and keep the camera in its protective bag in a dry environment.
7. Troubleshooting
| Problem | Possible Cause | Solution |
|---|---|---|
| Camera does not turn on. | Low or depleted battery; incorrectly inserted battery. | Charge batteries fully; ensure batteries are inserted correctly. |
| Images are blurry. | Autofocus failed; camera shake; dirty lens. | Half-press shutter to re-focus; enable anti-shake; clean the lens. |
| WiFi connection issues. | Incorrect password; app not installed; camera WiFi not enabled. | Verify password; install correct app; ensure camera WiFi is active. |
| Memory card error. | Card full; card not formatted; incompatible card. | Delete files or use a new card; format card in camera; use supported Micro SD card. |
8. Specifications
| Feature | Detail |
|---|---|
| Model Name | DC101 |
| Photo Sensor Resolution | 64 MP |
| Video Resolution | 4K (4320p) |
| Digital Zoom | 16X |
| Display | 3-inch LCD, 180° Flip Screen |
| Image Sensor | CMOS (1/3-inch) |
| Connectivity | Wi-Fi, Type-C USB |
| Storage | Micro SD Card (4-128GB supported, 32GB included) |
| Image Stabilization | Digital |
| Autofocus | Contrast Detection, Auto Focus |
| Lens | Fixed focal length (3.37mm) f/2.2 prime lens |
| File Format (Image) | JPEG |
| File Format (Video) | AVI |
| Battery Type | Lithium Polymer Rechargeable |
| Operating System Compatibility | Win7/Win8/Win 10/Win 11 |
9. Warranty and Support
9.1 Warranty Information
This Fulealfly DC101 camera comes with a Lifetime Warranty. Please retain your proof of purchase for warranty claims.
9.2 Customer Support
If you encounter any issues or have questions regarding your Fulealfly 4K Digital Camera DC101, please contact Fulealfly customer support. Refer to the product packaging or the official Fulealfly website for contact details.


