
1. Product Overview
The UNISHEEN 1080P60 Video Decoder (Model JM1000) is designed for efficient decoding of various video streams. It supports H.265 and H.264 codecs, providing clear and smooth 1080P60 video output via HDMI. This device is compatible with multiple streaming protocols, including SRT, HTTP, RTSP, RTMP, M3U8, FLV, and UDP (multicast/unicast), making it adaptable to diverse network environments and devices such as IP cameras, video encoders, and set-top boxes. Its plug-and-play design ensures straightforward setup and operation.

Figure 1.1: The UNISHEEN Video Decoder connected to a monitor, showcasing its HD video output and multi-display capabilities.

Figure 1.2: Comparison of H.264 and H.265 decoding, highlighting the bandwidth efficiency of H.265.
2. Package Contents
Please verify that all items are present in your package:
- UNISHEEN 1080P60 Video Decoder (Model JM1000)
- Power Adapter (12V DC)
- User Manual
3. Device Layout and Interfaces
Familiarize yourself with the ports and indicators on your UNISHEEN Video Decoder:
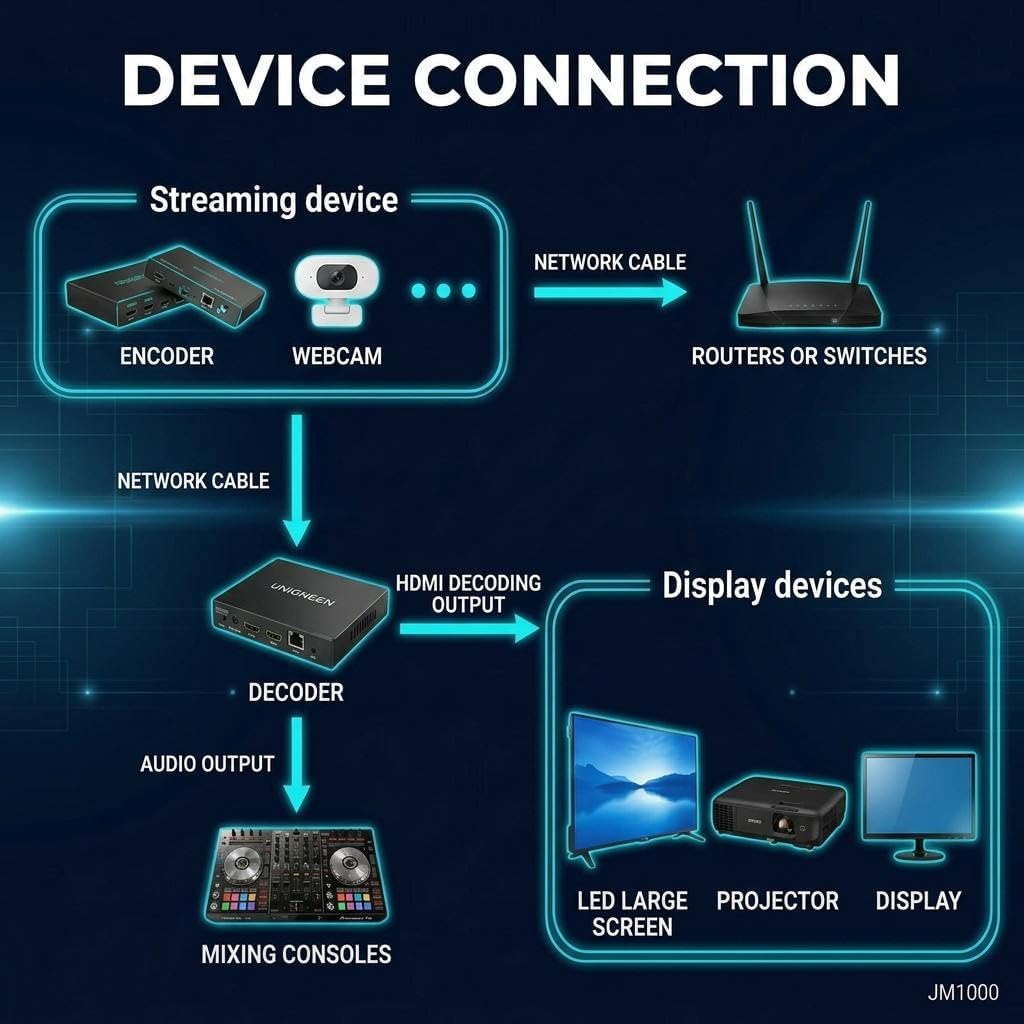
Figure 3.1: Front panel interfaces of the UNISHEEN Video Decoder.
- LAN Port: Connect an Ethernet cable to receive IP camera network video streams.
- HDMI OUT: Connect an HDMI cable to a display device for video output up to 1080P60.
- RST Button: Use a pin to press and hold for 12 seconds to restore factory settings.
- AUDIO Out: Connect external audio devices.
- DC 12V: Connect the provided power adapter (supports 5-12V, 1A).
- USB (Rear Ports): Connect a USB flash disk for local video playback.

Figure 3.2: Detailed interface and wiring guide.
4. Setup Instructions
4.1 Initial Connection
- Connect the power adapter to the DC 12V port and plug it into a power outlet.
- Connect an Ethernet cable from your router/switch to the LAN port on the decoder.
- Connect an HDMI cable from the HDMI OUT port on the decoder to your display device (monitor, TV, projector).
- If using external audio, connect your audio device to the AUDIO Out port.

Figure 4.1: Device connection diagram.
4.2 Accessing the Web Console
To configure the decoder, access its web-based management interface:
- Ensure your computer is on the same network as the decoder.
- Open any web browser.
- Enter the decoder's IP address in the address bar (e.g.,
192.168.1.xxx). The default IP address is typically found in the included documentation or can be discovered using network scanning tools. - Input the default username (usually admin) and password (usually admin).
- Click 'Sign in'.

Figure 4.2: Accessing the decoder's web console.
4.3 Obtaining RTSP URL via ONVIF (Example)
If you are decoding an ONVIF-compatible IP camera, you can obtain its RTSP streaming address through the decoder's web interface:
- In the web console, navigate to the 'Stream address setting' module.
- Locate the 'ONVIF device' section.
- Enter the IP address, username, and password of your ONVIF camera.
- Click 'Get Protocol Address'.
- Copy the generated RTSP URL.
Figure 4.3: Steps to obtain an RTSP URL from an ONVIF camera.
4.4 Configuring Stream Address
Once you have the stream URL, configure the decoder to play it:
- In the web console, go to 'Stream address setting'.
- Paste the obtained protocol address into the 'Channel 1 Address' field.
- Click 'Apply' to save the settings and recognize the protocol.

Figure 4.4: Configuring the stream address in the web console.
5. Operating Instructions
5.1 Multi-Screen Layout
The decoder supports various customizable split-screen modes for surveillance, live preview, and industrial video decoding. You can configure these layouts via the decoder's web backend to suit different monitoring and display scenarios.
- Single Channel Full Screen
- Quad Split Screen (4 streams)
- Three Screens (top, bottom, left, right configurations)
- Custom Screen Position & Size
- Add Text / Image / Rolling Text overlays

Figure 5.1: Flexible multi-screen layout options.

Figure 5.2: Examples of up to four simultaneous stream displays.
5.2 Supported Protocols
The decoder supports a wide range of streaming protocols for broad compatibility:
- SRT (Secure Reliable Transport)
- HTTP
- RTSP (Real-Time Streaming Protocol)
- RTMP (Real-Time Messaging Protocol)
- M3U8 (HTTP Live Streaming)
- FLV (Flash Video)
- UDP (User Datagram Protocol) - Multicast and Unicast

Figure 5.3: Supported streaming protocols.
6. Maintenance
To ensure the longevity and optimal performance of your UNISHEEN Video Decoder, follow these maintenance guidelines:
- Cleaning: Use a soft, dry cloth to clean the device. Avoid liquid cleaners or aerosols.
- Environment: Operate the device in a well-ventilated area, away from direct sunlight, heat sources, and excessive dust or moisture.
- Power Supply: Always use the original power adapter provided with the device. Using an incorrect power supply can cause damage or overheating.
- Firmware Updates: Periodically check the manufacturer's website for firmware updates to ensure the best performance and compatibility.
- Resetting: If the device malfunctions, a factory reset can be performed by pressing the RST button with a pin for 12 seconds. Note that this will erase all custom settings.
7. Troubleshooting
This section addresses common issues you might encounter with your UNISHEEN Video Decoder.

Figure 7.1: Common questions and answers for the UNISHEEN Decoder.
| Problem | Possible Cause / Solution |
|---|---|
| Decoder showing a red light | This is not an overheating indicator. It typically indicates the device is connected to power. If it's not functioning, check other connections. |
| Decoder overheating | May be caused by excessive input voltage. Ensure you are using the original power adapter included in the package. |
| No video display after setup |
|
| Cannot access web console |
|
8. Specifications
Detailed technical specifications for the UNISHEEN 1080P60 Video Decoder (Model JM1000):
| Feature | Detail |
|---|---|
| Model Number | JM1000 |
| Brand | UNISHEEN |
| Decoding Resolution | Max 1080P60 |
| Supported Codecs | H.265, H.264 |
| Supported Protocols | SRT, HTTP, RTSP, RTMP, M3U8, FLV, UDP (multicast/unicast) |
| Connector Type | HDMI |
| Number of Ports | 2 (LAN, HDMI Out, plus Audio Out, DC 12V, USB) |
| Input Voltage | 12V DC |
| Item Weight | 0.1 kg |
| Compatible Devices | Gaming Console, Laptop, Personal Computer, Smart Television, IP Cameras, Video Encoders |
| Color | Black |
9. Warranty and Support
UNISHEEN is committed to providing reliable products and customer support.
9.1 Warranty Information
- Manufacturer Warranty: This product comes with a 2-year manufacturer warranty.
- After-Sales Service: Enjoy 12-month free after-sales service for quality defects.
9.2 Return Policy
- 30-Day Free Return: A 30-day free return and full refund policy applies from the date of receipt.
9.3 Technical Support
For any technical assistance, setup issues, or product inquiries, please contact our support team:
- Lifelong Dedicated Technical Support: We offer continuous technical support for the lifetime of the product.
- Contact Seller: For the fastest resolution to faulty items, missing parts, or setup issues, please contact the seller directly through your order page or the 'About Seller' section on the UNISHEEN store homepage.
- Email: service@unisheen.cn
- Website: unisheen.cn

Figure 9.1: After-sales and service instructions.

Figure 9.2: UNISHEEN customer support contact details.