
CMSTEDCD SW523
CMSTEDCD KVM Docking Station User Manual
Brand: CMSTEDCD | Model: SW523
1. Product Overview
The CMSTEDCD KVM Docking Station is designed to enhance your productivity by allowing two computers to share two DisplayPort monitors and a range of USB peripherals. This 13-in-1 multifunctional device supports high resolutions up to 4K120Hz, offering both mirror and extended display modes for Windows and macOS systems (with specific macOS limitations). It provides seamless switching between connected PCs, making it ideal for professional and gaming environments.

Figure 1.1: CMSTEDCD KVM Docking Station with included cables.

Figure 1.2: Overview of the 13-in-1 multifunctional docking station and its connectivity options.
2. Package Contents
Please verify that all items listed below are included in your package:
- CMSTEDCD KVM Docking Station
- USB-A 3.0 Cable (1x)
- USB-C to C Cable (1x)
- External Controller Set (1x)
- DC 12V Power Adapter (1x)
- User Manual (1x)

Figure 2.1: All items included in the CMSTEDCD KVM Docking Station package.
3. Setup Guide
3.1 Port Layout
Familiarize yourself with the ports on the KVM docking station:

Figure 3.1: Front and Rear Panel Port Layout.
3.2 Compatibility Check
Before connecting, ensure your laptop's USB-C port supports video output and USB control protocol. For desktops, ensure they are connected via USB and DisplayPort.

Figure 3.2: USB-C Port Compatibility for Video Transmission.
3.3 Connection Steps
- Connect Monitors: Connect your two DisplayPort monitors to the 'DP OUT A' and 'DP OUT B' ports on the KVM docking station.
- Connect PC1 (Laptop): Connect your laptop's USB-C port (PC1 IN) to the KVM docking station using the provided USB-C to C cable. Ensure your laptop's USB-C port supports video output.
- Connect PC2 (Desktop): Connect your desktop's DisplayPort outputs to 'PC2 IN DP A' and 'PC2 IN DP B' on the KVM. Also, connect a USB-A port from your desktop to the 'PC2 IN USB-A' port on the KVM using the provided USB-A 3.0 cable.
- Connect Peripherals: Connect your keyboard, mouse, and other USB devices (printers, hard drives, flash drives) to the available USB 3.0 and USB 3.2 ports on the KVM. Insert SD/Micro SD cards if needed.
- Connect Power: Plug the DC 12V power adapter into the 'DC12V' port on the KVM and then into a power outlet.
- Power On: Turn on the KVM docking station using the 'ON/OFF' switch.

Figure 3.3: Typical setup with two computers sharing two monitors.
4. Operating Instructions
4.1 Switching Between Computers
You can switch between PC1 and PC2 using two methods:
- External Controller: Use the included external controller to switch between computers. This allows you to place the KVM out of sight and maintain a tidy desk.
- Select Button: Press the 'Select' button on the front panel of the KVM docking station to switch the signal source with a single click.
Note: Switching using keyboard shortcuts (Hotkeys) is not supported by this device.
4.2 Display Modes
The KVM docking station supports two primary display modes:
- Mirror Mode: Both connected monitors will display the same screen content from the selected computer.
- Extended Mode: Both connected monitors will display different screen content, extending your desktop across two displays.
To utilize these modes correctly, ensure your desktop supports multiple monitors and your laptop supports MST (Multi-Stream Transport) and SST (Single-Stream Transport). Please note that due to system limitations, macOS only supports mirror display mode and does not support extended display (MST).
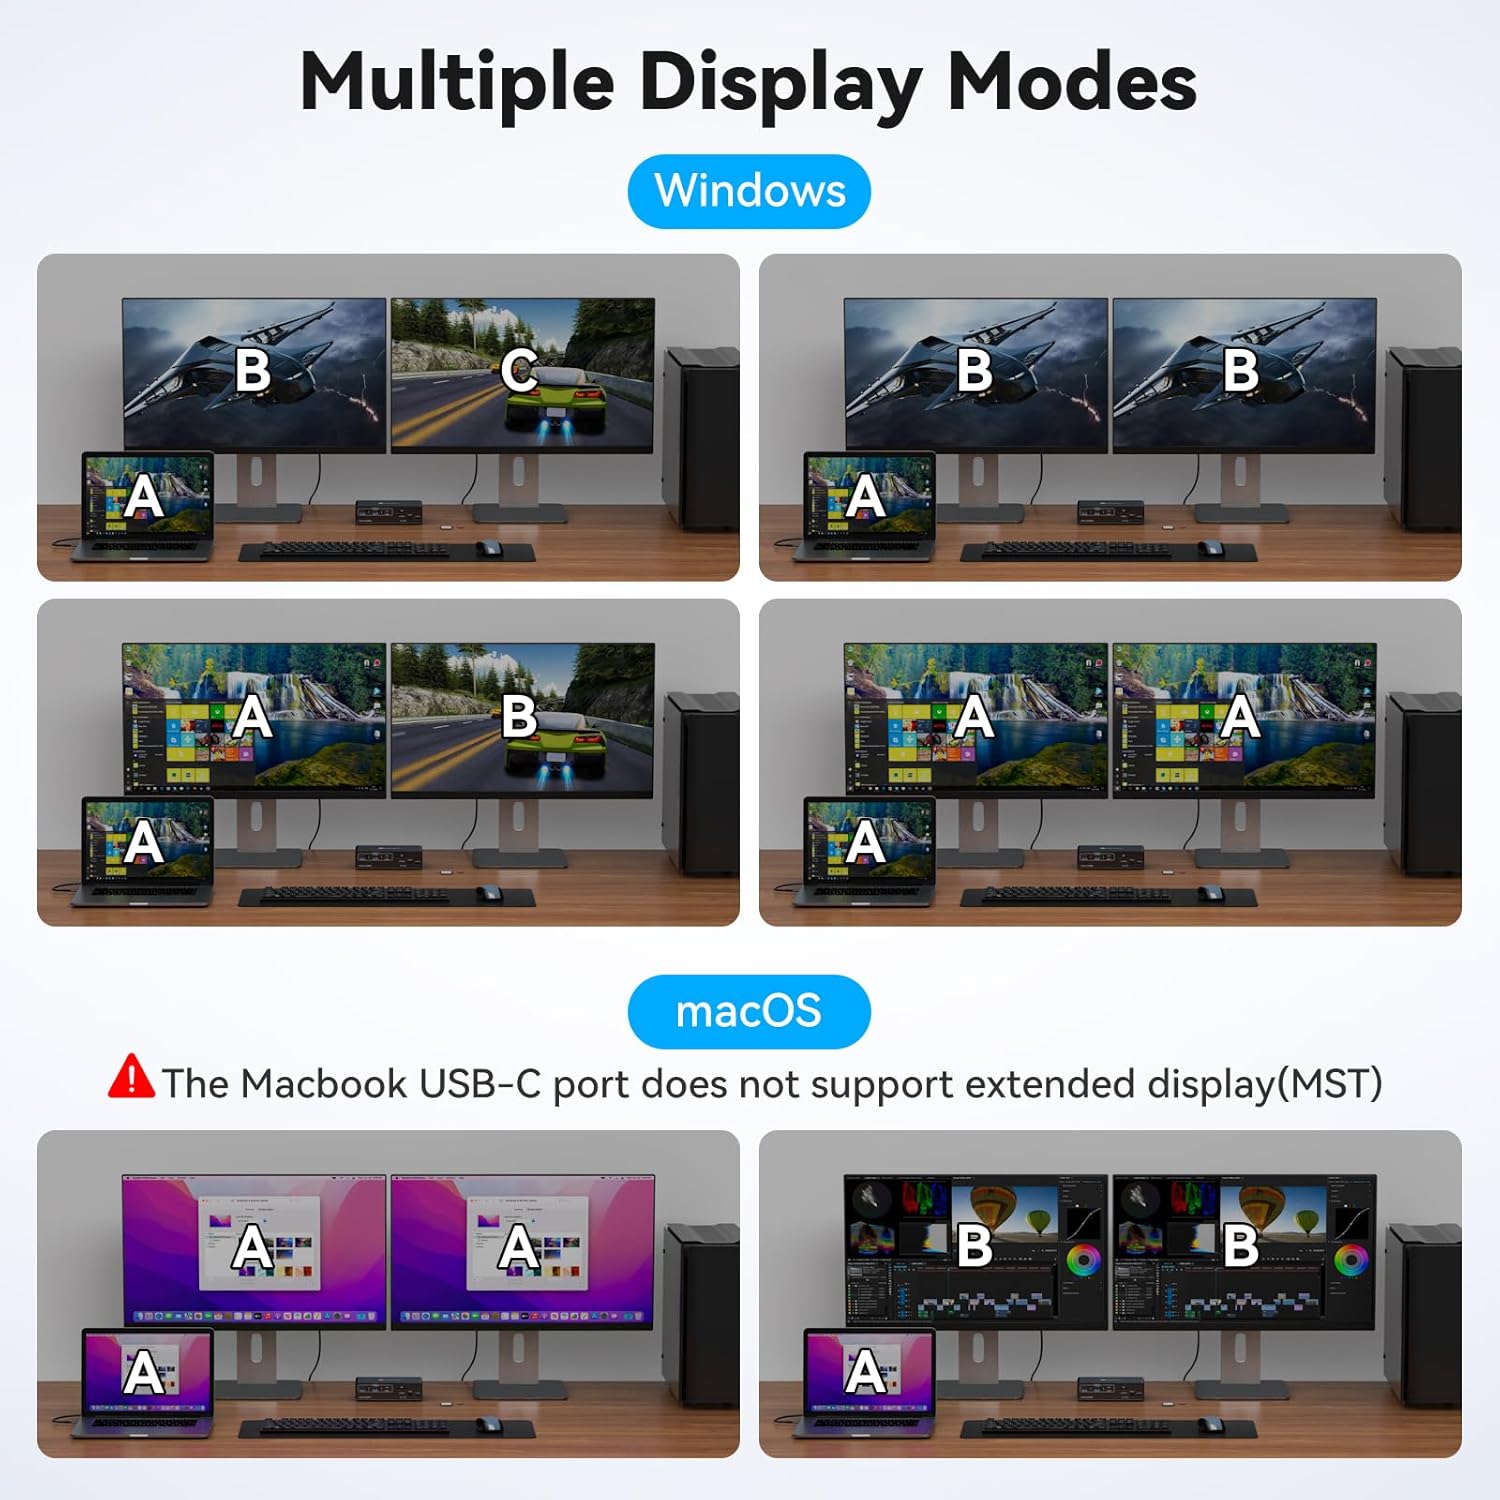
Figure 4.1: Multiple Display Modes for Windows and macOS.
4.3 High-Speed Data Transfer
The KVM switch features multiple USB 3.2 10 Gbps ports (2 USB-A + 1 USB-C) and USB 3.0 ports for connecting various peripherals. These ports enable high-speed data transfer for devices such as printers, external hard drives, and USB flash drives.
Note: The 10 Gbps USB-C port on the KVM docking station is for data transfer only and does not support Power Delivery (PD) charging or video transmission.

Figure 4.2: USB 3.2 High-Speed Data Transfer Ports.
5. Troubleshooting
- No Display/Incorrect Resolution:
Ensure all cables (DisplayPort, USB-C, USB-A) are securely connected. Verify that all devices and cables support the desired resolution (e.g., 4K120Hz). The total length of input and output cables should not exceed 3 meters. Check your computer's display settings to ensure the correct resolution and refresh rate are selected. - USB Peripherals Not Working:
Ensure the USB-A cable from your desktop (PC2) is connected to the KVM. For laptops, ensure the USB-C cable supports USB data transfer. Try reconnecting the USB devices. - Cannot Switch Between PCs:
Ensure both PCs are properly connected and powered on. Use either the external controller or the 'Select' button on the KVM. Hotkey switching is not supported. - macOS Extended Display Not Working:
macOS does not support Multi-Stream Transport (MST) for extended displays due to system limitations. Only mirror display mode is supported for macOS. - Laptop Not Charging via USB-C:
The USB-C input on this KVM docking station is for video and data only and does not support Power Delivery (PD) charging.
6. Specifications
| Feature | Specification |
|---|---|
| Manufacturer | CMSTEDCD |
| Model Reference Identifier | JHS-DE-SW523 |
| Package Dimensions | 19.8 x 14.7 x 5.7 cm |
| Weight | 570 g |
| Contact Material | Copper |
| Control Method | Button |
| Color | Light Gray |
| Number of Units | 1.0 piece |
| Video Output | Dual DisplayPort, up to 4K120Hz |
| USB Ports | 2x USB 3.0, 3x USB 3.2 10Gbps (2x USB-A, 1x USB-C) |
| Card Slots | 1x SD, 1x Micro SD |
7. Maintenance
To ensure the longevity and optimal performance of your CMSTEDCD KVM Docking Station, follow these simple maintenance guidelines:
- Cleaning: Use a soft, dry cloth to wipe the exterior of the device. Avoid using liquid cleaners or abrasive materials, which can damage the surface.
- Ventilation: Ensure the device is placed in a well-ventilated area to prevent overheating. Do not block the ventilation holes.
- Storage: When not in use for extended periods, store the KVM in a cool, dry place away from direct sunlight and extreme temperatures.
- Cable Management: Keep cables organized and untangled to prevent damage to the ports and cables themselves. Avoid bending cables sharply.
8. Warranty and Support
CMSTEDCD is committed to providing high-quality products and customer service. If you encounter any issues or have questions regarding your KVM Docking Station, please do not hesitate to contact our customer support team. We aim to respond to all inquiries within 24 hours and assist you in resolving any problems.
Please refer to your purchase documentation for specific warranty terms and conditions.
Ask a question about this manual
Ask about setup, troubleshooting, compatibility, parts, safety, or missing instructions. Manuals+ will review the question and use this page’s manual context to help answer it.