1. Introduction
This manual provides detailed instructions for the installation, operation, and maintenance of your GAMEMAX Master 2 ATX Full Tower Computer Case. Please read this manual thoroughly before beginning assembly to ensure proper setup and optimal performance. The GAMEMAX Master 2 is designed to accommodate a wide range of components, offering excellent cooling capabilities and flexible storage options.
2. Package Contents
Please verify that all items listed below are present in your package:
- GAMEMAX Master 2 ATX Full Tower Computer Case
- Accessory Box (screws, cable ties, standoffs, etc.)
- User Manual (this document)
- Pre-installed 3 x ARGB 120mm fans (2 x front, 1 x rear)
3. Specifications
| Feature | Detail |
|---|---|
| Brand | GAMEMAX |
| Model Name | MASTER2 |
| Case Type | Full Tower |
| Motherboard Compatibility | E-ATX / ATX / Micro-ATX / ITX |
| Material | Acrylonitrile Butadiene Styrene (ABS) |
| Color | Black |
| Item Weight | 25.5 pounds |
| Package Dimensions | 23.5 x 23 x 11.25 inches |
| USB 3.0 Ports | 2 |
| Power Supply Mounting | Bottom Mount |
| Cooling Method | Air, Water |
| HDD/SSD Trays | 10 |
4. Key Features
- Extensive Motherboard Support: Compatible with E-ATX, ATX, Micro-ATX, and ITX motherboards, offering versatility for various build types.
- Optimized Cooling: Features capability for up to 7 fans, with 3 x ARGB 120mm fans pre-installed (2 at the front, 1 at the rear) for efficient airflow and visual appeal.
- Integrated Fan Controller: The top panel includes a fan controller, allowing users to easily adjust fan speeds to optimize internal temperatures and noise levels.
- Advanced Water Cooling Readiness: Designed to support water cooling radiators up to 360mm at the top, providing options for high-performance cooling solutions.
- Ample Storage Options: Equipped with 10 HDD trays, supporting both traditional Hard Disk Drives (HDDs) and Solid State Drives (SSDs) for extensive storage configurations.
- Tempered Glass Side Panel: A clear tempered glass side panel showcases your internal components and RGB lighting.
- Mesh Front Panel: The mesh front panel enhances airflow, contributing to better cooling performance.
5. Setup Guide
5.1 Preparing the Case
Before installing components, ensure the case is placed on a stable, flat surface. Remove the tempered glass side panel by unscrewing the four thumb screws and carefully lifting it off. Remove the opposite side panel as well for easier cable management.

Figure 1: Front-side view of the GAMEMAX Master 2 case, showcasing the tempered glass panel and mesh front.
5.2 Motherboard Installation
- Identify the correct standoff positions for your motherboard size (E-ATX, ATX, Micro-ATX, or ITX).
- Install the necessary standoffs into the motherboard tray.
- Carefully place your motherboard onto the standoffs, aligning the screw holes.
- Secure the motherboard with the provided screws.

Figure 2: Interior layout of the Master 2 case, highlighting the motherboard mounting area and multiple drive bays.
5.3 Power Supply Installation
- Locate the power supply mounting area at the bottom rear of the case.
- Slide your power supply into the designated slot from the rear of the case.
- Secure the power supply with screws from the outside of the case.
5.4 Storage Drive Installation (HDD/SSD)
The Master 2 case features 10 HDD trays. These trays are versatile and can accommodate both 3.5" HDDs and 2.5" SSDs.
- Remove a drive tray from the drive cage.
- Mount your 3.5" HDD or 2.5" SSD onto the tray using the appropriate screws.
- Slide the loaded tray back into the drive cage until it clicks into place.
5.5 Graphics Card Installation
- Remove the necessary PCIe slot covers from the rear of the case.
- Align your graphics card with the PCIe slot on the motherboard.
- Gently press down until the card is fully seated.
- Secure the graphics card to the case with screws.
5.6 Fan and Cooling System Installation
The case comes with 3 ARGB 120mm fans pre-installed. Additional fans or water cooling radiators can be installed as follows:
- Top: Supports up to 360mm water cooling radiator or 3 x 120mm/2 x 140mm fans.
- Front: 2 x 120mm ARGB fans pre-installed.
- Rear: 1 x 120mm ARGB fan pre-installed.
Ensure proper airflow direction (intake/exhaust) for optimal cooling performance.

Figure 3: Front view of the Master 2 case, highlighting the mesh panel and pre-installed ARGB fans.
5.7 Cable Management
Utilize the cable routing cutouts and tie-down points behind the motherboard tray to organize cables. This improves airflow and gives your build a cleaner appearance.
5.8 Front Panel Connections
Connect the front panel cables (USB 3.0, audio, power switch, reset switch, HDD LED, power LED) to the corresponding headers on your motherboard. Refer to your motherboard manual for exact header locations.
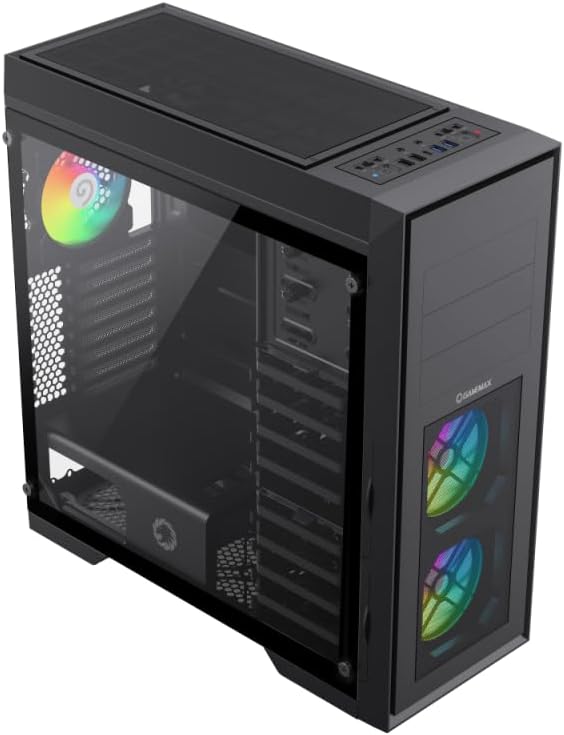
Figure 4: Top-front view of the Master 2 case, displaying the front I/O ports including USB 3.0 and the fan controller.
6. Operating Instructions
- Power On/Off: Press the power button on the top panel to turn your system on or off.
- Fan Speed Control: Use the fan controller switch on the top panel to adjust the speed of connected fans, balancing cooling performance and noise levels.
- ARGB Lighting: The pre-installed ARGB fans can be controlled via your motherboard's RGB software (if compatible) or a dedicated RGB controller (if included with the case or fans).
7. Maintenance
- Dust Filter Cleaning: Regularly check and clean the dust filters located at the front, top, and bottom of the case. Gently remove the filters and clean them with compressed air or water (ensure they are completely dry before reinstallation).
- Interior Cleaning: Periodically use compressed air to remove dust buildup from internal components and fan blades to maintain optimal cooling performance.
- Exterior Cleaning: Wipe the exterior surfaces with a soft, damp cloth. Avoid abrasive cleaners that may damage the finish or tempered glass.
8. Troubleshooting
- System Not Powering On:
- Check all power connections, including the power supply to the wall outlet, and internal connections to the motherboard and components.
- Ensure the power supply switch is in the "ON" position.
- Verify front panel power switch cable is correctly connected to the motherboard.
- Overheating Issues:
- Ensure all case fans are spinning and properly oriented for airflow.
- Clean any clogged dust filters.
- Verify CPU cooler and GPU fans are functioning correctly.
- Front Panel USB/Audio Not Working:
- Check that the front panel USB and audio cables are securely connected to the correct headers on your motherboard.
9. Warranty and Support
GAMEMAX products are manufactured to the highest quality standards. For warranty information, technical support, or service inquiries, please refer to the official GAMEMAX website or contact your local retailer. Keep your proof of purchase for warranty claims.
For further assistance, visit the GAMEMAX Store on Amazon.


