1. Introduction
The ASUS VA249QGS is a 23.8-inch Full HD (1920x1080) monitor designed to provide a superior visual experience with advanced features for both work and entertainment. It incorporates an IPS panel with a wide 178° viewing angle, a high 120Hz refresh rate, and a rapid 1ms MPRT response time for smooth motion.
Key technologies include:
- Eye Care+ Technology: Features Blue Light Reduction and Flicker-Free technology to minimize eye strain during prolonged use.
- Adaptive-Sync: Ensures a tear-free and stutter-free gaming experience.
- GamePlus: Provides in-game enhancements like crosshair, timer, and FPS counter.
- QuickFit: Offers on-screen document and photo alignment grids.
- Built-in Speakers: Integrated 2W x 2 stereo speakers for audio output.

2. Setup
2.1 Package Contents
Before you begin, ensure all items are present in your package:
- ASUS VA249QGS Monitor
- Monitor Stand (Base and Neck)
- HDMI Cable
- Power Cord
- Quick Start Guide
- USB Type-B to A Cable
- Warranty Card
2.2 Assembling the Monitor Stand
Carefully attach the stand neck to the monitor panel, then secure the base to the neck. Ensure all screws are tightened to prevent instability. Refer to the Quick Start Guide for detailed illustrations.
2.3 Connecting the Monitor
The monitor offers various connectivity options. Choose the appropriate cable for your device.
- DisplayPort: Connect one end of the DisplayPort cable to your computer's DisplayPort output and the other end to the monitor's DisplayPort input.
- HDMI: Connect one end of the HDMI cable to your computer's HDMI output and the other end to the monitor's HDMI input.
- VGA: Connect one end of the VGA cable to your computer's VGA output and the other end to the monitor's VGA input.
- USB Hub: Connect the included USB Type-B to A cable from your computer to the monitor's USB Type-B upstream port to enable the monitor's USB 3.2 Gen 1 Type-A ports.
- Audio: Use the 3.5mm stereo mini jacks for audio input (from PC) or audio output (to external speakers/headphones).

2.4 Powering On
Connect the power cord to the monitor's power input and then to a power outlet. Press the power button located on the back of the monitor to turn it on.
3. Operating the Monitor
3.1 On-Screen Display (OSD) Menu Navigation
The OSD menu allows you to adjust various monitor settings. The control buttons are located on the back of the monitor. Press any button to bring up the OSD menu, then use the navigation buttons to select and adjust settings.
3.2 Physical Adjustments
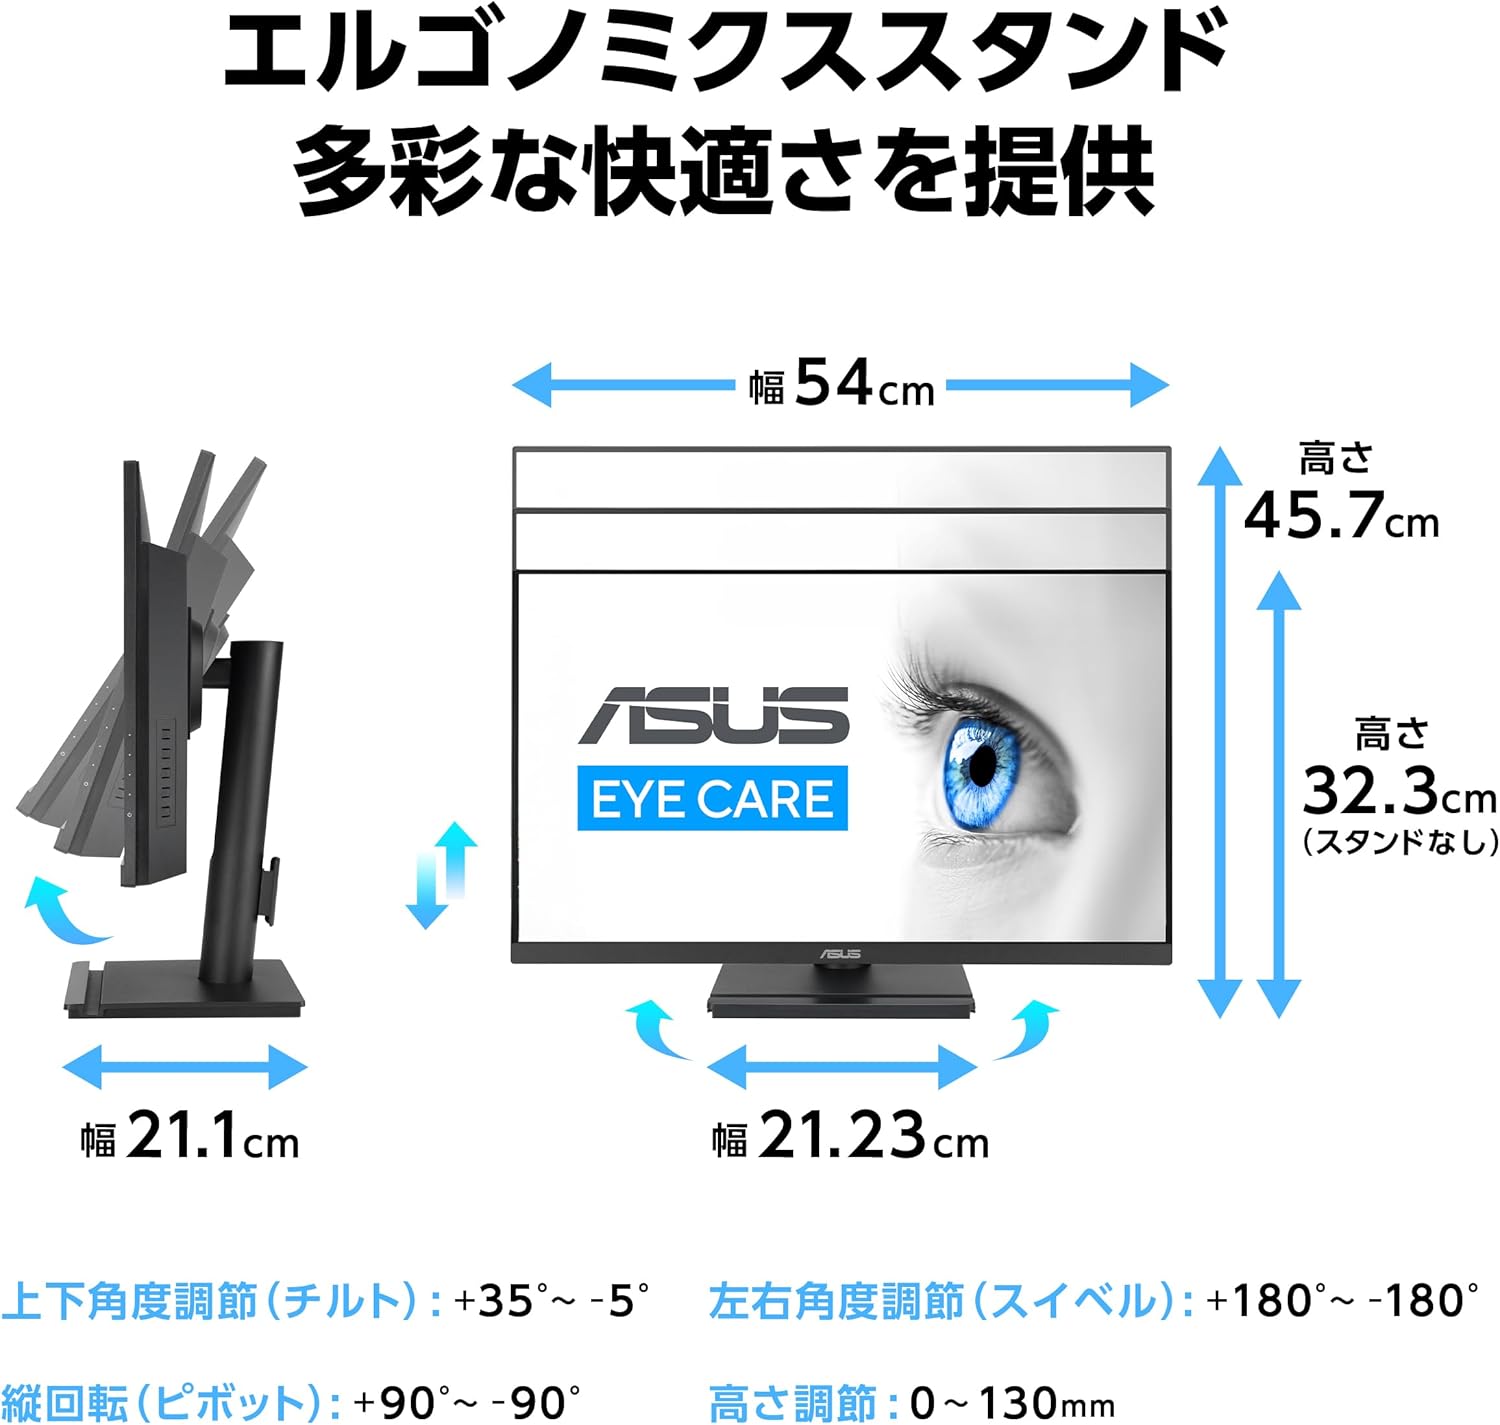
The ergonomic stand allows for flexible positioning to optimize your viewing comfort.
- Tilt: Adjust the screen angle from +35° to -5°.
- Swivel: Rotate the screen horizontally up to 180° left or right.
- Height Adjustment: Adjust the screen height by 0 to 130mm.
- Pivot: Rotate the screen vertically from +90° to -90° for portrait mode.
3.3 Display Features and Settings
- 120Hz Refresh Rate: Provides a smoother visual experience, especially for fast-paced content and gaming. Ensure your graphics card and connection support 120Hz.
- Eye Care+ Technology: Access the OSD menu to adjust the Blue Light Filter levels to reduce harmful blue light emissions. The monitor also features Flicker-Free technology to prevent screen flickering.
- Color Temperature: Select from 4 preset color temperature modes to suit your preference.
- SPLENDID Technology: Optimize display settings for different content types (e.g., Scenery, Standard, Game, Night View, sRGB, Reading, Darkroom).

3.4 Input Source Selection
If you have multiple devices connected, you can switch between input sources (DisplayPort, HDMI, VGA) via the OSD menu. It is important to manually select the correct input source if the monitor does not auto-detect it, especially when switching between different types of connections.
4. Maintenance
4.1 Cleaning the Monitor
To clean the monitor screen, gently wipe it with a soft, lint-free cloth. For stubborn marks, dampen the cloth slightly with water or a mild, non-abrasive screen cleaner. Avoid using alcohol, ammonia, or abrasive cleaners, as they can damage the screen surface.
For the monitor casing, use a soft, dry cloth. Do not spray cleaning solutions directly onto the monitor.
4.2 General Care
- Avoid placing heavy objects on the monitor or its cables.
- Do not expose the monitor to direct sunlight, excessive heat, or extreme cold.
- Keep the monitor away from liquids and excessive humidity.
- Ensure proper ventilation around the monitor to prevent overheating.
5. Troubleshooting
If you encounter issues with your monitor, refer to the following common troubleshooting steps:
| Problem | Possible Cause / Solution |
|---|---|
| No image on screen / Black screen |
|
| Image too bright or too dark | Adjust the Brightness and Contrast settings in the OSD menu. If brightness is still too high at 0, try lowering the Contrast setting. |
| OSD menu language changes unexpectedly | Navigate to the OSD menu's System Setup section and reset the language to your preferred setting (e.g., English). This can sometimes occur after a system reboot. |
| No audio from speakers |
|
6. Specifications
| Feature | Detail |
|---|---|
| Brand | ASUS |
| Model Number | VA249QGS |
| Screen Size | 23.8 Inches |
| Display Type | IPS |
| Resolution | Full HD (1920 x 1080 pixels) |
| Aspect Ratio | 16:9 |
| Refresh Rate | 120 Hz |
| Response Time | 1ms (MPRT) |
| Brightness | 350 cd/m² (typical) |
| Contrast Ratio | 1,500:1 (typical) |
| Viewing Angle | 178° (H) / 178° (V) |
| Connectivity | 1x DisplayPort 1.2, 1x HDMI (v1.4), 1x VGA, 4x USB 3.2 Gen 1 Type-A, 1x 3.5mm Audio In, 1x 3.5mm Audio Out |
| Speakers | 2W x 2 Stereo RMS |
| Physical Dimensions (WxHxD) | 54.00 x 45.70 x 21.10 cm (with stand) |
| Weight | Approx. 4.8 kg |
| VESA Wall Mount | 100mm x 100mm |
| Kensington Security Slot | Yes |
7. Warranty and Support
7.1 Product Warranty
This ASUS monitor comes with a 3-year domestic warranty from the date of purchase. Please retain your proof of purchase for warranty claims.
7.2 ASUS Customer Support
For product inquiries or technical assistance, please contact the ASUS Call Center:
- Toll-Free Number: 0800-123-2787
- From Mobile/PHS/Public Phones/Overseas: 0570-783-886 (Call charges apply)
Reception Hours: 9:00 - 19:00 JST, 365 days a year (no holidays).


