
1. Introduction
This manual provides essential instructions for the safe operation and maintenance of your elecci A22 Drone. Please read this manual thoroughly before operating the drone to ensure proper function and to prevent damage or injury. Keep this manual for future reference.
2. Safety Precautions
- Flight Environment: Operate the drone in open areas, away from people, animals, buildings, and power lines. Avoid flying in strong winds or adverse weather conditions.
- Battery Safety: Use only the provided batteries and charger. Do not overcharge or puncture batteries. Discontinue use if batteries show signs of damage or swelling.
- Propeller Safety: Keep hands, face, and loose clothing away from rotating propellers. Ensure propellers are securely attached before flight.
- Operator Responsibility: The operator is responsible for safe operation and compliance with local regulations. Do not operate under the influence of drugs or alcohol.
- Water Exposure: Avoid exposing the drone or controller to water or moisture.
3. Package Contents
Verify that all items are present in your package:
- elecci A22 Drone
- Screen Controller
- Rechargeable Batteries (2 included)
- USB Charging Cable
- Spare Propellers
- SD Card
- Handbag (Carrying Case)
- User Manual (This document)

Image 3.1: Contents of the elecci A22 Drone package, including the drone, screen controller, batteries, and other accessories.
4. Component Identification
4.1 Drone Components
- Propellers: Four rotating blades for lift and propulsion.
- Brushless Motors: Provide efficient and durable power for flight.
- 1080P HD Camera: Located at the front for photo and video capture.
- Optical Flow Sensor: Located on the underside for stable hovering.
- Obstacle Avoidance Sensors: Integrated for active obstacle detection.
- Battery Compartment: Located on the rear/underside for battery insertion.
- LED Lights: Indicate drone status and orientation.

Image 4.1: Detail of the elecci A22 Drone's 1080P HD camera and integrated sensors.
4.2 Screen Controller Components
- Control Sticks: Left stick for throttle/yaw, right stick for pitch/roll.
- Integrated Screen: Displays real-time video feed and flight data.
- Function Buttons: One-key take-off/landing, return home, speed modes, photo/video capture.
- Power Button: To turn the controller on/off.
- SD Card Slot: For storing captured media directly from the screen.

Image 4.2: The elecci A22 Drone screen controller, highlighting the integrated display for live video feed.
5. Setup
5.1 Charging Batteries
- Connect the drone battery to the USB charging cable.
- Plug the USB cable into a 5V/2A USB power adapter (not included).
- The indicator light on the battery will show charging status (e.g., red for charging, green for fully charged).
- Charge the controller battery using its dedicated charging port if applicable.
Note: A full charge typically takes 60-90 minutes. Do not leave charging batteries unattended.
5.2 Installing Drone Battery
- Ensure the drone is powered off.
- Open the battery compartment on the drone.
- Insert a fully charged battery, ensuring it clicks into place securely.
- Close the battery compartment.
5.3 Preparing the Controller
- Ensure the controller battery is charged.
- Press and hold the power button to turn on the controller.
- If using the detachable display screen independently, ensure it is charged and powered on.
- Insert the provided SD card into the designated slot on the screen controller for media storage.

Image 5.1: The elecci A22 Drone controller demonstrating the detachable display screen functionality.
5.4 Pairing Drone and Controller
- Place the drone on a flat, level surface.
- Power on the drone by pressing and holding its power button. The drone's LED lights will flash.
- Power on the controller.
- Push the left control stick (throttle) all the way up, then all the way down. The drone's LED lights will become solid, indicating successful pairing.
6. Operating Instructions
6.1 Basic Flight Controls
- One-Key Take-off/Landing: Press the dedicated button on the controller to automatically take off or land.
- Throttle (Left Stick Up/Down): Controls altitude.
- Yaw (Left Stick Left/Right): Rotates the drone horizontally.
- Pitch (Right Stick Up/Down): Moves the drone forward/backward.
- Roll (Right Stick Left/Right): Moves the drone left/right (sideways).
- Altitude Hold: The drone will maintain its current altitude automatically once the throttle stick is released to the center position.
6.2 Advanced Features
- Optical Flow Localization: Provides stable hovering, especially indoors or in areas with clear ground patterns.
- Active Obstacle Avoidance: The drone is equipped with sensors to detect and avoid obstacles, enhancing flight safety.
- 360° Flip: Press the 360° flip button and move the right stick in the desired direction to perform an aerial flip.
- One Button Return: Press the return home button, and the drone will attempt to fly back to its take-off point. Ensure a clear path.
- Speed Modes: Use the speed button to switch between different flight speeds (e.g., low, medium, high) for varying skill levels and conditions.
6.3 Camera Operation
- Photo Capture: Press the photo button on the controller to take a still image.
- Video Recording: Press the video button to start recording. Press again to stop.
- Real-time View: The integrated screen on the controller displays the live video feed from the drone's camera.
- Media Storage: Photos and videos are saved to the SD card inserted in the screen controller.
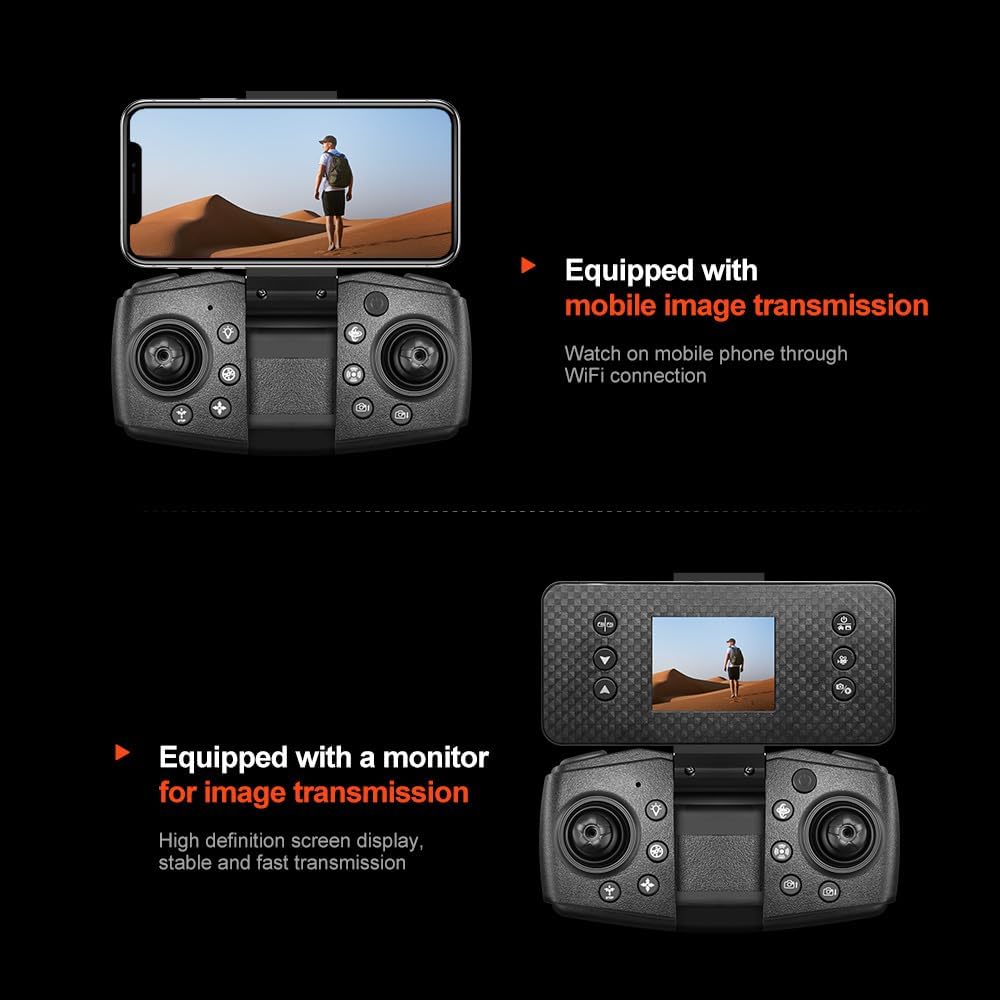
Image 6.1: The elecci A22 Drone controller, illustrating the option for mobile phone integration for image transmission via Wi-Fi.
7. Maintenance
- Cleaning: Use a soft, dry cloth to clean the drone and controller. Do not use solvents.
- Propeller Inspection: Regularly check propellers for damage (cracks, bends). Replace damaged propellers immediately using the provided spares.
- Battery Care: Store batteries in a cool, dry place. Do not store fully charged or completely depleted batteries for extended periods.
- Storage: When not in use, store the drone and its components in the provided carrying case to protect them from dust and physical damage.
8. Troubleshooting
| Problem | Possible Cause | Solution |
|---|---|---|
| Drone does not power on. | Battery is not charged or not inserted correctly. | Charge the battery fully and ensure it is securely inserted. |
| Controller does not connect to drone. | Not paired correctly or low controller battery. | Repeat pairing steps (Section 5.4). Charge controller battery. |
| Drone drifts during flight. | Not calibrated or strong wind interference. | Perform gyroscope calibration (refer to quick start guide for specific steps). Fly in calm conditions. |
| Poor camera image quality or no video feed. | Weak signal, dirty lens, or SD card issue. | Ensure drone is within range. Clean camera lens. Check SD card for proper insertion and format. |
| Obstacle avoidance not working. | Sensors are dirty or obstructed. | Clean the obstacle avoidance sensors carefully. |
9. Specifications
| Feature | Detail |
|---|---|
| Model Name | A22 |
| Brand | elecci |
| Video Capture Resolution | 1080p |
| Effective Still Resolution | 2 MP |
| Connectivity Technology | Bluetooth, Wi-Fi |
| Special Features | 360 Degree Flip, Auto Follow, One Button Return, One Key Rotation, Optical Flow, Obstacle Avoidance |
| Motor Type | Brushless |
| Batteries | 2 Lithium Ion batteries (included) |
| Item Weight | 0.4 Pounds (approx. 6.4 ounces) |
| Product Dimensions | 9.05"L x 2.55"W x 7.08"H |
| Included Components | Battery, Camera, Handbag, SD Card, Screen Controller |
10. Warranty and Support
For warranty information and technical support, please refer to the contact details provided with your purchase documentation or visit the official elecci website. Keep your proof of purchase for warranty claims.
Manufacturer: Shantou QICHENG Intelligent Technology Co., Ltd