
1. Introduction and Overview
The Tissting 56-Egg Automatic Incubator is designed for efficient and reliable egg hatching. This 3-in-1 unit functions as an incubator, hatcher, and brooder, suitable for various poultry and bird eggs including chicken, duck, quail, goose, and parrot eggs. It features automatic egg turning, precise temperature and humidity control, and a dual power backup system for uninterrupted operation.
The transparent ABS cover allows for easy observation of the egg development and hatching process, making it an educational tool. The system includes a programmable digital display for real-time monitoring of temperature, humidity, and incubation days.

Figure 1: The Tissting 56-Egg Incubator displaying its capacity for different egg sizes, alongside images of chicken, duck, goose, quail, parrot, and peacock.

Figure 2: A child observing the hatching process through the transparent top cover of the incubator, with newly hatched chicks visible.
2. Setup Instructions
- Unpacking: Carefully remove all components from the packaging. Verify that all items listed in the packing list are present: the egg incubator unit, AC power cable (and optional 12V DC clips), water bottle, and user manual.
- Placement: Place the incubator on a stable, level surface away from direct sunlight, drafts, or extreme temperature fluctuations. Ensure adequate ventilation around the unit.
- Water Bottle Connection: Connect the provided water bottle to the incubator's automatic water refill system. Ensure the bottle is filled with clean, distilled water to maintain humidity.
- Power Connection: Connect the AC power cable to the incubator and then to a suitable power outlet (110V for US plug). If using the DC backup, connect the 12V DC clips to a compatible 12V battery source.
- Initial Power-On: Turn on the incubator. The LCD display should illuminate, showing default temperature and humidity settings. Allow the incubator to run for at least 2-3 hours to stabilize the internal temperature and humidity before placing eggs.

Figure 3: The smart incubator unit connected to an external water bottle for automatic moisture control.
3. Operating Instructions
3.1 Egg Selection and Loading
- Select healthy, fertilized eggs that are 4 to 7 days old for optimal hatching success. Avoid cracked, misshapen, or excessively dirty eggs.
- Carefully place the eggs into the designated slots on the egg tray. The adjustable tray can accommodate 56 chicken eggs or over 120 quail eggs.
3.2 Temperature and Humidity Control
- The incubator features an intelligent system for automatic temperature and humidity control, maintaining conditions within a precision of ±0.5°F.
- Monitor the real-time temperature and humidity readings on the LCD display. The system will automatically adjust as needed.
- Ensure the water bottle is always filled to maintain adequate humidity levels.
3.3 Automatic Egg Turning
- The incubator automatically turns the eggs horizontally to ensure even heat distribution and prevent the embryo from sticking to the shell.
- The automatic turning function will stop during the last 3 days of the incubation period to prepare for hatching.

Figure 4: Close-up view of the incubator's automatic egg turning mechanism, illustrating 360-degree rotation.
3.4 Monitoring Egg Development
- The LCD display provides an incubation days countdown and an egg turn countdown.
- Use the built-in egg candler (egg lighting function) to check the development of the embryos without opening the lid, minimizing disturbance to the incubation environment.
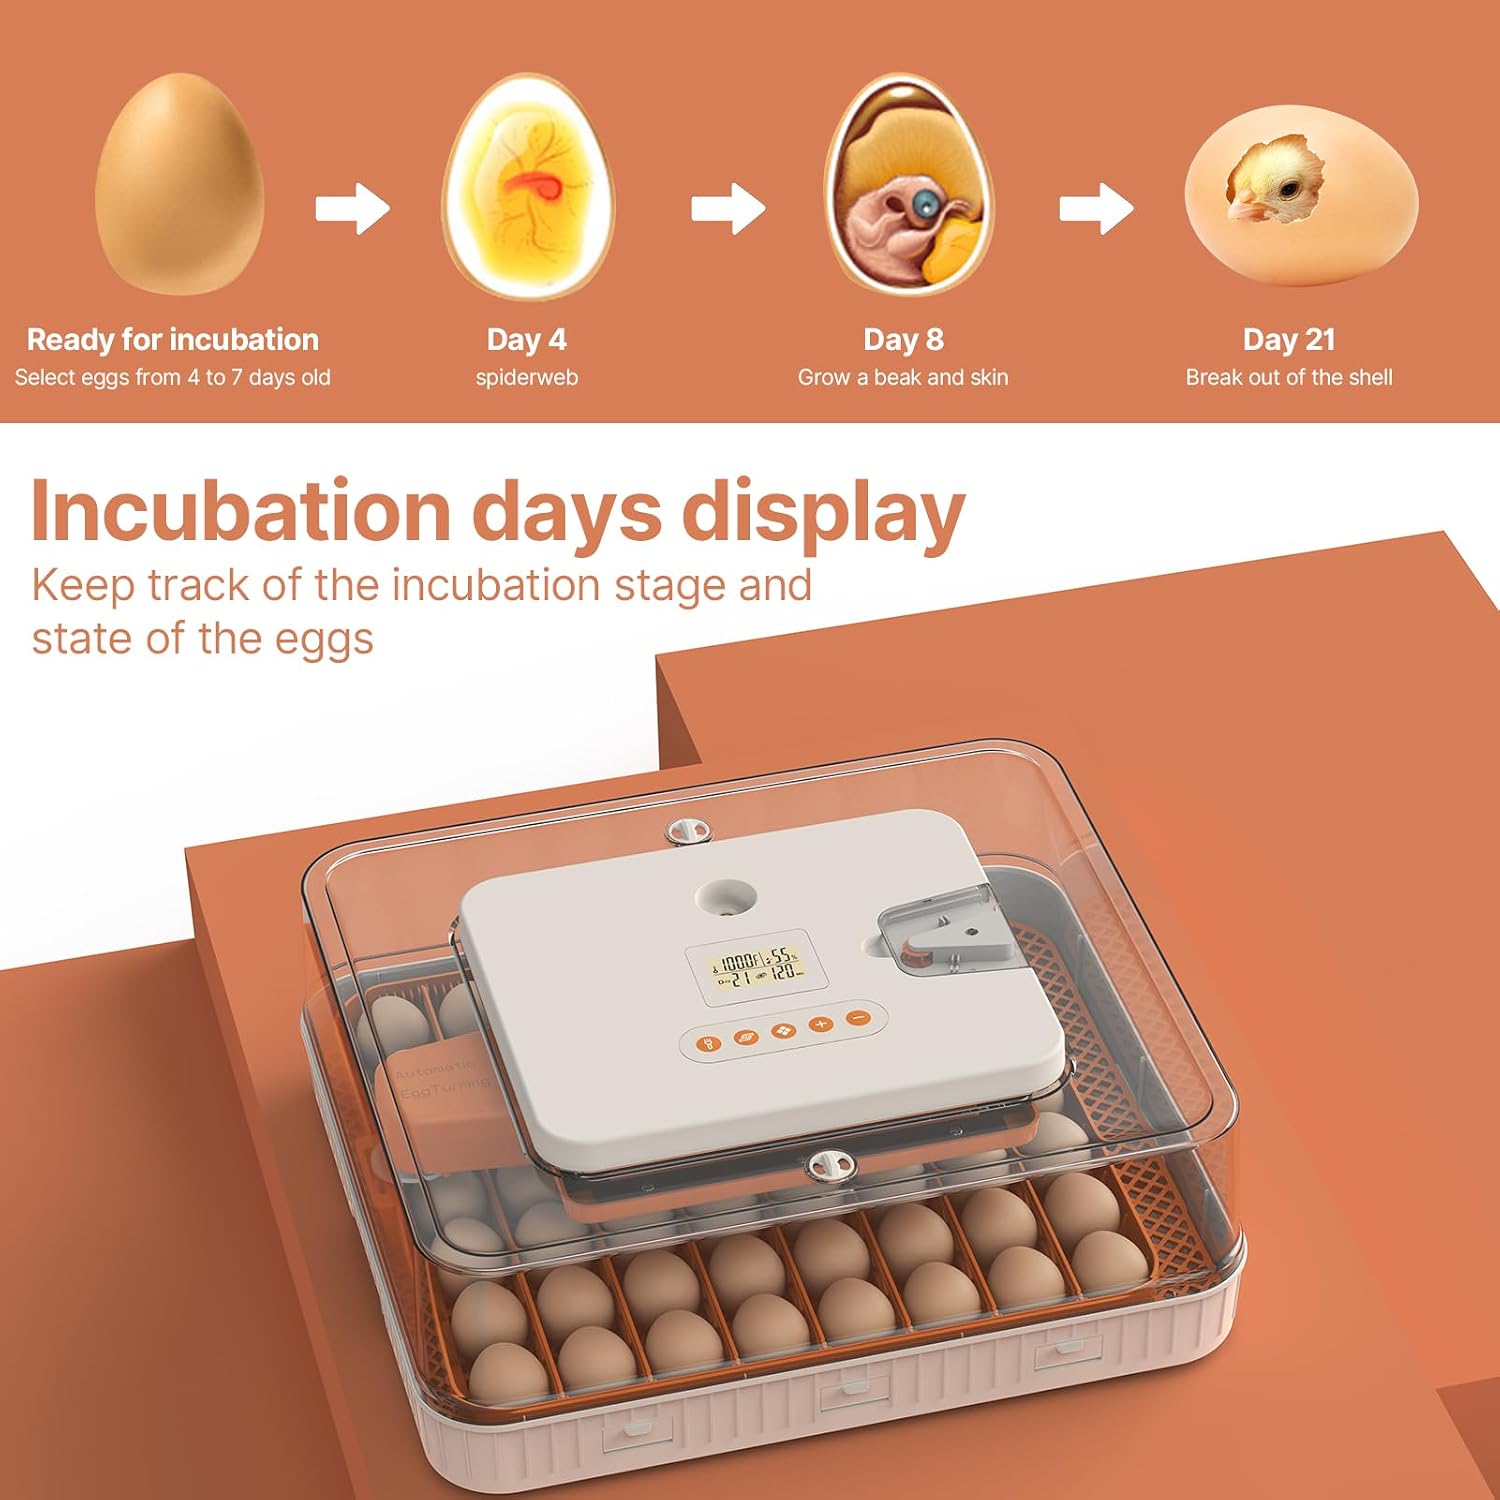
Figure 5: Visual representation of egg development stages from ready for incubation to breaking out of the shell, alongside the incubator's display showing incubation days.

Figure 6: The multi-function LCD screen and control buttons, indicating temperature, humidity, incubation days, and egg turn countdown.
4. Maintenance
- Cleaning: After each hatch, disconnect the power and allow the unit to cool. The removable base and spill-proof design facilitate easy cleaning. Wipe the top cover with a damp cloth only; do not immerse it in water. Clean the egg trays and base with a mild disinfectant solution. Ensure all parts are completely dry before reassembly or storage.
- Water System: Regularly clean the water bottle and tubing to prevent algae or bacterial growth. Use distilled water to minimize mineral buildup.
- Storage: When not in use, store the incubator in a clean, dry place, away from direct sunlight and extreme temperatures.
5. Troubleshooting
- No Power: Check the power cable connection and ensure the outlet is functional. If using DC backup, verify battery charge and connections.
- Temperature Fluctuations: Ensure the incubator is placed in a stable environment, away from drafts or direct heat sources. Verify the lid is securely closed.
- Humidity Issues: Check if the water bottle is filled and properly connected. Ensure there are no blockages in the water refill system.
- Eggs Not Turning: Confirm the automatic turning function is enabled (if applicable) and that the egg tray is correctly installed. The turning function stops in the last 3 days of incubation.
- Low Hatch Rate: Review egg selection criteria. Ensure proper temperature and humidity settings are maintained throughout the incubation period. Avoid frequent opening of the incubator.
6. Specifications
| Feature | Specification |
|---|---|
| Model Number | Tissting5pq6nmyh1b--1 |
| Capacity | 56 Chicken Eggs / 120+ Quail Eggs |
| Power | 85W |
| Voltage (US Plug) | 110V |
| Main Material | PET + ABS |
| Dimensions (L x W x H) | 48.3 x 42.5 x 17.5 cm (19.01 x 16.73 x 6.89 inches) |
| Item Weight | 4.65 kg (12.01 pounds) |
| Temperature Control Accuracy | ±0.5°F |

Figure 7: Detailed dimensions of the incubator unit, showing length, width, and height measurements.
7. Warranty and Support
For warranty information, technical support, or any inquiries regarding your Tissting 56-Egg Automatic Incubator, please refer to the contact details provided with your purchase documentation or visit the official Tissting website. Keep your purchase receipt as proof of purchase for warranty claims.