
Introduction
This manual provides detailed instructions for the setup, operation, and maintenance of your XTU Trail Camera WiFi Solar Powered. Designed for wildlife monitoring, home security, and outdoor surveillance, this camera combines high-resolution imaging with advanced features like solar power, night vision, and app connectivity. Please read this manual thoroughly before using the camera to ensure optimal performance and longevity.

The XTU Trail Camera, featuring a solar panel for continuous power, a 32GB SD card for storage, and smartphone connectivity for remote control and viewing.
What's in the Box?
Upon opening the package, please verify that all the following components are included:
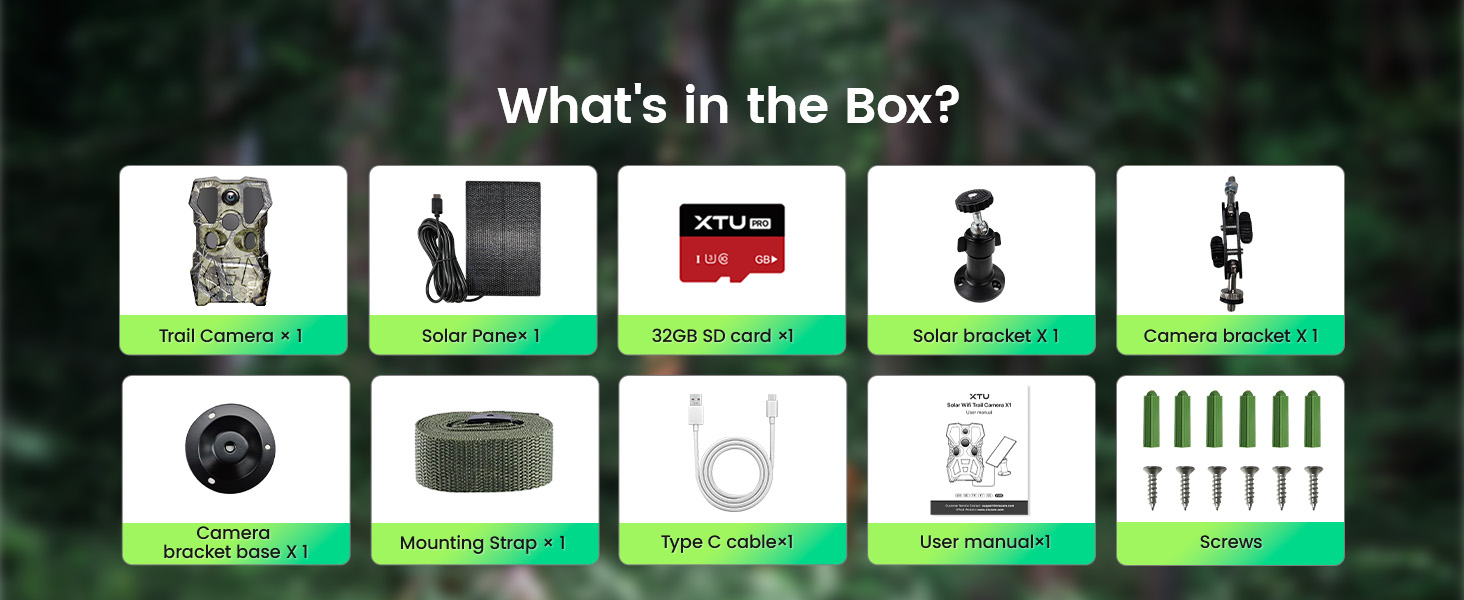
An illustration of the complete contents of the XTU Trail Camera package.
- 1 x XTU Trail Camera
- 1 x Solar Panel
- 1 x 32GB SD Card
- 1 x Solar Bracket
- 1 x Camera Bracket
- 1 x Camera Bracket Base
- 1 x Mounting Strap
- 1 x Type-C USB Cable
- 1 x User Manual
- Screws for mounting
Product Features
Crystal Clear Video and Image Quality
The XTU Trail Camera is equipped with a 4 million lens and a 2.0" LCD screen, delivering stunning 2.7K video and impressive 64MP photo quality. This ensures that every detail of wildlife activity is captured with exceptional clarity and precision.

Examples of high-resolution images and video frames captured by the camera, showcasing its 64MP photo and 2.7K UHD video capabilities.
Low Glow Infrared Lights and Advanced Night Vision
Experience exceptional visibility in low-light conditions with 8 upgraded 850nm low glow infrared lights. This feature ensures crystal-clear night vision, allowing the camera to capture wildlife activity day or night with a night vision range of up to 65ft (20 meters).

A visual comparison highlighting the superior clarity of the XTU camera's night vision capabilities.
Efficient Solar Powered and IP66 Waterproof
The camera is powered by a large rechargeable lithium battery and an efficient solar panel, providing extended usage time and reducing the need for frequent battery changes. With an IP66 weather-proof rating, the camera is designed to withstand harsh outdoor conditions, including rain, snow, and dust, ensuring reliable performance year-round.

The camera's robust IP66 waterproof design, capable of operating effectively in various weather conditions.

The integrated solar panel provides continuous power, extending the camera's operational time.
Camera's Hotspot Wi-Fi Connection and Two-Way Audio
The camera features integrated Wi-Fi and Bluetooth functions, allowing for easy viewing, downloading, and setting changes via a dedicated smartphone app. With a Wi-Fi connection distance of up to 30m (98ft), you can manage your camera remotely. Two-way communication is also supported through the app, enabling remote interaction near the camera. Note: The camera connects to the app via its hotspot Wi-Fi; it does not support connection to home Wi-Fi networks.

Remote control and monitoring of the camera via the smartphone app.
0.2s Trigger Speed and 120° Detection Range
Equipped with three PIR sensors, the camera automatically begins recording within 0.2 seconds of detecting motion. A wide motion detection angle of 120° ensures that fleeting moments of wildlife activity are captured, minimizing missed events.
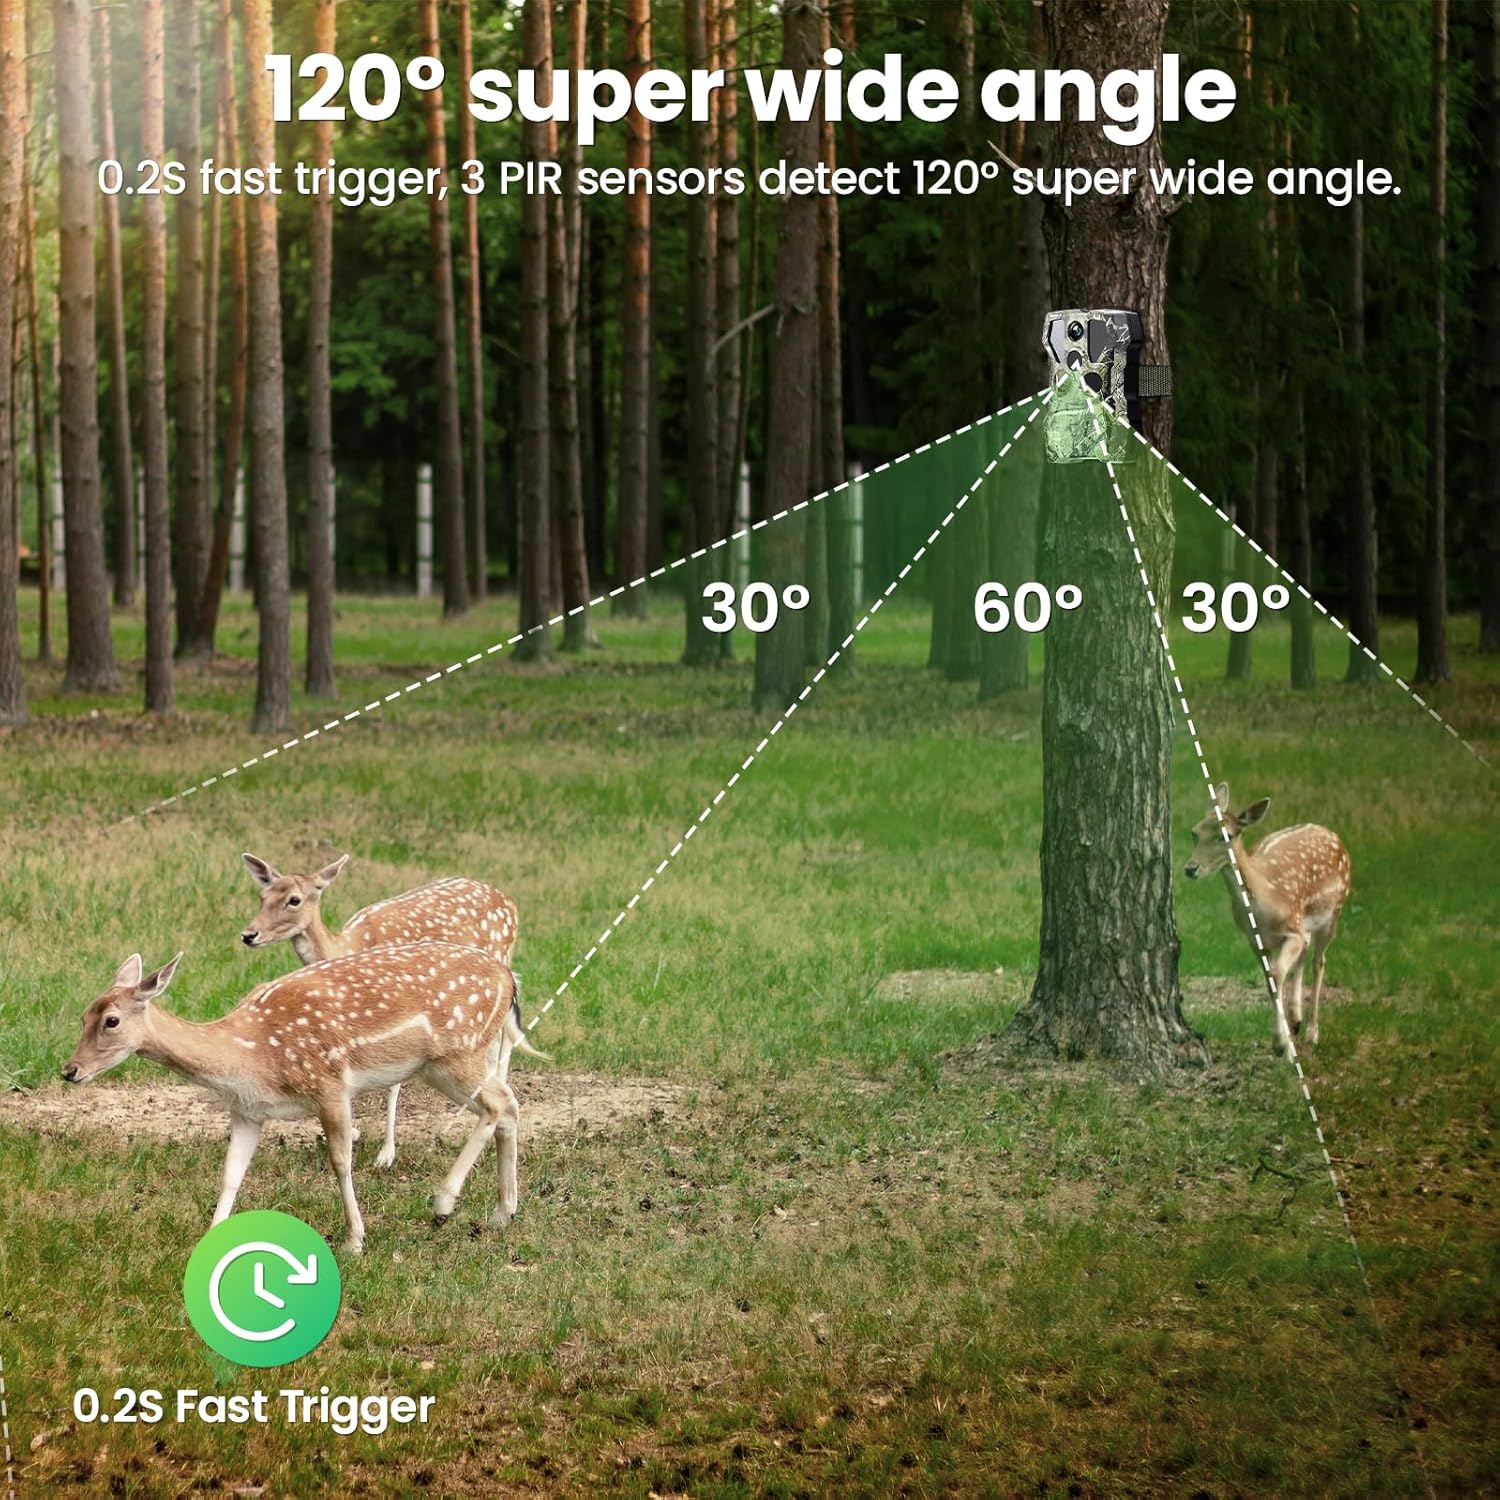
The camera's broad detection angle and rapid trigger speed for comprehensive wildlife monitoring.
Setup Guide
-
Battery and SD Card Installation
Open the camera's battery compartment. Insert the included rechargeable lithium battery. Ensure the battery is correctly oriented according to the polarity indicators. Insert the 32GB micro SD card into the designated slot. The camera supports up to a 256GB micro SD card if you wish to use a larger capacity.
-
Mounting the Camera and Solar Panel
Choose a suitable location for your camera, ideally where it has a clear view of the area you wish to monitor and the solar panel can receive ample sunlight. Use the provided mounting strap to secure the camera to a tree or pole. Alternatively, use the camera bracket and screws for wall mounting.
Mount the solar panel using the solar bracket in a position that maximizes sun exposure throughout the day. Connect the solar panel to the camera using the provided 10ft extension cord. This allows flexible placement of the solar panel for optimal charging.
Proper mounting of the camera and solar panel for continuous operation.
Operating Instructions
-
Powering On/Off
Locate the power switch on the camera. Slide it to the "ON" position to power on the camera. To power off, slide the switch to the "OFF" position.
-
Mode Selection
The camera typically operates in one of three modes: Photo, Video, or Photo+Video. These modes can be selected and configured via the camera's internal menu (accessed through the LCD screen) or more conveniently through the dedicated smartphone application.
-
Adjusting Settings via App
For detailed configuration, including resolution, trigger interval, PIR sensitivity, and more, it is recommended to use the XTU smartphone application. This provides a user-friendly interface for comprehensive control.
App Connection Guide
Follow these steps to connect your XTU Trail Camera to the smartphone application:
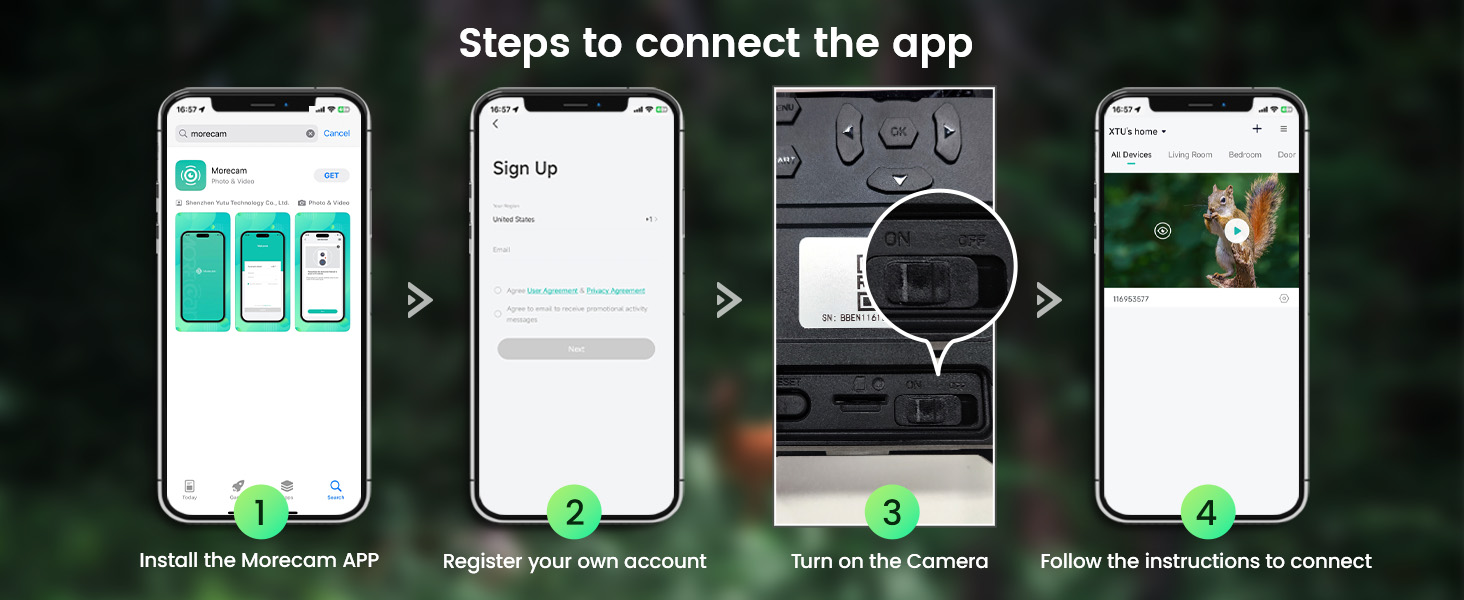
Visual guide for connecting the camera to the Morecam application.
- Install the Morecam APP: Search for "Morecam" in your smartphone's app store (iOS App Store or Google Play Store) and download the application.
- Register Your Account: Open the Morecam app and follow the prompts to register a new user account.
- Turn on the Camera: Ensure your XTU Trail Camera is powered on.
- Follow In-App Instructions: Within the Morecam app, select "Add Device" or a similar option. The app will guide you through connecting to the camera's hotspot Wi-Fi and completing the setup.
Important Note: The camera connects to the app via its own Wi-Fi hotspot. It does not connect to your home Wi-Fi network.
Maintenance
-
Cleaning
Regularly clean the camera lens, PIR sensors, and solar panel with a soft, dry cloth to ensure optimal performance. Avoid using abrasive cleaners or solvents.
-
Battery Care
While the solar panel provides continuous charging, periodically check the battery level via the app. If storing the camera for an extended period, ensure the battery is fully charged before storage and recharge it every few months to maintain battery health.
-
SD Card Management
The camera supports loop recording, meaning when the SD card is full, the oldest files will be overwritten. However, it is recommended to regularly back up important footage and format the SD card periodically to maintain its performance and prevent data corruption.

Explanation of the loop recording function for continuous operation.
Troubleshooting
If you encounter issues with your XTU Trail Camera, please refer to the following common problems and solutions:
-
Camera Not Powering On:
- Ensure the battery is fully charged.
- Verify the battery is inserted with correct polarity.
- Check if the power switch is firmly in the "ON" position.
-
Cannot Connect to App/Wi-Fi:
- Ensure the camera's Wi-Fi hotspot is active.
- Confirm your smartphone's Wi-Fi is connected to the camera's hotspot (not your home Wi-Fi).
- Ensure you are within the 30m (98ft) Wi-Fi range of the camera.
- Restart both the camera and your smartphone, then try connecting again.
-
Poor Image/Video Quality:
- Clean the camera lens.
- Ensure there are no obstructions in front of the lens or PIR sensors.
- Check app settings to confirm desired resolution (2.7K/64MP) is selected.
-
Camera Not Triggering/Missing Events:
- Adjust PIR sensitivity settings in the app (higher sensitivity for smaller/distant subjects).
- Ensure the camera is positioned correctly within the 120° detection range.
- Check for obstructions blocking the PIR sensors.
-
Short Battery Life:
- Ensure the solar panel is receiving adequate direct sunlight.
- Reduce the frequency of recordings or video length in settings.
- Consider using a lower PIR sensitivity if the camera is triggering excessively due to minor movements (e.g., leaves, small insects).
Specifications
| Feature | Detail |
|---|---|
| Model Number | SV-32YW |
| Image Resolution | 64 Megapixels |
| Video Resolution | 2.7K UHD |
| Night Vision | 8pcs 850nm Low Glow Infrared LEDs, up to 65ft (20m) |
| Trigger Speed | 0.2 seconds |
| PIR Detection Angle | 120 degrees (3 PIR sensors) |
| Power Source | Rechargeable Lithium Battery (included), Solar Panel |
| Storage | Micro SD Card (32GB included, supports up to 256GB) |
| Connectivity | Wi-Fi (hotspot), Bluetooth, Smartphone App |
| Waterproof Rating | IP66 |
| Dimensions (L x W x H) | 5.3 x 3.8 x 2.9 inches |
| Weight | 1.96 pounds |
Warranty and Support
XTU is committed to providing high-quality products and excellent customer service. For any questions, technical assistance, or warranty inquiries regarding your XTU Trail Camera, please contact XTU customer support.
- Professional Technical Support: XTU offers 24/7 professional technical support to assist you with any issues or questions you may have.
- Quick Reply: Expect prompt responses to your inquiries.
- Customer-Centric Approach: XTU values customer feedback and continuously strives to improve products and services based on user needs.

XTU's commitment to customer satisfaction and support.
For the most up-to-date contact information, please refer to the XTU official website or the contact details provided in your product packaging.


