
XINFUTE YR-HJ
Contents
XINFUTE YR-HJ Remote Control User Manual for Haier Arctic Expert Plus Split Air Conditioner
Model: YR-HJ
1. Introduction
This manual provides detailed instructions for the operation and maintenance of your XINFUTE YR-HJ remote control, designed for use with Haier Arctic Expert Plus Split Air Conditioner models AS35XCHHRA-NR and 1U35KEHFRA-NR. Please read this manual thoroughly before using the remote control to ensure proper function and longevity.
2. Setup: Battery Installation
The remote control requires two AAA batteries (not included) for operation. Follow these steps to install the batteries:
- Locate the battery compartment cover on the back of the remote control.
- Press down on the tab and slide the cover downwards to open the compartment.
- Insert two new AAA batteries, ensuring the positive (+) and negative (-) terminals match the diagrams inside the compartment.
- Slide the battery compartment cover back into place until it clicks securely.
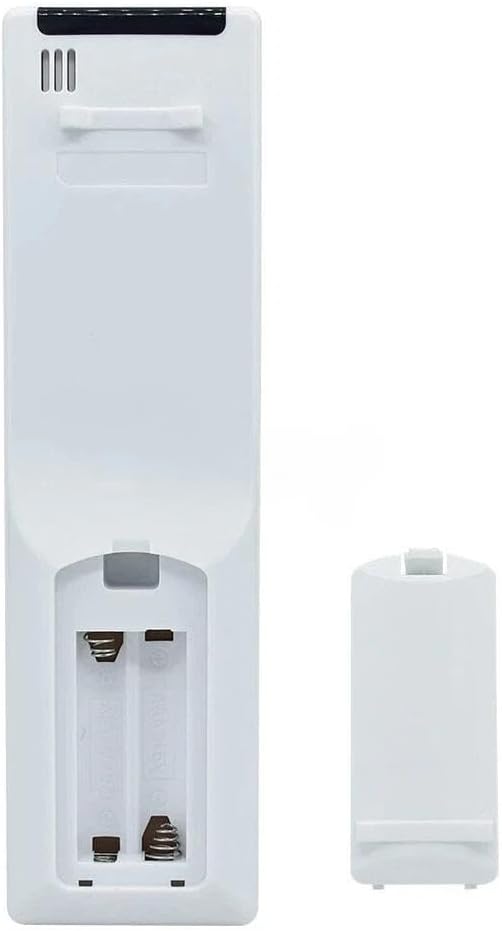
Figure 2.1: Rear view of the remote control with the battery compartment open, illustrating the correct orientation for inserting two AAA batteries.
Important:
- Do not mix old and new batteries.
- Do not mix alkaline, standard (carbon-zinc), or rechargeable (nickel-cadmium) batteries.
- Remove batteries if the remote control will not be used for an extended period to prevent leakage.
3. Operating Instructions
Familiarize yourself with the buttons on your remote control. Point the remote control directly at the air conditioner's receiver when operating.

Figure 3.1: Front view of the XINFUTE YR-HJ remote control, displaying the LCD screen and all control buttons.
3.1. Basic Functions
- Power Button (Yellow Circle): Press to turn the air conditioner ON or OFF.
- MODE Button: Press to cycle through operating modes: Auto, Cool, Dry, Fan, Heat (if applicable to your AC unit). The current mode is displayed on the LCD screen.
- Temperature Adjustment Buttons (Up/Down Arrows): Use these arrows to increase or decrease the desired temperature setting.
- FAN SPEED Button: Press to adjust the fan speed. Options typically include Auto, Low, Medium, High.
- SWING Buttons (Left/Right Arrows): Control the horizontal and vertical louver swing. One button typically controls horizontal swing, the other vertical.
3.2. Advanced Functions
- TURBO/QUIET Button:
- TURBO: Activates maximum cooling/heating capacity for rapid temperature change.
- QUIET: Reduces fan speed and compressor noise for quieter operation.
- I FEEL Button: Activates the "I FEEL" function, which senses the temperature at the remote control's location and adjusts the air conditioner's operation for optimized comfort around the user.
- ECO Button: Engages energy-saving mode, optimizing settings to reduce power consumption.
- HEALTH Button: Activates air purification or health-related functions of the air conditioner (e.g., ionizer, specific filters). Refer to your air conditioner's manual for details.
- SLEEP Button: Adjusts temperature and fan speed automatically during sleep for enhanced comfort and energy efficiency.
- SELF CLEAN Button: Initiates a self-cleaning cycle for the indoor unit, helping to prevent mold and bacteria buildup.
- HEALTH AIRFLOW Button: Controls specific airflow patterns designed for health benefits, such as avoiding direct drafts.
- ECOSENSOR Button: Activates the air conditioner's human presence sensor (if equipped) to adjust operation based on room occupancy.
- EXTRA FUNCTION Button: Accesses additional features. Consult your air conditioner's manual for specific functions linked to this button.
- TIME ON / TIME OFF Buttons: Set a specific time for the air conditioner to turn ON or OFF automatically. Use with the Confirm/Cancel button.
- CONFIRM / CANCEL Button: Used to confirm timer settings or cancel active functions.
- LOCK Button: Locks the remote control buttons to prevent accidental changes to settings. Press again to unlock.
- LIGHT Button: Turns the backlight of the remote control's LCD screen ON or OFF (if available).
- RESET Button: Resets the remote control to its factory default settings. This may require a pointed object (e.g., a paperclip) to press a recessed button.
4. Maintenance
4.1. Cleaning
To clean the remote control, wipe it gently with a soft, dry cloth. Do not use liquid cleaners, abrasive cleaners, or chemical sprays, as these can damage the remote control's surface or internal components.
4.2. Storage
If the remote control will not be used for an extended period, remove the batteries to prevent leakage and store it in a cool, dry place away from direct sunlight and extreme temperatures.
5. Troubleshooting
| Problem | Possible Cause | Solution |
|---|---|---|
| Remote control not responding. |
|
|
| LCD display is dim or blank. |
|
|
| Air conditioner does not respond to specific commands. |
|
|
6. Specifications
- Model: YR-HJ
- Compatible Air Conditioner Models: Haier Arctic Expert Plus AS35XCHHRA-NR, 1U35KEHFRA-NR
- Power Source: 2 x AAA Batteries (not included)
- Material: ABS
- Product Dimensions: 4 x 3 x 1 inches (approximately)
- Item Weight: 2.4 ounces (approximately, without batteries)

Figure 6.1: Multiple views of the remote control (front, side, and back) illustrating its physical dimensions and design.
7. Warranty and Support
Warranty: This product comes with a one-year warranty from the date of purchase. This warranty covers manufacturing defects and ensures the remote control functions as intended under normal use.
Customer Support: All products are inspected before shipment. If you are not satisfied with your purchase or encounter any issues, please contact XINFUTE customer support within 24 hours of receipt. For assistance, refer to the contact information provided with your purchase or visit the XINFUTE store on Amazon.
For further information or to purchase replacement parts, please visit the official XINFUTE Store.
Documents and downloads
Ask a question about this manual
Ask about setup, troubleshooting, compatibility, parts, safety, or missing instructions. Manuals+ will review the question and use this page’s manual context to help answer it.