
Introduction
Thank you for choosing the GLEAM Double X-Style Keyboard Stand. This heavy-duty stand is designed to provide stable and versatile support for a wide range of electronic keyboards, digital pianos, synthesizers, and DJ equipment. Its robust construction and adjustable features ensure a secure and comfortable playing experience. Please read this manual thoroughly before assembly and use to ensure proper setup and operation.
Safety Information
- Ensure all parts are securely fastened before placing any instrument on the stand.
- Do not exceed the recommended load capacity of 100 lbs (maximum capacity 200 lbs).
- Always adjust the stand height on a flat, stable surface.
- Keep fingers clear of moving parts during height adjustment to prevent pinching.
- Use the included locking straps to secure your instrument to the stand, especially during transport or in high-traffic areas.
- Periodically check all bolts and connections for tightness.
Package Contents
Please verify that all components are present before proceeding with assembly:
- GLEAM Double X-Style Keyboard Stand Frame
- Locking Straps (2)
- Instruction Manual
Setup
1. Unfolding the Stand
Carefully remove the stand from its packaging. Place the folded stand on a flat, stable surface. Gently pull the two X-frames apart to begin unfolding the stand.

Image: The GLEAM Double X-Style Keyboard Stand shown in its folded, compact state, ready for unfolding.
2. Adjusting Height and Width
The stand features a spring-loaded lock pin mechanism for height adjustment. Locate the adjustment knob and pin at the center joint of the X-frame.
- Pull the Lock Pin: Pull the spring-loaded lock pin outwards.
- Adjust Legs: While holding the pin out, adjust the legs to your desired height and corresponding width. The stand offers 7 adjustable height options, ranging from approximately 12 inches to 38 inches.
- Secure the Pin: Once the desired position is reached, release the lock pin. Ensure it fully engages and secures into the nearest hole for a firm lock.

Image: A detailed diagram illustrating the 7 different height and width adjustment positions of the stand, ranging from 11.8 to 38.1 inches in height.
3. Attaching Locking Straps
The stand includes two locking straps to secure your instrument. These straps feature pre-drilled holes for attachment.
- Position Straps: Place your keyboard or piano on the stand. Position the locking straps over the bottom of your instrument, aligning the holes on the straps with the pre-drilled holes on the stand's top support bars.
- Fasten Securely: Use appropriate fasteners (not included, typically screws that come with your keyboard or can be purchased separately) to securely attach the straps to both the stand and your instrument. This prevents accidental shifting or falling.

Image: A close-up view showing the non-slip rubber sleeves on the stand's arms and the secure straps designed to fasten the keyboard to the stand.
4. Ensuring Stability
The stand is equipped with rotatable rubber feet and non-slip rubber caps on the top support bars to enhance stability and protect your instrument.
- Foot Adjustment: The rotatable feet can be adjusted to compensate for uneven floor surfaces, ensuring the stand remains level and stable.
- Instrument Protection: The non-slip rubber caps on the top bars prevent your instrument from sliding and protect its finish from scratches.

Image: An illustration demonstrating the 360-degree rotation capability of the stand's foot sleeves, designed to maintain balance on uneven surfaces.
Operating Instructions
Height Adjustment for Performance
The GLEAM Keyboard Stand is designed for versatile use, accommodating both seated and standing playing positions. Refer to the "Setup" section for detailed instructions on adjusting the stand's height. Choose one of the 7 available height settings that best suits your comfort and performance needs.
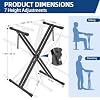
Image: A visual guide demonstrating how the stand's adjustable height can be set for both seated and standing musicians.
Instrument Compatibility
This stand is compatible with a wide range of instruments, including 57-key, 61-key, and 88-key digital pianos, synthesizers, and MIDI keyboards. The adjustable width of the X-frame allows it to adapt to various instrument sizes.

Image: The stand illustrated with different keyboard sizes (61, 76, and 88 keys) to demonstrate its universal compatibility and adjustable width.
Maintenance
- Cleaning: Wipe the stand with a soft, damp cloth to remove dust and dirt. Avoid abrasive cleaners or solvents that could damage the powder-coated finish.
- Inspection: Periodically inspect all joints, bolts, and rubber components for wear or damage. Ensure the lock pin mechanism operates smoothly.
- Storage: When not in use, the stand can be folded for compact storage. Store in a dry environment to prevent rust.
Troubleshooting
| Problem | Possible Cause | Solution |
|---|---|---|
| Stand feels unstable or wobbly. | Lock pin not fully engaged; uneven floor surface; loose connections. | Ensure the lock pin is fully seated in a height adjustment hole. Adjust the rotatable rubber feet to level the stand on uneven floors. Check and tighten all bolts. |
| Difficulty adjusting height. | Lock pin stuck; mechanism dirty. | Ensure the lock pin is pulled out completely. Clean the adjustment mechanism if dirt or debris is present. Apply a small amount of silicone lubricant if necessary. |
| Keyboard slides on the stand. | Locking straps not used or improperly fastened; rubber caps worn. | Always use the provided locking straps to secure your instrument. Ensure they are properly fastened. Inspect rubber caps for wear and replace if necessary. |
Specifications
| Model: | GKX |
| Brand: | GLEAM |
| Material: | Alloy Steel |
| Color: | Black |
| Item Shape: | X-Shape (Double-X) |
| Number of Levels: | 1 |
| Adjustable Height Range: | Approximately 12 inches to 38 inches (7 positions) |
| Load Capacity: | Recommended 100 lbs (Maximum 200 lbs) |
| Item Weight: | 3.4 kg (Approximately 7.5 lbs) |
| Item Dimensions (L x W x H): | 12.6 x 38.19 x 38.19 inches (when fully extended/adjusted) |
| Finish Type: | Powder Coated |