1. Introduction
The Raddy UV-6 Professional Weather Station is designed to provide comprehensive environmental data for your home and surroundings. It features a 6-inch VA display console and a multi-sensor outdoor unit, offering precise measurements of indoor and outdoor temperature, humidity, barometric pressure, wind speed and direction, rainfall, UV index, and light intensity. The system also includes an atomic clock for accurate timekeeping and supports monitoring of up to five areas with optional additional sensors.

Figure 1.1: Raddy UV-6 Professional Weather Station components.
2. Package Contents
Verify that all items are present in the package:
- Raddy UV-6 Display Console
- Outdoor Sensor Suite (integrated rain funnel, wind vane, anemometer, temperature & humidity sensor, UV/light sensors, solar panel)
- Mounting Pole and Hardware (U-bolts, nuts, washers, mounting brackets)
- Power Adapter for Display Console
- User Manual (this document)
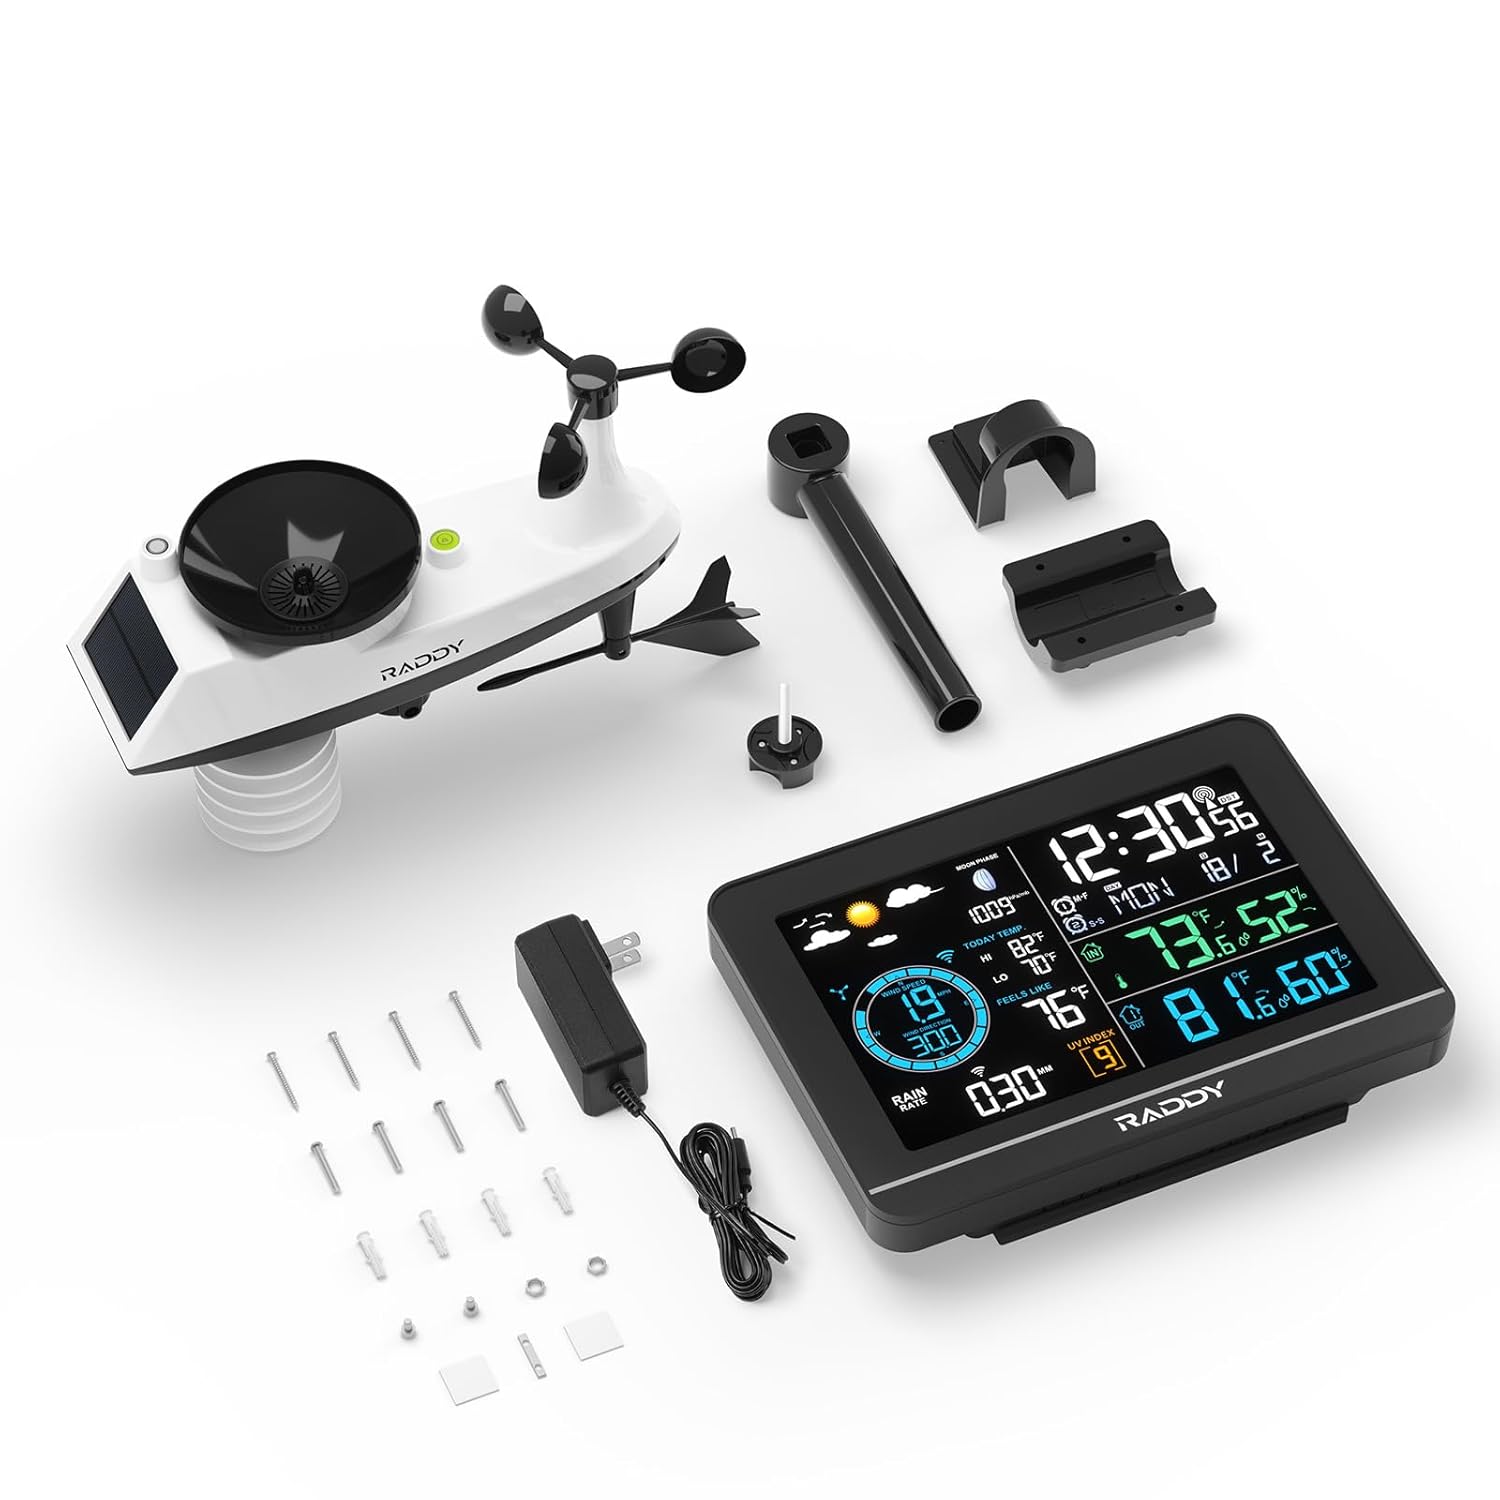
Figure 2.1: Contents of the Raddy UV-6 package.
3. Product Features
- Clear 6" VA Display: High-contrast screen with wide viewing angles, displaying various weather parameters.
- Precision Outdoor Sensor Suite: Integrated sensor for accurate measurement of wind speed/direction, rainfall, temperature, humidity, UV, and light.
- Wireless Data Transmission: Outdoor sensor wirelessly transmits data up to 300 feet (91 meters) to the display console.
- Atomic Clock with Dual Alarms: Automatically syncs time via RCC signal and includes dual alarms with snooze function.
- Multi-Area Monitoring: Supports monitoring of up to 5 areas (indoor console, outdoor sensor, and three optional R5 sensors sold separately).
- Adjustable Brightness & Auto Night Mode: 5 brightness levels and a programmable night mode for display dimming.
- Weather Forecast & Moon Phases: Provides a weather forecast based on barometric pressure changes and displays 12 types of moon phases.
- UV & Light Index Monitoring: Displays current UV index and light intensity.

Figure 3.1: Multi-functional display overview.

Figure 3.2: UV Index monitoring.

Figure 3.3: Multi-area monitoring capability.

Figure 3.4: Weather forecast modes and moon phases.

Figure 3.5: Dual alarm clocks.
4. Setup
4.1. Display Console Setup
- Connect the power adapter to the display console and plug it into a power outlet.
- Insert 3 x AAA batteries (not included) into the battery compartment for backup power.
- The console will power on and begin searching for the outdoor sensor and atomic clock signal.
4.2. Outdoor Sensor Suite Installation
Choose a location for the outdoor sensor that is open and unobstructed to ensure accurate readings for wind, rain, and sunlight. The sensor should be mounted securely.
- Assemble the wind cups and wind vane onto the sensor unit according to the instructions in the quick start guide.
- Insert 3 x AA batteries (not included) into the battery compartment of the outdoor sensor. Ensure the battery compartment is sealed tightly to prevent water ingress.
- Mount the outdoor sensor using the provided pole and hardware. Common mounting options include:
- On top of a pole (minimum diameter 2.4 cm)
- On the side of a pole
- On a flat surface (e.g., wooden post)
- Ensure the sensor is level for accurate rain gauge readings.
- Once powered, the outdoor sensor will automatically attempt to pair with the display console. Allow a few minutes for the connection to establish.

Figure 4.1: Outdoor sensor mounting options and details.
5. Operating Instructions
5.1. Display Console Overview
The 6-inch VA display provides a clear overview of all measured data. Key areas on the display include:
- Weather Forecast & Moon Phase
- Wind Direction & Speed
- Today's Max/Min Temperature & Feels Like Temperature
- Rainfall Data
- Light & UV Index
- Time & Date (Atomic Clock)
- Indoor Temperature & Humidity
- Outdoor Temperature & Humidity
5.2. Adjusting Display Brightness
The display offers 5 levels of brightness. Use the dedicated button on the console to cycle through the brightness levels. An auto night mode can be activated to automatically dim the display during specified hours (e.g., LV4 from 08:00-20:00, LV1 from 20:00-08:00).

Figure 5.1: Backlight and night mode settings.
5.3. Setting Alarms
The weather station features dual alarms. Refer to the detailed instructions in the full user manual for setting specific alarm times and functions.
5.4. Monitoring Multiple Areas
If you have purchased additional R5 sensors, you can monitor up to three extra locations. The display console allows you to manually switch between zones or activate an auto-cycle mode to view data from all connected sensors sequentially.
6. Maintenance
- Cleaning: Periodically clean the display console with a soft, dry cloth. For the outdoor sensor, gently clean the rain funnel, wind cups, and solar panel to ensure optimal performance. Avoid abrasive cleaners.
- Battery Replacement: Replace batteries in both the display console (AAA) and outdoor sensor (AA) when the low battery indicator appears on the display. For cold climates, consider using lithium batteries in the outdoor sensor for better performance.
- Sensor Placement: Regularly check the outdoor sensor's mounting to ensure it remains secure and unobstructed.
7. Troubleshooting
| Problem | Possible Cause | Solution |
|---|---|---|
| No outdoor data displayed | Outdoor sensor not paired or out of range; low batteries. | Ensure sensor batteries are fresh. Move sensor closer to console. Press the reset button on the outdoor sensor and re-pair. |
| Inaccurate temperature/humidity | Sensor exposed to direct sunlight/heat source; blocked ventilation. | Relocate sensor to a shaded, well-ventilated area. Ensure radiation shield is clear. |
| Wind speed/direction incorrect | Anemometer/wind vane obstructed or not spinning freely. | Check for debris (leaves, spiderwebs) on the wind cups and vane. Ensure they rotate freely. |
| Rainfall data inaccurate | Rain funnel blocked; sensor not level. | Clear any debris from the rain funnel. Ensure the outdoor sensor is mounted perfectly level. |
| Atomic clock not syncing | Interference; console too far from signal source. | Place console near a window, away from electronic devices that may cause interference. Allow up to 24 hours for initial sync. |
8. Specifications
| Feature | Detail |
|---|---|
| Model Number | UV6 |
| Display Type | 6-inch VA Display |
| Power Source (Console) | AC Adapter (included), 3 x AAA Batteries (backup, not included) |
| Power Source (Outdoor Sensor) | 3 x AA Batteries (not included), Solar Panel for long-term use |
| Wireless Transmission Range | Up to 300 feet (91 meters) in open air |
| Special Features | Adjustable Brightness, Dual Alarms, Large Display, Wireless Connectivity, Atomic Clock, UV Index, Light Index |
| Dimensions (Console) | Approx. 6.2" (W) x 4.5" (H) |
| Date First Available | April 28, 2025 |
9. Warranty and Support
Specific warranty details for the Raddy UV-6 Professional Weather Station are not provided in this manual. For warranty information, technical support, or service inquiries, please refer to the product packaging or contact Raddy customer service directly through their official website or the retailer where the product was purchased.