
Introduction
Thank you for choosing the VATOS Rechargeable Infrared Laser Tag Set with Projector. This set provides an immersive and interactive laser tag experience for kids, teens, and adults. It features advanced projection technology, multiple weapon modes, and real-time data synchronization for dynamic battles. Please read this manual carefully to ensure proper setup, operation, and maintenance of your laser tag set.

Image: Children engaging in both projector game and traditional laser tag battle.
Safety Information
WARNING: Toy inside, not suitable for children under 3 years old due to small parts which may present a choking hazard.
- This product uses Class 1 infrared technology (<0.9mW emission), which is eye-safe. Do not aim directly into eyes at close range.
- Ensure all components are handled carefully to prevent damage.
- Adult supervision is recommended during play, especially for younger children.
- Do not modify or disassemble the product components.
What's in the Box
Your VATOS Rechargeable Infrared Laser Tag Set includes the following components:
- 2 x Laser Tag Guns
- 2 x Vests (with digital LED score display)
- 1 x Projector
- 3 x Charging Cords (4-in-1 USB charging cable included)
- 1 x User Manual

Image: Detailed view of all components included in the package.
Setup Instructions
1. Projector Battery Installation
The projector requires 4 x AA batteries (not included).
- Locate the battery compartment on the bottom of the projector.
- Open the battery cover.
- Insert 4 AA batteries, ensuring correct polarity (+/-).
- Close the battery cover securely.
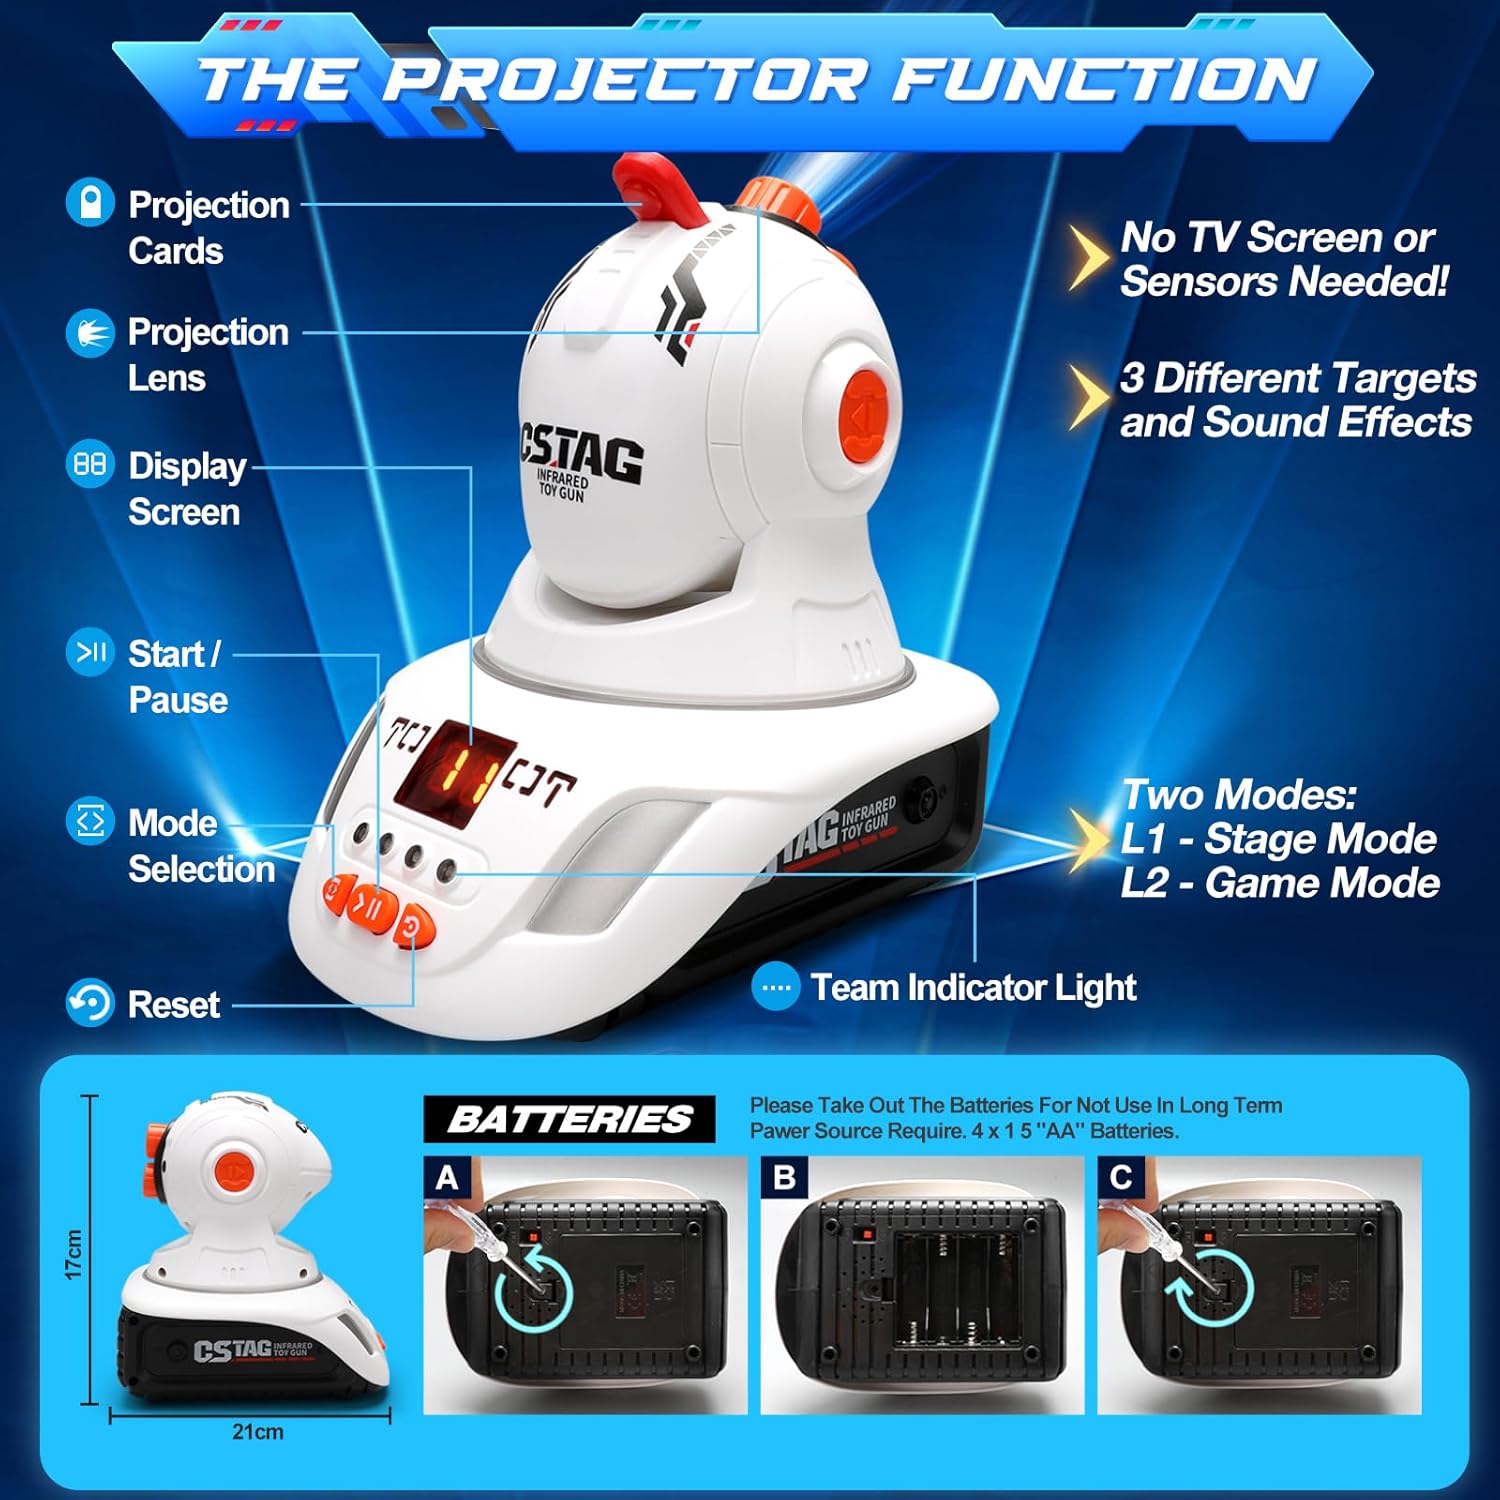
Image: Steps for installing AA batteries into the projector.
2. Charging Laser Tag Guns and Vests
The laser tag guns and vests are rechargeable. Use the provided 4-in-1 USB charging cable.
- Connect the charging cable to the charging ports on the laser tag guns and vests.
- Plug the USB end of the cable into a compatible USB power source (e.g., computer, USB wall adapter).
- The charging indicator light on the guns/vests will show charging status (refer to specific product lights for details).
- Charge until fully charged before first use.

Image: Laser guns and vests connected to the 4-in-1 USB charging cable.
Operating Instructions
1. Power On/Off
Locate the power switch on each laser tag gun and vest to turn them on or off.
2. Team Selection
Each gun and vest can be assigned to one of four team colors: blue, red, green, or white. Use the team selection button on the vest to choose your team. The team indicator light will display the selected color.
3. Weapon Modes
The laser tag guns feature four distinct weapon modes, each with unique bullet counts and sound effects:
- Single Shot: High damage, limited shots.
- Shotgun: Wide spread, moderate damage.
- Submachine Gun: Rapid fire, lower damage per shot.
- Machine Gun: Continuous fire, sustained damage.
Use the gun type switch button on the laser gun to cycle through these modes.

Image: Laser gun features and available weapon modes.
4. Health Points and Hits
Each player starts with 15 health points, displayed on the gun and vest. When hit, the vest will vibrate and make sounds, and health points will decrease. The game ends when a player's health reaches zero.

Image: Vest vibrating and making sounds when hit.
5. Projector Function
The projector offers an interactive target practice or game mode by projecting targets onto surfaces.
- Place the projector in a suitable location, aiming it at a wall or screen.
- Insert a projection card into the designated slot on the projector.
- Adjust the focal length using the lens to make the projected pattern clear.
- Select the desired projector game mode (L1 - Stage Mode, L2 - Game Mode) using the mode selection button.
- After the gun and vest are paired, press the two buttons on the gun simultaneously to enter projection mode.

Image: Step-by-step guide for setting up and using the projector.
The projector features 3 different targets with realistic sound simulations:
- Mallard (Quack sound)
- UFO (Intrusion alarm sound)
- Dinosaur (Roar sound)

Image: The three distinct game targets available with the projector.
6. Real-time Data Sync
The 2.4GHz real-time data synchronization ensures that hits and scores are accurately updated between guns and vests, providing a seamless gaming experience.

Image: Real-time data synchronization between gun and vest.
7. Official Product Videos
Video: An overview of the VATOS 2.4GHz laser tag game with projector, demonstrating its features and gameplay.
Video: A detailed demonstration of the VATOS Rechargeable Laser Tag with Projector, specifically for kids, showcasing its interactive elements.
Maintenance
- Cleaning: Wipe down the guns, vests, and projector with a soft, dry cloth. Do not use harsh chemicals or abrasive cleaners.
- Storage: Store the set in a cool, dry place away from direct sunlight when not in use. If storing for an extended period, remove AA batteries from the projector.
- Battery Care: Ensure rechargeable components are fully charged before storage to prolong battery life.
Troubleshooting
| Problem | Possible Cause | Solution |
|---|---|---|
| Projector not turning on | Dead or incorrectly inserted AA batteries. | Check battery polarity; replace with fresh AA batteries. |
| Laser guns/vests not turning on | Low battery or not charged. | Charge the units using the provided USB cable. |
| Guns/vests not syncing | Interference or out of range. | Ensure units are within range (up to 40 meters) and away from strong electronic interference. Try restarting both units. |
| Projected image is blurry | Focal length not adjusted. | Rotate the projection lens to adjust the focus until the image is clear. |
| No sound from units | Volume too low or mute activated. | Check volume settings or ensure mute function is not active. |
Specifications
- Model Number: BB6606A
- Brand: VATOS
- Material: Plastic
- Color: Blue, Red
- Item Weight: 220 Grams
- Item Dimensions (L x W x H): 8.66 x 1.57 x 5.71 inches
- Maximum Range: 40 Meters
- Number of Players: Up to 4 (with additional sets)
- Power Source: Rechargeable batteries (guns/vests), 4 x AA batteries (projector)
- Special Features: 2.4GHz Data Synchronization, Projector function, Rechargeable, Two ways to play
- Recommended Age: 6 years and up
Warranty and Support
This VATOS Laser Tag Set comes with a 360-day warranty from the date of purchase, covering manufacturing defects. Please retain your proof of purchase for warranty claims.
For technical support, troubleshooting assistance, or warranty inquiries, please contact VATOS customer service through the retailer's platform or visit the official VATOS website for contact information.
Online Resources: For additional tips, FAQs, and product updates, please visit the VATOS Brand Store on Amazon.

