Product Overview
The ATOMSTACK P1 5W Laser Engraver is a compact and portable engraving machine designed for precision work on various materials. It features a CoreXY structure and dual-motor drive for optimized performance, offering high-speed engraving and cutting capabilities. The bundle includes the ATOMSTACK R8 PRO Rotary Chuck, an accessory that extends the engraving possibilities to irregular, spherical, and cylindrical objects.
This manual provides essential information to help you set up, operate, and maintain your ATOMSTACK P1 Laser Engraver and R8 PRO Rotary Chuck safely and effectively.

Figure 1: The ATOMSTACK P1 5W Laser Engraver (left) and the R8 PRO Rotary Chuck (right, shown in two configurations for different object types). This image illustrates the main components of the product bundle.
Setup and Installation
The ATOMSTACK P1 Laser Engraver is designed for ease of use with a "Plug & Play" approach, requiring no complex installation. Its lightweight and compact design allows for portability.
1. Initial Setup
- Place the ATOMSTACK P1 on a stable, level surface.
- Ensure adequate ventilation around the machine.
- Connect the power adapter to the engraver and a suitable power outlet.
- Insert the USB key to unlock processing functions.
2. Software Installation and Connectivity
The ATOMSTACK P1 supports multiple software options for design and control:
- AtomStack Studio App: A free, beginner-friendly application available for Android, iOS, Windows, and macOS. This app includes a material library and automatic accessory recognition. Designs can be uploaded from your phone or PC.
- LightBurn and LaserGRBL: The engraver is compatible with LightBurn and LaserGRBL software (sold separately) for advanced users.
Connectivity is achieved via USB. The system features dual-software smart control with auto-activated roller mode via a recognition chip, ensuring seamless integration and zero manual setup for USB connectivity.

Figure 2: Overview of the AtomStack software and mobile application interface, demonstrating ease of use for beginners across various operating systems.
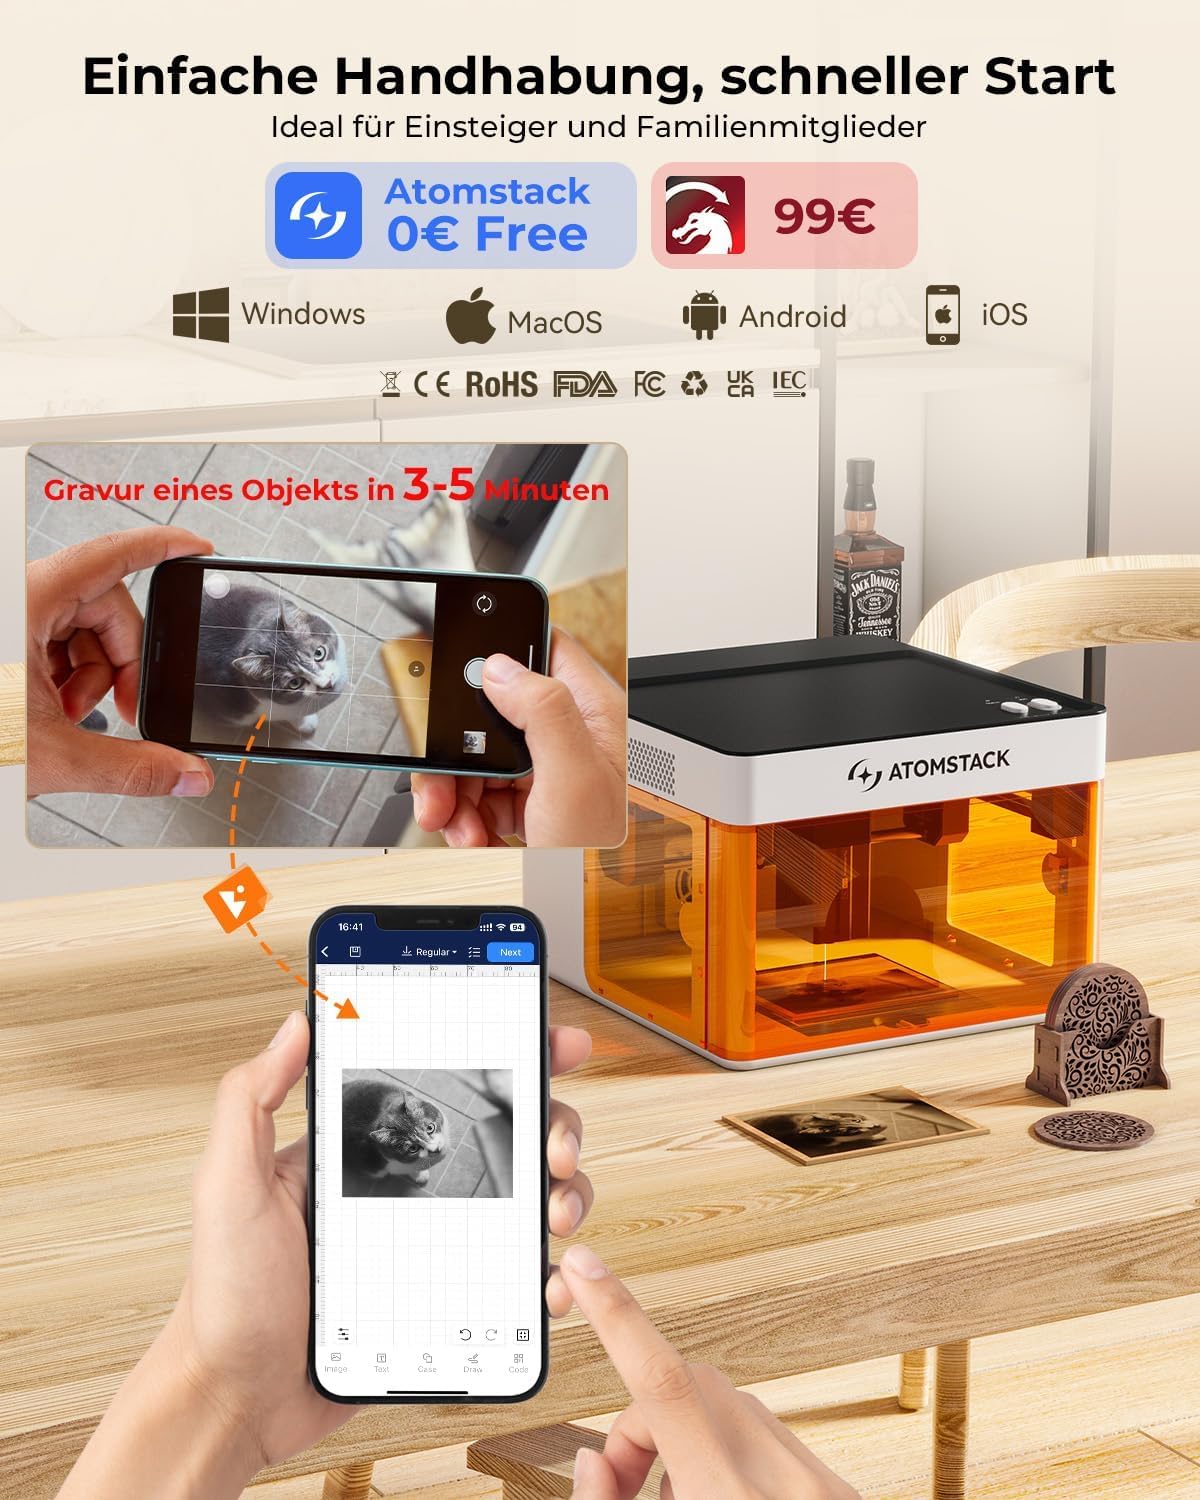
Figure 3: The ATOMSTACK P1 in use with the mobile application, highlighting its user-friendly interface and quick start capabilities.
3. Quick Focus Adjustment
The focus adjustment tool allows for quick and precise focusing, typically completing within 3 seconds. This improves engraving precision and protects your eyes.

Figure 4: Illustration of the ATOMSTACK P1's safety features, including USB safety interlock, secure enclosure detection, quick focus adjustment, and gyro-based tilt detection.
Operating Instructions
The ATOMSTACK P1 Laser Engraver and R8 PRO Rotary Chuck offer versatile capabilities for engraving and cutting a wide range of materials.
1. Engraving and Cutting with ATOMSTACK P1
- Working Area: The standard engraving area is 110x110mm (4.33x4.33 inches) with a maximum processing height of 50mm.
- Precision: Achieve 0.06mm ultra-fine engraving with 0.1mm positioning accuracy, suitable for intricate details like QR codes, photos, and text.
- Speed: The engraver operates at a high speed of 10,000mm/min. It can cut 3mm basswood in a single pass or engrave a phone case in under 5 minutes.
- Material Compatibility: The 5W Diode Laser (455±5nm) is suitable for wood, bamboo, paper, leather, cardboard, cork, rock, felt, fabric, MDF, coated metals, and some dark opaque acrylic. The 1.2W IR Laser (1064±1nm) is ideal for stainless steel, aluminum, brass, iron, gold, silver, platinum, titanium, and black acrylic.

Figure 5: Examples of materials compatible with the ATOMSTACK P1's 1.2W IR Laser and 5W Diode Laser, demonstrating its versatility across over 300 material types.

Figure 6: Detailed view of the ATOMSTACK P1's CoreXY mechanism, highlighting its structural stability, 0.1mm motion accuracy, 10000mm/min maximum working speed, and precise laser spot size (0.08x0.06mm for 5W Diode Laser, 0.03x0.03mm for 1.2W IR Laser).

Figure 7: Demonstration of the ATOMSTACK P1's laser cutting capability, showing its ability to cut 3mm basswood plywood in a single pass.
2. Using the R8 PRO Rotary Chuck
The R8 PRO Rotary Chuck is designed to overcome the limitations of flat engraving, allowing you to engrave on spherical, cylindrical, and irregular objects.
- Capacity: The rotary chuck has an extended length capacity of up to 1 meter (3.28 feet).
- Adjustments: It features dual-size adjustment and 180° horizontal / 30° vertical rotation for precise positioning of various object shapes.
- Fixtures: Equipped with three sets of fixtures to adapt to multiple special-shaped materials.

Figure 8: The R8 PRO Rotary Chuck set up for engraving on regular cylindrical objects such as tumblers and cans.

Figure 9: The R8 PRO Rotary Chuck configured for engraving on irregular cylindrical objects like bottles and wine glasses.

Figure 10: The R8 PRO Rotary Chuck demonstrating its adaptability with three sets of fixtures for engraving on special-shaped materials, including spherical objects.
Safety Features
The ATOMSTACK P1 is designed with several safety features to ensure user protection during operation:
- Class 1 Laser Certification: The engraver meets Class 1 laser safety standards.
- Fully Enclosed Design: A 720° fully enclosed structure with a visual window contains the laser and engraving process, enhancing safety and user comfort.
- USB Safety Interlock: Requires the insertion of a USB key to unlock processing and related functions, preventing accidental operation.
- Secure Enclosure Detection: Automatically stops operation if the enclosure door is not properly closed.
- Gyro-Based Tilt Detection: A built-in gyroscope stops operation if excessive tilting is detected, ensuring safety.

Figure 11: The ATOMSTACK P1's FDA/Class 1 laser safety features, including its fully enclosed design with a visual window. It also shows the optional D3 Air Purifier for a cleaner working environment.
Maintenance
Regular maintenance ensures the longevity and optimal performance of your ATOMSTACK P1 Laser Engraver and R8 PRO Rotary Chuck. While specific detailed maintenance steps are not provided in the product information, general best practices for laser engravers include:
- Keep the engraving area clean from debris and dust.
- Periodically inspect the laser lens for cleanliness and clear any residue.
- Ensure all moving parts of the CoreXY mechanism and the rotary chuck are free from obstructions.
- Store the machine in a dry, dust-free environment when not in use.
- If using the optional D3 Air Purifier, ensure its filter is maintained or replaced as per its own instructions to effectively manage smoke and odors.

Figure 12: The ATOMSTACK D3 Air Purifier, an optional accessory, featuring a composite activated carbon filter designed to absorb exhaust odors and prevent secondary pollution during laser engraving and cutting.
Troubleshooting
If you encounter issues with your ATOMSTACK P1 Laser Engraver or R8 PRO Rotary Chuck, consider the following general troubleshooting steps:
- Machine Not Powering On:
- Check power connections to the engraver and the outlet.
- Ensure the power adapter is functioning correctly.
- Engraving Not Starting/Stopping Unexpectedly:
- Verify the USB safety interlock key is fully inserted.
- Ensure the enclosure door is securely closed, as the secure enclosure detection will halt operation if open.
- Check for excessive tilting; the gyro-based tilt detection will stop the machine if it's not level.
- Confirm software settings and design file are correctly loaded and configured.
- Poor Engraving Quality:
- Perform a quick focus adjustment to ensure the laser is properly focused on the material surface.
- Check material compatibility and adjust laser power/speed settings according to the material library in the AtomStack software or recommended settings for LightBurn/LaserGRBL.
- Ensure the material is flat and securely placed on the engraving platform or in the rotary chuck.
- Rotary Chuck Not Functioning:
- Ensure the rotary chuck is properly connected and recognized by the software (auto-activated roller mode).
- Verify the object is securely mounted and balanced in the chuck.
For further assistance, if you still encounter any problems, please refer to the accompanying manual or contact the ATOMSTACK team directly through the Amazon platform for a solution.
Specifications
| Feature | Specification |
|---|---|
| Product Model | ATOMSTACK P1 Laser Engraver, R8 PRO Rotary Chuck |
| Engraver Dimensions (P1) | 265 x 303 x 185 mm (10.43 x 11.93 x 7.28 inches) |
| Engraver Weight (P1) | 3 kg (6.7 lbs) |
| Engraving Area (P1) | 110 x 110 mm (4.33 x 4.33 inches) |
| Max Processing Height (P1) | 50 mm |
| Laser Power (P1) | 5W Diode Laser (455±5nm) |
| Optional Laser (P1) | 1.2W IR Laser (1064±1nm) - Accessories need to be purchased separately |
| Laser Spot Size (5W Diode) | 0.08 x 0.06 mm |
| Laser Spot Size (1.2W IR) | 0.03 x 0.03 mm |
| Motion Accuracy | 0.1 mm |
| Max Working Speed | 10,000 mm/min |
| Rotary Chuck Capacity (R8 PRO) | Up to 1 meter (3.28 feet) |
| Rotary Chuck Adjustments (R8 PRO) | Dual-size adjustment, 180° horizontal / 30° vertical rotation |
| Software Compatibility | AtomStack Studio App (Android, iOS, Windows, macOS), LightBurn, LaserGRBL |
| Safety Certifications | Class 1 Laser, FDA, CE, RoHS, FCC, UKCA, IEC |

Figure 13: Diagram illustrating the engraving area and overall dimensions of the ATOMSTACK P1, along with its compatibility with the Rotary Chuck R8 and Rotary Roller R6 (accessories sold separately).
Warranty and Support
ATOMSTACK is committed to providing excellent customer service and support for its products.
- Warranty: The ATOMSTACK P1 Laser Engraver and R8 PRO Rotary Chuck come with a 365-day warranty.
- Customer Service: 24/7 service and professional technical support teams are available to answer any questions you may have.
- Contact: If you encounter any issues or have questions regarding the use of your machine, please contact the ATOMSTACK team directly through the Amazon platform for assistance.


