1. Introduction
This manual provides essential instructions for the safe and efficient operation, setup, maintenance, and troubleshooting of your LOTOS LTP8050 CNC 80AMP Plasma Cutter. Please read this manual thoroughly before operating the equipment and retain it for future reference.
2. Safety Information
Plasma cutting involves high voltage, high temperatures, and intense light. Always follow safety precautions to prevent injury or damage to equipment.
- Wear appropriate personal protective equipment (PPE), including welding helmet with proper shade, flame-resistant clothing, gloves, and safety shoes.
- Ensure adequate ventilation to remove fumes and gases.
- Do not operate in damp or wet conditions.
- Keep children and unauthorized personnel away from the work area.
- Disconnect power before performing any maintenance or changing consumables.
- Ensure proper grounding of the equipment.
- Use clean, dry compressed air as specified.
3. Package Contents
Verify that all items are present in your package:
- Plasma Cutter Power Supply
- Blow Back 18ft Plasma Cutting Torch
- Ground Cable
- Consumables (starter set)
- 2 Pin & 5 Pin CNC Connectors
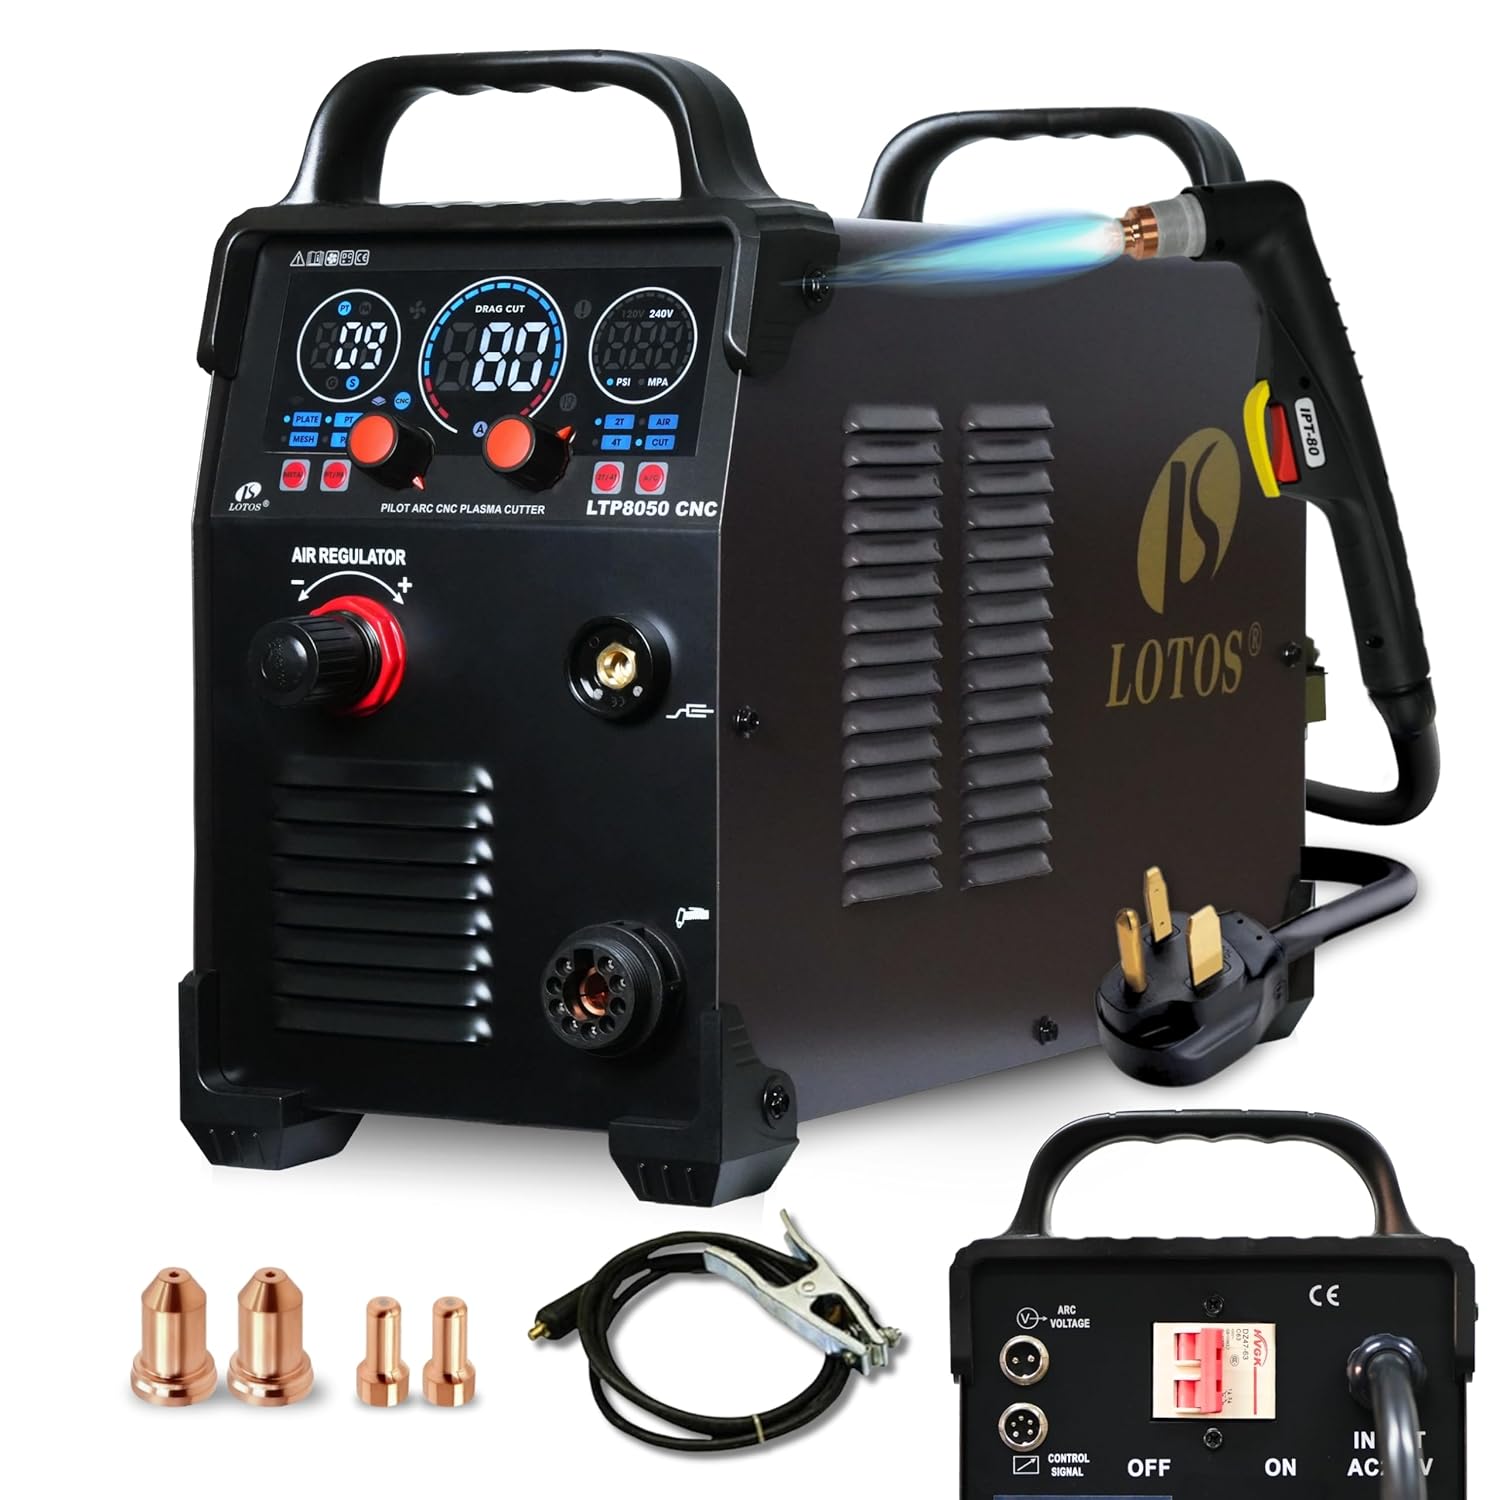
Image: The LOTOS LTP8050 CNC Plasma Cutter unit with its plasma torch, ground clamp, power cord, and a set of consumables (nozzles and electrodes) laid out in front.
4. Setup
4.1 Power and Air Connection
- Connect the plasma cutter to a single-phase 215–245V power supply. A 50A breaker is recommended.
- Connect a clean, dry air supply to the pre-installed NPT 1/4" Type-D plug and air filter-regulator. Ensure the air supply provides at least 80 PSI at 4.5 SCFM.
- Verify the air pressure on the unit's display.
4.2 Torch and Ground Cable Connection
- Connect the 14-ft plasma torch to the central connector on the front panel of the unit.
- Attach the ground cable to the appropriate terminal on the front panel.
- Securely attach the ground clamp to the workpiece, ensuring good electrical contact.
4.3 CNC Interface Connection (Optional)
The LTP8050CNC is equipped with a pre-installed CNC port for Torch Height Control (THC) and ARC OK signals. This non-HF blowback start design reduces electromagnetic interference (EMI) for CNC electronics.
- Connect your CNC plasma table interface to the dedicated CNC port on the rear of the unit using the provided 2-pin and 5-pin connectors.
- Refer to your CNC table's manual for specific wiring instructions for THC and ARC OK signals.

Image: A detailed view of the rear panel of the plasma cutter, highlighting the ARC VOLTAGE OUTPUT (2-pin) and SIGNAL CONTROL (5-pin) ports for CNC integration.
5. Operating Instructions
5.1 Power On and Initial Settings
- Turn on the main power switch located on the rear of the unit.
- The large LED display will illuminate, showing current settings.
- Adjust the amperage (20-80A DC) using the control knob on the front panel according to the material thickness and type.
- Adjust Pilot-Arc Time (6–15 seconds) and Post-Flow (2–10 seconds) as needed for your application. An input-pressure reminder assists in maintaining consistent kerfs and extending torch life.

Image: The front panel of the plasma cutter, featuring a large LED display for monitoring amperage, pilot arc time, post-flow, and air pressure, along with control buttons and an air regulator knob.
5.2 Cutting Techniques
The LTP8050CNC supports both stand-off and drag cutting methods.
- Stand-off Cutting: Maintain a consistent gap (typically 1-2mm) between the torch tip and the workpiece. This method requires a steady hand and can result in rougher edges if the gap is not consistent.
- Drag Cutting: The torch tip rests directly on the workpiece. This method is easier for beginners, provides better stability, results in fewer burrs, cleaner cut lines, and is ideal for template tracing or freehand cutting. Drag consumables are sold separately.

Image: A visual comparison illustrating stand-off cutting, where a small gap is maintained between the torch and workpiece, and drag cutting, where the torch tip directly contacts the workpiece for smoother cuts.
5.3 Material Compatibility and Cutting Capacity
The unit cuts stainless steel, mild/alloy steel, aluminum, and copper with reduced slag and minimal post-processing.
- Clean Cut: Up to 1 inch (25mm)
- Severance Cut: Up to 1.5 inches

Image: Examples of plasma cutting on different metal surfaces, including clean, painted, and rusty metal, demonstrating the cutter's versatility.

Image: The plasma cutter in operation, showing the torch cutting through metal, with text indicating 15-80A DC output, 1" ideal clean cut, and 1 1/2" max severance cut.
6. Maintenance
6.1 Consumables
Regularly inspect and replace torch consumables (nozzles, electrodes, shield cups) as they wear out. Worn consumables can negatively affect cut quality and torch performance. Refer to the consumables section of the full manual for replacement procedures.
6.2 Air System
Ensure your compressed air supply is clean and dry. Periodically drain any moisture from the air filter-regulator and the compressor tank. Moisture in the air line can cause poor cut quality and damage to the torch.
7. Troubleshooting
This section covers common issues. For detailed troubleshooting, consult the complete product manual.
| Problem | Possible Cause | Solution |
|---|---|---|
| No arc initiation | Poor ground connection, worn consumables, insufficient air pressure, incorrect amperage setting. | Check ground clamp, replace consumables, verify air pressure, adjust amperage. |
| Poor cut quality | Worn consumables, incorrect cutting speed, improper air pressure, moisture in air line. | Replace consumables, adjust cutting speed, check air pressure and dryness. |
| Unit powers on but no output | Internal fault, safety lockout. | Turn off and restart. If problem persists, contact customer support. |
8. Specifications
| Feature | Detail |
|---|---|
| Model Number | LTP8050CNC |
| Input Power | Single-phase 215–245V |
| Recommended Breaker | 50A at 220V |
| Output Current | 20–80A DC |
| Clean Cut Capacity | Up to 1" (25mm) |
| Severance Cut Capacity | Up to 1.5" |
| Air Requirement | ≥80 PSI @ 4.5 SCFM (clean, dry air) |
| Torch Type | Blow Back Plasma Cutting Torch (18ft) |
| CNC Interface | Pre-installed CNC port (THC & ARC OK output) |
| Pilot Arc Time Adjustment | 6–15 seconds |
| Post-Flow Adjustment | 2–10 seconds |
| Dimensions (Package) | 24 x 15 x 12.6 inches |
| Weight (Package) | 39 Pounds |
9. Warranty and Support
LOTOS Technology provides comprehensive support for its products.
- Warranty: 3-year hardware coverage.
- Returns: 30-day money-back guarantee.
- Replacement: 1-year new replacement policy.
- Technical Support: Lifetime technical support is available.
For assistance, please contact LOTOS Technology customer service. Contact information can typically be found on the official LOTOS website or in the full product manual.

Image: A customer service representative smiling, symbolizing the availability of US-based technical support.


