1. Introduction
Thank you for choosing the DRTONK Electric Pasta Maker Machine. This appliance is designed to simplify the process of making fresh, homemade pasta and dumpling skins. With its automatic functions and variety of molds, you can enjoy delicious, additive-free pasta quickly and easily. Please read this manual thoroughly before operating the machine to ensure safe and efficient use.

Image 1.1: The DRTONK Electric Pasta Maker Machine in operation, extruding fresh pasta.
2. Important Safety Instructions
When using electrical appliances, basic safety precautions should always be followed to reduce the risk of fire, electric shock, and/or injury to persons.
- Read all instructions carefully before use.
- Do not immerse the motor unit in water or other liquids.
- Ensure the machine is unplugged before cleaning or assembling/disassembling parts.
- Keep hands and utensils away from moving parts during operation to prevent injury.
- The machine is equipped with a safety mechanism: it will not start until the cover is properly closed. Do not attempt to bypass this safety feature.
- Multiple cooling holes at the bottom are designed for heat dissipation. Ensure these are not blocked during operation.
- This appliance is for household use only.
- Do not operate the appliance with a damaged cord or plug, or after the appliance malfunctions or has been damaged in any manner.
- Close supervision is necessary when any appliance is used by or near children.
3. Package Contents
Please check the package contents upon unpacking. If any items are missing or damaged, contact customer support.
- 1 x DRTONK Electric Pasta Maker Machine
- 13 x Pasta Molds (one preinstalled)
- 1 x Power Cord
- 1 x Cleaning Scraper
- 1 x Dumpling Wrapper Tool
4. Product Overview
Familiarize yourself with the components of your DRTONK Electric Pasta Maker Machine.

Image 4.1: Overview of the pasta maker, highlighting its compact design and dimensions (33cm x 19cm x 26cm).
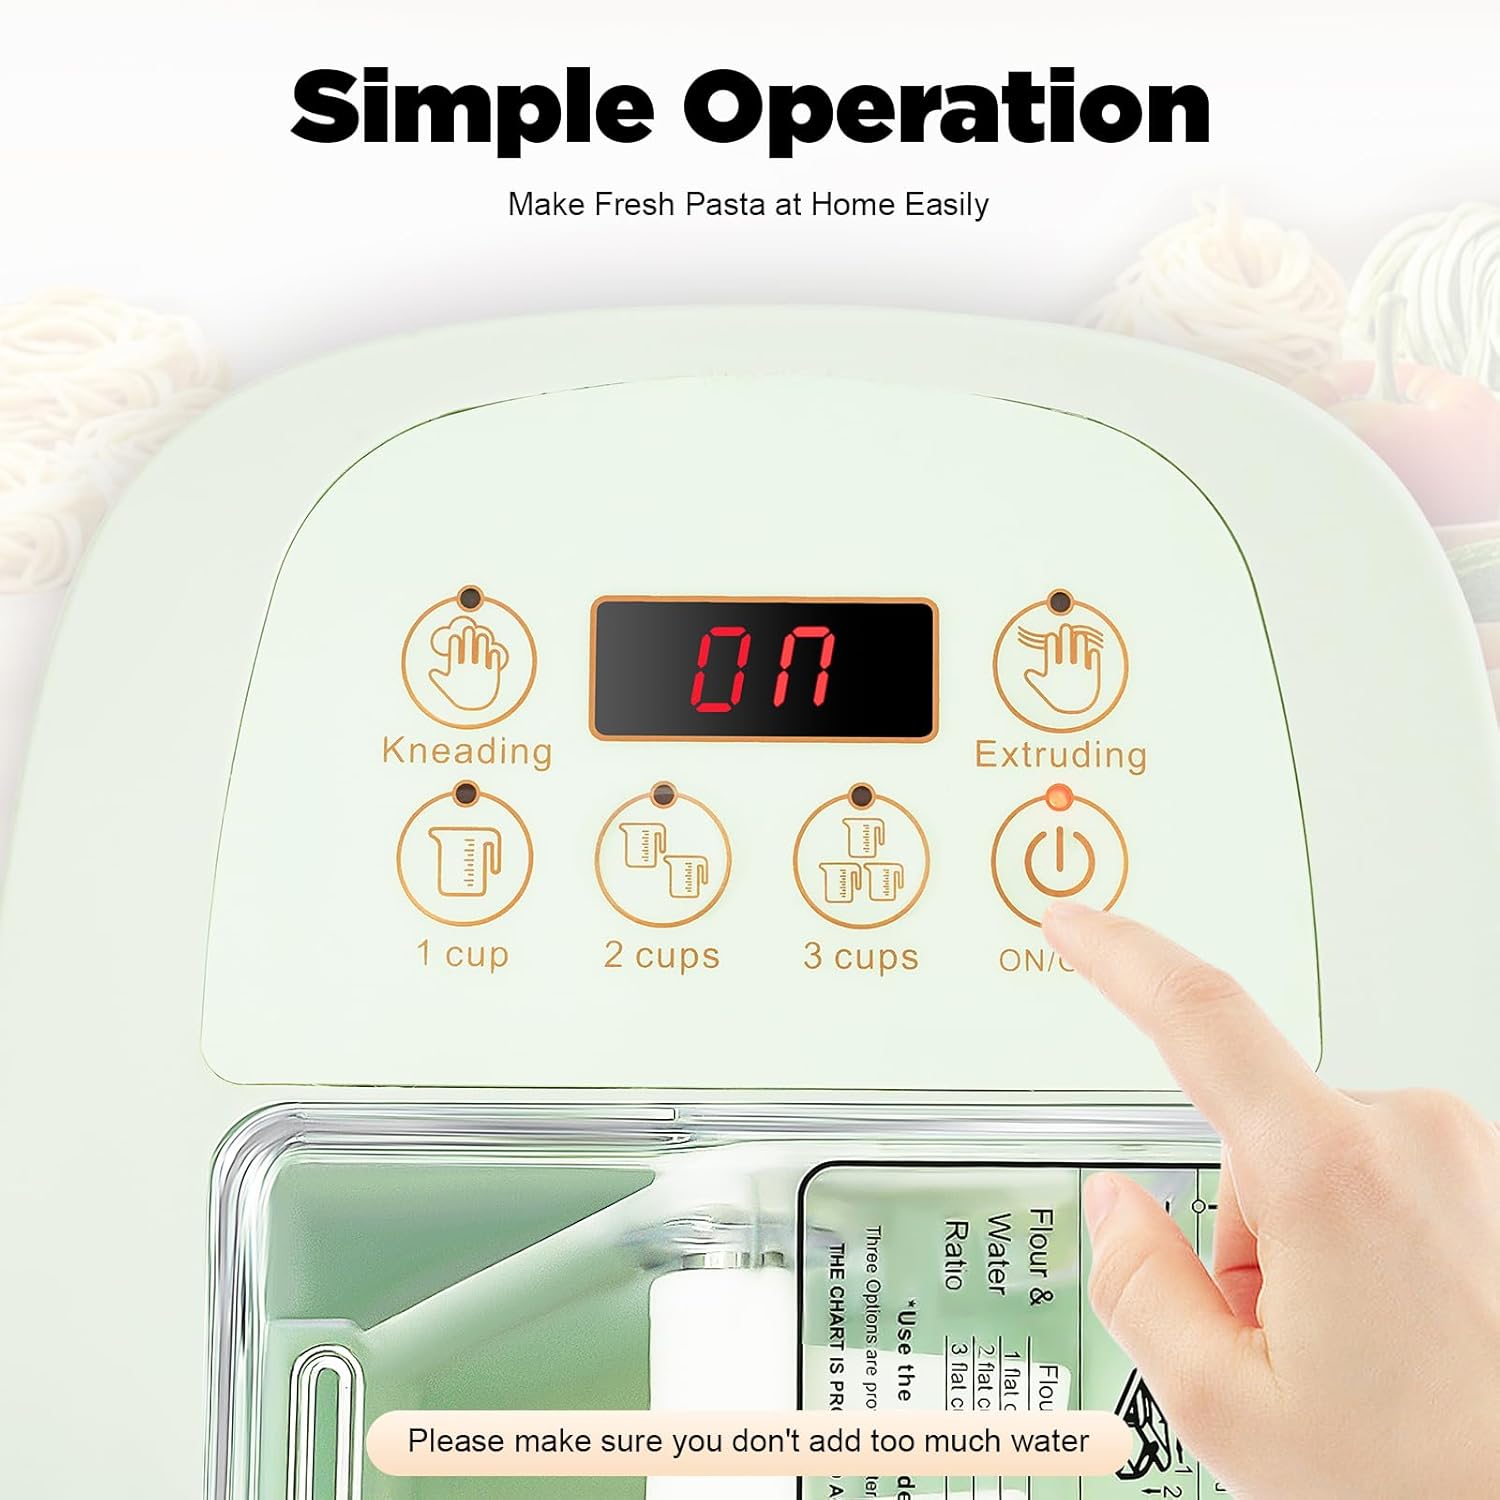
Image 4.2: The control panel with LED display, Kneading and Extruding buttons, and cup measurements.

Image 4.3: Detailed view of features including slip prevention feet, the humanized water filling spout, and the practical cleaning scraper.
5. Setup
- Unpack: Carefully remove all components from the packaging.
- Placement: Place the pasta maker on a stable, flat, and dry tabletop surface. Ensure there is enough space around the machine for operation and ventilation.
- Initial Cleaning: Before first use, wash all removable parts (mixing chamber, molds, covers) with warm soapy water, rinse thoroughly, and dry completely. The main motor unit should be wiped with a damp cloth.
- Assemble Mixing Chamber: Ensure the mixing chamber and extrusion head are correctly assembled and secured.
- Attach Mold: Select your desired pasta mold and attach it securely to the extrusion head. One mold is preinstalled.
- Connect Power: Plug the power cord into the machine and then into a standard 110V electrical outlet.
6. Operating Instructions
Follow these steps to make fresh pasta with your DRTONK Electric Pasta Maker.
6.1. Preparing Ingredients
- Flour: Use all-purpose flour or specialty pasta flour.
- Liquid: Typically water, but eggs or vegetable juice can also be used. Refer to the recipe chart (often found on the machine or in an accompanying recipe book) for precise flour-to-liquid ratios.
- Measurements: The control panel includes indicators for 1, 2, or 3 cups of flour, helping with liquid measurement.
6.2. Pasta Making Process
- Add Flour: Open the lid of the mixing chamber and add the measured flour. Close the lid securely. The machine will not operate if the lid is not properly closed.
- Select Program: Press the "Kneading" button to start the mixing process.
- Add Liquid: Slowly pour the measured liquid through the water filling spout on the lid while the machine is kneading. The humanized spout ensures even injection of liquid.
- Kneading: The machine will knead the dough automatically. This process typically takes several minutes.
- Extruding: Once kneading is complete, the machine will automatically switch to the "Extruding" phase, or you can press the "Extruding" button. Fresh pasta will begin to emerge vertically from the chosen mold. This process is efficient, with noodles dispensing in approximately 3 minutes.
- Cut Pasta: As the pasta extrudes to your desired length, use the included cleaning scraper or a knife to cut the noodles.
- Repeat: If making multiple batches, ensure the machine is clean between uses, especially the extrusion head and mold.
The entire production process, from adding ingredients to finished pasta, typically takes between 10 to 18 minutes.

Image 6.1: The 13 included pasta molds and examples of the pasta shapes they produce, including wide noodles, spaghetti, macaroni, and dumpling skins.
7. Maintenance and Cleaning
Regular cleaning ensures the longevity and hygienic operation of your pasta maker.
- Unplug: Always unplug the machine from the power outlet before cleaning.
- Disassemble: Carefully disassemble all removable parts: the mixing chamber, extrusion head, and pasta mold.
- Clean Removable Parts: These parts are dishwasher safe. Alternatively, wash them by hand with warm water and mild dish soap. Use the included cleaning scraper to remove any dough residue from the molds and extrusion blade. Ensure all dough is removed from the small holes of the molds.
- Clean Main Unit: Wipe the main motor unit with a soft, damp cloth. Do not immerse the main unit in water or rinse it under running water.
- Dry: Ensure all parts are completely dry before reassembling or storing the machine.
- Storage: Store the pasta maker in a clean, dry place.
8. Troubleshooting
If you encounter issues with your pasta maker, refer to the following common problems and solutions.
| Problem | Possible Cause | Solution |
|---|---|---|
| Machine does not start. |
|
|
| Dough is too sticky or too dry. |
|
|
| Pasta does not extrude or extrudes slowly. |
|
|
| Machine makes unusual noise. |
|
|
9. Specifications
| Feature | Detail |
|---|---|
| Brand | DRTONK |
| Model Number | pasta maker electric-1 |
| Color | Green |
| Material | ABS, PC, POM |
| Blade Material | POM |
| Voltage | 110V |
| Rated Power | 260W |
| Noise Level | 65dB |
| Product Dimensions (L x W x H) | 33cm x 19cm x 26cm (12.99in x 7.48in x 10.23in) |
| Power Cord Length | 90cm (35.43in) |
| Number of Molds | 13 |
| Pasta Extrusion Time | Approximately 3 minutes |
| Total Production Time | Approximately 10-18 minutes |
| Control Mode | Buttons |
| Display Type | LED |
| Operation Mode | Automatic |
| Dishwasher Safe | Removable parts only |

Image 9.1: Side view of the pasta maker showing its overall dimensions.
10. Warranty and Support
For warranty information or technical support, please refer to the warranty card included with your product or contact DRTONK customer service.
Please have your model number (pasta maker electric-1) and purchase date available when contacting support.


