1. Introduction
This manual provides essential instructions for the safe and effective operation, setup, and maintenance of your GLITTER 811H Industry Spot Welder and Milliohm Resistance Meter. This device is designed for precision battery pack assembly and testing, offering both high-power spot welding and accurate resistance measurement capabilities.
The GLITTER 811H is engineered for industrial applications, capable of welding various materials including copper, aluminum-nickel, stainless steel, iron, nickel, titanium, molybdenum, and zinc. It features a robust design with a heat-insulated handle, non-slip silicone cover, and 18K gold-plated connectors for optimal performance.

Image 1.1: The GLITTER 811H Industry Spot Welder and Milliohm Resistance Meter, showcasing its main unit, welding pens, and foot pedal.
2. Safety Information
WARNING: Improper use of this equipment can result in serious injury or death. Always follow safety guidelines.
- Always wear appropriate personal protective equipment (PPE), including safety glasses, welding gloves, and protective clothing.
- Ensure the work area is well-ventilated and free from flammable materials.
- Do not operate the welder in wet or damp conditions.
- Disconnect power before performing any maintenance or changing accessories.
- Keep children and unauthorized personnel away from the operating area.
- Never touch the welding electrodes or workpiece immediately after welding, as they will be extremely hot.
- Ensure proper grounding of the equipment.
3. Package Contents
Verify that all items listed below are present in your package:
- 1 x 811H Spot Welder Unit
- 1 x 75B Welding Pen (50mm² copper wire)
- 4 x Welding Pins for 75B
- 2 x Milliohm Meter Test Leads
- 1 x Power Cord
- 1 x Foot Pedal Switch
- 1 x Copper Strip Sample
- 10 x Pure Nickel Strip Sample
- 10 x Nickel-aluminum Composite Strip Sample
- 1 x User Manual (this document)

Image 3.1: Visual representation of all components included in the GLITTER 811H package.
4. Specifications
| Feature | Specification |
|---|---|
| Model Number | 811H |
| Manufacturer | Glitter |
| Item Weight | 19.32 pounds |
| Product Dimensions | 2.6 x 7.1 x 5 inches |
| Color | Silver and Red |
| Material | Aluminium alloy |
| Power Source | AC |
| Voltage | 6 Volts |
| Wattage (Pulse Output Power) | 42000 Watts |
| Output Current | 7000 Amps |
| Welding Energy | 840 Joules |
| Resistance Measurement Range | 0-200 mΩ |
| Internal Resistance | Less than 0.3 mΩ |
| Welding Pen Cable Cross-section | 50mm² |
5. Setup
- Unpacking and Inspection: Carefully remove all components from the packaging. Inspect for any signs of damage during transit. Report any damage to the supplier immediately.
- Placement: Place the 811H main unit on a stable, level, and non-flammable surface. Ensure adequate clearance around the unit for ventilation.
- Connect Welding Pen: Insert the connectors of the 75B Welding Pen into the designated ports on the front panel of the 811H unit. Ensure a secure connection.
- Connect Foot Pedal: Plug the foot pedal switch into its dedicated port on the front panel.
- Connect Power: Connect the power cord to the 811H unit and then plug it into a suitable AC power outlet. Ensure the power outlet meets the voltage requirements specified in the specifications.
- Initial Power On: Press the power button on the unit. The display should illuminate, indicating the unit is ready for operation.
6. Operating Instructions
6.1. Milliohm Resistance Measurement
The 811H includes a built-in milliohm resistance meter for checking the stability of welds or measuring the internal resistance between a metal strip and a battery electrode. The measurement range is 0-200 mΩ.
- Connect the Milliohm Meter Test Leads to the designated ports on the front panel.
- Ensure the unit is powered on.
- Place the probes of the test leads firmly on the points where resistance needs to be measured (e.g., between a nickel strip and a battery terminal).
- The resistance value will be displayed on the dedicated resistance value display.
Note: This function measures the resistance of the connection or material, not the internal resistance of the battery itself.
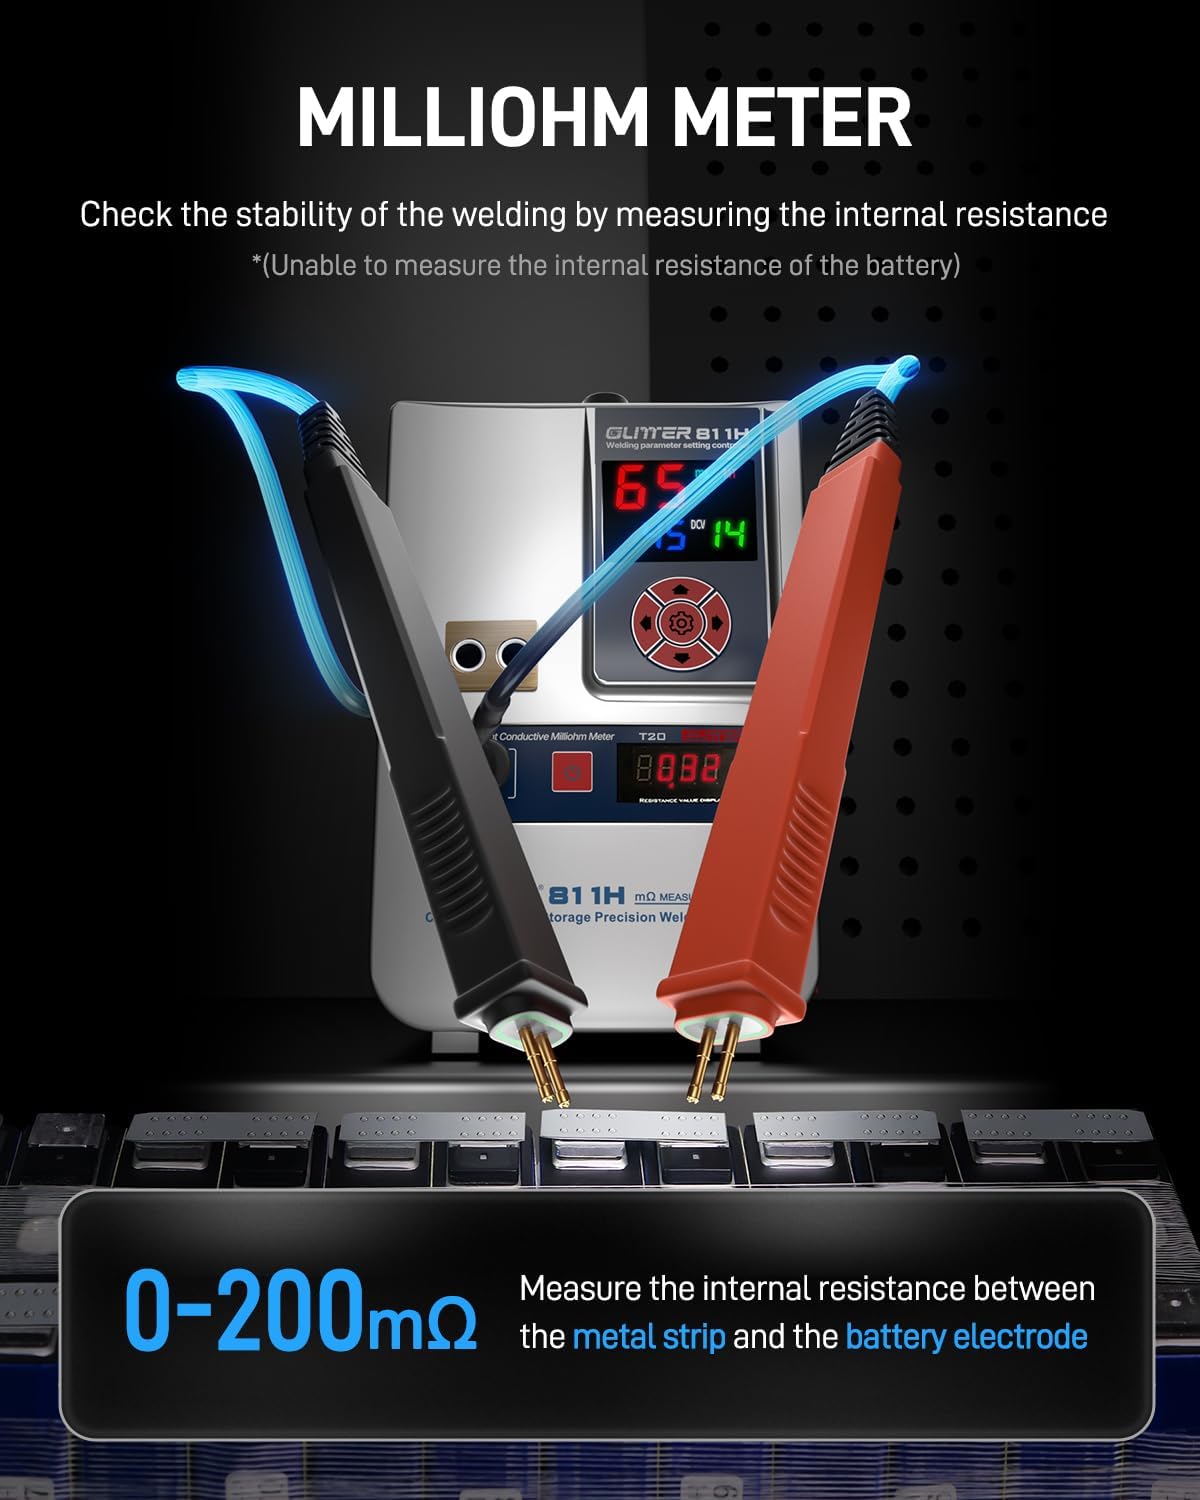
Image 6.1: Demonstrating the use of the milliohm meter function to measure resistance between a metal strip and a battery electrode.
6.2. Spot Welding Operation
The 811H provides powerful and precise spot welding for various battery assembly tasks.

Image 6.2: Overview of the GLITTER 811H's welding capabilities, highlighting 42000W pulse power and 7000A output current.
- Material Preparation: Ensure the surfaces to be welded are clean and free from oxidation, dirt, or grease.
- Select Welding Electrodes: Choose appropriate welding pins for the 75B Welding Pen based on the material and thickness. The 811H supports welding of various materials including stainless steel, iron, nickel, titanium, molybdenum, copper, aluminum, and zinc.
- Adjust Welding Parameters: Use the control panel to adjust the welding energy (99 gears available). Start with lower settings and gradually increase until the desired weld strength is achieved. The display shows real-time output current and energy settings.
- Positioning: Hold the welding pen firmly. Position the welding pins perpendicular to the workpiece, ensuring both pins make simultaneous contact. The elastic pressure balance technology ensures consistent pressure for reliable welds.
- Execute Weld: Depending on the selected triggering mode, either press the foot pedal (MT mode) or allow the automatic trigger (AT mode) to initiate the weld.
Welding Thickness Guidelines:

Image 6.3: Display showing real-time output current, 99 energy gears, and 0-200mΩ milliohm meter for precise welding control.
| Electrode Type | Material | Max Thickness |
|---|---|---|
| Copper Electrode | Pure Nickel Strip | 0.25mm |
| Nickel Plated Copper Strip | 0.25mm | |
| Pure Copper Strip (with flux) | 0.4mm | |
| Aluminum Electrode | Nickel-aluminum Composite Strip | 0.4mm |
| Pure Nickel Strip | 0.3mm | |
| Pure Copper Strip | 0.2mm | |
| Nickel Plated Copper Strip | 0.15mm |

Image 6.4: Examples of welding various strip materials and thicknesses for prismatic battery packs using copper and aluminum electrodes.
6.3. Triggering Modes
The 811H offers two triggering modes for welding:
- AT (Automatic Trigger) Mode: Ideal for fast and precise batch spot welding. The weld is initiated automatically once the welding pins make proper contact with the workpiece.
- MT (Manual Trigger) Mode: Utilizes the foot pedal for manual control. This mode provides more time for beginners to position the welding pins accurately before initiating the weld.

Image 6.5: Illustration of the two triggering modes: AT (Automatic) for rapid welding and MT (Manual) using the foot pedal.
6.4. Consistent Welding Features
The 811H incorporates advanced features to ensure consistent and reliable welds:
- Dual Pulse Technology: Helps remove the oxide layer on the material surface, leading to more reliable and stronger welds.
- Ultra-Low Internal Resistance: The welding pen features 50mm² copper wire and ultra-low internal resistance (less than 0.3mΩ), ensuring maximum current transmission and minimal energy loss.
- Elastic Pressure Balance Technology: This patented technology in the welding pen ensures consistent and balanced needle pressure during operation, resulting in uniform weld spots.

Image 6.6: Diagram illustrating the dual pulse, ultra-low internal resistance, and elastic pressure balance technology for consistent welding results.
7. Maintenance
- Electrode Maintenance: Regularly inspect the welding pins for wear or oxidation. Replace worn pins to ensure optimal welding performance. Clean oxidized pins with fine-grit sandpaper or a specialized electrode cleaner.
- Unit Cleaning: Keep the main unit clean and free from dust and debris. Use a dry, soft cloth for cleaning. Do not use abrasive cleaners or solvents.
- Cable Inspection: Periodically check all cables and connections for damage. Replace any frayed or damaged cables immediately.
- Storage: When not in use, store the unit and accessories in a dry, cool place, away from direct sunlight and moisture.
8. Troubleshooting
| Problem | Possible Cause | Solution |
|---|---|---|
| Unit does not power on | No power supply; Loose power cord | Check power outlet; Ensure power cord is securely connected |
| Weak or inconsistent welds | Incorrect power setting; Dirty or worn electrodes; Poor material contact; Material too thick | Increase power setting; Clean or replace electrodes; Ensure firm contact; Verify material thickness is within specifications |
| Milliohm meter shows erratic readings | Loose test leads; Dirty probes; Poor contact with material | Ensure test leads are securely connected; Clean probes; Ensure firm and clean contact points |
| Welding pen overheating | Continuous use at high power; Insufficient cooling time | Allow the unit to cool down; Reduce welding frequency or power if possible |
9. Warranty and Support
The GLITTER 811H Industry Spot Welder & Milliohm Resistance Meter is covered by a manufacturer's warranty against defects in materials and workmanship. Please refer to the warranty card included with your product for specific terms and conditions, including the warranty period and coverage details.
For technical support, service, or warranty claims, please contact Glitter customer service through the retailer where the product was purchased or visit the official Glitter website for contact information.
Please have your model number (811H) and purchase date ready when contacting support.


