Glitter 812A
GLITTER 812A Spot Welder & Soldering Station User Manual
Model: 812A
1. Introduction
This manual provides detailed instructions for the safe and efficient operation of your GLITTER 812A Spot Welder & Soldering Station. This versatile 2-in-1 device combines a powerful 14500W spot welder with a 50W anti-static intelligent soldering station, designed for various battery pack assembly and electronics installation needs. Please read this manual thoroughly before use and retain it for future reference.
1.1 Safety Information
- Always wear appropriate personal protective equipment, including safety glasses, when operating the spot welder or soldering iron.
- Ensure adequate ventilation in your workspace to avoid inhaling fumes from soldering.
- Do not operate the device in damp or wet conditions.
- Keep children and unauthorized personnel away from the operating area.
- Disconnect power before performing any maintenance or changing accessories.
- Handle the soldering iron with extreme care as the tip reaches high temperatures.
- Avoid direct contact with welding electrodes during operation.
2. What's in the Box
Verify that all components listed below are present in your package.

Figure 2.1: Contents of the GLITTER 812A package. The image displays the main unit, welding pens, soldering iron, foot pedal, power cord, and various accessories.
- 812A Spot Welder x1
- 912 Soldering Iron x1
- 73B Spot Welding Pen x1
- 73SA Press-down Welding Arm x1
- Nickel Plated Strip Sample x100
- Welding Plates for 73B x2
- Welding Pins for 73SA x4
- Spring spare parts for spot welding pen x2
- Pry bar for the copper wire plug x1
- Knob for adjusting spot welding pressure x1
- Hex Key for replacing the welding pin of 73B x1
- Hex Key for replacing the welding pin of 73SA x1
- Screwdriver for adjusting the welding pin spacing x1
- Screwdriver to open the spot welding pen x1
- Battery Fixture x1
- Foot Pedal Switch x1
- Soldering Iron Holder x1
- Power Cord x1
- User Manual x1
3. Initial Setup
3.1 Power Connection and Initial Charge
- Plug the power adapter into an AC 110V or 220V wall socket.
- Turn on the main switch located on the machine.
- Charge the machine for approximately 20-30 minutes until the internal voltage reaches 6V.
3.2 Connecting Welding Accessories
- For 73SA Press-down Welding Arm: Connect the arm to the designated ports on the main unit. Ensure a secure connection.
- For 73B Spot Welding Pen: Connect the welding pen to the designated ports. The pen is designed for handheld operation.
- For Soldering Iron: Connect the 912 Soldering Iron to its dedicated port. Place the iron in its holder when not in use.
Video 3.1: Demonstration of initial setup, including power connection, turning on the unit, and connecting the 73B welding pen. This video also shows basic welding operations.
4. Operating the Spot Welder
4.1 Welding Methods
The GLITTER 812A offers two primary welding methods:
- 73SA Press-down Welding Arm: Ideal for precise, repetitive spot welds on battery packs. The arm ensures consistent pressure.
- 73B Integrated Spot Welding Pen: Provides flexibility for various welding angles and applications, especially useful for intricate work.

Figure 4.1: Two welding methods: the 73SA press-down arm (top) and the 73B integrated spot welding pen (bottom).
4.2 Triggering Modes
Select the appropriate triggering mode based on your welding task:
- AT (Auto Trigger) Mode: For fast and precise batch spot welding. The machine automatically triggers the weld when the electrodes make proper contact.
- MT (Manual Trigger) Mode: Utilizes the foot pedal for triggering. This mode allows beginners more time to position the electrodes before initiating the weld.
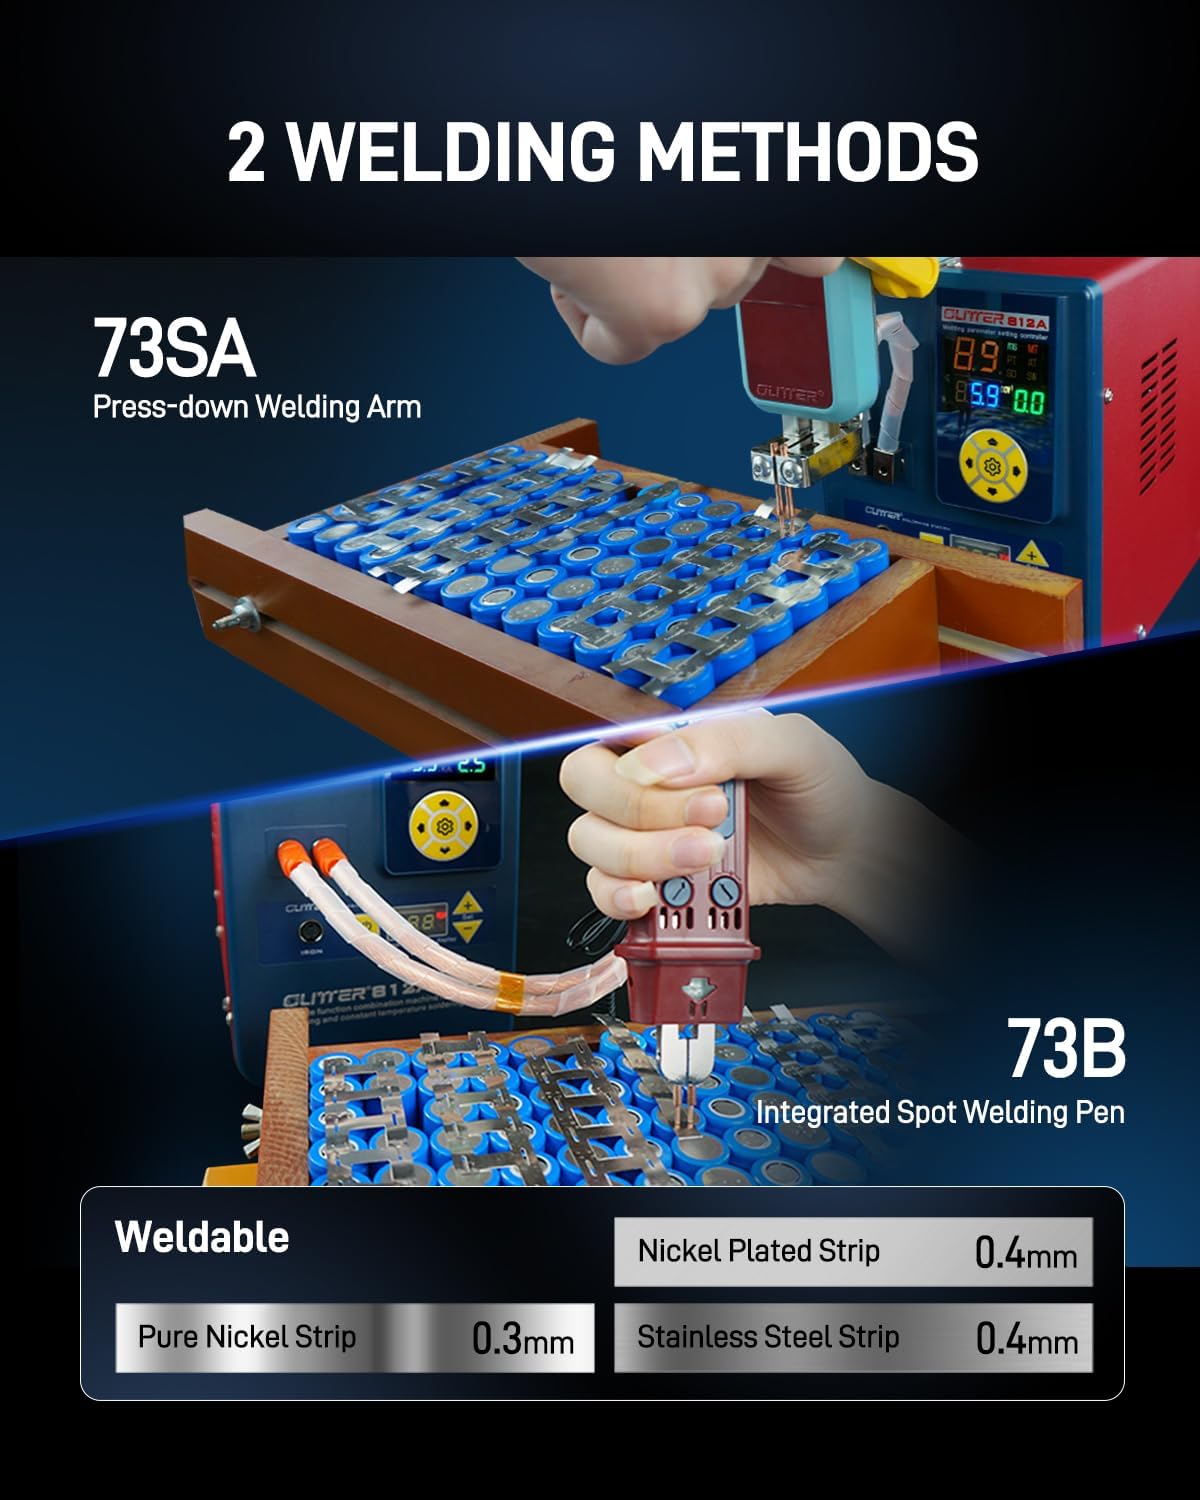
Figure 4.2: AT (Auto Trigger) mode for rapid welding and MT (Manual Trigger) mode using a foot pedal for controlled operation.
4.3 Adjusting Welding Parameters
The GLITTER 812A features precise digital parameter display and adjustment capabilities.
- Energy Grade (Gears): The machine offers 99 adjustable energy gears. Select the appropriate energy grade based on the material and thickness of the welding strips.
- Pulse Time: Adjustable from 0-20ms for fine-tuning weld duration.
- Welding Current Monitoring: Real-time display of welding current ensures consistent and reliable welds.
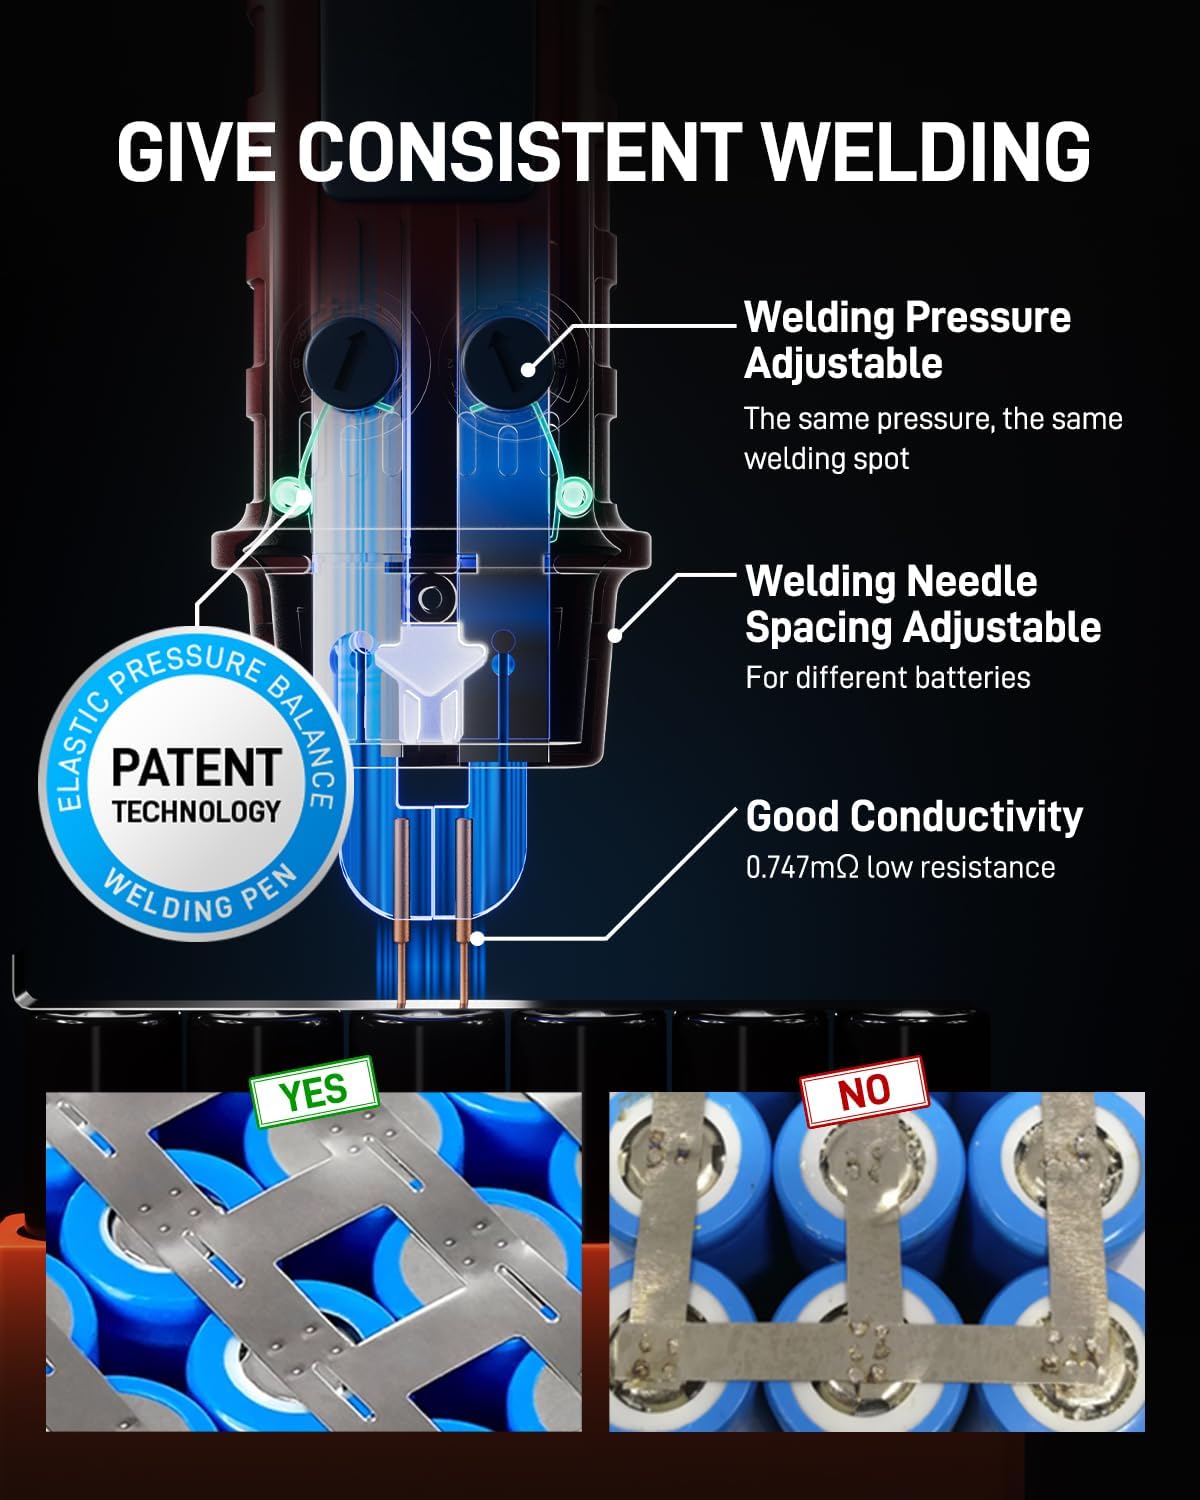
Figure 4.3: Digital control panel for precise adjustment of welding parameters.
4.4 Consistent Welding Features
The welding pen incorporates features designed for consistent and high-quality welds:
- Adjustable Welding Pressure: Ensures uniform pressure for each weld spot.
- Adjustable Welding Needle Spacing: Allows customization for different battery sizes and configurations.
- Good Conductivity: Features ultra-low resistance (0.747mΩ) to prevent overheating during prolonged use and ensure efficient current delivery.

Figure 4.4: Features for consistent welding quality, including adjustable pressure and needle spacing.
4.5 Weldable Materials and Thicknesses
The GLITTER 812A is capable of welding various materials commonly used in battery assembly:
| Material | Maximum Thickness |
|---|---|
| Pure Nickel Strip | 0.3mm |
| Nickel Plated Strip | 0.4mm |
| Stainless Steel Strip | 0.4mm |
| Lithium-ion batteries (e.g., 18650, 21700) | (with appropriate strips) |
| Brass, Titanium | (with appropriate strips) |
5. Operating the Soldering Station
The integrated 50W soldering station is designed for precision electronics work.

Figure 5.1: The thermostat-controlled soldering station in operation.
- Rapid Heating: The 50W soldering iron heats up in approximately 6 seconds.
- Temperature Control: Features a thermostat control system to maintain a consistent temperature between 250-450°C.
- Real-time Display: The unit displays the real-time soldering temperature.
- Smart Sleep Mode: The soldering station includes an auto-sleep mode to conserve energy and prolong tip life.
To use, ensure the soldering iron is properly connected. Adjust the desired temperature using the controls on the main unit. Allow the iron to reach the set temperature before beginning soldering work.
6. Versatile Applications
The GLITTER 812A is suitable for a wide range of applications, including:

Figure 6.1: Examples of diverse applications for the GLITTER 812A.
- Lithium battery pack assembly for electric scooters and power tools.
- Repair and assembly of cell phone batteries and power banks.
- Printed Circuit Board (PCB) soldering and electronics installation.
- Various DIY projects requiring spot welding or soldering.
7. Maintenance
7.1 General Cleaning
- Ensure the unit is powered off and unplugged before cleaning.
- Wipe the main unit and accessories with a soft, dry cloth. Do not use abrasive cleaners or solvents.
- Keep ventilation openings clear of dust and debris.
7.2 Soldering Iron Tip Care
- Always tin the soldering iron tip with solder before and after use to prevent oxidation.
- Clean the tip regularly using a damp sponge or brass wool.
- Replace worn or damaged tips to maintain optimal soldering performance.
7.3 Welding Electrode Maintenance
- Inspect welding electrodes for wear or pitting. Replace them as needed using the provided hex keys.
- Ensure electrodes are clean and free of oxidation for consistent weld quality.
- Adjust electrode spacing as required for different materials and thicknesses.
8. Troubleshooting
| Problem | Possible Cause | Solution |
|---|---|---|
| Unit does not power on. | Power cord not connected, main switch off, power outlet issue. | Check power cord connection, ensure main switch is on, test power outlet. |
| Weak or inconsistent welds. | Incorrect energy setting, dirty electrodes, improper pressure, material too thick. | Adjust energy grade, clean electrodes, ensure firm contact, verify material thickness is within limits. |
| Soldering iron not heating. | Iron not properly connected, temperature setting too low, faulty heating element. | Check connection, increase temperature setting, contact support if element is faulty. |
| Overheating of unit. | Blocked ventilation, prolonged continuous use at high power. | Ensure ventilation is clear, allow unit to cool down, operate within recommended duty cycles. |
9. Specifications
| Feature | Detail |
|---|---|
| Model | 812A |
| Spot Welder Pulse Output Power | 14500W |
| Spot Welder Output Current | 2500A |
| Welding Energy | 290J |
| Welding Pulse Time | 0-20ms (Adjustable) |
| Welding Gears | 99 |
| Soldering Iron Power | 50W |
| Soldering Temperature Range | 250-450°C |
| Soldering Heat-up Time | 6 seconds (to 350°C) |
| Power Source | AC |
| Product Dimensions | 7.1 x 2.6 x 5 inches |
| Item Weight | 13.3 pounds |
| Display Type | LED |
10. Warranty and Support
For warranty information, technical support, or service inquiries, please refer to the contact information provided with your purchase or visit the official Glitter website. Keep your purchase receipt as proof of purchase.
Related Documents - 812A
 |
GLITTER 801D Battery Spot Welder User Manual Comprehensive user manual for the GLITTER 801D battery spot welder (Model P853). This guide covers product specifications, operating instructions, troubleshooting, package contents, and safety warnings for efficient battery pack assembly and maintenance. |
 |
GLITTER 811A Spot Welder User Manual: Features, Operation, and Maintenance Comprehensive user manual for the GLITTER 811A Industrial Intelligent Spot Welder. Covers features, applications, troubleshooting, maintenance, and operation for battery welding and metal fabrication. |
 |
GLITTER 811H Spot Welder User Manual Comprehensive user manual for the GLITTER 811H Industrial Intelligent Energy Storage Spot Welder, detailing features, applications, troubleshooting, maintenance, and operation for welding various metals and battery packs. |
 |
GLITTER 801H Capacitor Energy Storage Spot Welder Machine - Features and Interface Detailed overview of the GLITTER 801H spot welder machine, highlighting its industrial interface, capacitor energy storage, welding modes, and user controls for efficient battery welding. |
 |
P852C – GLITTER 811A Průmyslová inteligentní bodová svářečka – Návod k použití a specifikace Kompletní návod k obsluze pro průmyslovou inteligentní bodovou svářečku GLITTER 811A od společnosti Hadex. Pokrývá specifikace, provoz, funkce, řešení problémů a údržbu pro efektivní svařování baterií a kovů. |
 |
Glitter 811H Универсальный Сварочный Аппарат - Инструкция по Эксплуатации Подробное руководство пользователя для универсального сварочного аппарата Glitter 811H, охватывающее обзор устройства, подготовку, режимы сварки (MT/AT), использование миллиомметра, мобильной ручки и процедуры испытаний. |
Ask a question about this manual
Ask about setup, troubleshooting, compatibility, parts, safety, or missing instructions. Manuals+ will review the question and use this page’s manual context to help answer it.