1. Introduction
Thank you for purchasing the BEZGAR LH-LY-048 Mini Drone. This manual provides essential information for the safe operation, setup, and maintenance of your drone. Please read it thoroughly before use and retain it for future reference.
Safety Precautions
- Always operate the drone in open, clear areas, away from people, animals, and obstacles.
- Do not fly near high-voltage lines, airports, or crowded places.
- Ensure the drone's battery and remote control batteries are fully charged before each flight.
- Keep fingers and hair away from rotating propellers.
- Adult supervision is recommended for younger users.
- Do not modify the drone or its components.
2. Package Contents
Verify that all items listed below are included in your package:
- BEZGAR LH-LY-048 Mini Drone x 1
- Remote Control x 1
- Rechargeable Drone Batteries x 2
- USB Charging Cable x 1
- Spare Propellers x 4
- Screwdriver x 1
- User Manual x 1

Image: Contents of the BEZGAR LH-LY-048 Mini Drone package, including the drone, remote control, batteries, charging cable, spare propellers, and screwdriver.
3. Product Overview
Familiarize yourself with the drone and remote control components.
Drone Components
- Propellers (4)
- Propeller Guards (integrated)
- LED Lights
- Battery Compartment
- Power Switch

Image: The BEZGAR LH-LY-048 Mini Drone, showcasing its red body, integrated propeller guards, and vibrant LED lights.
Remote Control Layout
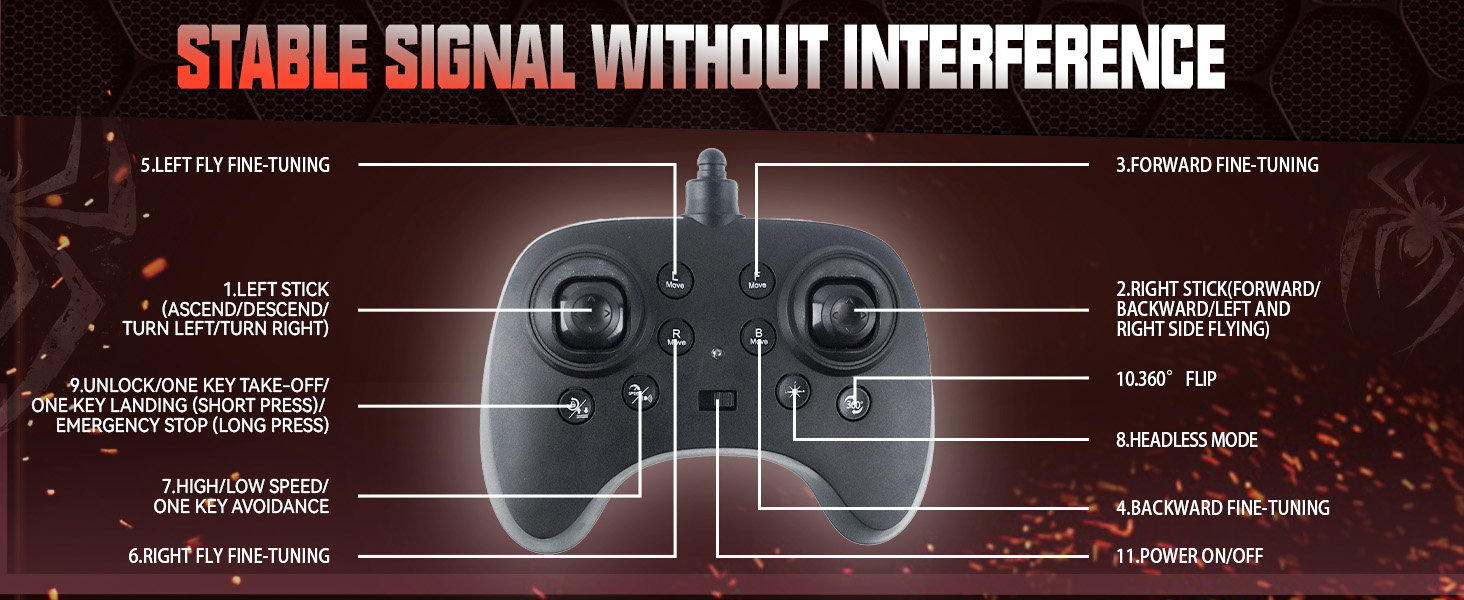
Image: Diagram of the remote control for the BEZGAR LH-LY-048 Mini Drone, labeling various buttons and joysticks for flight control, speed modes, headless mode, and 360° flips.
- Left Stick (Ascend/Descend/Turn Left/Turn Right)
- Right Stick (Forward/Backward/Left and Right Side Flying)
- Forward Fine-Tuning
- Backward Fine-Tuning
- Left Fly Fine-Tuning
- Right Fly Fine-Tuning
- High/Low Speed / One Key Avoidance
- Headless Mode
- 360° Flip
- Unlock/One Key Take-Off/One Key Landing (Short Press) / Emergency Stop (Long Press)
- Power ON/OFF
4. Setup
4.1 Battery Installation
Drone Battery
- Ensure the drone's power switch is in the OFF position.
- Open the battery compartment cover on the drone.
- Connect the drone battery to the drone's power connector.
- Place the battery securely into the compartment and close the cover.
Remote Control Batteries
- Open the battery cover on the back of the remote control.
- Insert 3 AAA batteries (not included) according to the polarity markings.
- Close the battery cover.
4.2 Charging the Drone Battery
- Connect the drone battery to the USB charging cable.
- Plug the USB charging cable into a USB power adapter (5V/1A recommended) or a computer's USB port.
- The indicator light on the USB cable will illuminate during charging and turn off when fully charged.
- Charging time is approximately 60 minutes per battery.
4.3 Propeller Installation/Replacement
If a propeller is damaged, replace it with a spare propeller from the package. Ensure the correct propeller (A or B) is installed on the corresponding motor as indicated on the drone's body.
5. Operating Instructions
5.1 Pairing the Drone and Remote Control
- Place the drone on a flat, level surface.
- Turn on the drone's power switch. The drone's LED lights will flash.
- Turn on the remote control.
- Push the left joystick up to its maximum position, then pull it down to its minimum position. The drone's LED lights will stop flashing and remain solid, indicating successful pairing.
5.2 Calibration
After pairing, if the drone drifts, perform a calibration:
- Place the drone on a flat, level surface.
- Simultaneously push both joysticks down and to the bottom-right (or bottom-left, depending on the remote model, refer to remote diagram). The drone's lights will flash rapidly and then become solid, indicating successful calibration.
5.3 Basic Flight Controls
One Key Take-Off/Landing
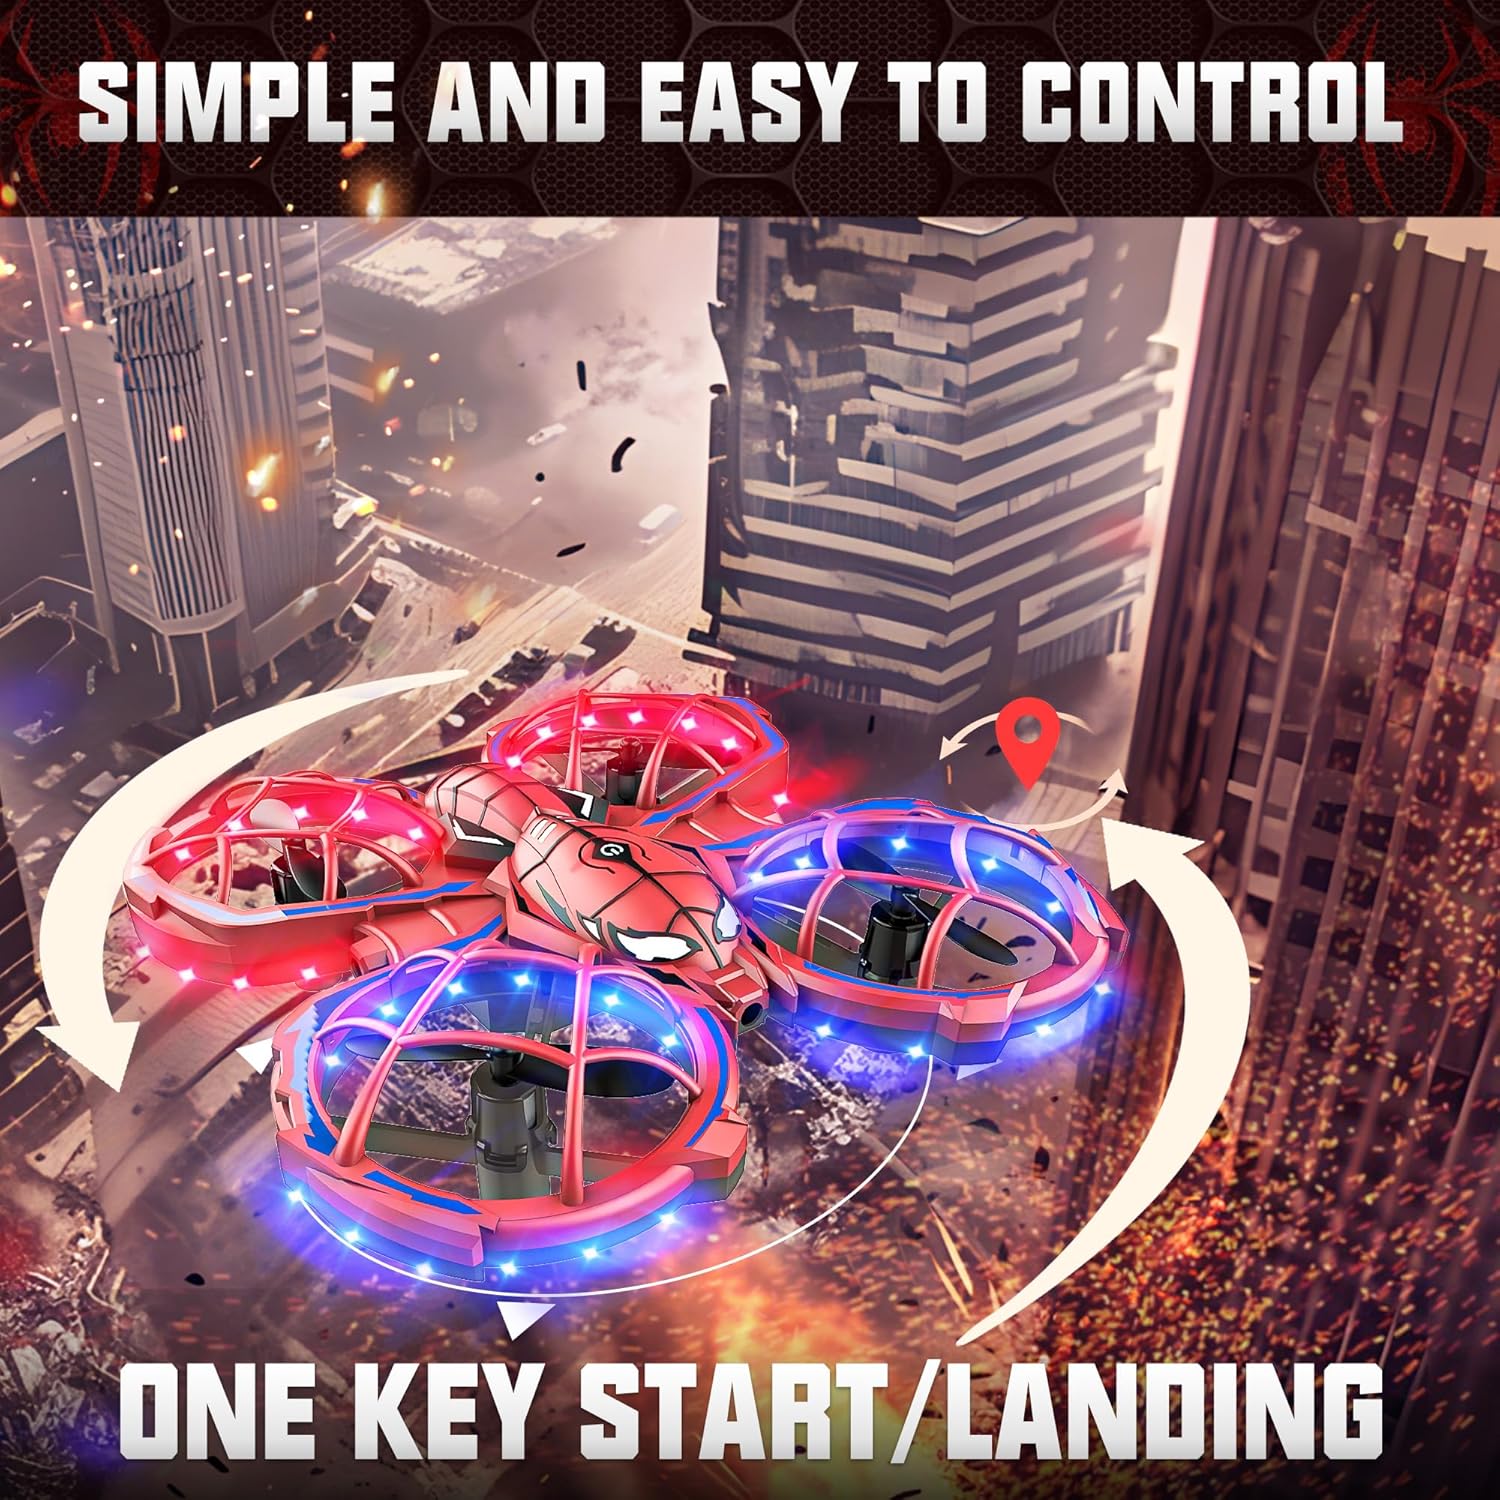
Image: The BEZGAR LH-LY-048 Mini Drone taking off with a single button press, illustrating the 'One Key Start/Landing' feature.
After pairing and calibration, short press the One Key Take-Off/Landing button (usually indicated by an unlock symbol) on the remote control. The drone will automatically take off and hover at a certain altitude. Press the button again to land the drone automatically.
Manual Take-Off
Alternatively, after pairing and calibration, push both joysticks outwards and downwards to start the propellers. Then, gently push the left joystick up to ascend.
Directional Control
- Left Joystick (Throttle): Push up to ascend, pull down to descend. Push left/right to rotate the drone left/right.
- Right Joystick (Direction): Push up/down to fly forward/backward. Push left/right to fly sideways (strafe) left/right.
5.4 Special Features
Altitude Hold

Image: The BEZGAR LH-LY-048 Mini Drone maintaining a stable altitude, illustrating the Altitude Hold feature. Also shows the concept of Headless Mode.
The drone is equipped with an Altitude Hold function, which allows it to maintain a stable height automatically after ascending. You can release the left joystick, and the drone will hover at its current altitude.
Headless Mode
Press the Headless Mode button on the remote control. In Headless Mode, the drone's orientation is locked to the remote control's orientation, regardless of the drone's actual front direction. This simplifies control for beginners. Press the button again to exit Headless Mode.
3 Speed Modes

Image: The BEZGAR LH-LY-048 Mini Drone executing a 360-degree stunt roll, with an overlay indicating three different speed modes (30%, 60%, 100%).
Press the Speed Mode button (usually indicated by a speed icon) to cycle through three different flight speeds: Low, Medium, and High. This allows you to adjust the drone's responsiveness to your skill level.
360° Flips Stunt
To perform a 360° flip, fly the drone to a height of at least 2 meters. Press the 360° Flip button on the remote control, then quickly push the right joystick in any direction (forward, backward, left, or right). The drone will perform a flip in that direction.
Obstacle Avoidance

Image: The BEZGAR LH-LY-048 Mini Drone automatically avoiding an obstacle, highlighting its 'Auto Avoidance' feature and 'Full Frame Protection'.
The drone features an obstacle avoidance system. When activated (refer to remote diagram for specific button), the drone will attempt to detect and avoid nearby obstacles, enhancing safety, especially for beginners.
5.5 Official Product Video
Video: This video demonstrates the BEZGAR LH-LY-048 Mini Drone's LED lights, one-click takeoff, level flight, 3-speed modes, flexible handling, paramotor flight, 360-degree roll, barrier avoidance mode, and one-touch landing. It showcases the drone's features and ease of use.
6. Maintenance
6.1 Cleaning
Use a soft, dry cloth to clean the drone and remote control. Do not use water or chemical cleaners, as they may damage electronic components.
6.2 Storage
When not in use for extended periods, remove batteries from both the drone and the remote control. Store the drone and its accessories in a cool, dry place, away from direct sunlight and extreme temperatures.
6.3 Propeller Care
Regularly inspect propellers for damage. Replace any bent or broken propellers immediately to ensure optimal flight performance and safety.
7. Troubleshooting
| Problem | Possible Cause | Solution |
|---|---|---|
| Drone does not respond to remote. | Not paired, low battery, out of range. | Ensure drone and remote are powered on and paired. Check battery levels. Fly within operational range. |
| Drone drifts during flight. | Not calibrated, uneven surface at take-off. | Perform calibration on a flat surface. Use fine-tuning buttons on the remote. |
| Propellers do not spin. | Low battery, propellers obstructed, drone not unlocked. | Charge drone battery. Clear any obstructions. Ensure drone is unlocked (short press One Key Take-Off/Landing button). |
| Short flight time. | Battery not fully charged, old battery. | Ensure battery is fully charged. Consider replacing old batteries. |
8. Specifications
| Feature | Detail |
|---|---|
| Brand | BEZGAR |
| Model Name | LH-LY-048 |
| Special Features | 360 Degree Flip, Auto Hovering, Headless Mode, Obstacle Avoidance |
| Color | Red |
| Connectivity Technology | Radio Frequency (2.4GHz) |
| Item Weight | 0.2 Kilograms (approx. 7 ounces) |
| Control Type | Remote Control |
| Material | Plastic (ABS) |
| Product Dimensions | 4.88"L x 1.41"W x 5"H |
| Batteries | 2 Nonstandard Battery (included for drone), 3 AAA batteries (not included for remote) |
| Flight Time | Up to 12 minutes total (with 2 batteries) |
| Charging Time | Approx. 60 minutes per battery |
9. Warranty and Support
BEZGAR products are manufactured to high-quality standards. For warranty information, technical support, or replacement parts, please contact BEZGAR customer service or visit the official BEZGAR store online.
BEZGAR Store: https://www.amazon.com/stores/BEZGAR-SheerPleasureOfControl/page/A86573E2-C591-4D75-8AD0-0579204FA57D


