
1. Introduction
This manual provides detailed instructions for the setup, operation, maintenance, and troubleshooting of your DreamQuest Mini PC N95-16+512. Please read this manual thoroughly before using the device to ensure proper functionality and longevity.
2. Package Contents
Verify that all items listed below are present in your package:
- DreamQuest Mini PC x1
- Vesa Mount x1
- Wrench x1
- Fastener x2
- User Manual x1
- HDMI Cable x1
- Power Adapter (US Plug) x1

Figure 2.1: Package Contents
3. Product Overview
3.1 External Ports and Connectors
The DreamQuest Mini PC features a variety of ports for connectivity. Familiarize yourself with the port layout for optimal setup.

Figure 3.1: Front and Rear Port Layout
- DC Power Input: Connect the included power adapter.
- Dual LAN (1000Mbps): Two Gigabit Ethernet ports for wired network connections.
- HDMI (x2): Connect to displays supporting up to 4K @ 60Hz.
- DisplayPort: Connect to displays supporting up to 4K @ 60Hz.
- USB-C (Full-function): Supports fast charging, data transfer, and video output (4K @ 60Hz).
- Audio Jack: For headphones or external speakers.
- USB 3.2 (x4): High-speed ports for connecting peripherals.
- TF Card Slot: For external memory cards.
3.2 Internal Components
The Mini PC is equipped with an Intel N95 processor, 16GB DDR4 RAM, and a 512GB M.2 SSD. It also supports expansion for both storage and memory.
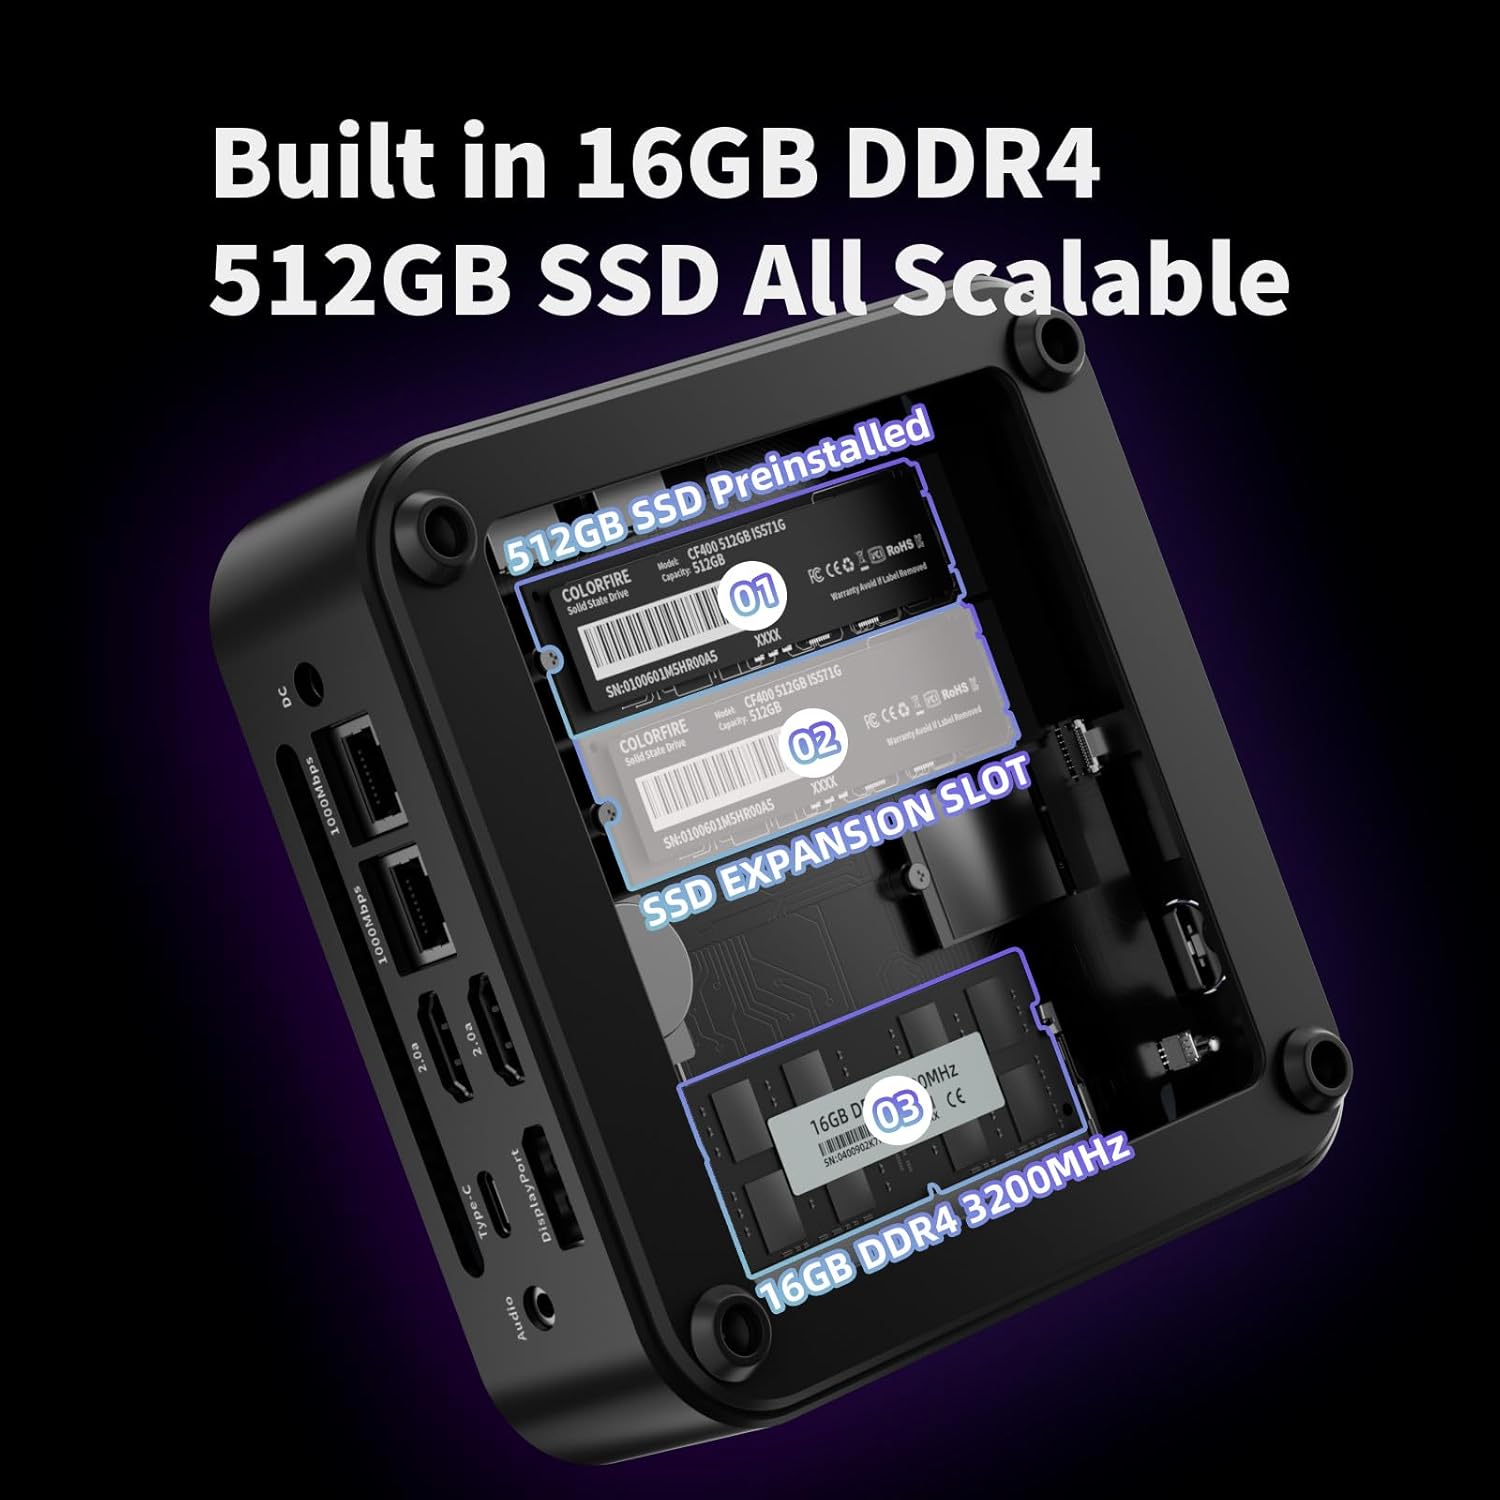
Figure 3.2: Internal Storage and Memory Layout
- Processor: 12th Gen Intel Alder Lake N95 (up to 3.4GHz).
- RAM: 16GB DDR4 (3200MHz), expandable up to 32GB.
- Storage: 512GB M.2 SSD preinstalled. Dual SSD slots supporting up to 4TB total storage (2TB each), with one adaptive slot and one PCIe/NVMe-compatible slot. Also includes a 2.5" SATA 3.0 HDD interface, expandable up to 2TB.
- Graphics: Integrated Intel UHD Graphics, supporting 4K @ 60Hz.
- Wireless: Built-in WiFi5 and Bluetooth 4.2.
4. Setup Instructions
4.1 Initial Connection
- Connect Display: Use the included HDMI cable or a DisplayPort/USB-C cable to connect your monitor(s) to the Mini PC. The device supports up to three 4K @ 60Hz displays simultaneously.
- Connect Peripherals: Plug in your USB keyboard and mouse into the available USB 3.2 ports.
- Connect Network (Optional): For a wired connection, connect an Ethernet cable to one of the Dual LAN ports. For wireless, ensure your WiFi network is available.
- Connect Power: Plug the power adapter into the DC power input on the Mini PC, then connect the adapter to a power outlet.
4.2 Powering On and Initial Setup
- Press the power button located on the front of the Mini PC.
- The device will boot into Windows 11 Pro. Follow the on-screen instructions to complete the initial Windows setup, including language, region, network connection, and user account creation.
- Once setup is complete, your Mini PC is ready for use.
5. Operating Instructions
5.1 Windows 11 Pro
Your Mini PC comes preloaded with Windows 11 Pro, offering a secure and productive computing experience. For detailed information on Windows 11 Pro features and usage, refer to Microsoft's official documentation.

Figure 5.1: Key Features Overview
5.2 Linux and Other OS Support
The Mini PC supports various operating systems including Linux and Ubuntu. It also features PXE boot, Wake On LAN, RTC Wake, and Auto Power On. To install a different operating system or configure these features, access the BIOS settings during startup (typically by pressing Del or F2).
5.3 Display Configuration
The Mini PC supports up to three independent 4K @ 60Hz displays via its HDMI, DisplayPort, and USB-C video outputs. Connect your monitors and configure display settings within Windows 11 Pro (Right-click on desktop > Display settings) to extend or duplicate your desktop.

Figure 5.2: Triple 4K Display Setup
5.4 Wireless Connectivity (WiFi & Bluetooth)
The Mini PC includes built-in WiFi5 for wireless internet access and Bluetooth 4.2 for connecting wireless peripherals such as keyboards, mice, and audio devices.

Figure 5.3: WiFi and Bluetooth Connectivity
5.5 Dual Gigabit LAN
Utilize the dual Gigabit Ethernet ports for robust and stable wired network connections, supporting network redundancy or connection to multiple networks.

Figure 5.4: Dual Gigabit Network Ports
6. Storage and Memory Expansion
The DreamQuest Mini PC offers flexible options for expanding its storage and memory capacity.
- M.2 SSD Expansion: The device includes two M.2 SSD slots. One 512GB M.2 SSD is preinstalled. The second slot supports an additional M.2 SSD (up to 2TB), compatible with PCIe/NVMe.
- 2.5" SATA HDD/SSD: A built-in SATA 3.0 interface allows for the installation of a 2.5-inch hard drive or SSD (up to 2TB, not exceeding 7mm thickness).
- RAM Expansion: The 16GB DDR4 RAM can be expanded up to 32GB. Consult a qualified technician for RAM upgrades.
Note: Opening the Mini PC for upgrades may require specific tools and knowledge. Refer to the detailed instructions in the included physical user manual or contact customer support for assistance.
7. Maintenance
7.1 Cleaning
- Ensure the Mini PC is powered off and unplugged before cleaning.
- Use a soft, dry cloth to wipe the exterior.
- For dust accumulation in vents, use compressed air. Do not insert objects into the vents.
7.2 Cooling System
The Mini PC features an upgraded smart fan and optimized airflow design for efficient cooling. Ensure proper ventilation by keeping the air inlets and outlets clear of obstructions.

Figure 7.1: Efficient Cooling System
7.3 Software Updates
Regularly update Windows 11 Pro and device drivers to ensure optimal performance and security. Access Windows Update through Settings > Windows Update.
8. Troubleshooting
| Problem | Possible Cause | Solution |
|---|---|---|
| No power | Power adapter not connected or faulty. Power outlet issue. | Ensure power adapter is securely connected to the Mini PC and a working power outlet. Try a different outlet. |
| No display | Monitor not connected or input selected incorrectly. Faulty cable. | Check display cable connections. Ensure monitor is on and set to the correct input source (HDMI, DisplayPort, USB-C). Try a different cable or monitor. |
| No internet (WiFi) | WiFi disabled. Incorrect password. Router issue. | Check WiFi settings in Windows. Ensure correct password is entered. Restart your router. |
| No internet (Wired LAN) | Ethernet cable disconnected or faulty. Router/modem issue. | Verify Ethernet cable is securely connected to both the Mini PC and the router/modem. Check router/modem status. |
| Bluetooth device not connecting | Bluetooth disabled. Device not in pairing mode. | Ensure Bluetooth is enabled in Windows settings. Put the Bluetooth device into pairing mode. |
9. Specifications
| Feature | Detail |
|---|---|
| Brand | DreamQuest |
| Model Name | DreamQuest Pro Plus (N95-16+512) |
| Processor | 12th Gen Intel Alder Lake N95 (up to 3.4GHz) |
| RAM | 16 GB DDR4 (3200MHz), expandable to 32GB |
| Storage | 512 GB M.2 SSD (preinstalled), Dual M.2 SSD slots (up to 4TB total), 2.5" SATA 3.0 HDD interface (up to 2TB) |
| Graphics | Integrated Intel UHD Graphics |
| Operating System | Windows 11 Pro (preloaded), supports Linux, Ubuntu |
| Video Output | 2x HDMI, 1x DisplayPort, 1x USB-C (all support 4K @ 60Hz, triple display capable) |
| USB Ports | 4x USB 3.2, 1x USB-C (full-function) |
| Network | Dual Gigabit Ethernet (1000Mbps), WiFi5 |
| Wireless | WiFi5, Bluetooth 4.2 |
| Other Features | TF Card Slot, Audio Jack, PXE, Wake On LAN, RTC Wake, Auto Power On |
| Item Weight | 2.23 pounds |
| Dimensions | 9.49 x 6.65 x 2.13 inches |
10. Warranty and Support
DreamQuest Mini PCs come with a 1-year warranty.
To utilize warranty services or for technical support, please follow these steps:
- Log in to your purchasing account.
- Navigate to "My Orders".
- Locate the order ID for your DreamQuest Mini PC.
- Click on "Contact Seller" to reach DreamQuest customer support.
For additional resources, you may refer to the official DreamQuest website or the included physical user manual.

