1. Introduction
Thank you for choosing the ARCCAPTAIN LY800J Auto Darkening Welding Helmet. This manual provides essential information for the safe and effective operation, maintenance, and troubleshooting of your welding helmet. Please read it thoroughly before use and retain it for future reference.
2. Safety Information
WARNING: Welding and cutting processes can be hazardous. Always follow safety precautions to prevent injury or death.
- Always wear appropriate personal protective equipment (PPE) including safety glasses, gloves, and protective clothing.
- This helmet is designed to protect eyes and face from sparks, spatter, and harmful radiation under normal welding conditions. It is not suitable for laser welding.
- The auto-darkening filter (ADF) provides automatic DIN 16 ultraviolet/infrared protection, effectively filtering harmful light.
- Ensure the helmet is correctly adjusted and all lenses are clean and undamaged before each use.
- Do not use the helmet if the auto-darkening function is not working correctly. Immediately replace any damaged parts.
3. Product Overview
The ARCCAPTAIN LY800J welding helmet features advanced auto-darkening technology, a wide viewing area, and multiple adjustment options for various welding and grinding applications.
Key Features:
- Faster Auto Darkening: 1/25000 seconds switching time from light to dark.
- Large Viewing Screen: 3.94” x 3.66” main viewing area with 180° panoramic view.
- True Color Technology: 1/1/1/1 optical clarity for enhanced visual experience.
- 4 Arc Sensors: Ensures reliable arc detection.
- Solar Powered: Equipped with two solar panels and two CR2450 lithium batteries for extended life.
- Wide Shade Range: DIN4 (light state), DIN5-9/9-13 (dark state) for TIG/MIG/ARC welding and grinding.
- Durable Material: Made from eco-friendly polypropylene (PP) for enhanced flexibility.
Components Diagram:
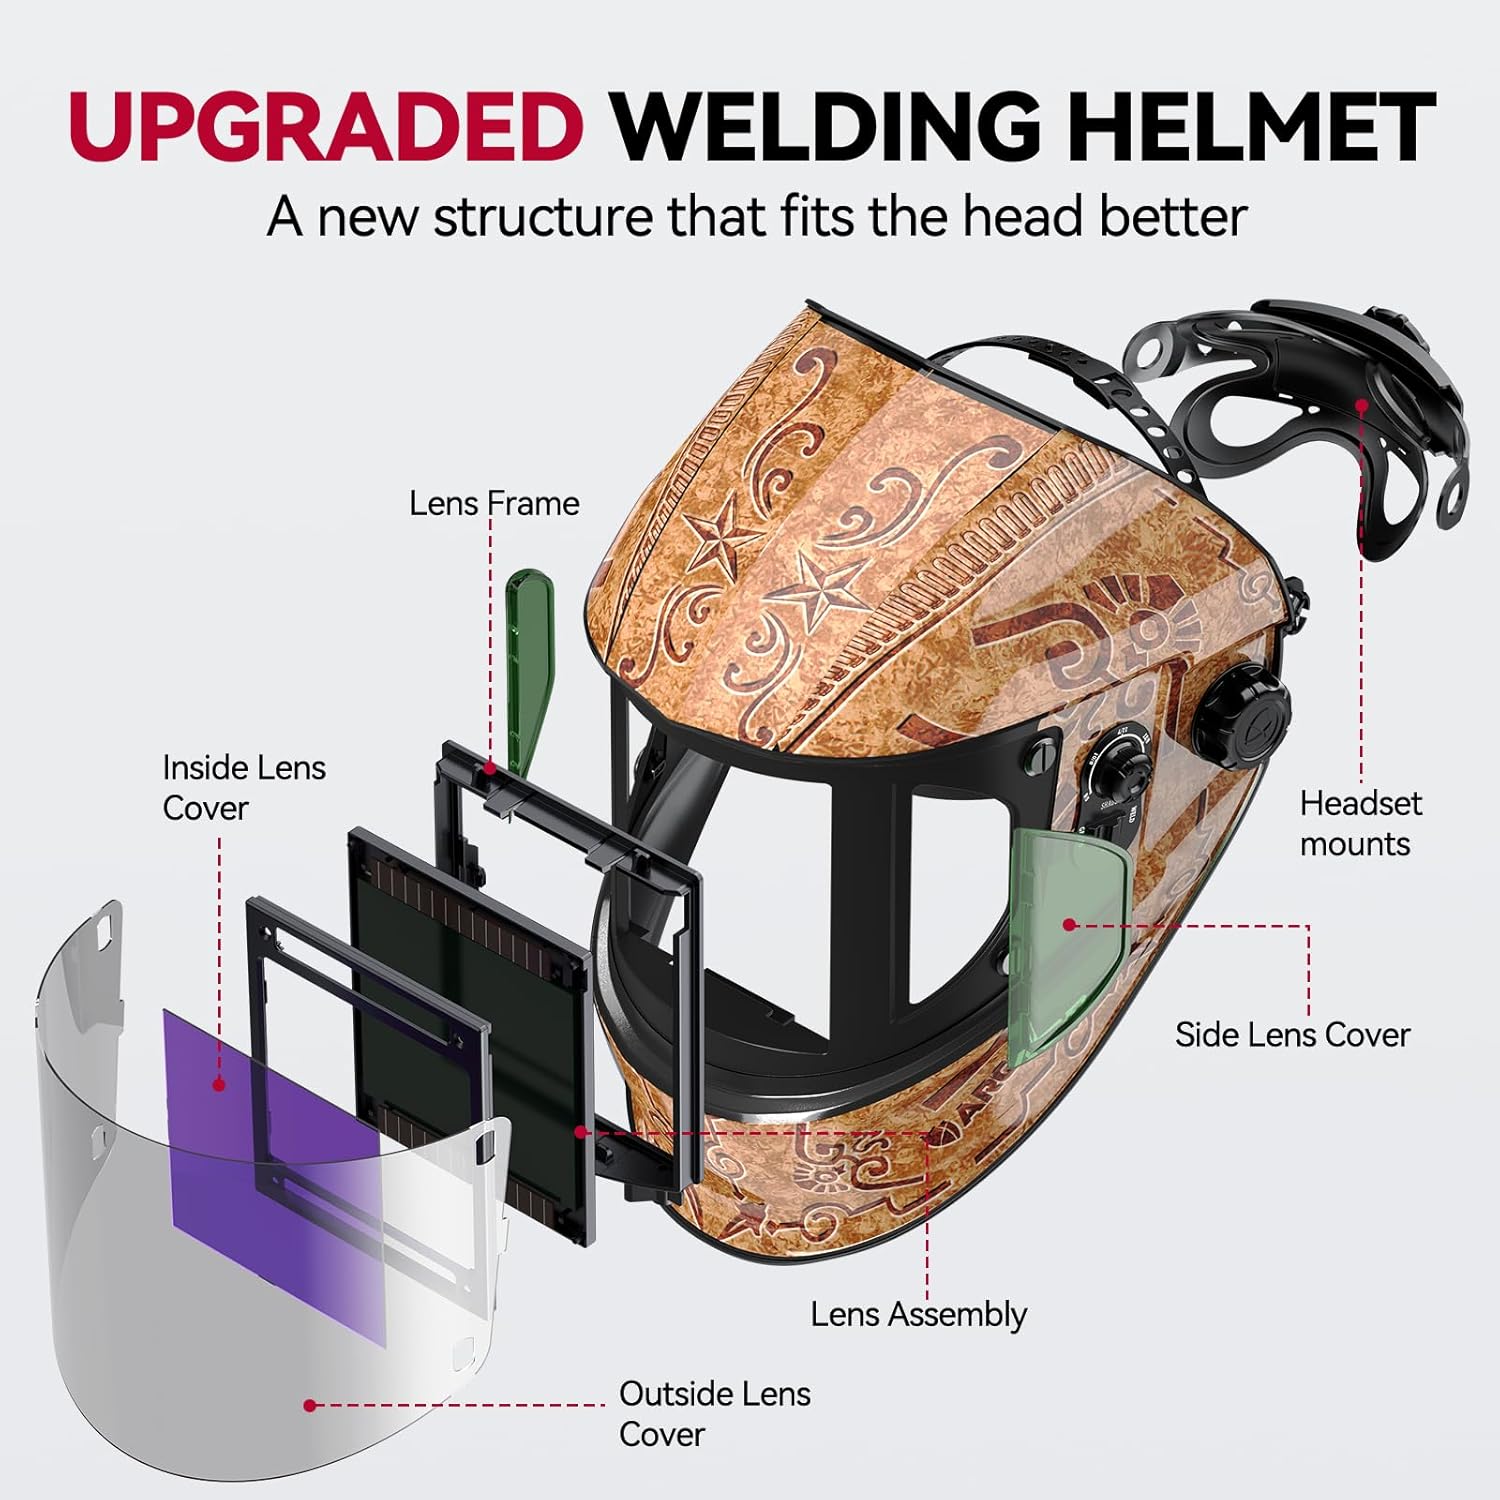
Figure 1: Exploded view of the ARCCAPTAIN welding helmet, showing the lens frame, inside lens cover, lens assembly, outside lens cover, headset mounts, and side lens cover.

Figure 2: Front view of the ARCCAPTAIN welding helmet, emphasizing the 3.94" x 3.66" extra-large display screen, true color, 180° panoramic view, auto-darkening, and lightweight design.
4. Setup
Headgear Adjustment:
The helmet features an upgraded knob section for easy adjustment, even while wearing gloves. The interior is designed for a better fit to the human head.
- Place the helmet on your head.
- Adjust the Head Circumference Adjustment knob at the back to achieve a snug but comfortable fit.
- Use the Tightness Adjustment Knob on the sides to control how easily the helmet flips up and down.
- Adjust the Enlarged Angle Adjustment Knob to set the desired viewing angle when the helmet is down.

Figure 3: Illustration of the headgear adjustment knobs for head circumference, tightness, and angle, designed for easy use even with gloves.
Battery Installation & Check:
The welding mask is equipped with two solar panels and two CR2450 lithium batteries (included). The solar panels continuously charge the batteries during use, providing a working time of up to several years.
- The batteries are typically pre-installed.
- To test the auto-darkening function, locate the test button inside the helmet. Press it to ensure the lens darkens and returns to light state.
- If the lens does not darken, check battery installation or replace batteries.
5. Operating Instructions
Mode Selection:
The helmet offers three primary modes: Weld, Cut, and Grind. Select the appropriate mode using the switch on the side of the helmet.
- Weld Mode: For TIG, MIG, and ARC welding. Provides shade levels DIN 9-13.
- Cut Mode: For plasma cutting. Provides shade levels DIN 5-9.
- Grind Mode: For grinding operations. Provides a light shade level DIN 4, allowing clear vision while protecting from sparks and debris.

Figure 4: Visual representation of Grind Mode (DIN 4), Cut Mode (DIN 5-9), and Weld Mode (DIN 9-13).
Shade Adjustment:
Adjust the shade level using the knob on the side of the helmet to match the intensity of your welding or cutting arc. Refer to welding standards for recommended shade levels based on amperage.
Sensitivity Adjustment:
The sensitivity knob allows you to adjust how much light is required to trigger the auto-darkening function. Set to MIN for strong arcs and MAX for weak arcs (e.g., low amperage TIG).
Delay Control:
The delay control knob adjusts the time it takes for the lens to return from dark to light state after welding. Use a FAST delay for quick tack welds and a SLOW delay for high amperage welds to prevent eye fatigue from residual arc glow.

Figure 5: Controls for Delay, Shade, and Sensitivity on the side of the helmet.
Panoramic View:
The helmet features a 180° panoramic view with side windows. Note that the side windows are tinted but do not auto-darken. Ensure your primary welding arc is within the main auto-darkening lens area.
Video 1: Official ARCCAPTAIN product video demonstrating the auto-darkening feature, panoramic view, and various modes of operation.
6. Maintenance
Cleaning:
- Clean the helmet shell with mild soap and water. Avoid harsh solvents.
- Wipe the inner and outer protective lenses with a soft, clean cloth. Do not use abrasive cleaners.
Lens Replacement:
The helmet comes with replacement inner and outer lenses. Replace them when they become scratched or damaged to maintain optical clarity and protection.
- To replace the outer lens, carefully unclip the lens frame and remove the old lens. Insert the new lens and secure the frame.
- To replace the inner lens, gently pry open the tabs holding it in place, remove the old lens, and snap the new one into position.
Battery Replacement:
The CR2450 lithium batteries can be replaced when the low battery indicator (if present) illuminates or the auto-darkening function becomes unreliable. Refer to the battery compartment location, typically near the ADF unit, for replacement.
7. Troubleshooting
| Problem | Possible Cause | Solution |
|---|---|---|
| Lens does not darken when arc is struck. | Low battery; incorrect sensitivity setting; sensors obstructed. | Check/replace batteries; adjust sensitivity; clean sensors. |
| Poor visibility. | Dirty lenses; incorrect shade setting. | Clean lenses; adjust shade to appropriate level. |
| Helmet feels uncomfortable. | Improper headgear adjustment. | Adjust head circumference, tightness, and angle settings. |
8. Specifications
| Feature | Specification |
|---|---|
| Brand | ARCCAPTAIN |
| Model Name | ARCCAPTAIN Welding Helmet (LY800J) |
| Style | LY800Js-WC |
| Material | Polypropylene (PP) |
| Item Weight | 2.59 pounds |
| Power Source | Solar Powered, 2 x CR2450 Lithium Metal batteries (included) |
| Optical Clarity | 1/1/1/1 |
| Viewing Area | 3.94” x 3.66” (Main), 180° Panoramic View |
| Shade Range | Light State: DIN 4; Dark State: DIN 5-9/9-13 |
| Switching Time | 1/25000 seconds |
| UV/IR Protection | DIN 16 (automatic) |
| Operating Temperature | -5°C to 55°C |
| Storage Temperature | -20°C to 70°C |
| Included Components | 1 x ARCCAPTAIN Storage Bag, 1x Welding Helmet, 2 x Replaced Lithium Battery, 3 x Replacement Lens |
9. Warranty and Support
ARCCAPTAIN provides a 2-year warranty for this product. For warranty claims, technical support, or any inquiries, please contact ARCCAPTAIN customer service through their official channels or the retailer where the product was purchased.


