1. Introduction
This manual provides detailed instructions for the installation, operation, maintenance, and troubleshooting of your AUTO-VOX 1080P Wireless RV Backup Camera. Please read this manual thoroughly before using the product to ensure proper function and safety. Keep this manual for future reference.

Image: The AUTO-VOX 1080P Wireless RV Backup Camera, highlighting its key features: long battery life, IR night vision, and IP69 waterproof rating.
2. Safety Information
- Installation: Ensure the camera is securely mounted to prevent detachment during vehicle movement. Incorrect installation may lead to accidents or damage.
- Power Source: Use only the specified power source for the camera. Using an incompatible power source may cause damage or fire.
- Water Resistance: The camera is IP69 weatherproof. However, avoid submerging it in water or exposing it to high-pressure water jets for extended periods.
- Temperature: Operate the camera within the specified temperature range (-4°F to 149°F / -20°C to 65°C). Extreme temperatures can affect performance and battery life.
- Cleaning: Do not use harsh chemicals or abrasive cleaners on the camera lens or body. Use a soft, damp cloth for cleaning.
- Disclaimer: This camera is an aid for safe driving and parking. Always exercise caution and check your surroundings directly. Do not rely solely on the camera display.
3. Package Contents
The AUTO-VOX 1080P Wireless RV Backup Camera package typically includes:
- 1 x 1080P Wireless RV Backup Camera
- Mounting Bracket and Screws
- Power Cable (USB charging cable)
- User Manual
4. Setup
4.1 Compatibility Check
This camera is designed to be compatible with AUTO-VOX Solar 4B/S46/S46PRO monitors. To ensure compatibility with your Solar 4B kit, verify that the power button on your existing camera system is the same color as the new camera. This camera requires drilling for installation and does not include a magnetic mount.
4.2 Physical Installation
The camera requires a drilling installation. Follow these steps for secure mounting:
- Select a suitable location on your RV, truck, or trailer for optimal rear view.
- Securely attach the mounting bracket to the chosen surface using the provided screws.
- Slide the camera onto the mounted bracket until it clicks into place.

Image: A visual guide demonstrating the two-step installation process: first, securing the mounting bracket, and second, attaching the camera to the bracket.
4.3 Distinguishing Camera Versions
To identify your camera version, observe the design of the power buttons on the top of the camera unit. This is important for ensuring compatibility with your monitor system.

Image: A comparison illustrating how to distinguish between new and old camera versions based on the color of their power buttons.
4.4 Pairing with Monitor (e.g., Cam2)
To pair your camera with a compatible monitor (e.g., for a second camera input), follow these steps:
- On your monitor, enter the Menu Settings.
- Navigate to the 'Pair' option.
- Select 'Cam2' (or the desired camera channel).
- Turn on the backup camera. The monitor will automatically detect and pair with the camera.
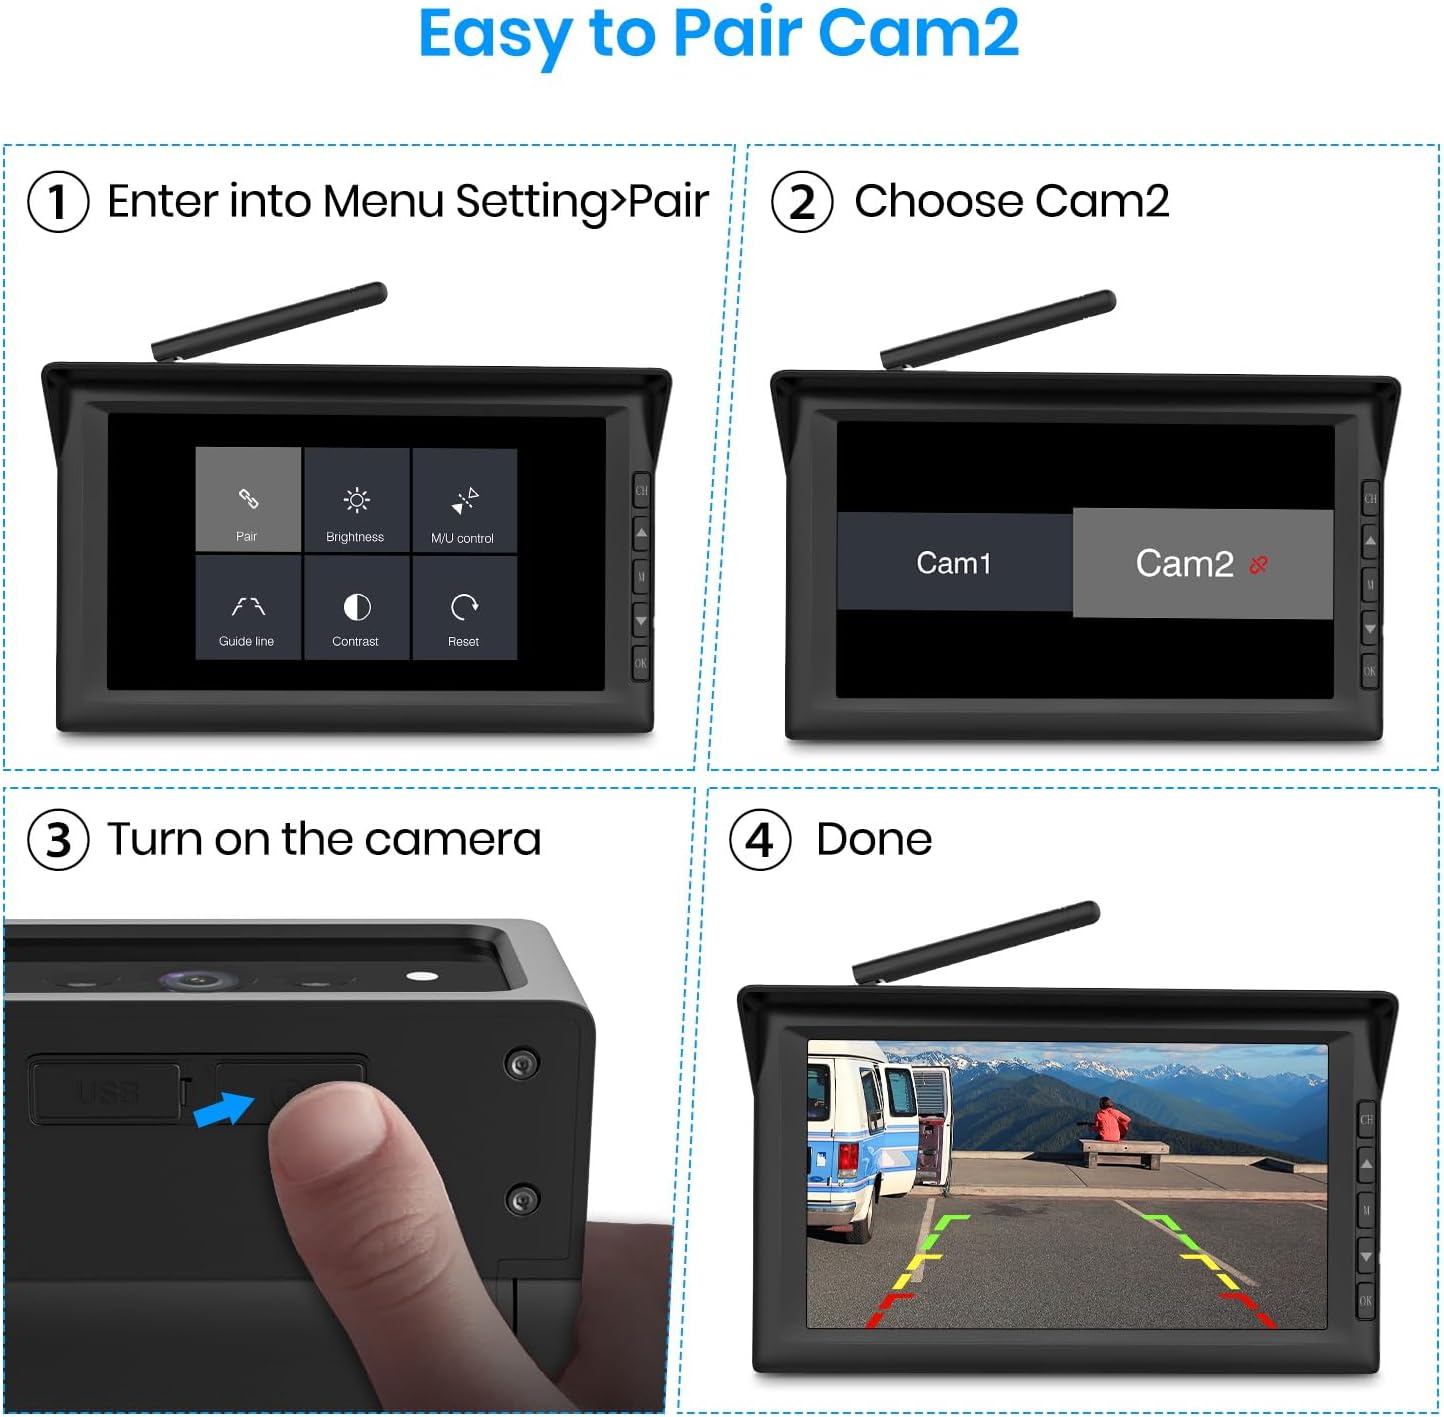
Image: A step-by-step visual guide on pairing the camera with a monitor, from accessing menu settings to confirming the connection.
5. Operating Instructions
5.1 Powering On/Off and Automatic Sleep Mode
The camera is designed for convenience with smart power management:
- The camera automatically activates when your vehicle is parked, eliminating the need for manual power-up.
- It enters a sleep mode when idle, conserving battery life and improving safety by being ready when needed.

Image: A visual comparison highlighting the convenience of the camera's automatic sleep mode, which eliminates manual power control.
5.2 1080P IR Night Vision
Equipped with 2 high-performance infrared LEDs and advanced optical imaging technology, the camera provides clear 1080P resolution visibility even in complete darkness.

Image: An RV at night, demonstrating the camera's ultra-long range IR night vision capability, providing clear visibility in low-light conditions.

Image: A split image comparing the clear 1080P daytime view with the effective IR night vision, showcasing the camera's versatility.
5.3 Extended Battery Life
The camera features a high-capacity battery, offering over 15 hours of continuous operation on a single charge. This makes it suitable for long road trips and extended use without frequent recharging.

Image: A graphic demonstrating the camera's extended battery life, capable of supporting long travel trips for up to 15 hours.
5.4 Dual Camera Protection (with compatible monitors)
When used with compatible AUTO-VOX monitors (e.g., Solar 4B or Solar 5), you can expand your system's coverage. This allows for flexible placement, such as monitoring passengers or cargo inside your RV, or mounting on the side for enhanced blind spot visibility, providing a complete view inside and out.

Image: A monitor displaying a split view from two cameras, illustrating how the system provides comprehensive coverage when paired with an S4B monitor.

Image: A monitor displaying a split view from two cameras, illustrating how the system provides comprehensive coverage when paired with a Solar 5 monitor.

Image: A graphic demonstrating the 'Two Views, One Screen' feature, showing how multiple cameras can be displayed on a single monitor for enhanced situational awareness.
6. Maintenance
- Cleaning the Lens: Regularly clean the camera lens with a soft, lint-free cloth to ensure a clear image. Avoid using abrasive materials that could scratch the lens.
- Battery Care: For optimal battery longevity, avoid fully discharging the battery frequently. Charge the camera regularly, especially before long trips. Store the camera in a cool, dry place if not used for extended periods.
- Mounting Check: Periodically inspect the mounting bracket and screws for tightness. Vibrations from driving can loosen connections over time.
- Firmware Updates: Check the AUTO-VOX official website for any available firmware updates that may improve performance or add new features.
7. Troubleshooting
7.1 No Image on Monitor
- Check Power: Ensure the camera is powered on and has sufficient battery charge.
- Check Pairing: Verify that the camera is correctly paired with your monitor. Refer to Section 4.4 for pairing instructions.
- Signal Interference: Large metal objects or other wireless devices can interfere with the signal. Try repositioning the camera or monitor slightly.
7.2 Poor Image Quality
- Clean Lens: Ensure the camera lens is clean and free from dirt, dust, or moisture.
- Lighting Conditions: While the camera has IR night vision, extreme low light or direct bright light can affect image clarity.
- Signal Strength: A weak wireless signal can result in a degraded image. Ensure the camera and monitor are within effective range and free from obstructions.
7.3 Battery Not Holding Charge
- Charging Cable: Ensure you are using the correct and undamaged charging cable.
- Charging Source: Verify the USB charging source is functional.
- Battery Age: Over time, all rechargeable batteries degrade. If the camera is old, battery replacement might be necessary (contact support).
8. Specifications
| Product Dimensions | 3.2 x 4.7 x 4.7 inches |
| Item Weight | 15.5 ounces |
| Batteries | 4 Lithium Ion batteries (included) |
| Color | Black |
| Manufacturer | AUTO-VOX |
| Installation Type | Surface Mount (Drilling required) |
| Optical Sensor Technology | CMOS infrared |
| Lens Type | Wide Angle |
| Real Angle of View | 120 Degrees |
| Connector Type | Wireless |
| Optical Sensor Size | 1/2.5 inch |
| Field Of View | 120 Degrees |
| Compatible Devices | AUTO-VOX Solar 4B/S46/S46PRO Monitors (ASINs: B0DP9H5JJ2, B0FCXSGRTC, B0DWK8P5B3, B0DYTYS628) |
| Weatherproof Rating | IP69 |
| Operating Temperature | -4°F to 149°F (-20°C to 65°C) |
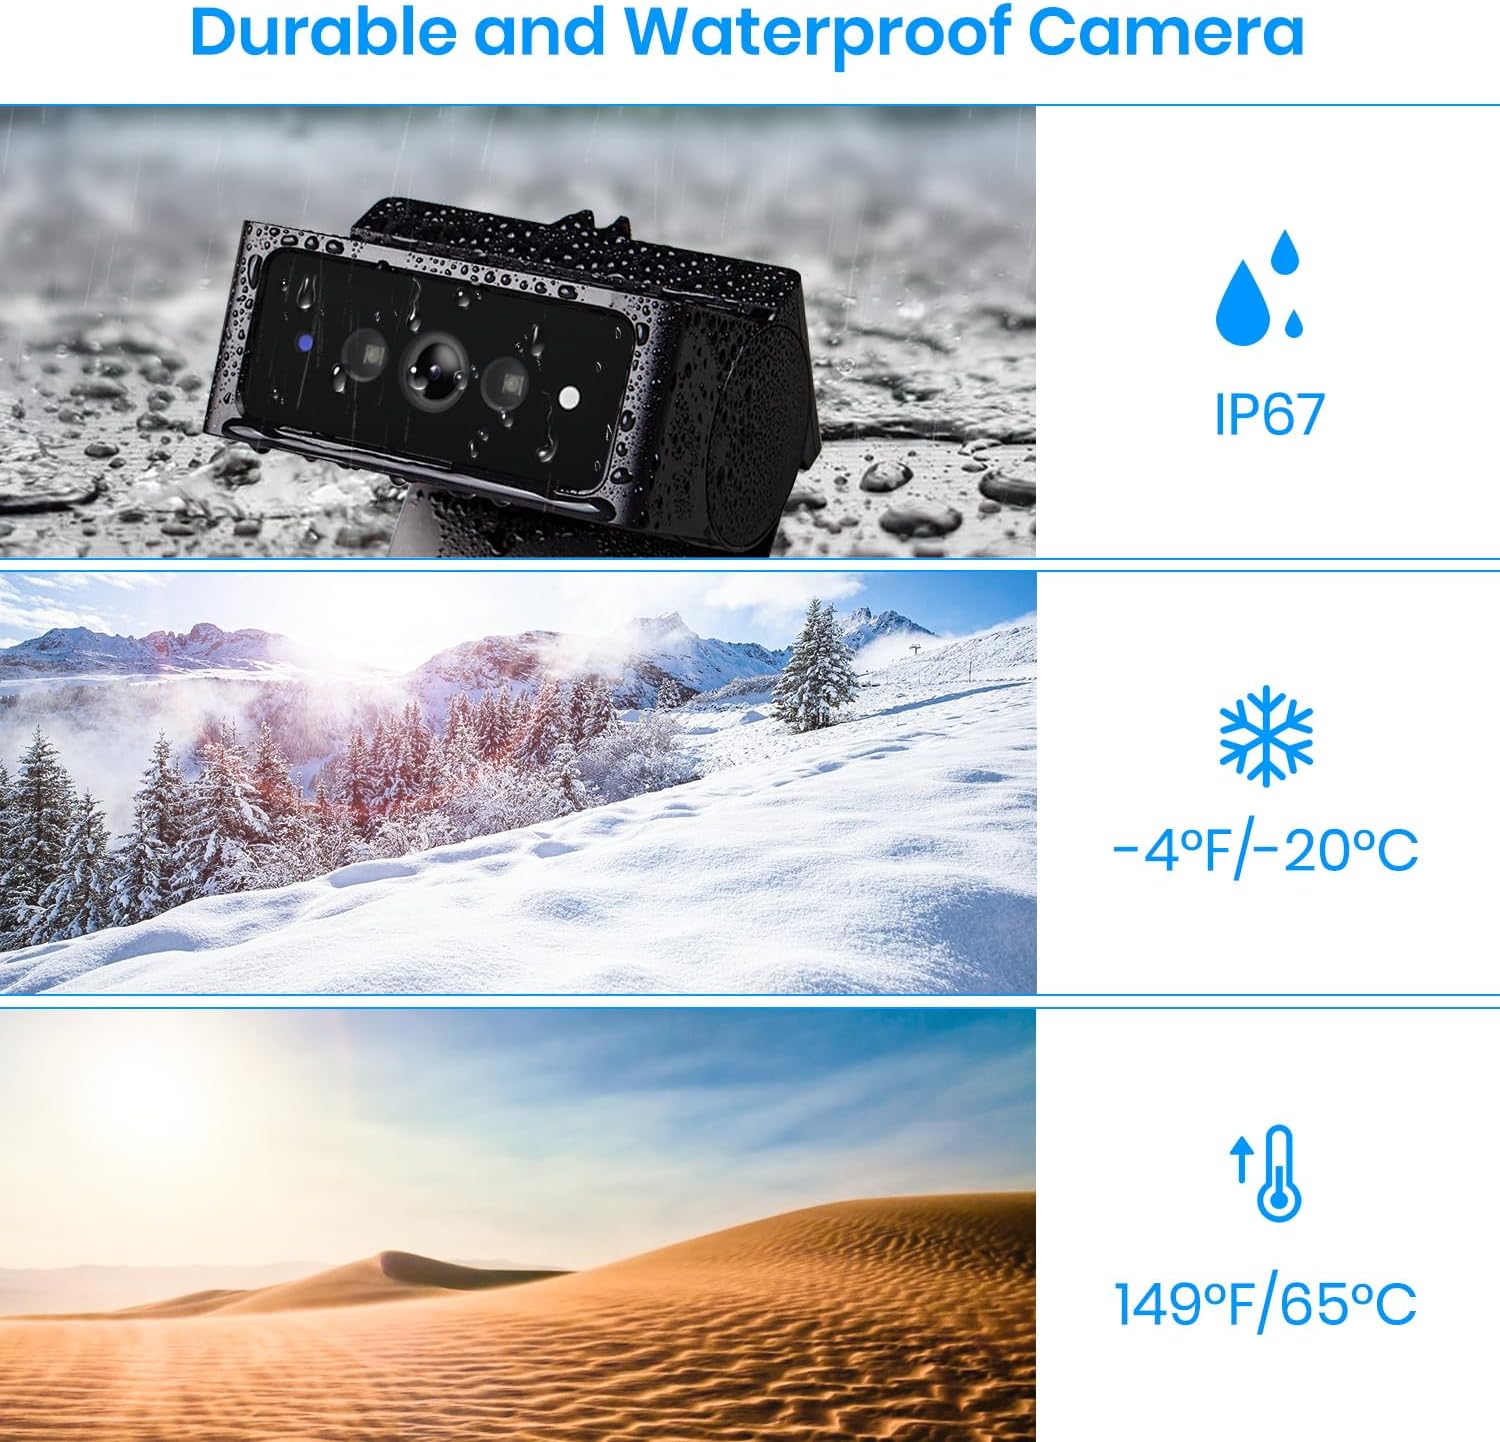
Image: Visual representation of the camera's durability, highlighting its IP67 waterproof rating and resistance to extreme temperatures.
9. Warranty and Support
For warranty information, technical support, or customer service, please visit the official AUTO-VOX store or contact their customer support directly. Keep your purchase receipt for warranty claims.
You can find more information and contact details by visiting the AUTO-VOX Store on Amazon.