
1. Introduction
Thank you for choosing the Omethey 6.5 Cubic Feet Digital Safe. This manual provides essential information for the safe and efficient operation of your new security safe. Please read these instructions carefully before installation and use, and retain them for future reference.
2. Safety Information
- Always keep the emergency keys in a secure location away from the safe. Do not store them inside the safe.
- Ensure the safe is mounted securely to a floor or wall to prevent theft and tipping.
- Do not attempt to force the safe open if the digital lock malfunctions. Use the emergency key or contact customer support.
- Keep the safe away from excessive moisture or direct heat sources.
- This safe is designed for security and storage of valuables. It is not rated as fireproof or waterproof.
3. Package Contents
Verify that all items are present in the package:
- 1 x Omethey 6.5 Cubic Feet Digital Safe
- 4 x Emergency Keys
- 6 x Expansion Screws (for mounting)
- 1 x USB Type-C Cable (for emergency power)
- 4 x Non-slip Pads
- 1 x User Manual (this document)

Figure 3.1: Included Accessories
This image displays the Omethey 6.5 Cubic Feet Digital Safe along with its accessories: four emergency keys, six expansion screws for mounting, one USB Type-C cable for external power, four non-slip pads, and the user manual.
4. Product Overview
The Omethey 6.5 Cubic Feet Digital Safe is designed to protect your valuables with robust construction and advanced security features. It features a double-door design, a digital keypad, and an internal soft lining.
4.1 Key Features
- Reinforced Solid Steel Construction: Made from low carbon alloy steel with a pry-resistant thickened door and 5 solid locking bolts for enhanced security against theft, prying, drilling, and corrosion.
- Dual Door Design: Allows separate access to upper and lower compartments.
- Digital Keypad with Backlight: For easy operation in low-light conditions.
- Internal LED Light: Illuminates the interior when the safe is opened.
- Deposit Slot: Convenient for quickly depositing cash or small items without opening the main door.
- Metal Storage Box: An internal compartment for smaller items.
- Soft Interior Lining: Protects contents from scratches.
- Adjustable Shelf: Allows customization of internal storage space.
- Dual Alarm System: Activates upon incorrect password attempts or violent vibrations.
- Mute Function: For silent operation.

Figure 4.1: Reinforced Solid Steel Construction
This image illustrates the robust construction of the safe, emphasizing its resistance to theft, prying, drilling, and corrosion, with a drill attempting to penetrate the steel.

Figure 4.2: Product Details
This image provides a detailed view of the safe's internal and external features, including the soft lining, the convenient drop slot, the metal storage box, the double door mechanism, the internal LED light, and the five robust locking bolts.

Figure 4.3: Adjustable Shelves for Convenient Storage
This image demonstrates the versatility of the safe's interior with adjustable shelves, showing how they can be rearranged to store different types and sizes of valuables, such as stacks of cash, gold bars, jewelry, and cameras.

Figure 4.4: Soft Interior Lining
This image highlights the soft interior lining of the safe, designed to protect delicate valuables from scratches and damage during storage.
5. Setup
5.1 Unpacking
- Carefully remove the safe from its packaging.
- Inspect the safe for any signs of damage. If damaged, contact customer service immediately.
- Place the non-slip pads on the bottom corners of the safe.
5.2 Mounting the Safe
The safe can be bolted to the floor or a wall for added security. Pre-drilled mounting holes are provided (four at the back, two at the bottom).
- Choose a suitable location for the safe.
- Mark the drilling points through the pre-drilled holes on the desired surface (floor or wall).
- Drill pilot holes using an appropriate drill bit for your surface material.
- Align the safe with the drilled holes and secure it using the provided expansion screws. Tighten all screws firmly.
5.3 Initial Power and Opening
Upon first use, the safe will require power to operate the digital keypad. If the safe is not responding, use the emergency key to open it.
- Insert one of the emergency keys into the keyhole located behind the keypad cover.
- Turn the key clockwise while simultaneously turning the knob clockwise to open the safe door.
- Once open, install the required batteries (not included) into the battery compartment, typically located on the inside of the door.
6. Operating Instructions
6.1 Opening the Safe
There are three methods to open your Omethey digital safe:
- Using Digital Password: Enter your programmed 4-8 digit password on the keypad, then turn the knob clockwise to open.
- Using Emergency Key: Insert the emergency key into the keyhole, turn it clockwise, and simultaneously turn the knob clockwise to open.
- Using External Power (USB Type-C) and Password: If batteries are depleted, connect the USB Type-C cable to the external power port and a power bank (not included). Enter your password, then turn the knob clockwise to open.

Figure 6.1: Three Ways to Open the Safe
This diagram visually explains the three methods for opening the safe: using the emergency key in conjunction with the knob, entering the digital password followed by turning the knob, and using an external USB Type-C power source with the password and knob in case of battery depletion.
6.2 Setting/Changing Digital Password
- With the safe door open, press the internal reset button (usually a small red button on the inside of the door or near the battery compartment).
- The keypad will beep, and an indicator light will flash, signaling it's ready for a new password.
- Enter your new 4-8 digit password on the keypad.
- Press the '#' or 'E' button to confirm. The safe will beep to confirm the new password has been set.
- Test the new password with the door open before closing it.
6.3 Dual Alarm System
The safe is equipped with a dual alarm system that activates under specific conditions:
- Incorrect Password: After 3 consecutive incorrect password entries, the alarm will sound for 60 seconds.
- Violent Vibration: If the safe detects violent movement or impact, the alarm will sound for 60 seconds.
To stop the alarm, enter the correct password on the keypad.

Figure 6.2: Dual Alarm System
This image illustrates the dual alarm system, showing how it is triggered by a violent hit (hammer icon), forced movement of the safe, or three consecutive incorrect password attempts on the digital keypad. An alarm light indicates activation.

Figure 6.3: Dual Alarm System and Mute Mode
This image highlights the dual alarm system, indicating that it can produce sound up to 70 decibels, audible throughout a home. It also shows the mute mode feature, which allows for silent operation without disturbing others or alerting intruders.
6.4 Mute Function
To activate or deactivate the mute function, refer to the specific instructions in the quick start guide or the full user manual (if provided separately). This function allows for silent operation of the keypad.
6.5 Deposit Slot Usage
The deposit slot allows for quick insertion of cash, envelopes, or small documents without needing to open the main safe door.
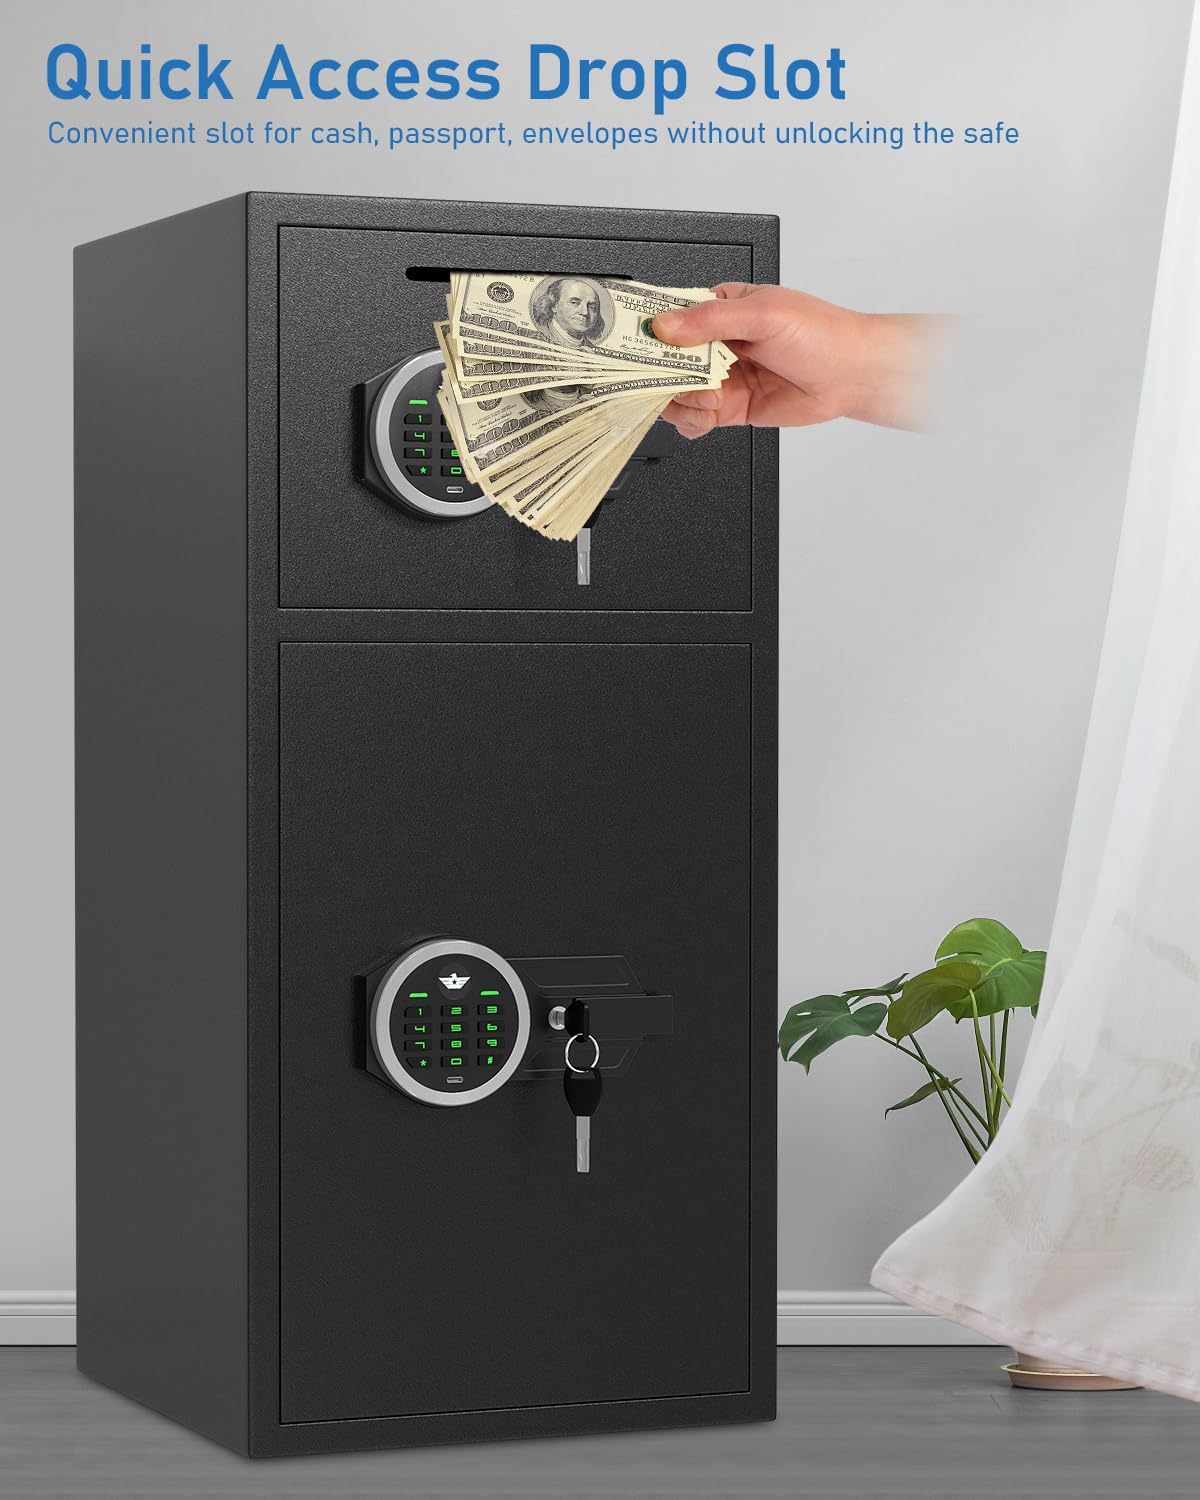
Figure 6.4: Quick Access Drop Slot
This image demonstrates the quick access drop slot, showing a hand easily depositing a stack of cash into the safe without the need to unlock or open the main door.

Figure 6.5: Deposit Slot
This image provides a close-up view of the deposit slot, illustrating how money can be quickly and conveniently dropped into the safe without requiring the safe to be opened.
7. Maintenance
7.1 Battery Replacement
When the battery power is low, the keypad indicator light may flash or the safe may emit a warning sound. Replace all batteries promptly to ensure continuous operation.
- Open the safe door using your password or emergency key.
- Locate the battery compartment on the inside of the door.
- Remove the old batteries and insert new ones, ensuring correct polarity.
- Close the compartment cover.
7.2 Cleaning
Wipe the exterior of the safe with a soft, damp cloth. Avoid using abrasive cleaners or solvents that could damage the finish or electronic components.
7.3 Emergency Key Storage
Always store the emergency keys in a secure, hidden location outside of the safe. Do not store them inside the safe, as they are your only means of access if the digital system fails or batteries die.
8. Troubleshooting
- Safe will not open with password:
- Ensure batteries are not depleted. Use the USB Type-C external power cable or emergency key.
- Verify you are entering the correct password.
- Ensure the '#' or 'E' button is pressed after entering the password.
- Keypad is unresponsive:
- Replace batteries.
- Use the USB Type-C external power cable.
- Alarm sounds unexpectedly:
- Check if the safe was subjected to impact or vibration.
- Ensure no one attempted to open the safe with incorrect passwords.
- Enter the correct password to silence the alarm.
- Door does not close properly:
- Check for any obstructions preventing the door from fully closing.
- Ensure the locking bolts are fully retracted before attempting to close.
9. Specifications
| Feature | Detail |
|---|---|
| Brand | Omethey |
| Model Number | KM-75 |
| Product Dimensions (D x W x H) | 13.8"D x 13.8"W x 29.5"H |
| Capacity | 6.5 Cubic Feet |
| Lock Type | Electronic Combination Lock |
| Color | Black |
| Material | Metal |
| Special Features | Alarm System, Anti-Theft, Combination Lock, Sensor Light |
| Mounting Type | Floor & Wall Mount |
| Alarm | Audible & Vibration (70 dB) |
| Control Type | Push Button Control |
| Chamber Depth | 13 Inches |
| Water Resistance Level | Not Water Resistant |
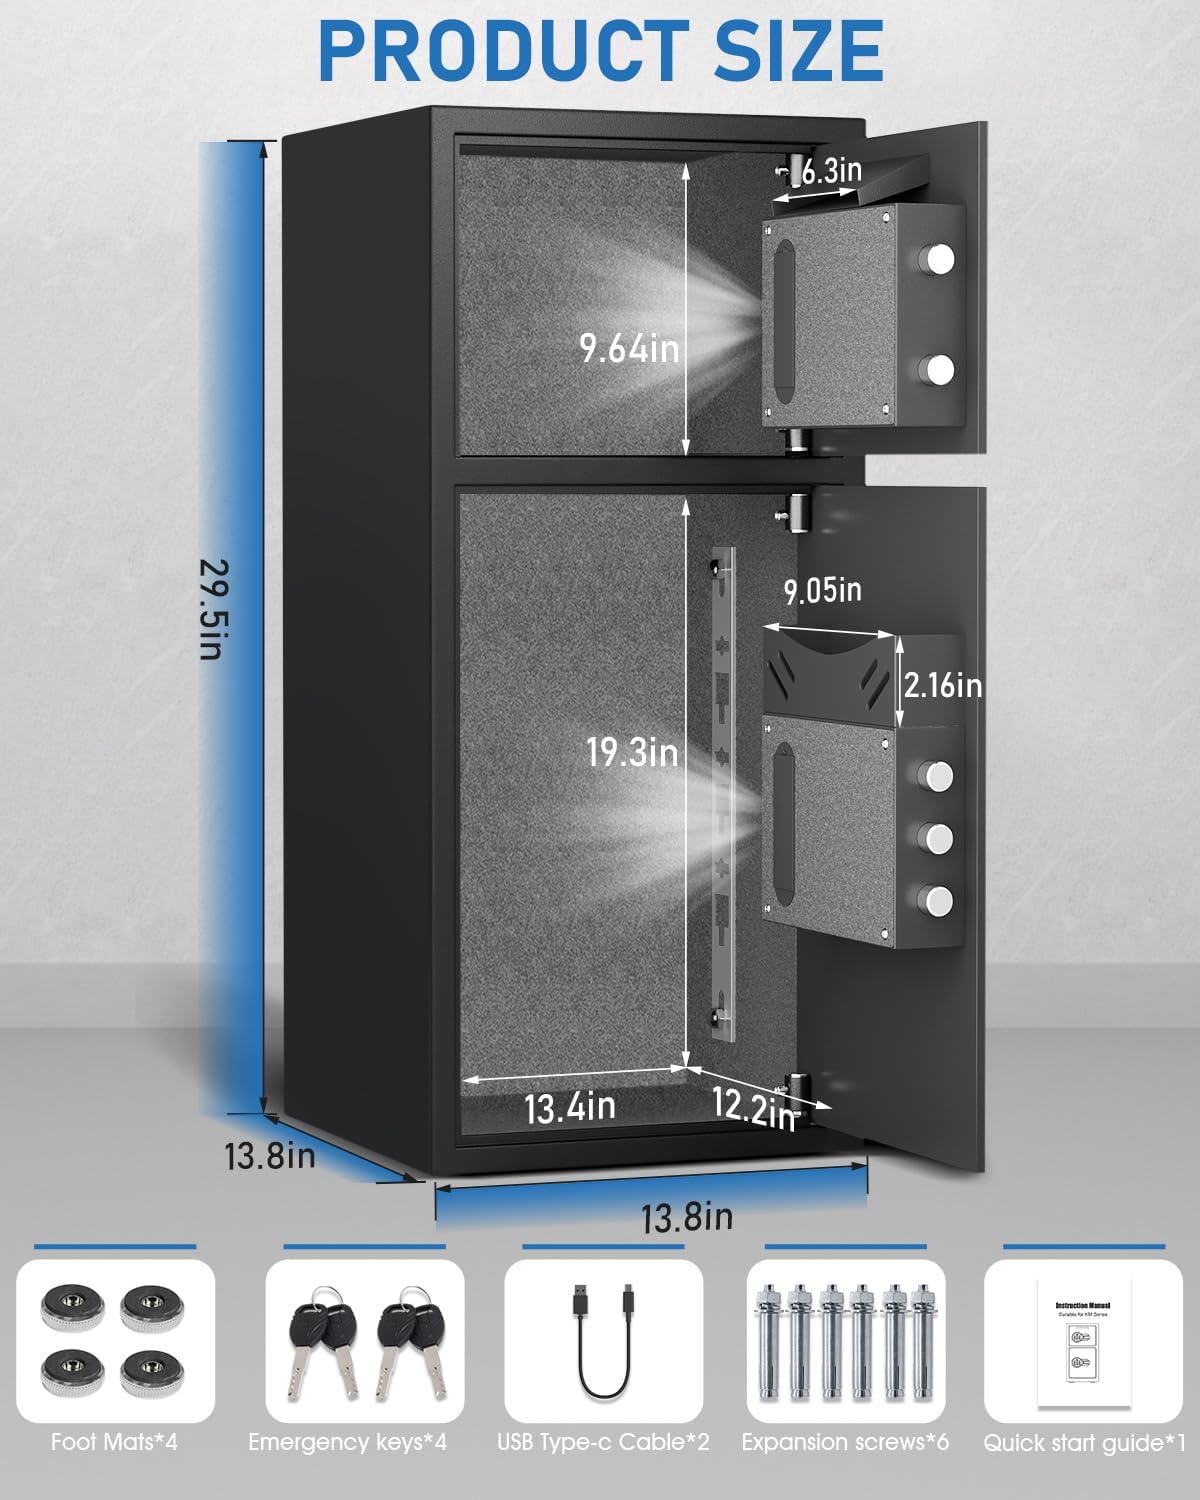
Figure 9.1: Product Size and Dimensions
This image provides a detailed diagram of the safe's external dimensions (13.8 inches deep, 13.8 inches wide, 29.5 inches high) and key internal measurements, including the upper and lower compartment heights and door widths.
10. Warranty & Support
Omethey provides lifetime customer service for each safe sold. If you encounter any issues or have questions regarding your Omethey 6.5 Cubic Feet Digital Safe, please do not hesitate to contact our customer support team.
Customer Service Contact: Please refer to the contact information provided on the product packaging or the official Omethey website for the most up-to-date support details.

